Apple Slab Pie Perfection: Your New Go-To Dessert!
Is there anything more comforting than the smell of apples and cinnamon baking in the oven? It’s like a hug for your house! But making a pie for a crowd can feel like a big project. That’s why I fell head over heels for this Apple Slab Pie. It’s all the flavor of a classic apple pie, baked in a simple sheet pan, and it’s perfect for feeding a hungry family (or a book club that’s *very* good at eating). I’ve tweaked and tested this recipe for years, and I’m thrilled to share my foolproof version with you.
A Slice of Pie History
The slab pie is actually a genius piece of American home cooking. Think church potlucks, family reunions, and county fairs. It takes the traditional, round fruit pie and transforms it into a generous rectangle. This means more slices, easier cutting, and less fussing with fancy lattice tops. My grandma used to make a version with peaches for the whole neighborhood. My recipe honors that spirit of sharing, using a buttery, flaky crust and a spiced apple filling that’s just sweet enough.
Why You’ll Absolutely Love This Apple Slab Pie
Let me count the ways! First, it’s incredibly forgiving. No need for a perfect pie-crimping technique. Second, it serves a crowd with zero stress. You get about 12-15 generous squares from one pan. Finally, the texture and flavor is spot-on. The cornstarch in the filling thickens the apple juices beautifully, and baking it in a sheet pan ensures every slice has the perfect crust-to-filling ratio. It’s the dessert that always gets a round of applause, and you’ll feel like a rockstar.
Perfect Occasions for Your Masterpiece
This pie isn’t just for Thanksgiving! It’s your secret weapon for so many gatherings. Bring it to a fall tailgate, serve it as the grand finale at a Sunday family dinner, or set it out with coffee at a Halloween party. I love making it for my kids’ school bake sales—it’s always the first thing to sell out. It’s also fantastic for a casual dessert buffet where people can just grab a square and keep on chatting.
Gathering Your Apple Slab Pie Ingredients
Here’s everything you’ll need to create this autumnal delight. Using good-quality, cold butter is my number one tip for the crust!
- For the Base:
- 3 cups (470 g) all-purpose flour
- 1 tbsp sugar
- 1 tsp table salt
- 3 sticks (12 oz or 340 g) unsalted butter, cold and cut into small pieces
- ¾ cup very cold water
- For the Apple Mixture:
- 3 to 4 lbs apples (peeled, cored, and chopped into ½-inch pieces; about 10 cups)
- Squeeze of lemon juice
- ⅔ to ¾ cup sugar (adjust based on apple sweetness)
- 3 tbsp cornstarch
- 1 tsp ground cinnamon
- ¼ tsp ground nutmeg
- ¼ tsp ground allspice
- ⅛ tsp table salt
- To Complete:
- 2 tbsp heavy cream OR 1 beaten egg mixed with 1 tbsp water
Easy Ingredient Substitutions
Don’t stress if you’re missing an item! Here are some simple swaps:
- Apples: I love a mix of Granny Smith and Honeycrisp. Use what you have! Tart apples hold their shape, sweeter ones get softer. Mix and match!
- Butter: In a pinch, you can use a high-quality salted butter. Just reduce the added salt in the crust by half.
- Cornstarch: Tapioca starch or arrowroot powder can be used in the same amount as a thickener.
- Spices: No nutmeg or allspice? Just use an extra teaspoon of cinnamon. It will still be delicious.
- Heavy Cream: The egg wash works just as well for that golden shine. You can even use just milk in a pinch.
Creating Your Apple Slab Pie Step-by-Step
Step 1: Make the Dough
In a large, chilly bowl, whisk the flour, sugar, and salt. This is your foundation. Now, take your very cold butter pieces and scatter them over the flour. Grab your pastry cutter and work it through the mixture. You’re looking for coarse crumbs with some pea-sized butter bits still visible. This is what makes the crust flaky! Slowly drizzle in the ice-cold water, mixing gently with a fork. Stop when the dough just starts to clump together. Pro tip: Too much water makes tough crust, so go slow! Divide the dough into two disks, wrap them tightly, and let them relax in the fridge for at least an hour. Patience is key here.
Step 2: Prep the Apple Filling
While the dough chills, tackle your apples. I find peeling and coring them goes fast with a good peeler and an apple corer. Toss your apple chunks into a big mixing bowl. Give them a quick spritz of lemon juice right away. This keeps them from turning brown and adds a tiny bright note. In a small bowl, whisk together the sugar, cornstarch, cinnamon, nutmeg, allspice, and salt. Sprinkle this fragrant, spiced sugar over the apples. Toss everything with your hands until every single piece is coated in that sweet, spiced dust. The smell is incredible already.
Step 3: Assemble the Pie
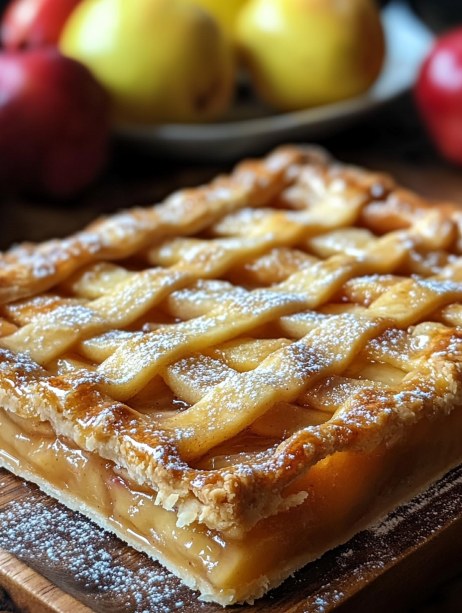
Preheat your oven to 375°F (190°C). Take one dough disk from the fridge. On a lightly floured surface, roll it out into a rectangle slightly larger than your 9×13-inch pan. Don’t worry about perfection! Gently lay it into the pan, letting the edges drape over the sides. Now, pour your gorgeous spiced apple mixture on top, spreading it into an even layer. Roll out your second crust the same way. Carefully lay it over the apples. Fold the edges of the bottom crust over the top crust and crimp them together with your fingers or a fork. Trim any really long overhang. Finally, take a small knife and cut 4-5 small slits in the top crust so steam can escape.
Step 4: Bake to Golden Perfection
The final touch! Brush the entire top crust with your heavy cream or egg wash. This will give your pie that beautiful, glossy, golden-brown finish. Slide the pan into the center of the hot oven. Bake for 40 to 50 minutes. Keep an eye on it. You want the crust to be deeply golden and you should see bubbly juices peeking through the slits. When you see that, you know it’s done. The hardest part is letting it cool on a rack for at least an hour before cutting. This lets the filling set so you get clean slices, not a runny mess.
Time Breakdown
- Prep Time: 45 minutes (hands-on)
- Chill Time: 1 hour (crucial for the crust!)
- Cook Time: 45 minutes
- Cool Time: 1 hour
- Total Time: About 3 hours 30 minutes (mostly hands-off)
Chef’s Secret: The Cold Truth
My absolute non-negotiable secret? Keep everything cold. Cold butter, cold water, cold bowl, cold hands. When the butter stays in distinct little pieces within the dough, it creates pockets of steam in the hot oven. That steam is what lifts the layers apart, giving you a crust that’s tender, flaky, and absolutely melts in your mouth. If your dough gets warm and greasy, pop it back in the fridge for 10 minutes.
A Fun Apple Fact
Did you know there are over 7,500 varieties of apples grown around the world? In the U.S. alone, we grow about 2,500 kinds. That’s a lot of pies waiting to be made! Using a mix of two or three types in your pie—like a tart Granny Smith and a sweet Fuji—gives you a much more complex and interesting flavor and texture.
Kitchen Tools You’ll Need
- A large mixing bowl (or two)
- Pastry cutter or two forks
- Measuring cups and spoons
- Rolling pin
- 9×13-inch metal baking pan (glass is okay, but metal gives a crisper bottom)
- Apple peeler and corer (a big time-saver!)
- Knife and cutting board
- Pastry brush
- Wire cooling rack
Storing Your Apple Slab Pie
Once your pie has cooled completely, you have a few options. For short-term storage, you can simply cover the pan tightly with aluminum foil or plastic wrap. It will keep beautifully on the counter for up to two days. The crust may soften a bit, but the flavor will still be fantastic.
If you need to store it a bit longer, refrigeration is your friend. Cover the pie well and place it in the fridge. It will stay fresh for up to four days. Let slices come to room temperature or warm them gently in a low oven or microwave for a few seconds before serving.
Yes, you can freeze it! Wrap the entire cooled pie (or individual slices) tightly in plastic wrap, then in a layer of foil. Freeze for up to three months. To serve, thaw it overnight in the refrigerator and then warm it in a 300°F oven until heated through.
My Best Apple Slab Pie Tips
- Cold is King: I can’t say it enough. Start with cold ingredients for the dough.
- Taste Your Apples: Before you add sugar, taste a piece. A sweeter apple needs less sugar, a tarter one needs more.
- Prevent Soggy Bottoms: Make sure your oven is fully preheated before baking. This “shocks” the crust and helps it stay crisp.
- Cool Completely: I know it’s hard, but let the pie cool. This allows the filling to thicken properly so it won’t run all over the plate.
Presentation Ideas to Impress
- Dust the top with powdered sugar or a sprinkle of cinnamon sugar right before serving.
- Serve each square warm with a scoop of vanilla ice cream or a dollop of freshly whipped cream.
- Drizzle individual plates with a little caramel sauce or warm maple syrup.
- For a party, cut the pie into smaller 2-inch squares and serve as finger-food desserts.
Six Delicious Recipe Variations
Love the slab pie idea? Try these fun twists!
- Pear-Ginger Slab Pie: Swap apples for ripe but firm pears. Add 1 tbsp of minced fresh ginger to the filling for a spicy kick.
- Mixed Berry Slab Pie: Use 10 cups of frozen mixed berries (don’t thaw). Increase cornstarch to ¼ cup as berries are juicier.
- Peach Streusel Slab: Use sliced peaches. Skip the top crust and instead, mix 1 cup flour, ½ cup brown sugar, and ½ cup cold butter into crumbs. Sprinkle over filling and bake.
- Cinnamon Roll Slab Pie: Add 1 tsp of vanilla to the apple filling. After baking, drizzle with a simple glaze made of powdered sugar and milk.
- Savory Chicken Pot Pie: Use this same crust recipe. Fill with cooked chicken, mixed vegetables, and a creamy sauce. A perfect dinner!
- Apple-Cheddar Slab Pie: Add ½ cup of sharp cheddar cheese to the dough for a savory-sweet twist that’s pure comfort food.
Common Mistakes to Avoid
Mistake 1: Using Warm Ingredients for the Crust
This is the biggest culprit for a tough, greasy crust. When the butter gets too warm, it melts into the flour instead of staying in separate pieces. This results in a crust that’s more like a cookie than a flaky pastry. Always start with butter straight from the fridge. Even chill your flour and bowl for 15 minutes if your kitchen is warm. Pro tip: If your hands are warm, run them under cold water before handling the dough.
Mistake 2: Not Letting the Dough Rest
You mix the dough, it comes together, and you’re excited to roll it out right away. Resist! Chilling the dough for at least an hour is not optional. This relaxes the gluten (which makes rolling easier) and re-firms the butter. Skipping this step leads to a crust that shrinks dramatically in the oven and becomes tough. Plan ahead and give your dough its well-deserved nap.
Mistake 3: Cutting the Pie While It’s Hot
You pull this beautiful, bubbling pie from the oven and immediately want to serve it. I get it! But patience is a virtue here. The filling is essentially a hot, sugary liquid. If you cut into it right away, it will pour out everywhere and leave you with a collapsed, soupy slice. Letting it cool for a full hour allows the cornstarch to do its job and set the filling into a perfect, sliceable consistency.
Mistake 4: Using Only One Type of Apple
Using just one variety of apple can give you a one-note pie. Some apples, like Red Delicious, turn to mush. Others, like Granny Smith, stay very firm. Using a mix (e.g., 2/3 tart apples, 1/3 sweet apples) gives you a more balanced flavor and a better texture, with some softness and some slight bite remaining. It makes the pie much more interesting to eat.
Your Apple Slab Pie Questions, Answered
Can I use pre-made pie crust?
Absolutely! To save time, you can use two boxes of store-bought pie crusts (you’ll need four total crusts to cover a 9×13 pan). Let them come to room temperature according to the package, then press two together for the bottom layer and two for the top. Just be aware that homemade crust really does taste better and have a superior texture.
How do I prevent the bottom crust from getting soggy?
A soggy bottom is a common pie worry! A few tricks help. First, make sure your filling isn’t overly wet before baking. Tossing the apples with cornstarch absorbs excess juice. Second, bake the pie on the lower third of your oven, where the bottom heat is strongest. Finally, using a metal pan instead of glass helps conduct heat faster, crisping the crust quicker.
What are the best apples for pie?
The best apples for pie are “baking apples” that hold their shape when cooked. My top picks are Granny Smith (for tartness), Honeycrisp (sweet and crisp), Jonagold (a great all-rounder), and Braeburn. My personal favorite is a 50/50 mix of Granny Smith and Honeycrisp. Avoid softer apples like Red Delicious or McIntosh for filling, as they can become too mushy.
Can I make this pie ahead of time?
Yes, in two great ways. First, you can make the dough disks up to two days ahead and keep them wrapped in the fridge. Second, you can assemble the entire pie, wrap it tightly, and freeze it *before* baking. When you’re ready, bake it straight from the freezer, adding about 10-15 extra minutes to the baking time. You can also bake it a day ahead, let it cool, cover it at room temperature, and re-warm slices slightly before serving.
My filling is too runny. What went wrong?
A runny filling usually means one of three things: Not enough thickener (cornstarch), the pie wasn’t baked long enough for the thickener to activate, or it was cut before it cooled. Make sure you’re using the full 3 tablespoons of cornstarch. Also, bake until you see thick, bubbly juice through the slits. And remember, cooling is part of the setting process!
Can I add other fruits?
Of course! Apples play well with others. Try adding a cup of fresh cranberries for a tart pop, or a cup of fresh blackberries or raspberries. If using frozen fruit, do not thaw it first, and consider adding an extra tablespoon of cornstarch as frozen fruit releases more liquid.
How do I get a shiny, golden top crust?
The secret is in the wash! Brushing the top crust with heavy cream, an egg wash (egg beaten with water), or even just milk before baking encourages browning and gives that beautiful, professional-looking sheen. Cream will give a rich, golden color, while an egg wash gives a deeper, glossier finish.
Can I make this gluten-free?
You can! Substitute the all-purpose flour in the crust with a good 1-to-1 gluten-free flour blend. Look for one that contains xanthan gum, which helps bind the dough. The filling is naturally gluten-free, so just that one swap will get you a delicious gluten-free apple slab pie everyone can enjoy.
Why is my crust tough and hard?
A tough crust is often caused by overworking the dough. When you mix the dough, stop as soon as it comes together. When you roll it, use gentle, firm rolls from the center out, and try not to roll back and forth too many times. Overworking develops the gluten in the flour, which makes the crust chewy instead of tender and flaky.
How many people does this slab pie serve?
This is the beauty of a slab pie! It easily serves 12 to 15 people, depending on how large you cut the squares. If you’re serving it as the main dessert after a big meal, you might get more servings. If it’s the only sweet at a party with big appetites, you might get fewer. It’s perfect for large gatherings.
Go Bake Some Memories
So there you have it—my tried-and-true path to Apple Slab Pie Perfection. This recipe has seen me through countless family dinners, friendly gatherings, and cozy fall afternoons. It’s more than just a dessert; it’s a centerpiece that brings people together. Don’t be intimidated by the process. Embrace the flour on your nose and the smell filling your kitchen. Grab those apples, get your hands a little messy, and bake a memory. I promise, the first bite of that warm, spiced apple filling wrapped in a flaky, buttery crust will make it all worth it. Happy baking!
Cheesy Chicken Alfredo
Ingredients
Equipment
Method
- In a large bowl, whisk the flour, sugar, and salt for the dough.
- Scatter the cold butter pieces over the flour and use a pastry cutter to work through until coarse crumbs form.
- Slowly drizzle in the ice-cold water, mixing gently until the dough clumps together.
- Divide the dough into two disks, wrap tightly, and refrigerate for at least an hour.
- Toss apple chunks with lemon juice in a bowl to prevent browning.
- In another bowl, whisk together sugar, cornstarch, cinnamon, nutmeg, allspice, and salt; sprinkle over apples and mix to coat.
- Preheat the oven to 375°F (190°C).
- Roll out one dough disk into a rectangle larger than a 9x13-inch pan and place it in the pan.
- Pour the apple mixture into the pan and spread it evenly.
- Roll out the second dough disk and place it over the apples, crimping the edges together.
- Cut 4-5 small slits in the top crust for steam to escape.
- Brush the top crust with heavy cream or an egg wash.
- Bake for 40 to 50 minutes until golden brown and juices bubble through the slits.
- Allow to cool completely on a wire rack before cutting.