The Allure of the Classic Victoria Sponge Cake
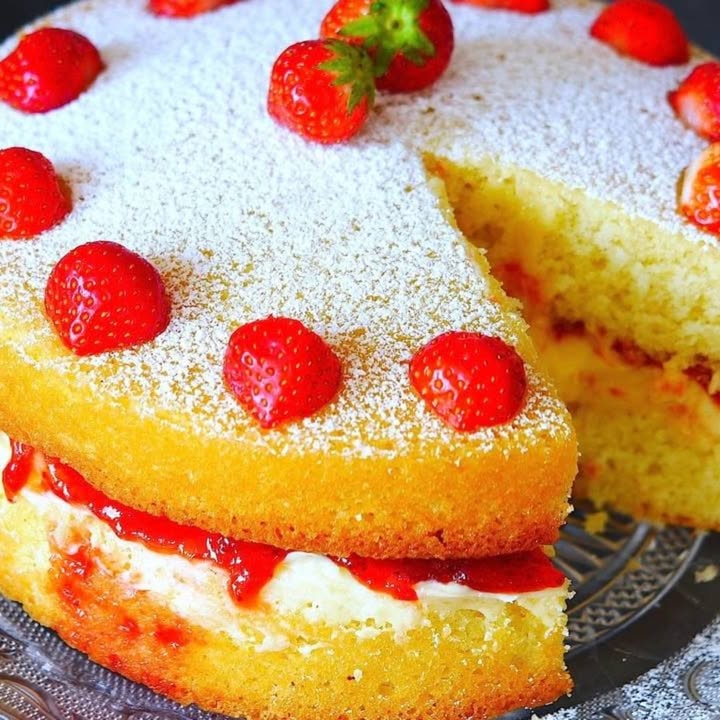
Is there anything more beautifully British than a perfect Victoria Sponge? Picture this: two feather-light, golden cakes hugging a generous layer of sweet jam and creamy buttercream. It’s more than a cake; it’s a welcoming gesture, a centerpiece for gossip over tea, and a guaranteed smile-maker. My quest for the perfect recipe ended with this one, tested thoroughly at countless family birthdays and “just because” afternoons. It never fails to vanish!
A Slice of History: The Queen’s Favorite
This beloved cake owes its name and fame to Queen Victoria, who was known to enjoy a slice with her afternoon tea. Back in the 19th century, the rise of reliable baking powder made such light sponges possible for home bakers. While traditionally filled with just raspberry jam and a dusting of sugar, the addition of vanilla buttercream is now a cherished modern twist. It’s a recipe that honors tradition but welcomes your personal touch.
Why You’ll Fall in Love With This Victoria Sponge
This recipe is a dream for so many reasons! First, it’s wonderfully simple, using the classic “equal weights” method for the sponge. You’ll love its reliable rise and melt-in-your-mouth texture. The flavor is a timeless combination of sweet vanilla, rich butter, and the fruity tang of jam. It looks impressive but is genuinely straightforward, making you feel like a star baker with minimal fuss.
Perfect Occasions for Your Victoria Sponge Cake
This cake is the ultimate crowd-pleaser. It’s perfect for:
- Afternoon Tea: The quintessential setting. Serve neat slices with a pot of Earl Grey.
- Summer Garden Parties: Its light texture is ideal for warm weather.
- Birthday Celebrations: A elegant, less-sweet alternative to frosted layer cakes.
- Just because you deserve a treat! It turns an ordinary Tuesday into something special.
Your Victoria Sponge Cake Ingredients
For the Sponge Cake:
- 250 gr OR 1 cup 2 tbsp of unsalted butter, softened
- 250 gr OR 1 1/4 cup of caster sugar (superfine sugar)
- 250 gr OR 1 2/3 cups 1 tbsp of plain sifted flour
- 4 large eggs, at room temperature
- 10 gr OR 1 tbsp of baking powder
For the Filling:
- 100 gr OR 1/2 cup butter, softened
- 100 gr OR 1 cup of icing sugar (powdered sugar)
- 1 tsp of vanilla extract
- 100 gr OR 1/2 cup of strawberry jam (you can use more or less!)
Handy Ingredient Substitutions
Don’t fret if you’re missing something! Here are easy swaps:
- Butter: You can use salted butter, but omit any extra salt in the recipe.
- Caster Sugar: Regular granulated sugar works, but pulse it in a blender briefly for a finer texture.
- Plain Flour: For a lighter crumb, use cake flour.
- Strawberry Jam: Raspberry jam is the traditional choice! Apricot or blackcurrant jam are also lovely.
- Eggs: Must be at room temperature for best volume.
How to Make Your Perfect Victoria Sponge
Step 1: Creating the Cake Batter
Get your stand mixer or electric hand mixer ready. Add the soft butter, caster sugar, sifted flour, eggs, and baking powder all into the bowl at once. Yes, all in one go! Mix on a medium speed until the ingredients are just combined and you have a smooth, pale, dropping consistency batter. The key here is patience—stop as soon as it’s uniform. Over-mixing leads to a tough cake, and we want clouds, not bricks!
Pro tip: Scrape down the sides of the bowl halfway through mixing to ensure everything is incorporated evenly.
Step 2: Prepping and Baking
While you mix, preheat your oven to 190°C / 375°F. Now, lovingly prepare two 20 cm / 8 inch cake tins. Grease them with butter or cooking spray, then line the bottoms with a circle of parchment paper. This guarantees your golden sponges will pop out easily after baking. Divide the mixture equally between the two tins. For absolute precision, weigh the tins on a kitchen scale.
Chef’s tip: Gently tap each filled tin on the counter to release any large air bubbles.
Step 3: The Bake & Cool
Place the tins in the center of your preheated oven. Bake for 25-35 minutes. You’ll know they’re ready when they’re a glorious golden color, have pulled away slightly from the tin edges, and spring back when lightly pressed. The ultimate test? A skewer or toothpick inserted into the center should come out clean. Let the cakes cool in their tins for about 20 minutes before turning them out onto a wire rack to cool completely. A warm cake will melt your filling!
Step 4: Making the Buttercream & Assembly
For the dreamy filling, beat the softened butter in a clean bowl until super smooth. Gradually sift in the icing sugar and add the vanilla extract. Whisk until it’s pale, fluffy, and wonderfully creamy. This might take 3-4 minutes. Now for the fun part! Place one cooled cake layer on your serving plate. Spread the vanilla buttercream evenly over the top. Next, spoon over your strawberry jam. Carefully place the second cake layer on top. Finish with a graceful dusting of icing sugar and maybe a few fresh berries in the center.
Victoria Sponge Cake Timing
- Prep Time: 20 minutes
- Cook Time: 30 minutes
- Cooling Time: 1 hour (very important!)
- Total Time: About 1 hour 50 minutes
Chef’s Secret for the Perfect Rise
My secret weapon? Room temperature ingredients. Taking the eggs and butter out of the fridge an hour before baking makes all the difference. Soft butter creams beautifully with sugar, trapping air. Room-temperature eggs incorporate more easily, giving you that light, well-risen sponge that defines a great Victoria cake.
A Sweet Extra Fact
In the UK, the annual “WI Victoria Sponge” competition at village fairs is taken very seriously! Judging criteria include the lightness of the sponge, the consistency of the filling, and that the jam must not seep into the cake. It’s a true art form.
Necessary Equipment
- Two 8-inch (20cm) round cake tins
- Stand mixer or electric hand mixer
- Mixing bowls
- Spatula
- Parchment paper
- Wire cooling rack
- Kitchen scales (highly recommended)
- Sieve for icing sugar
Storing Your Masterpiece
If your cake survives the day (a big if!), you can store it covered at room temperature for up to 24 hours. The sugar in the jam and buttercream acts as a mild preservative.
For longer storage, the fridge is your friend. Place the whole cake in a cake carrier or under a large inverted bowl. It will keep fresh and delicious for up to 3 days. The cool temperature firms up the buttercream beautifully.
You can also freeze the unfilled sponge layers separately for up to a month. Wrap them tightly in plastic wrap and then foil. Thaw at room temperature before filling and serving.
Tips and Advice for Success
- Always sift your flour and baking powder together. This adds air and prevents lumps.
- Don’t open the oven door during the first 20 minutes of baking. A draft can make your cakes sink.
- Let the cakes cool completely before filling. Patience prevents a squished, gooey mess.
- Use good quality jam for the best flavor. A homemade or local jam makes it extra special.
Presentation Ideas to Impress
- Dust with icing sugar through a dolly for a pretty lace pattern.
- Pile fresh strawberries, raspberries, or edible flowers in the center.
- Serve on a beautiful vintage cake stand for true afternoon tea vibes.
- Cut into elegant finger-sized slices for a proper tea party.
Healthier & Creative Variations
Fancy a twist on the classic? Here are six delicious ideas:
- Lemon Drizzle Sponge: Add the zest of two lemons to the cake batter. Fill with lemon curd instead of jam, and use a lemon buttercream.
- Dairy-Free Delight: Use a high-quality plant-based butter and milk alternative. Ensure your jam is dairy-free.
- Whole Wheat Berry Cake: Substitute half the plain flour with whole wheat flour and fill with mixed berry jam.
- Chocolate Orange Sponge: Replace 50g of flour with cocoa powder and add orange zest to the batter. Fill with dark chocolate orange spread.
- Elderflower & Cream: Swap the buttercream for lightly sweetened whipped cream and add a tablespoon of elderflower cordial to it. Use raspberry jam.
- Mini Victoria Sandwiches: Bake the batter in a shallow sheet pan. Use a round cutter to stamp out small circles and sandwich them for adorable two-bite treats.
Common Mistakes to Avoid
Mistake 1: Using Cold Ingredients
This is the biggest cake-wrecker! Straight-from-the-fridge butter won’t cream properly, and cold eggs won’t emulsify well, leading to a dense, heavy sponge. Your batter might even look curdled. Always plan ahead. Take your butter and eggs out at least an hour before you start baking. The butter should be soft enough that your finger leaves a clear indent.
Mistake 2: Over-mixing the Batter
Once you add the flour, gluten development is the enemy of tenderness. Vigorous or lengthy mixing after the flour is incorporated will activate the gluten, resulting in a tough, rubbery texture. Mix on a low speed and only until you no longer see streaks of dry flour. A few small lumps are absolutely fine—they will work themselves out in the oven.
Mistake 3: Under-preparing the Tins
That moment when your beautiful cake sticks to the pan is heartbreaking. Just greasing isn’t always enough. Always line the bottom of your tin with a circle of parchment paper. Grease the sides well. This double protection ensures your sponges release perfectly intact, ready for their filling.
Mistake 4: Filling a Warm Cake
Impatience leads to a soggy, sliding mess. The heat from a warm cake will instantly melt the buttercream, causing it to soak into the sponge and ooze out the sides. It also makes the layers slippery to handle. Let the cakes cool in the tin for 20 minutes, then on a wire rack until they are completely, totally cool to the touch.
Your Victoria Sponge Cake Questions, Answered
Can I make this Victoria Sponge by hand, without a mixer?
Absolutely, you can! It will require a bit more elbow grease. Start by creaming the softened butter and sugar together vigorously with a wooden spoon until pale and fluffy. This is the most important step for air. Then, beat in the eggs one at a time, mixing thoroughly after each. Finally, gently fold in the sifted flour and baking powder using a large metal spoon or spatula, using a light, lifting motion. The key is to be gentle once the flour is added.
Why did my cake sink in the middle after baking?
A sunken cake is usually a sign of too much moisture or an imbalance in leavening. The most common causes are: opening the oven door too early (before the structure has set), under-baking, using too much baking powder, or over-beating the batter after adding the flour. Ensure your oven is fully preheated, don’t peek for the first 20 minutes, and test for doneness with a skewer that comes out clean.
What’s the difference between caster sugar and regular granulated sugar?
Caster sugar (called superfine sugar in the US) has finer granules than regular table sugar. This finer texture dissolves much more easily into butter and eggs, creating a smoother, finer-crumbed sponge. If you only have granulated sugar, you can make a good substitute by pulsing it in a food processor or blender for a few seconds to break the crystals down a bit.
Can I use a different size cake tin?
You can, but it will change the baking time and height of your cakes. Using a larger tin (like 9-inch) will result in thinner layers that bake faster. Using a smaller tin will give you thicker layers that need longer baking and risk not cooking through in the center. Adjust the time accordingly and always rely on the skewer test for doneness.
How do I prevent the jam from soaking into the cake?
Create a buttercream barrier! Spread your vanilla buttercream all the way to the edges of the bottom cake layer first. Then, spoon the jam into the center and spread it gently on top of the buttercream. The buttercream acts as a seal, keeping the jam’s moisture from making the sponge soggy.
My buttercream is too runny or too stiff. What went wrong?
Buttercream consistency is all about temperature. If it’s runny, your butter was likely too soft or warm. Pop the whole bowl in the fridge for 10-15 minutes to firm up, then re-whip. If it’s too stiff and crumbly, your butter was too cold. Let it sit at room temperature to soften slightly, or add a tiny splash (½ teaspoon) of milk or cream while beating to loosen it.
Can I freeze the assembled Victoria Sponge Cake?
It’s not recommended to freeze the fully assembled cake, as the buttercream can become watery and the texture of the sponge may change. The best method is to freeze the plain, unfilled sponge layers separately. Wrap them tightly in plastic wrap and then foil. Thaw at room temperature while still wrapped to prevent condensation, then fill and serve as normal.
Is there a way to make this cake without eggs?
Making a classic Victoria Sponge without eggs is challenging, as they provide structure and lift. For an egg-free version, you would need to use a specific vegan sponge recipe that uses alternatives like flax eggs, aquafaba, or commercial egg replacer. The texture and method will be different from this traditional recipe.
What can I use if I don’t have baking powder?
In a pinch, you can make your own. For every teaspoon of baking powder, mix ¼ teaspoon of baking soda with ½ teaspoon of cream of tartar. This combination will provide the necessary lift. However, for best and most reliable results, store-bought baking powder is recommended.
How do I get my layers perfectly level for stacking?
If your cakes dome slightly in the center (which is normal), you can level them. Once completely cool, use a long, serrated bread knife. Hold it parallel to the counter and gently slice off the domed top to create a flat surface. This also gives you a lovely cook’s treat—those scraps are perfect for tasting!
The Final Slice
And there you have it—the secrets to a truly magnificent Victoria Sponge Cake. It’s a recipe built on simplicity and joy, one that fills your kitchen with the most wonderful smell and your table with happy faces. Don’t be intimidated; give it a try. The first time you slice into that light, jam-filled beauty, you’ll feel like a baking champion. Now, put the kettle on. It’s tea time.
Italian Tortellini Delight
Ingredients
Equipment
Method
- Preheat the oven to 190°C (375°F) and prepare two 20 cm (8 inch) cake tins by greasing and lining with parchment paper.
- In a mixing bowl, add the softened butter, caster sugar, sifted flour, eggs, and baking powder. Mix on medium speed until combined, ensuring not to over-mix.
- Divide the mixture equally between the two prepared cake tins.
- Bake in the center of the preheated oven for 25-35 minutes until golden and a skewer inserted comes out clean.
- Cool the cakes in their tins for 20 minutes, then turn out onto a wire rack to cool completely.
- To make the buttercream, beat the softened butter until smooth, then gradually sift in the icing sugar and add the vanilla extract.
- Once the cakes are completely cool, place one layer on a serving plate and spread with vanilla buttercream.
- Spoon the strawberry jam over the buttercream and place the second cake layer on top.
- Dust with icing sugar and add fresh berries if desired.