Decadent Chocolate Chip Cookie Dough Brownie Bombs: Your New Dessert Obsession
I still remember the day these little treats took over my kitchen. It was a rainy Saturday, and my kids declared our house “bored.” We needed a project. Something fun, messy, and most importantly, chocolatey. Enter the idea of merging two of our favorite desserts: fudgy brownies and edible cookie dough. The result? A bite-sized explosion of joy that had everyone asking for more before I could even finish decorating them. Let me tell you, these Chocolate Chip Cookie Dough Brownie Bombs are not just a dessert. They’re a delicious experience.
A Sweet Mash-Up: From Ice Cream Truffles to Brownie Bombs
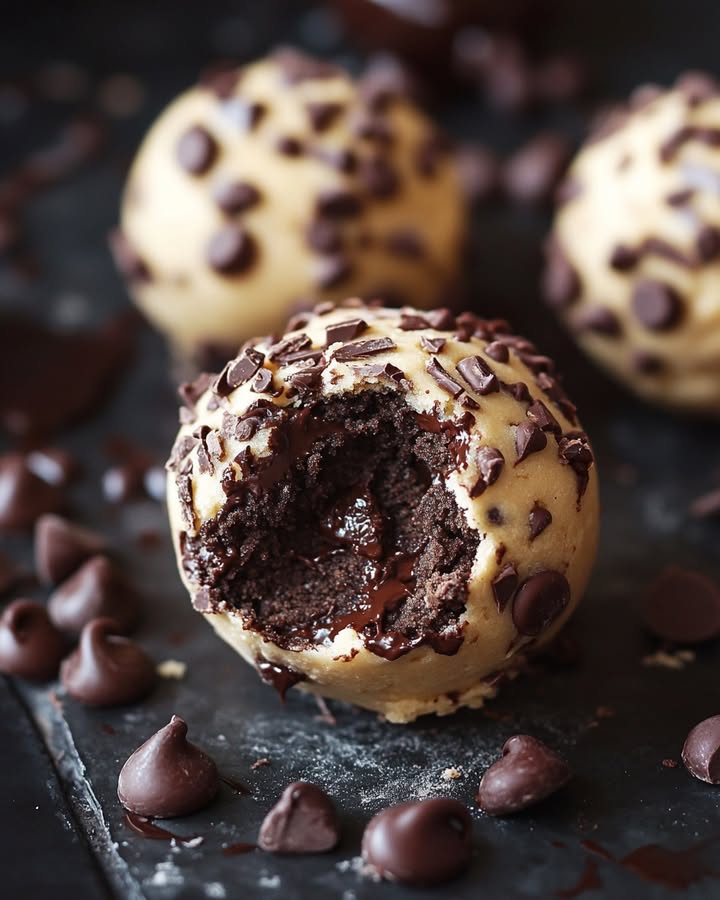
This recipe feels like a beautiful, edible accident. The concept of cookie dough “bombs” or “truffles” became super popular a few years ago, often tucked inside ice cream shops. They’re a brilliant way to enjoy that safest-to-eat cookie dough we all crave. My twist was born from a classic “baker’s problem”: leftover brownies. Instead of just eating them plain (which is fine!), I thought, “What if we wrapped them *around* the dough?” It turned the treat into a portable, shareable, three-layered masterpiece. We get the chewy, fudgy brownie, the sweet, buttery dough, and the crisp chocolate shell. It’s the best of all dessert worlds in one perfect bite.
Why Your Family Will Go Nuts for These Brownie Bombs
First, they are incredibly fun to make. This is a fantastic recipe to do with helpers of all ages. Secondly, they solve the “what dessert to bring” dilemma forever. Bring these to any gathering, and you instantly become a rock star. They look fancy and complicated, but the process is straightforward. Most importantly, the taste is just unreal. That combination of textures—soft dough, dense brownie, snappy chocolate—with the rich flavor will make these disappear faster than you can say “just one more!”
The Perfect Occasions for These Little Chocolate Miracles
Honestly, any day that ends in “y” is a good day for these. But they truly shine at parties. Think birthday bashes, potlucks, holiday cookie swaps (they’re a showstopper!), or as a special “movie night” treat. I love making a big batch and freezing them. Then, when friends drop by unexpectedly, I can pull out a plate of these gourmet-looking bites in minutes. They’re also the ultimate lunchbox surprise or after-school snack for happy kids.
Gathering Your Ingredients
Here’s what you’ll need to create this chocolatey magic:
- ¾ cup butter, softened
- ¾ cup packed brown sugar
- ¼ cup white sugar
- 2 tablespoons milk
- 1 teaspoon vanilla extract
- 2 cups all-purpose flour
- A generous pinch of salt
- 2 cups miniature chocolate chips, divided
- 1 package (family-size) fudge brownie mix, baked & cooled
- 1 package (20 oz) CandiQuik or chocolate almond bark
Smart Ingredient Swaps & Substitutions
No worries if you’re missing something! This recipe is very forgiving.
- Butter: Use unsalted if you prefer. The salt pinch balances it.
- Milk: Any milk works—whole, 2%, or even a splash of cream for extra richness.
- Gluten-Free: Swap the all-purpose flour for your favorite 1:1 gluten-free baking blend.
- Brownie Base: Use your favorite homemade brownie recipe! Just bake it in a 9×13 pan so it’s the right thickness.
- Coating Chocolate: CandiQuik is my favorite for its easy melting and setting, but you can use good melting wafers or even tempered chocolate.
Crafting Your Decadent Chocolate Chip Cookie Dough Brownie Bombs
Get your stand mixer ready and let’s make some magic! Clear a space in your freezer—you’ll need it.
Step 1: Make the Edible Cookie Dough
In the bowl of your stand mixer, combine the softened butter, brown sugar, and white sugar. Beat them on medium-high speed for a good 2-3 minutes. You want it pale, fluffy, and completely smooth. Now, pour in the milk and vanilla. The aroma is already heavenly! Mix until it’s fully blended into that sugary butter. Turn the mixer to low and gradually add the flour and salt. Mix just until a soft dough forms and no dry streaks remain. Finally, by hand, stir in one cup of those mini chocolate chips. The dough should be pliable and smell like your childhood dreams.
Pro tip: Scrape down the sides of the bowl halfway through adding the flour to ensure everything mixes evenly.
Step 2: Shape and Freeze the Dough Balls
Line a baking sheet with parchment paper or foil. Using a small cookie scoop or a tablespoon measure, portion out the dough. Roll each portion between your palms to create a neat, round ball. Place them on the prepared sheet. This size is perfect—a little nugget of joy that will nestle inside the brownie. Once the sheet is full, pop it into the freezer for a solid hour. This hardens the dough so it’s easy to wrap and won’t squish out later.
Pro tip: A cookie scoop is a lifesaver here for uniform size, which makes coating much easier later.
Step 3: Assemble the Brownie Bombs
Take your completely cooled brownies and cut them into 1-inch squares. You’ll need gentle hands for this part. Take one brownie square and gently flatten it in your palm. Place a frozen dough ball right in the center. Now, carefully wrap the brownie around the dough, pinching the edges to seal it completely. It might crack a little—that’s okay! Just press it back together. Repeat with all the dough balls. Place these assembled bombs back on the baking sheet and freeze for another 30 minutes. This second chill ensures they stay firm during the chocolate bath.
Chef’s tip: If the brownies are very crumbly, slightly dampen your fingertips. It helps the brownie become more pliable without sticking too much.
Step 4: The Chocolate Coating Dive
Melt your CandiQuik or almond bark according to the package directions. I like using a deep, narrow mug or bowl for easy dipping. Take your bombs from the freezer. Spear one with a fork or a dipping tool. Dunk it completely into the melted chocolate. Let the excess drip off for a few seconds back over the bowl. Gently slide it off the fork onto the lined baking sheet. Immediately, before the chocolate sets, sprinkle the top with some of the remaining mini chocolate chips. Repeat until all bombs are beautifully coated.
Pro tip: Work in small batches, keeping the rest in the freezer, to prevent them from softening.
Step 5: Chill, Serve, and Enjoy!
Let the chocolate-coated bombs sit at room temperature, or speed things up by placing them in the fridge. You’ll know they’re ready when the chocolate shell is firm to the touch and doesn’t give under gentle pressure. Store them in an airtight container in the fridge for up to a week, or in the freezer for up to 3 months for a fantastic make-ahead treat!
Timing Your Dessert Masterpiece
While these look involved, the time is mostly hands-off chilling.
- Prep Time (active): 1 hour
- Chilling/Freezing Time: 1.5 hours
- Brownie Baking & Cooling: About 1 hour
- Total Project Time: About 3.5 hours
- Servings: Makes about 18 delicious bombs
My Secret Weapon for the Perfect Bomb
The real trick is in the double freeze. That first freeze on the naked dough balls is non-negotiable. It creates a firm core. The second freeze after wrapping them in brownie is what keeps the whole structure intact when you dip it into the warm chocolate. Skip it, and you risk a melted, gooey mess. Trust me on this—the wait is worth it!
A Fun Fact About Our Main Ingredients
Did you know the chocolate chip cookie itself was a happy accident? In the 1930s, Ruth Wakefield, owner of the Toll House Inn, ran out of baker’s chocolate for her cookies. She chopped up a bar of Nestlé semisweet chocolate, expecting it to melt into the dough. It didn’t, and the world’s favorite cookie was born. Our recipe pays homage to that beautiful kitchen surprise, taking her iconic dough to a whole new level!
Equipment You’ll Need
- Stand mixer or hand mixer
- 9×13 inch baking pan (for the brownies)
- Mixing bowls
- Baking sheets
- Parchment paper or aluminum foil
- Small cookie scoop (about 1 tablespoon size)
- Fork or dipping tools
- Microwave-safe bowl or double boiler for melting chocolate
Storing Your Chocolate Treasures
These bombs store beautifully. For short-term enjoyment, keep them in a single layer in an airtight container in the refrigerator. They’ll stay perfect for 5-7 days. The cold fridge keeps the chocolate shell snappy and the cookie dough firm.
For long-term storage, the freezer is your best friend. Place the fully set bombs in a single layer on a baking sheet to freeze solid (about 2 hours). Then, transfer them to a freezer-safe bag or container. They’ll keep for up to 3 months. This way, you always have an impressive dessert on hand.
When you’re ready to eat a frozen bomb, you can thaw it in the fridge for an hour or let it sit at room temperature for 15-20 minutes. I sometimes eat them straight from the freezer—they have the texture of fantastic ice cream!
Tips for Brownie Bomb Bliss
- Use room temperature butter for the dough. It creams with the sugar much better, creating a lighter texture.
- Don’t overbake your brownies! You want them fudgy and moist, not cakey and dry, so they can wrap easily.
- If your coating chocolate seems too thick, add a tiny teaspoon of coconut oil to thin it for smoother dipping.
- Get creative with toppings! After dipping, try crushed pretzels, sprinkles, sea salt flakes, or chopped nuts.
Presentation Ideas that Wow
How you serve these can make them even more special. Place them in pretty mini cupcake liners for a party. Stack them on a tiered cake stand for a real “dessert table” vibe. For a fun gift, pack a few in a small decorative box lined with wax paper. You can even drizzle them with contrasting melted white chocolate for a professional bakery look. A little sprinkle of flaky sea salt on top just before the chocolate sets cuts the sweetness perfectly.
Healthier Twists on the Classic Bomb
Craving the experience but want a lighter version? Here are a few ideas:
- Protein-Packed Power Balls: Swap the cookie dough for a blend of oat flour, protein powder, almond butter, and a touch of maple syrup. Use a black bean brownie as the outer layer!
- Gluten-Free & Dairy-Free Delight: Use certified gluten-free flour and brownie mix. Choose dairy-free butter, chocolate chips, and coating chocolate.
- Sugar-Conscious Bites: Use a sugar-free brownie mix and a sugar-free chocolate coating. In the dough, use a monk fruit sweetener blend designed for baking.
- Nutty Wonder: Replace half the flour in the dough with finely ground almonds. Add chopped toasted walnuts to the brownie batter for extra crunch and flavor.
- Peanut Butter Paradise: Add ½ cup of creamy peanut butter to the cookie dough. Use a peanut butter cup chunk inside instead of plain dough!
- Fruit-Infused: For a surprising twist, add ¼ cup of very finely chopped dried cherries or cranberries to the cookie dough along with the chips.
Common Mistakes to Avoid
Mistake 1: Using Warm or Soft Brownies
This is the biggest pitfall. If your brownies are still warm or even slightly soft, they will completely fall apart when you try to wrap them. The brownie squares need to be fully cooled to room temperature and are even better if they’ve been chilled. A cool, firm brownie is much more manageable and holds its shape around the frozen dough core.
Mistake 2: Skipping the Freezing Steps
I know, the freezer waits are the hardest part! But they are crucial. If the dough balls aren’t frozen solid, they’ll become a melted mess when you handle them. If the assembled bombs aren’t frozen before dipping, the warm coating chocolate will cause the brownie to soften and the bomb might collapse. Set a timer and be patient. Your reward is a perfect, neat finished product.
Mistake 3: Making the Cookie Dough Balls Too Big
It’s tempting to make them golf-ball sized, but remember, they get wrapped in brownie and then coated. A bomb that’s too large is difficult to coat evenly and is a huge bite. A scant tablespoon is the perfect size. It creates a balanced treat where you get all the flavors in one perfect mouthful without it being overwhelming.
Mistake 4: Coating with Chocolate That’s Too Hot
If your melting chocolate or almond bark is steaming hot, it can shock the frozen bomb. This can cause the chocolate coating to crack as it sets or even melt the outer layer of the brownie. Let the melted chocolate cool for a minute or two. It should be fluid but not hot to the touch. Test by dipping just the corner of one bomb first.
Frequently Asked Questions
Can I use pre-made cookie dough for this recipe?
You could, but I highly recommend making the dough from this recipe. Most pre-made refrigerated cookie doughs contain eggs and leavening, which we don’t want here. Our edible dough is specifically designed to be safe and delicious to eat raw, with the perfect texture for freezing and holding its shape. It tastes so much more fresh and buttery, too!
How far in advance can I make these brownie bombs?
They are the ultimate make-ahead dessert! You can easily prepare them 2-3 days before an event and store them in the fridge. For even longer storage, freeze them for up to 3 months. Just thaw in the fridge overnight before serving. In fact, I think they taste even better after a day, as the flavors have more time to meld together beautifully.
My chocolate coating is clumpy and thick. What did I do wrong?
This usually happens if a bit of water or steam got into the melting chocolate, or if it was overheated. Chocolate is finicky. For best results, melt your coating wafers or almond bark in short bursts in the microwave, stirring well between each, or use a double boiler. If it’s already thick, try stirring in a tiny bit of coconut oil or vegetable shortening to smooth it out. Don’t add butter or milk, as this can make it worse.
Can I use a different type of chocolate for the coating?
Absolutely! While CandiQuik or almond bark are easiest because they set firmly and don’t require tempering, you can use good quality chocolate chips or baking chocolate. If you do, you’ll need to temper it properly for a shiny, snappy finish, or simply accept that it might dry with a softer, matte finish. For simplicity, the melting wafers are your best bet.
Are these safe for kids to eat since the dough has raw flour?
This is an important question. Regular raw flour can carry pathogens. To make this dough completely safe, you can “heat-treat” your flour before using it. Simply spread the 2 cups of flour on a baking sheet and bake at 350°F for about 5-7 minutes, until it reaches 165°F. Let it cool completely before using it in the recipe. This extra step gives you total peace of mind.
What’s the best way to get a smooth, professional-looking chocolate coat?
The secret is in the dip and drip! Use a deep, narrow container for the melted chocolate. Fully submerge the bomb, then lift it out and gently tap the hand holding the fork against your other wrist. This shakes off the excess chocolate and helps create a smooth, even layer. Then, gently slide it off the fork onto your parchment paper. A little practice makes perfect.
Can I add other mix-ins to the cookie dough?
Please do! This is where you can get creative. Swap the mini chips for M&M’s, butterscotch chips, or peanut butter chips. Add a tablespoon of instant espresso powder for a mocha kick. Mix in some crushed toffee bits or a sprinkle of cinnamon. Just keep the total volume of add-ins about the same so the dough still holds together.
Why did my brownie crack so much when I tried to wrap the dough?
This likely means your brownie was a bit on the cakier or drier side, or it was too cold. Make sure you’re using a “fudgy” style brownie mix or recipe. Also, try lightly warming the brownie square in your hands for just a few seconds to make it more pliable before flattening and wrapping.
Do I have to use mini chocolate chips?
Mini chips are ideal because they distribute well in the dough and create a fine texture. If you only have regular-sized chips, give them a rough chop before adding them. This prevents large, awkward chunks that can make shaping the balls difficult.
Can I make these completely nut-free?
Yes, very easily. Just ensure your brownie mix, chocolate chips, and coating chocolate are all produced in nut-free facilities if you have a severe allergy. Read the labels carefully. All the other base ingredients are naturally nut-free, so this recipe adapts perfectly for allergy-friendly needs.
The Sweetest Conclusion
There you have it! My family’s absolute favorite treat to make and share. These Decadent Chocolate Chip Cookie Dough Brownie Bombs might seem like a project, but every minute spent is filled with fun and the promise of something incredible. They capture that pure joy of licking the spoon mixed with the deep comfort of a rich brownie, all dressed up in a pretty chocolate coat. So gather your ingredients, rally your little helpers (or just treat yourself), and get ready to make a dessert memory that’s as fun to create as it is to eat. Happy baking!
Mexican Shrimp Delight
Ingredients
Equipment
Method
- In the bowl of a stand mixer, combine softened butter, brown sugar, and white sugar; beat until pale and fluffy.
- Add milk and vanilla, mixing until fully blended.
- Gradually add flour and salt on low speed until a soft dough forms; stir in 1 cup of mini chocolate chips by hand.
- Line a baking sheet with parchment paper and portion out the dough; roll into balls.
- Freeze dough balls for 1 hour.
- Cut cooled brownies into 1-inch squares, then flatten each square in your palm.
- Place a frozen dough ball in the center of the brownie square and wrap it around, sealing it completely.
- Freeze assembled bombs for another 30 minutes.
- Melt CandiQuik or almond bark according to package directions.
- Dip each bomb into the melted chocolate, allowing excess to drip off before placing on a lined sheet.
- Sprinkle with remaining mini chocolate chips before the chocolate sets.
- Chill until the chocolate shell is firm; store in the fridge or freeze for later.