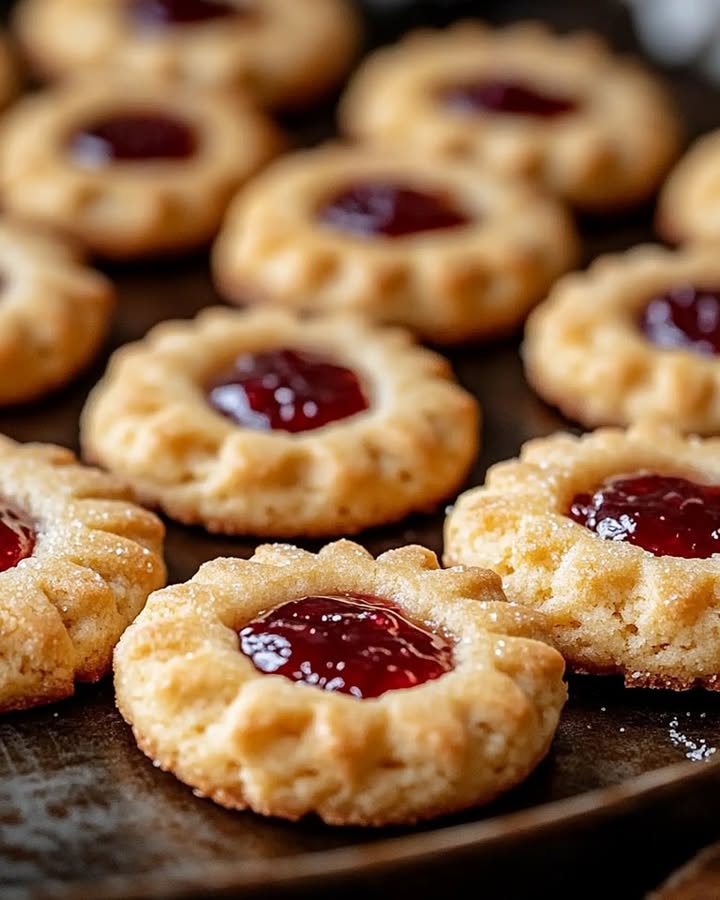
The Joy of Baking: Raspberry Almond Shortbread Thumbprint Cookies
I still remember the first time I bit into one of these cookies. It was at a friend’s holiday party, and I immediately begged for the recipe. Now, these Raspberry Almond Shortbread Thumbprint Cookies are my go-to when I need a surefire hit. They combine buttery richness, fruity sweetness, and a hint of nutty almond in one perfect, melt-in-your-mouth bite. Let me show you how to make them!
A Little History on Thumbprint Cookies
These delightful cookies have a cozy history. They trace back to Scandinavian bakers who made “thumbprint” treats for festivals. The idea was simple: press a thumb into soft dough and fill it with preserves. My version honors that tradition but adds almond extract for a modern twist. It’s a classic recipe that feels both nostalgic and new every time I bake them.
Why You’ll Adore This Recipe
You will love this recipe for so many reasons. First, the ingredients are basic pantry staples. Second, the process is straightforward and fun, even with kids. Third, the flavors are incredible—buttery shortbread with a tangy raspberry center. They look fancy but are surprisingly easy. These cookies always make people feel special, and that’s the best part of baking.
When to Bake These Cookie Gems
These cookies shine at any gathering. They are perfect for Christmas cookie swaps, Valentine’s Day treats, or spring tea parties. I love bringing them to potlucks or packaging them as homemade gifts. They are also my secret weapon for cheering up a rainy day. Anytime you want to spread a little sweetness, these thumbprint cookies are the answer.
Ingredients for Raspberry Almond Shortbread Thumbprint Cookies
- 1 cup unsalted butter, softened
- 1/2 cup granulated sugar
- 1 teaspoon almond extract
- 2 cups all-purpose flour
- 1/2 cup raspberry jam (for filling)
Easy Ingredient Swaps
No need to run to the store! Here are some simple substitutions:
- Butter: Salted butter works; just omit any extra salt.
- Sugar: Try brown sugar for a caramel note.
- Almond extract: Pure vanilla extract is a great stand-in.
- Flour: Use a gluten-free blend for dietary needs.
- Jam: Any jam you love—strawberry, apricot, or blackberry.
Making Your Raspberry Almond Shortbread Thumbprint Cookies
Step 1: Get Your Oven Ready
Start by preheating your oven to 350°F (175°C). This gives it time to reach the perfect temperature. Line a baking sheet with parchment paper. The parchment keeps cookies from sticking and makes cleanup easy. Gather your measuring cups and spoons. Pro tip: Make sure your butter is truly softened. It should indent easily when poked but not be greasy.
Step 2: Cream the Butter and Sugar
In a large bowl, beat the softened butter and sugar together. Use an electric mixer on medium speed. Mix until the combination is pale, fluffy, and smooth. This usually takes 2 to 3 minutes. Then, beat in the almond extract. Your kitchen will start to smell wonderful. This creamy base is the secret to tender shortbread.
Step 3: Mix in the Flour
Gradually add the all-purpose flour to the butter mixture. Mix on low speed just until the dough comes together. You will see soft crumbs forming into a ball. Be careful not to overmix. Overmixing can make the cookies tough. The dough should be soft and hold together when you squeeze it. If it’s too crumbly, add a teaspoon of cold water.
Step 4: Shape the Dough Balls
Roll portions of dough into 1-inch balls. Use your palms to make them smooth. Place each ball on the prepared baking sheet. Space them about 2 inches apart. They need room to spread a little. Now, make a deep indentation in each ball. Use your thumb or the back of a small spoon. Pro tip: Lightly flour your thumb to prevent sticking.
Step 5: Add the Raspberry Filling
Spoon about half a teaspoon of raspberry jam into each indentation. Do not overfill the wells. Too much jam can bubble over and burn in the oven. The bright red jam looks so pretty against the pale dough. If your jam is too runny, stir in a pinch of cornstarch first. This helps it stay put during baking.
Step 6: Bake the Cookies
Bake the cookies for 15 to 18 minutes. Watch for the edges to turn a light golden brown. The centers should remain light but set. The jam will bubble slightly, which is normal. Remove the sheet from the oven. Let the cookies cool on the sheet for 5 minutes. Then transfer them to a wire rack. This helps them firm up perfectly.
Step 7: Cool and Serve
Let the cookies cool completely on the wire rack. This might take 20 to 30 minutes. Once cool, they are ready to enjoy. You can dust them with powdered sugar for a festive look. Serve them with coffee, tea, or milk. Store any leftovers in an airtight container. But they rarely last long in my house!
Chef’s Tip: For the best shape, chill the shaped dough balls on the baking sheet for 15 minutes before baking. This prevents excessive spreading and gives you a neater thumbprint.
Time Breakdown for Baking
Here is what you can expect time-wise:
- Prep time: 15 minutes
- Bake time: 18 minutes
- Cooling time: 30 minutes
- Total time: About 1 hour and 5 minutes
This makes it a quick and rewarding baking project.
A Chef’s Secret for Extra Flavor
My secret is to toast the flour. Spread the all-purpose flour on a baking sheet. Bake it at 300°F for 5 minutes before using. Let it cool. This removes raw flour taste and deepens the buttery flavor. It makes your shortbread cookies taste even more rich and professional.
A Fun Cookie Fact
In some countries, these are called “jam thumbies” or “butter tea cakes.” The thumbprint is said to hold good luck. I like to think each little jam pool is a pocket of joy. It is a small detail that makes homemade cookies so special.
Tools You Will Need
- Large mixing bowl
- Electric hand mixer or stand mixer
- Measuring cups and spoons
- Baking sheet
- Parchment paper
- Wire cooling rack
- Small spoon for jam
Storing Your Thumbprint Cookies
Once completely cooled, store the cookies in an airtight container. Place them in a single layer or separate layers with parchment paper. They will stay fresh at room temperature for up to 5 days. Keep the container in a cool, dry spot away from the stove or sunlight.
For longer storage, you can freeze these cookies. First, freeze them in a single layer on a baking sheet until solid. Then transfer them to a freezer-safe bag or container. They can be frozen for up to 3 months. Thaw at room temperature for an hour before serving.
You can also freeze the unbaked dough balls. Shape them and freeze on a sheet, then bag them. When ready to bake, add the thumbprint and jam, and bake from frozen. Just add 2-3 extra minutes to the baking time.
Helpful Tips for Success
- Use real butter for the best flavor and texture.
- Measure flour correctly by spooning it into the cup and leveling it off.
- If the dough is sticky, chill it for 15 minutes before rolling.
- Experiment with different jam flavors for fun variety.
- Drizzle cooled cookies with a simple glaze for extra sweetness.
Pretty Ways to Present Your Cookies
- Arrange them on a vintage cake stand for a charming display.
- Place each cookie in a colorful mini muffin liner.
- Stack them in a clear glass jar as a kitchen centerpiece.
- Gift them in a decorative tin tied with a ribbon.
- Serve on a wooden board alongside cheeses for a party.
Lighter Recipe Variations
If you want a healthier twist, try these six ideas:
- Oat Flour Thumbprints: Replace half the all-purpose flour with oat flour. It adds fiber and a chewy texture. Use sugar-free jam to cut sugar.
- Apple Sauce Swap: Replace half the butter with unsweetened applesauce. The cookies will be softer but still delicious. Reduce sugar slightly.
- Honey Sweetened: Use raw honey instead of granulated sugar. Reduce the oven temperature by 25°F as honey browns faster.
- Nut Flour Blend: Substitute 1/4 cup of the flour with almond flour. This adds protein and a rich, nutty taste.
- Chia Jam Filling: Make a quick chia seed jam with mashed berries and chia seeds. It is lower in sugar and packed with nutrients.
- Mini Size: Make teaspoon-sized dough balls for portion control. They bake faster, in about 10-12 minutes.
Common Mistakes to Avoid with Thumbprint Cookies
Mistake 1: Not Measuring Flour Correctly
Too much flour is a common error. It makes the dough dry and crumbly. Always spoon flour into your measuring cup. Then level it off with a knife. Do not scoop the cup directly into the flour bag. This packs the flour and adds extra. A kitchen scale is best for perfect accuracy every time.
Mistake 2: Making Shallow Thumbprints
If your thumbprint is too shallow, the jam spills out during baking. Press a deep, well-defined indentation. Use your thumb or a small measuring spoon. Press almost to the bottom but not through the dough. If the dough cracks, just smooth the edges. A good well holds the jam nicely and looks professional.
Mistake 3: Baking on a Hot Baking Sheet
Putting dough on a warm sheet causes spreading. Always use a cool baking sheet for each batch. If you only have one sheet, rinse it under cold water. Dry it quickly before reusing. This keeps the dough firm as it goes into the oven. Your cookies will keep their perfect round shape.
Mistake 4: Using Jam Straight from the Fridge
Cold jam is thick and hard to spoon. It can also make the dough cold. Let your jam sit at room temperature before filling. Stir it to loosen it up. This makes it easier to portion and keeps the dough temperature even. Room temperature jam spreads smoothly into each thumbprint.
Mistake 5: Moving Cookies Too Soon
Hot cookies are very fragile. If you move them right off the baking sheet, they can break. Let them set on the sheet for 5 minutes. They firm up just enough to handle. Then use a thin spatula to move them to a cooling rack. This patience gives you intact, beautiful cookies.
Answers to Your Cookie Questions
Can I make the dough without a mixer?
Yes, you can make the dough by hand. Use a wooden spoon to cream the butter and sugar. It will take a bit more elbow grease. Mix until the sugar is fully incorporated and the mix is fluffy. Then use your hands or a spatula to work in the flour. The key is to have softened butter. Mixing by hand gives you control and is quite satisfying.
How can I make these cookies dairy-free?
To make dairy-free cookies, use a plant-based butter substitute. Look for one that is meant for baking, like sticks of vegan butter. Make sure it is softened just like regular butter. The dough may be slightly softer, so chill it before shaping. All other ingredients are naturally dairy-free. Check your jam label to be certain it has no dairy additives.
Why are my cookies hard instead of melt-in-your-mouth?
Hard cookies often come from overbaking or overmixing. Set a timer and check cookies at the minimum bake time. They should be lightly golden at the edges only. Also, mix the dough only until the flour disappears. Overworking the dough develops gluten, which leads to toughness. Using cold butter can also create a harder texture, so soften it properly.
Can I use fresh raspberries instead of jam?
You can use fresh raspberries, but it is tricky. Fresh berries release a lot of juice. This can make the cookies soggy. If you try, use one small, dry berry per cookie. You might also mix berries with a little sugar and cornstarch. Let it sit to thicken. I recommend a thicker homemade jam or preserves for the best results and less mess.
How do I get my cookies to look uniform?
For uniform cookies, use a small cookie scoop or a tablespoon measure. Portion the dough into equal amounts before rolling. This ensures all balls are the same size. You can also weigh the dough balls with a kitchen scale. Aim for about 20 grams each. Consistent size means even baking and a professional appearance.
What is the best way to fill the thumbprints neatly?
The neatest way is to use a piping bag or a small plastic bag. Fill it with jam and snip a tiny corner. Pipe the jam into each indentation. This gives you control and prevents drips. A small spoon also works if you are careful. Wipe the spoon between fills. Neat filling makes the cookies look bakery-worthy.
Can I add lemon zest to the dough?
Yes, lemon zest is a wonderful addition. Add the zest of one lemon when you cream the butter and sugar. It gives a bright, citrusy note that pairs well with raspberry. You can also use lemon extract instead of almond. This creates a lemon-raspberry thumbprint cookie. It is a refreshing twist for spring and summer.
How long can I store the baked cookies?
Baked cookies store well at room temperature for 5 days. Keep them in an airtight container. For longer storage, freeze them for up to 3 months. Thaw at room temperature. If your kitchen is humid, they may soften. In that case, a cookie jar with a tight seal is best. They rarely last a week because they are so delicious.
Can I make these cookies with my kids?
These cookies are perfect for baking with kids. They can help roll the dough balls and press the thumbprints. Supervise the oven part, of course. It is a fun, hands-on activity. The recipe is forgiving and the results are rewarding. Kids love filling the thumbprints with jam. It is a great way to make family memories in the kitchen.
What if my dough is too soft to roll?
If your dough is too soft, chill it. Cover the bowl and refrigerate for 20 to 30 minutes. This firms up the butter and makes the dough easier to handle. If it is still sticky, you can lightly flour your hands. Avoid adding more flour to the dough itself. Too much flour changes the texture. Chilling is the best solution.
Happy Baking and Sharing
I am so excited for you to try these Raspberry Almond Shortbread Thumbprint Cookies. They have brought so much joy to my family and friends. The simple process and stunning results never fail to please. Remember, baking is about love and sharing. So put on your apron, preheat that oven, and create some sweet memories. Enjoy every buttery, fruity bite!
Chicken Scampi Delight
Ingredients
Equipment
Method
- Preheat your oven to 350°F (175°C) and line a baking sheet with parchment paper.
- In a large bowl, beat the softened butter and sugar together until pale, fluffy, and smooth. Mix in almond extract.
- Gradually add the all-purpose flour to the butter mixture and mix on low speed until the dough comes together, being careful not to overmix.
- Roll portions of dough into 1-inch balls and place them on the prepared baking sheet, spaced about 2 inches apart. Make a deep indentation in each ball using your thumb or a small spoon.
- Spoon about half a teaspoon of raspberry jam into each indentation without overfilling.
- Bake the cookies for 15 to 18 minutes, until the edges are lightly golden and the centers are set. Let them cool on the baking sheet for 5 minutes before transferring to a wire rack.
- Allow the cookies to cool completely on the wire rack (20 to 30 minutes) before enjoying. Optionally dust with powdered sugar.