Heavenly Strawberry Cheesecake Bliss Cupcakes: A Taste of Sunshine
Have you ever had a dessert that makes you close your eyes and just sigh? That’s the magic of these cupcakes. I created them for my daughter’s spring picnic, aiming to capture the joy of a sunny day in a single bite. They combine everything wonderful: a buttery crust, fluffy cake, creamy filling, and fresh berries. Every time I make them, they disappear before I can even put the kettle on for coffee!
From Classic Cheesecake to Portable Bliss
The classic New York cheesecake is a timeless treasure. But let’s be honest, it’s a project. These cupcakes are my happy solution. They take all the beloved elements—the graham cracker base, the tangy cream cheese, the fruit topping—and turn them into individual, no-slice-necessary treats. It’s a modern, shareable twist on a traditional favorite, perfect for our on-the-go lives without losing an ounce of that decadent feeling.
Why You’ll Adore These Blissful Cupcakes
You will love this recipe because it delivers huge flavor with surprisingly simple steps. The texture combination is pure joy: a bit of crunch, super moist cake, and cloud-like filling. They look absolutely stunning, like you spent hours in a fancy bakery, but the process is totally forgiving. Plus, using fresh strawberries makes them taste like a celebration. They are guaranteed crowd-pleasers for both kids and adults.
Perfect Occasions for Your Cupcake Extravaganza
These cupcakes are your secret weapon for any happy gathering. They’re ideal for birthday parties, baby or bridal showers, and garden parties. Bring them to a potluck and watch them become the star of the dessert table. I love making them for Mother’s Day brunch or as a sweet “just because” treat for neighbors. Any day feels special with a little strawberry cheesecake bliss!
Gathering Your Ingredients
Here’s what you’ll need to create this extravaganza. I recommend having everything at room temperature for the smoothest mixing.
- 1 cup graham cracker crumbs
- 2 tablespoons granulated sugar
- 4 tablespoons unsalted butter, melted
- 1 1/2 cups all-purpose flour
- 1 teaspoon baking powder
- 1/2 teaspoon baking soda
- 1/4 teaspoon salt
- 1/2 cup unsalted butter, softened
- 1 cup granulated sugar
- 2 large eggs
- 1 teaspoon vanilla extract
- 1/2 cup buttermilk
- 8 oz cream cheese, softened
- 1/2 cup powdered sugar
- 1 cup heavy cream
- 1 cup fresh strawberries, diced
Simple Swaps: Substitution Options
Don’t worry if you’re missing an item! Here are some easy swaps.
- Graham Cracker Crumbs: Use digestive biscuit crumbs or even crushed vanilla wafers.
- Buttermilk: Make your own by adding 1/2 tablespoon of lemon juice or white vinegar to 1/2 cup of regular milk. Let it sit for 5 minutes.
- Fresh Strawberries: In a pinch, use well-drained thawed frozen strawberries. For a different twist, try blueberries or raspberries.
- Heavy Cream: For a stable filling, heavy cream is best. A full-fat coconut cream can work for a dairy-free version.
Crafting Your Heavenly Strawberry Cheesecake Bliss Cupcakes
Follow these steps for foolproof, beautiful results. Let’s get baking!
Step 1: Prep and Make the Crust
First, heat your oven to 350°F (175°C). Line your muffin tin with pretty cupcake liners. Now, let’s make that signature crust. In a small bowl, mix the graham cracker crumbs and 2 tablespoons of sugar. Pour in the melted butter. Stir until the mixture looks like wet sand and holds together when pinched. The smell is so warm and inviting! Press about one tablespoon firmly into the bottom of each liner. This creates a delicious surprise base for your cupcakes. Pro tip: Use the bottom of a small glass or measuring cup to press the crumbs down evenly for a solid crust.
Step 2: Combine the Dry Ingredients
Grab a medium-sized bowl. Whisk together the flour, baking powder, baking soda, and salt. This isn’t just mixing; you’re making sure the leaveners are evenly distributed throughout the flour. That even distribution is what gives our cupcakes a perfect, even rise. No one wants a cupcake with a big air bubble on one side! I always give it a good 30-second whisk to be sure.
Step 3: Create the Cake Batter
In a large bowl, beat the softened butter and one cup of sugar. Keep beating until the mixture becomes pale, fluffy, and light. This takes about 2-3 minutes and adds air for a tender cake. Now, add your eggs one at a time. Beat well after each addition until fully combined. The batter will become smooth and creamy. Mix in the vanilla extract for that warm, classic flavor.
Step 4: Bring the Batter Together
Now, we’ll combine the wet and dry ingredients. Add about one-third of your flour mixture to the butter mixture. Mix on low speed until just combined. Follow with half of the buttermilk. Repeat, ending with the final third of the flour. Mix only until you no longer see dry flour streaks. A slightly lumpy batter is better than an overmixed one! Overmixing leads to tough cupcakes, and we want them cloud-soft.
Step 5: Bake to Golden Perfection
Scoop the beautiful batter into your prepared liners, filling each about two-thirds full. This leaves room for them to dome nicely. Slide the tin into your preheated oven. Bake for 18-20 minutes. You’ll know they’re done when the tops spring back lightly to the touch and a toothpick inserted into the cake part comes out clean. Let them cool completely in the pan on a wire rack. Patience is key here!
Step 6: Whip Up the Cheesecake Filling
While the cupcakes cool, make the blissful filling. In a bowl, beat the softened cream cheese and powdered sugar until completely smooth and lump-free. In another bowl, whip the heavy cream until you have stiff, beautiful peaks. Be careful not to over-whip it into butter! Now, gently fold the whipped cream into the cream cheese mixture. Use a spatula and a light hand to keep the filling airy and light. Chef’s tip: Chill your bowl and beaters before whipping the cream. It whips up faster and higher!
Step 7: Assemble the Bliss
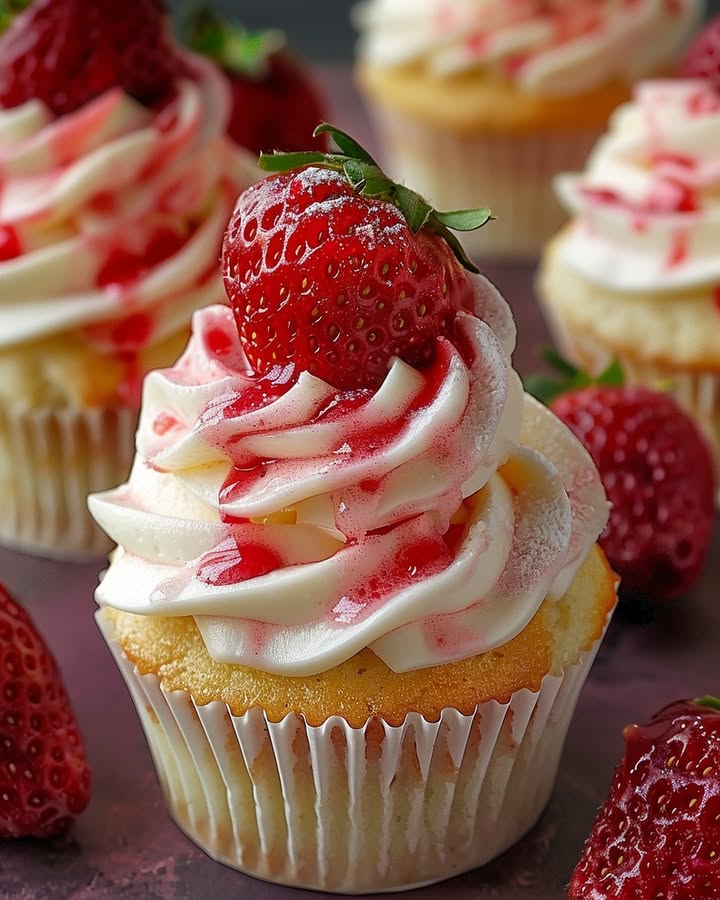
This is the fun part! Once the cupcakes are completely cool, take a small knife or a cupcake corer. Gently cut out a small cone from the center of each cupcake. Don’t go all the way to the crust! Fill each little well with your fluffy cheesecake filling. I like to pipe it in for a pretty look. Finally, crown each masterpiece with a generous spoonful of those vibrant, diced fresh strawberries. The red against the white filling is just gorgeous.
Your Recipe Timetable
Good things take a little time, but this recipe is wonderfully efficient.
- Prep Time: 30 minutes (includes making the filling)
- Cooking Time: 20 minutes
- Cooling Time: 1 hour (very important!)
- Total Time: About 1 hour 50 minutes
- Kcal: Approximately 320 per cupcake
- Servings: 12 delightful cupcakes
Chef’s Secret for Ultimate Flavor
My secret weapon? A tiny pinch of finely grated lemon zest in the cheesecake filling. It doesn’t make it taste like lemon. Instead, it brightens the cream cheese flavor and makes the strawberry topping taste even more strawberry-like. It’s a subtle trick that adds a layer of “wow” people can’t quite place.
A Berry Interesting Fact
Did you know the average strawberry has about 200 seeds? They’re the only fruit that wears its seeds on the outside! That brilliant red color is a signal of ripeness and comes from healthy pigments called anthocyanins. Choosing fragrant, deeply red berries is the key to the best flavor in this and any strawberry dessert.
Necessary Equipment
You likely have everything you need already!
- Standard 12-cup muffin tin
- Cupcake liners
- Mixing bowls (large, medium, small)
- Electric hand mixer or stand mixer
- Whisk and spatula
- Measuring cups and spoons
- Wire cooling rack
- Small knife or cupcake corer
Storing Your Strawberry Cheesecake Bliss
For Short-Term: These cupcakes are best enjoyed the day they are made. If you need to store them for a few hours, keep them in a single layer in an airtight container in the refrigerator. The fresh strawberry topping can release juice, so they are best within 24 hours.
For Longer Storage: You can store unfilled, cooled cupcakes (without strawberries or filling) at room temperature for 1 day or freeze them for up to 2 months. Thaw and then fill and top on the day you plan to serve them. The cheesecake filling can be made and stored separately in the fridge for 1-2 days.
Avoiding Sogginess: The key is to store them with care. If you must refrigerate assembled cupcakes, place them in a container with a paper towel underneath to absorb any excess moisture. Add the diced strawberries as close to serving as possible for the freshest taste and texture.
Tips and Advice for Cupcake Success
- Truly ensure your cream cheese, butter, and eggs are at room temperature. This prevents lumpy filling and ensures a smooth, evenly textured cake.
- When filling the liners, use an ice cream scoop for evenly sized cupcakes that bake at the same rate.
- Don’t skip the “folding” step for the filling. Stirring vigorously will deflate the whipped cream and make the filling dense.
- Pat your diced strawberries dry with a paper towel before topping. This keeps the cupcakes from getting wet on top.
Presentation Tips to Wow Your Guests
- Dust the tops with a light snowfall of powdered sugar just before serving.
- Pipe the cheesecake filling using a star tip for a bakery-quality look.
- Add a single small, perfect whole strawberry on top of the diced ones.
- Serve on a beautiful cake stand or a tiered dessert platter.
- For a dinner party, place each cupcake on a individual small plate with a drizzle of strawberry sauce.
Healthier & Fun Variations to Try
Love the idea but want to mix it up? Here are six delicious twists.
- Gluten-Free Bliss: Use a 1-to-1 gluten-free flour blend and certified gluten-free graham crackers. The recipe works beautifully!
- Lemon Berry Burst: Add 1 tablespoon of lemon zest to the cake batter. Use a mix of strawberries and blueberries for the topping.
- Chocolate Dipped Delight: Dip the tops of the cooled (unfilled) cupcakes in melted dark chocolate. Let it set before filling and topping.
- Mini Marvels: Bake in a mini muffin tin for about 10-12 minutes. Perfect for parties where people want to try a little of everything.
- Nutty Crunch: Add 1/4 cup of very finely chopped toasted pecans or almonds to the graham cracker crust mixture.
- Cheesecake Frosting Style: Skip coring the cupcakes. Instead, pile the cheesecake filling high on top as a frosting, then add strawberries. It’s faster and just as delicious!
Common Mistakes to Avoid
Avoid these pitfalls for perfect cupcakes every single time.
Mistake 1: Using Cold Ingredients
This is the biggest culprit for lumpy filling and dense cake. Cold cream cheese and butter won’t blend smoothly with sugar. You’ll end up with bits of cream cheese in your filling and a batter that doesn’t cream properly. Always take these items out of the fridge at least an hour before you start baking. They should feel soft and slightly warm to the touch.
Mistake 2: Overmixing the Cake Batter
Once you add the flour, your mixing speed should go low. Overmixing develops the gluten in the flour. This makes your cupcakes tough and chewy instead of tender and light. Mix only until you see no more dry patches of flour. It’s okay if the batter looks a little lumpy. Those small lumps will bake out just fine.
Mistake 3: Skipping the Graham Cracker Press
Just spooning the crumb mixture into the liner won’t create a proper crust. If you don’t press it down firmly, it will just be loose crumbs on the bottom of your cupcake. You want a solid, thin layer that holds together. Use a small tool to really tamp it down. This gives you that true cheesecake crust experience with every bite.
Mistake 4: Filling the Liners Too Full
It’s tempting to use all that beautiful batter. But if you fill the liners more than two-thirds full, the batter will spill over the sides as it rises. You’ll get messy, uneven cupcakes that are hard to remove from the pan. Using a scoop helps control the portion and leads to picture-perfect, domed tops.
Mistake 5: Assembling While Warm
Impatience is the enemy here! If you try to core and fill the cupcakes while they are still warm, they will crumble and fall apart. The warm filling will also melt into a mess. Let them cool completely on a wire rack. This can take a full hour. Use this time to wash up and prepare your delicious filling.
Your Cupcake Questions, Answered
Can I make these cupcakes ahead of time?
You can definitely do some prep ahead. Bake the cupcakes and let them cool completely. Then, store them unfilled in an airtight container at room temperature for one day. Make the cheesecake filling and keep it separately in the fridge. On the day of serving, core, fill, and top with fresh strawberries. This keeps the cupcakes fresh and the strawberries from getting mushy.
Can I use frozen strawberries instead of fresh?
You can use frozen strawberries, but you must thaw and drain them extremely well. Chop them after thawing and press them in a strainer or between paper towels to remove as much liquid as possible. Excess juice will make your cupcake topping soggy and can seep into the cake. For the best texture and look, fresh is always preferred.
My filling is too runny. What went wrong?
A runny filling usually means the heavy cream was not whipped to stiff peaks, or the cream cheese was too warm. Make sure your cream cheese is softened but still cool. Chill your mixing bowl and beaters before whipping the cream. Whip until the cream is thick and holds a firm peak when you lift the beater. Also, avoid over-folding the cream into the cream cheese.
How do I core a cupcake without a special tool?
No corer? No problem! Use a small, sharp paring knife. Cut a cone shape about 1 inch wide and 2/3 deep into the top of the cupcake. Gently lift the cone out. You can even save the little piece of cake you removed, cut off the very tip, and place the “lid” back on top of the filling for a hidden surprise!
Can I turn this into a full-sized cake?
The recipe is designed for cupcakes, but you could adapt it. Press the graham crust into the bottom of a 9-inch springform pan. Pour the cake batter over it and bake at 350°F. Start checking for doneness around 30-35 minutes. Let it cool, then spread the cheesecake filling over the top and garnish with strawberries. The baking time will need some testing.
Why did my cupcakes sink in the middle?
Sinking often happens if the cupcakes are underbaked, if the oven door was opened too early, or if there was too much leavener (baking powder/soda). Make sure your baking powder and soda are fresh. Don’t open the oven door before at least 15 minutes of baking. Use the toothpick test to ensure they are fully cooked in the center before removing them.
Is there a substitute for buttermilk?
Yes, it’s easy to make a buttermilk substitute. For this recipe, put 1/2 tablespoon of lemon juice or white vinegar in a measuring cup. Add enough regular milk to reach the 1/2 cup line. Stir and let it sit for 5-10 minutes until it looks slightly curdled and thickened. Then, use it just like you would buttermilk.
Can I freeze these cupcakes?
You can freeze the unfilled, baked cupcakes very successfully. Let them cool completely, then wrap each one tightly in plastic wrap and place them in a freezer bag. Freeze for up to 2 months. Thaw at room temperature. Do not freeze the assembled cupcakes with filling and strawberries, as the texture will suffer.
What’s the best way to soften cream cheese quickly?
Take it out of the foil wrapper and place it on a microwave-safe plate. Microwave on LOW power (10% power) for 15-second intervals, checking after each. It should be soft but not melted or hot. You can also place the sealed block in a bowl of warm water for 15-20 minutes. Never try to soften it on high power!
The graham cracker crust is sticking to the liner. Help!
This can happen if you don’t use enough butter or don’t press it firmly. Make sure your butter-melted mixture is fully combined so all crumbs are moistened. Press it down very firmly with a small glass or spoon. Also, using high-quality, non-stick cupcake liners can make a big difference in easy release.
A Final Slice of Happiness
There you have it! Your guide to creating the most delightful, impressive, and downright delicious strawberry cheesecake cupcakes. They bring together the cozy comfort of a homemade cupcake with the elegant feel of a cheesecake. I promise, the moment you see your friends or family take that first bite, you’ll see pure bliss. It’s what makes baking for loved ones so special. Now, go preheat that oven and create your own little extravaganza. Happy baking!
Cajun Chicken Pasta
Ingredients
Equipment
Method
- Preheat oven to 350°F (175°C) and line a muffin tin with cupcake liners.
- Mix graham cracker crumbs and 2 tablespoons of sugar in a bowl; add melted butter and stir until mixed.
- Press mixture firmly into the bottom of each liner to form a crust.
- In a medium bowl, whisk together flour, baking powder, baking soda, and salt.
- In a large bowl, beat softened butter and 1 cup of sugar until light and fluffy.
- Add eggs one at a time, beating well after each addition, and mix in vanilla extract.
- Gradually add flour mixture and buttermilk, alternating between them, until just combined.
- Fill liners with batter, about two-thirds full, and bake for 18-20 minutes until done.
- Let cupcakes cool completely in the pan on a wire rack.
- Beat cream cheese and powdered sugar until smooth; whip heavy cream until stiff peaks form.
- Gently fold whipped cream into cream cheese mixture until combined.
- Core the center of each cupcake and fill with cheesecake filling.
- Top with diced strawberries.