My Go-To Almond Cake That Feels Like a Hug
You know that feeling when you need a dessert that’s both incredibly special and surprisingly simple? For me, that’s the Traditional Almond Cake with Toasted Slivers. The first time I made it for a friend’s birthday, I was shocked. It felt so fancy, but the process was a breeze! It’s become my secret weapon—the cake that makes everyone think I spent hours in the kitchen. Truthfully, it’s mostly just whisking and pouring, but the rich, moist, and intensely almondy result is pure magic. It’s gluten-free without even trying, and it’s so tender it practically melts in your mouth.
The Simple Story of a Classic Almond Cake
While you might find fancy versions in patisseries, this cake, often called a “Namandier” or simple almond cake, has humble roots in French home baking. It’s part of a wonderful family of desserts that rely on ground nuts instead of flour, a tradition found across Europe. I love the modern twist of adding those golden toasted almond slivers on top. They add a wonderful crunch and make it look absolutely stunning with zero effort. It’s a perfect example of how a few high-quality ingredients can create something truly extraordinary. My version came from a wrinkled page in my grandmother’s old recipe notebook, and I’ve been making it my own ever since.
Why You’ll Fall in Love With This Almond Cake Recipe
Let me count the ways! First, it’s a one-bowl wonder—fewer dishes mean more time to enjoy a glass of wine while it bakes. Second, the flavor is deep, nutty, and not overly sweet. It’s sophisticated enough for a dinner party but simple enough for a Tuesday night treat. Third, it’s naturally gluten-free, so it’s a fantastic option for guests with dietary needs. And finally, the aroma that fills your kitchen? It’s downright intoxicating. It smells like a warm, cozy bakery and promises something delicious is on the way.
The Perfect Times to Bake This Beautiful Cake
This almond cake is my ultimate versatile dessert. I’ve served it for all sorts of occasions:
- Afternoon Coffee or Tea: A small slice with a hot drink is pure bliss.
- Elegant Dinner Parties: Dress it up with fresh berries and a dollop of crème fraîche.
- Holiday Gatherings: It’s a wonderful, non-chocolate option that pleases every palate.
- A Thoughtful Gift: Bake it in a disposable pan, and you’ve got a homemade gift anyone would adore.
- Just Because: Sometimes, a Tuesday deserves a celebration, too!
It truly is a dessert for convivial moments, perfect for sharing and creating sweet memories.
Gathering Your Ingredients for Almond Cake Success
Here’s what you’ll need to make this beauty. Quality matters here, especially with the almonds!
- 200g Almond Flour: This is finely ground blanched almonds. It gives the cake its structure and rich flavor.
- 175g Granulated Sugar: Sweetens the cake perfectly without making it cloying.
- 100g Unsalted Butter, Melted: Use the good stuff! It adds incredible moisture and richness.
- 4 Large Eggs: They bind everything together and help the cake rise beautifully.
- 1 Teaspoon Almond Extract: This intensifies the almond flavor. Pure extract is key!
- 35g Slivered Almonds: These are for the gorgeous, crunchy topping. We’ll toast them as the cake bakes.
Don’t Panic! Easy Ingredient Swaps
Out of something? No problem! Here are my trusted substitutions:
- Almond Flour: You can make your own by grinding blanched almonds in a food processor until very fine (but stop before it turns to paste!).
- Sugar: An equal amount of golden caster sugar works well for a slightly deeper flavor.
- Butter: For a dairy-free version, use a high-quality vegan butter stick that bakes well.
- Almond Extract: If you don’t have it, use an extra teaspoon of vanilla extract. The almond flavor will be milder but still delicious.
- Slivered Almonds: Sliced almonds or even chopped whole almonds make a fine substitute.
Let’s Bake! Step-by-Step Instructions
Step 1: Get Your Pan and Oven Ready
First things first, preheat your oven to 350°F (180°C). This ensures it’s nice and hot when your batter is ready. Now, take your 8 or 9-inch round cake pan. Generously grease it with softened butter, making sure to get into all the corners. For absolute peace of mind, I like to line the bottom with a circle of parchment paper. This guarantees your cake will slide out perfectly every single time. A well-prepared pan is the first secret to a beautiful, unmangled cake.
Step 2: Create the Luscious Batter
In a large mixing bowl, crack in your four eggs. Add the granulated sugar. Now, grab your whisk or electric hand mixer. Whisk them together vigorously for a good 2-3 minutes. You’re looking for the mixture to become pale, thick, and wonderfully frothy. This incorporates air, which will give your cake a lovely light texture. Next, gently fold in the almond flour with a spatula until just combined. Then, stream in the slightly cooled melted butter and that precious teaspoon of almond extract. The batter will be smooth, glossy, and smell absolutely heavenly.
Pro tip: Let your melted butter cool for a minute before adding it. You don’t want to cook the eggs with hot butter!
Step 3: Transfer and Smooth
Pour your gorgeous, fragrant batter into your prepared cake pan. It will be quite thick and pourable. Use a spatula to scrape every last bit out of the bowl. Give the pan a few gentle taps on the countertop. This helps settle the batter evenly and pops any large air bubbles that might be hiding. The surface should look smooth and inviting, ready for its final decoration. This simple step ensures an even rise and a lovely flat top.
Step 4: Add the Topping and Bake to Golden Perfection
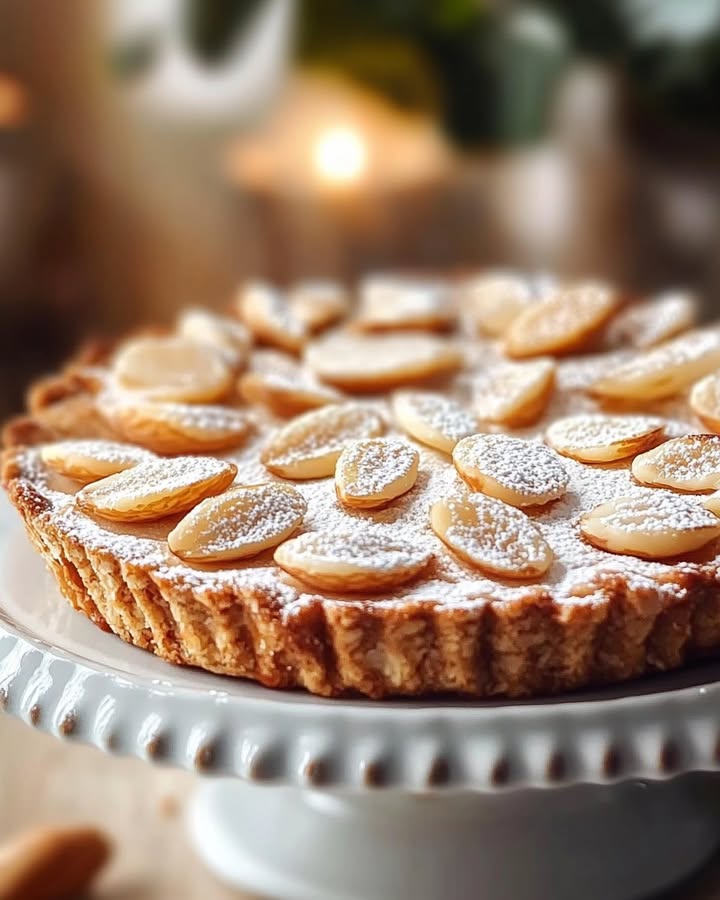
Here comes the easy yet impactful part: the decoration! Take your slivered almonds and scatter them evenly over the entire surface of the batter. Don’t press them down; just let them rest on top. As the cake bakes, they will toast to a beautiful golden brown. Carefully place the pan in the center of your preheated oven. Bake for 30-35 minutes. You’ll know it’s done when the top is a deep golden brown, the edges pull away slightly from the pan, and a skewer inserted into the center comes out clean.
Chef’s tip: If the almonds are browning too quickly, you can loosely tent a piece of aluminum foil over the top for the last 10 minutes of baking.
Step 5: Cool, Unmold, and Enjoy the Rewards
Patience is key here! Allow the cake to cool completely in the pan on a wire rack. This might take an hour or so, but it’s crucial. A warm cake is fragile and can easily break. Once it’s completely cool, run a knife around the edge to loosen it. Invert it onto a plate, then flip it again onto your serving platter. For an optional elegant finish, a light dusting of powdered sugar right before serving looks magical. Then, slice, serve, and get ready for the compliments!
Your Time Investment for Almond Cake Bliss
This recipe respects your busy life.
- Prep Time: 15 minutes (seriously, it’s that fast!)
- Cook Time: 30 minutes
- Cooling Time: 1 hour (the hardest part!)
- Total Time: About 1 hour 45 minutes, mostly hands-off.
You can make this in the afternoon and have a stunning dessert ready for dinner.
My Chef’s Secret for the Ultimate Almond Cake
For an extra layer of flavor, I love to brown my butter before adding it to the batter. Simply melt the butter in a saucepan over medium heat and continue cooking until it turns a nutty golden brown and smells like toffee. Let it cool slightly before using. This one extra step adds a deep, caramel-like note that complements the almonds beautifully.
A Sweet Little Fact About Almonds
Did you know almonds are actually seeds, not true nuts? They’re the seed of the fruit of the almond tree. That rich, buttery flavor we adore comes from their high natural oil content. This is also why almond-based cakes stay so incredibly moist for days, making them perfect for making ahead!
What You’ll Need From Your Kitchen
- An 8-inch or 9-inch round cake pan (springform works great for easy release)
- Parchment paper (for lining)
- Large mixing bowl
- Whisk or electric hand mixer
- Spatula
- Wire cooling rack
- Measuring cups and spoons or a kitchen scale (a scale is more accurate for baking!)
Keeping Your Cake Fresh and Delicious
This cake stores beautifully thanks to its moist texture. Once completely cool, you can keep it right on the counter. Just cover it loosely with aluminum foil or place it under a cake dome. It will stay perfectly fresh and delicious for up to 3 days.
If you want to keep it longer, you can freeze it. Wrap the whole cake or individual slices tightly in plastic wrap, then in aluminum foil. Pop it in the freezer for up to 2 months.
When you’re ready to enjoy, just thaw it overnight in the refrigerator or at room temperature for a few hours. The texture returns perfectly, and it tastes just as good as the day it was baked!
My Best Tips for Almond Cake Perfection
- Room Temperature Eggs: This is a game-changer. They incorporate much more air than cold eggs, leading to a lighter cake.
- Weigh Your Ingredients: For baking, especially with gluten-free recipes, a kitchen scale ensures perfect proportions every time.
- Don’t Overmix: Once you add the almond flour, fold gently. Overmixing can deflate the air you whisked in and make the cake dense.
- The Cool Down: I know it’s tempting, but please let the cake cool completely. It finishes setting as it cools, and slicing into it warm will cause it to crumble.
Making Your Cake Look as Good as It Tastes
- Serve it on a simple white cake stand for a classic, elegant look.
- Add fresh berries like raspberries or strawberries around the slice on the plate.
- A dollop of lightly sweetened whipped cream or a drizzle of crème anglaise takes it to restaurant-level.
- For a wintery feel, pair it with a scoop of poached pear or a warm compote.
- Dusting with powdered sugar through a small sieve creates a beautiful snow-dusted effect.
Playing with Your Food: 6 Delicious Variations
Once you’ve mastered the classic, try these fun twists on the traditional almond cake!
- Citrus Sunshine: Add the zest of one lemon or orange to the batter. The bright citrus cuts through the richness beautifully.
- Berry Burst: Scatter a handful of fresh or frozen raspberries or blueberries over the batter before adding the almond slivers. They’ll sink in slightly and create juicy pockets.
- Chocolate Marble: Set aside 1/3 of the batter and mix in 2 tablespoons of cocoa powder. Drop spoonfuls of each batter into the pan and swirl with a knife.
- Spiced & Cozy: Mix in 1 teaspoon of ground cinnamon or a pinch of cardamom with the almond flour for a warm, aromatic flavor.
- Boozy & Bold: Replace one tablespoon of the almond extract with Amaretto liqueur or a splash of dark rum for an adult-only version.
- Frangipane-Style Tart: Press a layer of shortcrust pastry into a tart pan. Pour the almond cake batter on top and bake. You get a stunning dual-textured dessert.
Common Mistakes to Avoid for Almond Cake Success
Mistake 1: Using Cold Eggs Straight From the Fridge
Cold eggs don’t whip up as well. They won’t trap as much air, which can result in a denser, flatter cake. The creaming process with sugar is crucial for creating that lovely light texture. Always plan ahead and take your eggs out about 30-60 minutes before you start baking. If you forget, place them in a bowl of warm (not hot) water for 5-10 minutes to quickly bring them to room temperature.
Mistake 2: Overbaking the Cake
Because this cake is so moist, it can be tricky to tell when it’s done. Overbaking will dry it out. The top should be a deep golden brown, and the edges will look set and slightly pulled away from the pan. The most reliable test is the skewer test. Insert a toothpick or thin skewer into the center of the cake. It should come out with just a few moist crumbs clinging to it, not wet batter. If it’s clean, your cake is perfectly baked.
Mistake 3: Not Letting the Cake Cool Completely Before Slicing
I know, the aroma is irresistible! But slicing into a warm almond cake is a recipe for crumbles. The cake is still setting its structure as it cools. Cutting into it too soon will cause it to fall apart and can make the texture seem gummy. Your patience will be rewarded. Let it cool in the pan on a rack until it’s completely room temperature. Then, it will slice cleanly and hold its beautiful shape.
Mistake 4: Packing the Almond Flour Into the Measuring Cup
If you’re using cups instead of a scale, be very gentle with your almond flour. Scooping it directly from the bag packs it down, leading to using too much flour. This makes the cake dry and heavy. Instead, spoon the almond flour lightly into your measuring cup and level it off with a knife without pressing down. Even better, invest in an inexpensive kitchen scale for perfect results every time.
Your Almond Cake Questions, Answered!
Can I make this cake ahead of time?
Absolutely! In fact, many bakers (myself included) think it tastes even better the next day. The flavors have more time to meld and develop. Bake it, let it cool completely, then wrap it tightly and store it at room temperature. It will be perfect for serving up to 3 days later. This makes it a fantastic stress-free dessert for entertaining.
Why is my almond cake dense and not fluffy?
A dense cake usually points to a few common issues. First, check your eggs. Were they at room temperature and properly whisked with the sugar until thick and pale? Second, you might have overmixed the batter after adding the almond flour. Fold gently just until combined. Third, old or improperly stored baking powder can lose its potency. Finally, make sure you didn’t accidentally pack down the almond flour, using too much.
My cake sank in the middle after baking. What went wrong?
Don’t worry, it happens! A sunken center is often a sign of underbaking. The outside sets, but the wet, unbaked center collapses as it cools. Next time, ensure your oven is fully preheated and use the skewer test. Also, avoid opening the oven door frequently during the first 25 minutes of baking, as sudden temperature drops can cause a cake to fall. Trust the process and your timer.
Can I use almond meal instead of almond flour?
You can, but there’s a difference. Almond flour is typically made from blanched (skin-off) almonds and ground very fine. Almond meal often includes the brown skins and is more coarsely ground. Using almond meal will give your cake a slightly darker color, a more textured crumb, and a stronger, nuttier flavor. The texture might also be a bit more dense. For the classic light texture, almond flour is best.
How do I know when the cake is perfectly done?
Rely on more than just the clock. Look for these signs: the top will be a uniform, deep golden brown. The edges will start to pull away slightly from the sides of the pan. When you gently press the center, it should spring back. Most importantly, insert a skewer into the thickest part. It should come out with a few moist crumbs attached, but no wet, raw batter. If it’s clean, it’s done.
Can I make this recipe dairy-free or vegan?
For dairy-free, simply replace the butter with a high-quality vegan butter stick that’s meant for baking. For a vegan version, it’s trickier because eggs are a key binder. You could experiment with a flax egg substitute, but the texture will be different—more dense and fudgy. I’d recommend looking for a recipe specifically designed as a vegan almond cake for best results.
What can I use if I don’t have a round cake pan?
No problem! You can use an 8×8 inch square baking pan. The baking time might be slightly less, so start checking at 25 minutes. You can also use a loaf pan, though it will need a longer baking time (check at 40-45 minutes). Just make sure to grease and line whatever pan you use for easy removal.
The top is browning too fast but the inside isn’t done. Help!
This is easily fixed. If you see the almond slivers or the cake top getting dark too quickly, loosely tent a piece of aluminum foil over the top. Shiny side out is best. This will shield it from direct heat and allow the center to finish baking without the top burning. Do this for the last 10-15 minutes of the baking time.
Can I add other flavors to this almond cake?
Please do! This is a wonderful base recipe. Try adding the zest of a lemon or orange. A teaspoon of vanilla bean paste or extract is lovely. Spices like cinnamon, cardamom, or a pinch of nutmeg work well. You could even fold in a handful of chocolate chips or dried cranberries. Just add these extras when you fold in the almond flour.
Is this cake really gluten-free?
Yes, it truly is! As long as you use pure almond flour with no additives and confirm that your other ingredients (like baking powder or extracts) are gluten-free, this cake contains no wheat flour whatsoever. It’s a fantastic, naturally gluten-free dessert that everyone can enjoy, making it a perfect choice for mixed-diet gatherings.
The Final Slice
So there you have it—my all-time favorite, foolproof Traditional Almond Cake. It’s the recipe I turn to when I want to impress without the stress. The process is simple, the ingredients are straightforward, but the result always feels like a special occasion. I hope you bake it, share it, and watch it disappear with smiles all around. Don’t forget to tag me if you share a photo—I love seeing your kitchen creations! Happy baking
Flaky Apple Bars
Ingredients
Equipment
Method
- Preheat your oven to 350°F (180°C) and prepare an 8 or 9-inch round cake pan by greasing it and lining the bottom with parchment paper.
- In a large mixing bowl, whisk together the eggs and granulated sugar for 2-3 minutes until pale and frothy.
- Gently fold in the almond flour, then stream in the melted butter and almond extract, mixing until smooth.
- Pour the batter into the prepared cake pan and tap the pan to level the batter.
- Scatter the slivered almonds on top and bake for 30-35 minutes until golden brown and a skewer comes out clean.
- Allow the cake to cool completely in the pan on a wire rack before removing and serving.