My Magical Leopard Cake: A Baking Adventure
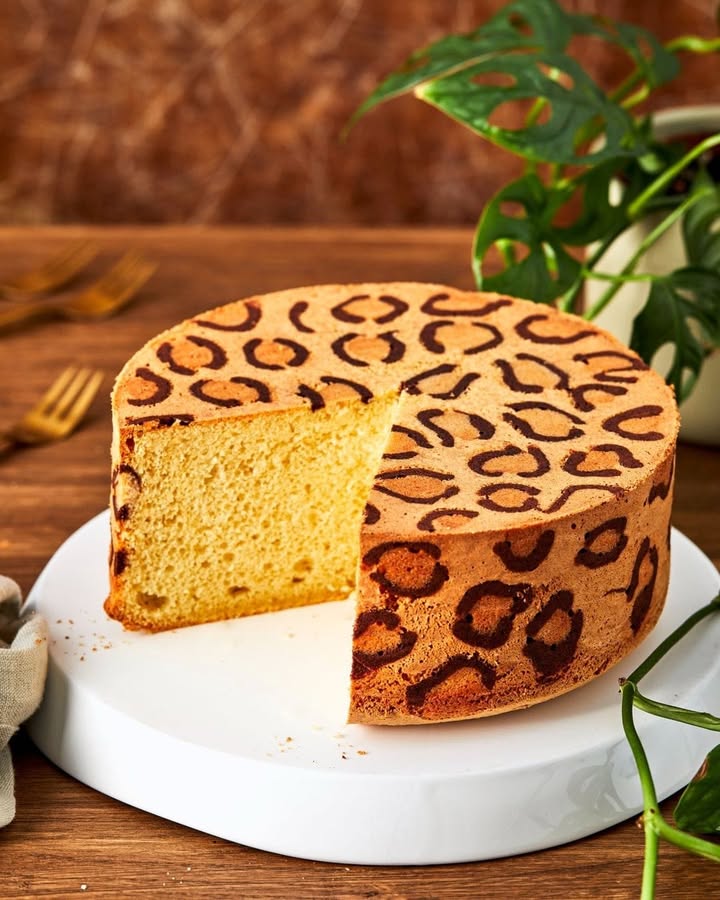
Have you ever baked a cake that feels like pure magic? I still remember the first time I unmolded my Leopard cake. The gasps of delight from my kids were everything. It looks like a stunning piece of animal print art, but it’s secretly just a wonderfully moist vanilla cake with a clever trick. This isn’t just baking; it’s creating delicious, edible joy for everyone at the table.
Where Did This Spotted Wonder Come From?
This recipe feels like it came straight from a whimsical storybook, doesn’t it? While its exact origins are a bit fuzzy, the technique of piping patterns into a cake pan before adding batter is a classic showstopper. I think of it as the fancier, wilder cousin of the humble marble cake. My version is the one I’ve perfected over many birthdays and potlucks. It’s the cake that makes people ask, “How on earth did you DO that?” with a big, proud smile on my face.
Why You’ll Absolutely Love This Leopard Cake
Let me count the ways! First, the shock factor is unbeatable. It’s a surprisingly simple process that yields jaw-dropping results. The cake itself is beautifully tender and not too sweet, perfectly complementing the thin, delicate leopard print layer. It’s a fantastic project to do with little helpers—my nieces love squeezing the piping bags. Best of all, it’s a one-layer wonder, so you get all that visual drama without the stress of stacking tiers.
When to Bake Your Leopard Masterpiece
This cake is your secret weapon for any occasion that needs a sprinkle of fun and wonder.
- Wild Birthday Parties: For the animal lover or anyone who embraces their wild side!
- Unique Potluck Contribution: Be the talk of the table without saying a word.
- Bake Sales: This cake sells itself the moment someone lays eyes on it.
- Just Because Days: Sometimes a Tuesday needs a little leopard print to make it special.
What You’ll Need for Your Leopard Cake
Gathering your ingredients is the first step in the magic. Here’s your list for this delightful project.
For the Bright Leopard Print:
- 40g powdered sugar
- 40 g soft butter
- 40g egg white
- 40 g wheat flour Type 405 (or all-purpose)
- 1 pinch of baking cocoa
For the Dark Leopard Print:
- 40g powdered sugar
- 40 g soft butter
- 40g egg white
- 30 g wheat flour Type 405 (or all-purpose)
- 15 g baking cocoa
For the Cake Batter:
- 4 medium eggs (size M)
- 250g sugar
- 1 tbsp vanilla extract
- 85 ml neutral cooking oil (like rapeseed or canola)
- 1 pinch of salt
- 250 g wheat flour Type 405 (or all-purpose)
- 15g baking powder
- 125 ml milk
Easy Swaps and Substitutions
Don’t fret if you’re missing something! Baking is adaptable.
- Butter: A good, soft margarine can work in the print pastes.
- Milk: Any milk you have on hand—dairy, almond, oat—will do the job.
- Oil: Canola, vegetable, or even a light olive oil are perfect.
- Flour: Standard all-purpose flour is exactly what “Type 405” means.
- Cocoa: Use natural unsweetened cocoa powder for the best color contrast.
Crafting Your Leopard Cake, Step by Step
Ready for the fun part? Let’s create some baking magic together. Follow these steps, and you’ll have a masterpiece.
Step 1: Prep Your Canvas
First, get your oven warming to 180°C (350°F) for conventional heat or 160°C (320°F) for fan-forced. Take a 20 cm (8-inch) springform pan. Cut a round of parchment paper for the bottom. Then, cut a long strip to line the inner wall. This ensures your beautiful cake releases perfectly. Trust me, this step is non-negotiable for clean spots! Pro tip: A dab of butter on the pan helps the parchment stick in place.
Step 2: Make the Light Spots
Now, let’s mix the paste for the lighter parts of the leopard print. In a small bowl, beat the soft butter and powdered sugar until creamy. The mixture will turn pale and fluffy. Gently mix in the egg white until just combined. Finally, sift in the flour and that tiny pinch of cocoa. Stir until you have a smooth, pipeable paste. The scent is sweet and buttery, with just a hint of cocoa.
Step 3: Make the Dark Spots
Repeat the process for the darker spots. Cream the butter and sugar, then mix in the egg white. This time, sift in the flour and the larger amount of rich, dark cocoa powder. You’ll see the paste turn a deep, chocolatey brown. This contrast is what makes the leopard print pop later on. The two pastes should have a similar, toothpaste-like consistency.
Step 4: Pipe and Freeze the Pattern
This is the artistic part! Spoon each paste into its own small piping bag or plastic bag. Snip a tiny 2mm hole in each tip. On your prepared parchment paper circle, pipe random C-shapes, blobs, and clusters. Let the dark and light spots touch and overlap to create a real leopard print effect. Then, place the entire parchment sheet in the freezer for at least 20 minutes. Chef’s tip: This freezing step is the secret! It sets the pattern so it doesn’t smudge when you pour the batter.
Step 5: Create the Cake Batter
While your pattern chills, make the cake. Whisk the eggs, sugar, vanilla, and salt together in a large bowl until thick and pale. The mixture should ribbon off the whisk. Slowly drizzle in the oil while whisking, then the milk. Finally, sift the flour and baking powder over the wet ingredients. Fold gently until just combined. You’ll have a gorgeous, smooth, pourable batter.
Step 6: Assemble and Bake
Carefully take your frozen leopard print from the freezer. Place it pattern-side up in the bottom of your lined springform pan. Slowly and gently pour the vanilla cake batter over the top. Use a spatula to spread it evenly, being careful not to disturb the frozen design. Place the pan in the center of your preheated oven and bake for 40-50 minutes. Your kitchen will smell incredible. The cake is done when a skewer inserted in the center comes out clean.
Step 7: Cool and Reveal
Let the cake cool in the pan for about 15 minutes. Then, run a knife around the edge, unclasp the springform ring, and gently peel away the parchment paper from the sides. The moment of truth comes when you flip it over and peel off the bottom parchment to reveal your stunning leopard print! Let it cool completely on a wire rack.
Your Leopard Cake Timeline
- Prep Time: 45 minutes (includes pattern piping and freezing)
- Baking Time: 45-50 minutes
- Cooling Time: 1 hour
- Total Time: About 2 hours 30 minutes
The Chef’s Little Secret
My absolute best trick is to draw my leopard print pattern on the paper first with a pencil, then flip the paper over and pipe on the reverse side. This way, I have a guide to follow, and the pencil marks never touch the food. It gives you perfect, confident spots every single time!
A Fun Fact About Your Cake
That “Type 405” flour mentioned in the recipe? It’s simply the German classification for everyday all-purpose wheat flour. It has a medium protein content, perfect for creating tender cakes like this one. So, no need for a special international grocery trip—your regular flour is perfect.
Tools You’ll Need
- 20 cm (8-inch) springform pan
- Parchment paper
- Mixing bowls (2 small, 1 large)
- Whisk and spatula
- Electric hand mixer or stand mixer (helpful but not essential)
- Two small piping bags or sturdy plastic zip-top bags
- Wire cooling rack
Storing Your Beautiful Creation
Once completely cool, your leopard cake can be stored at room temperature, covered with a cake dome or overturned bowl, for up to 3 days. The vanilla cake stays wonderfully moist thanks to the oil in the batter.
For longer storage, you can wrap individual slices or the whole cake tightly in plastic wrap and freeze for up to a month. The pattern holds up beautifully to freezing. Just thaw at room temperature when you’re ready for a slice of magic.
I do not recommend refrigerating the cake, as the cold can dry it out and cause the texture to become denser. The best way to enjoy it is at room temperature, where all the flavors shine.
My Best Tips for Success
- Butter Softness is Key: For the print pastes, your butter must be very soft at room temperature. This ensures a smooth, pipeable consistency without lumps.
- Don’t Rush the Freeze: Those 20 minutes in the freezer are crucial. They firm up the piped pattern so it stays put when the batter hits it.
- Fold Gently: When combining the dry and wet ingredients for the main batter, use a folding motion. Overmixing leads to a tough cake.
- Serve with Style: A simple dusting of powdered sugar or a dollop of whipped cream is all it needs. Let the pattern be the star!
Presentation Ideas to Wow Your Guests
This cake is art, so let it shine! Place it on a simple, elegant cake stand. Dust the top lightly with powdered sugar using a small sieve.
For a birthday, add a few fresh berries like raspberries or strawberries around the base. You could also serve it with a side of vanilla custard or a berry coulis for dipping.
At a party, I love to leave the cake unsliced in the center of the table for a while. Let everyone admire it before you make the first cut to reveal the pattern inside too!
Want to Try a Different Pattern?
The technique is your playground! Here are six fun variations.
- Zebra Cake: Use only the dark chocolate paste. Pipe straight lines and swirls for a bold zebra stripe effect.
- Floral Print Cake: Use the pastes to pipe little flowers and leaves on the parchment before freezing.
- Polka Dot Cake: Simple circles of dark paste on a light paste background (or vice versa) create a cheerful dotted look.
- Checkerboard Cake: Pipe a precise grid pattern for a modern, geometric design.
- Seasonal Cake: For Christmas, pipe holly leaves and berries. For Halloween, pipe little bats or pumpkins!
- Two-Tone Leopard: Skip the light paste. Use just the dark cocoa paste on the bare parchment for a classic brown leopard print on a vanilla cake background.
Common Mistakes to Avoid
Mistake 1: Piping the Pattern Too Thick
It’s tempting to pipe big, bold spots, but this can cause problems. A thick layer of paste may not bake through properly and can peel away from the cake. It can also make the bottom of the cake dense. Aim for thin, delicate lines and shapes. Think of it like drawing with a fine-tipped pen, not a marker.
Mistake 2: Skipping the Freezing Step
This is the number one reason patterns get blurry. If your piped paste is at room temperature, the weight of the cake batter will smear it instantly. Freezing solidifies the butter in the paste, creating a stable canvas. Set a timer for 20 minutes. Use that time to clean up and make your cake batter. It’s a necessary pause that guarantees sharp prints.
Mistake 3: Overmixing the Cake Batter
Once you add the flour, you must be gentle. Vigorous beating develops the gluten in the flour, leading to a chewy, tough cake instead of a light, tender crumb. Mix the dry ingredients in until you no longer see streaks of flour. A few tiny lumps are better than overmixing. Your cake’s texture depends on this gentle touch.
Mistake 4: Using Cold Ingredients
Cold butter won’t cream properly with the sugar for the print pastes. Cold eggs and milk can cause your beautiful batter to curdle or not emulsify well with the oil. Take your eggs, butter, and milk out about an hour before you start baking. Room-temperature ingredients blend together smoothly for a perfect, uniform batter and paste.
Your Leopard Cake Questions, Answered
Can I make the pattern ahead of time?
Absolutely! You can pipe the leopard print pattern onto the parchment paper, freeze it solid, and then store it flat in a freezer bag for up to a week. When you’re ready to bake, just take it out, place it in your pan, and proceed with the recipe. This is a fantastic way to break up the project for a busy week.
Why did my leopard print smear or disappear?
This almost always happens because the piped pattern wasn’t frozen long enough, or the batter was poured on too forcefully. Ensure your pattern is rock-solid from the freezer. When adding the batter, pour it slowly onto the back of a spoon held over the pattern to dissipate the force. Spreading gently with a spatula also helps protect your design.
Can I use liquid food coloring instead of cocoa?
You can, but it changes the texture. Cocoa powder absorbs moisture and adds structure. Liquid food coloring can make the paste runny. If you want colored spots, try using gel food coloring. It’s highly pigmented and won’t thin out your paste. You might need to add a tiny bit more flour to maintain the right piping consistency.
My print pastes are too runny to pipe. What do I do?
This usually means your butter was too soft or melted, or you added too much egg white. Don’t worry! Pop the bowl of paste into the refrigerator for 10-15 minutes to firm up the butter. Give it a good stir when you take it out. It should then be perfect for piping. Remember, you want a consistency like soft playdough.
Can I make this into cupcakes?
Yes, you can create leopard print cupcakes! The process is similar but on a smaller scale. Pipe tiny leopard spots onto small circles of parchment paper and freeze them. Place a frozen paper circle, pattern-side up, at the bottom of each cupcake liner. Fill only 2/3 full with batter and bake as usual. You’ll have adorable patterned cupcake tops!
What’s the best way to slice this cake cleanly?
For the cleanest slices that show off the pattern, use a sharp, thin-bladed knife. Run the knife under very hot water, wipe it dry, and then make your cut. The heat helps the knife glide through without tearing or crumbling the cake. Wipe and reheat the knife between each slice for perfect presentation every time.
Can I add flavor to the cake batter?
Of course! The vanilla base is lovely, but it’s also a great canvas. Try adding the zest of one orange or lemon to the batter for a citrus twist. You could also swap the vanilla extract for almond extract for a nutty flavor. Just stick to extracts or zests, as adding liquid like juice will change the batter’s balance.
Is there a dairy-free version of this leopard cake?
You can make some easy swaps. Use a plant-based margarine for the print pastes. For the cake batter, use your preferred non-dairy milk, like almond or oat milk. The oil in the cake keeps it moist without needing dairy butter. The result will still be stunning and delicious for everyone to enjoy.
Why is oil used instead of butter in the cake?
Oil creates a supremely moist and tender crumb that stays soft for days. Butter-based cakes can sometimes dry out faster. The neutral flavor of the oil lets the vanilla and the visual leopard print be the stars. It’s a trick I use in many of my favorite cakes for reliable, delicious results.
My cake stuck to the pan even with parchment. What happened?
This can be frustrating. First, ensure you’re using a springform pan, which is designed to open and release cakes. Second, make sure you greased the pan lightly before placing the parchment paper. The butter or spray helps the parchment adhere. Finally, let the cake cool for the full 15 minutes in the pan before attempting to release it. A cake that’s too hot is more fragile and prone to sticking.
Go Ahead, Unleash Your Inner Baker-Artist!
Baking this Leopard cake is more than following a recipe. It’s an experience filled with anticipation and joy. From piping those first few spots to the grand reveal, every step is part of the fun. It’s a reminder that food can be beautiful, playful, and deeply satisfying to create. So gather your ingredients, take a deep breath, and get ready to bake a cake that’s as much a conversation piece as it is a delightful treat. Your friends and family will be amazed, and you’ll feel like a baking superhero. Now, go make some spots!
Raspberry Almond Thumbprint Cookies
Ingredients
Equipment
Method
- Preheat your oven to 180°C (350°F) or 160°C (320°F) for fan-forced.
- Prepare a 20 cm (8-inch) springform pan with parchment paper.
- For the light spots, beat soft butter and powdered sugar until creamy, then mix in the egg white, followed by flour and cocoa.
- For the dark spots, repeat the process using more cocoa for a rich color.
- Spoon each paste into piping bags and pipe random C-shapes onto the prepared parchment.
- Freeze the piped pattern for at least 20 minutes.
- Whisk together eggs, sugar, vanilla, and salt in a large bowl until thick and pale.
- Gradually add oil and milk while whisking, then sift in flour and baking powder, folding gently.
- Place the frozen leopard print pattern in the pan, pour the batter on top, and spread gently.
- Bake for 40-50 minutes or until a skewer comes out clean.
- Allow the cake to cool in the pan for about 15 minutes before releasing it and letting it cool completely on a wire rack.