A Slice of Sunshine: My Journey with Castella Cake
There’s a certain magic to a Castella cake. It’s not your typical fluffy sponge. This is a cake of substance, with a deep golden-brown crust that gives way to a honey-colored, springy interior so moist it practically whispers. I first tried it in a tiny Japanese bakery years ago and was instantly hooked. The quest to recreate that perfect, bouncy texture in my own kitchen became a delicious obsession, and after many (many!) attempts, I’m thrilled to share this recipe with you. It’s simpler than you think, and the reward—a slice of fragrant, sweet, and incredibly tender cake—is absolutely worth it.
The Sweet Story of Castella: A Portuguese Guest in Japan
Castella cake has a wonderful history that spans oceans. It originated as “Pão de Castela,” a simple sugar, flour, and egg cake brought to Nagasaki, Japan by Portuguese merchants in the 16th century. The Japanese adored it and made it their own, refining the technique and adding local ingredients like mizuame (a starch syrup) or honey. The result is the iconic Nagasaki Castella we know today. While traditional versions are baked in long, wooden boxes, my home-kitchen version uses a standard loaf pan, capturing the same elegant simplicity and sublime texture that has made it a beloved gift and tea-time treat for centuries.
Why You’ll Fall in Love with This Castella Cake
You’ll love this recipe because it’s a lesson in patience that pays off deliciously. The ingredient list is beautifully short—just eggs, sugar, flour, and honey. The magic is in the method. Beating the eggs over warm water creates an incredibly stable foam, which is the secret to that signature tall rise and fine, uniform crumb. Unlike fussy butter cakes, Castella is dairy-free. Its flavor deepens and its texture becomes uniquely moist and velvety after its 12-hour rest wrapped in plastic. It’s a humble cake that feels like a grand achievement.
Perfect Occasions for Your Homemade Castella
This cake is a versatile star. Its elegant simplicity makes it perfect for afternoon tea with friends. Pack slices for a sophisticated picnic dessert. It’s a wonderful gift, staying fresh for days and looking gorgeous wrapped in parchment paper and twine. I love serving it as a not-too-sweet ending to a rich meal, paired with a cup of green tea or a light Earl Grey. For holidays, you can dress it up with a dusting of powdered sugar or serve it alongside fresh berries and a dollop of softly whipped cream.
What You’ll Need: The Castella Ingredients
Gathering your ingredients is the first step to success. Here’s what you’ll need:
- 4 medium eggs, at room temperature: This is non-negotiable. Room temp eggs whip up much higher, giving the cake its lift.
- 110g of sugar: Fine, white granulated sugar works perfectly.
- 2-3 tablespoons of honey: This adds the classic, warm flavor and helps retain moisture.
- 100g strong flour (bread flour): The higher protein content gives the cake structure without making it tough.
Simple Swaps: Substitution Options
Don’t have every ingredient? No problem. Here are some easy swaps:
- For the honey: You can use an equal amount of maple syrup or agave nectar. For a more traditional taste, seek out Japanese mizuame.
- For the strong flour: All-purpose flour will work in a pinch. The crumb might be slightly less chewy, but still delicious.
- For flavor: Add a teaspoon of vanilla extract or a tablespoon of rum to the egg mixture for a subtle twist.
Crafting Perfection: The Castella Method
Follow these steps carefully for a cake that’s tall, golden, and wonderfully moist.
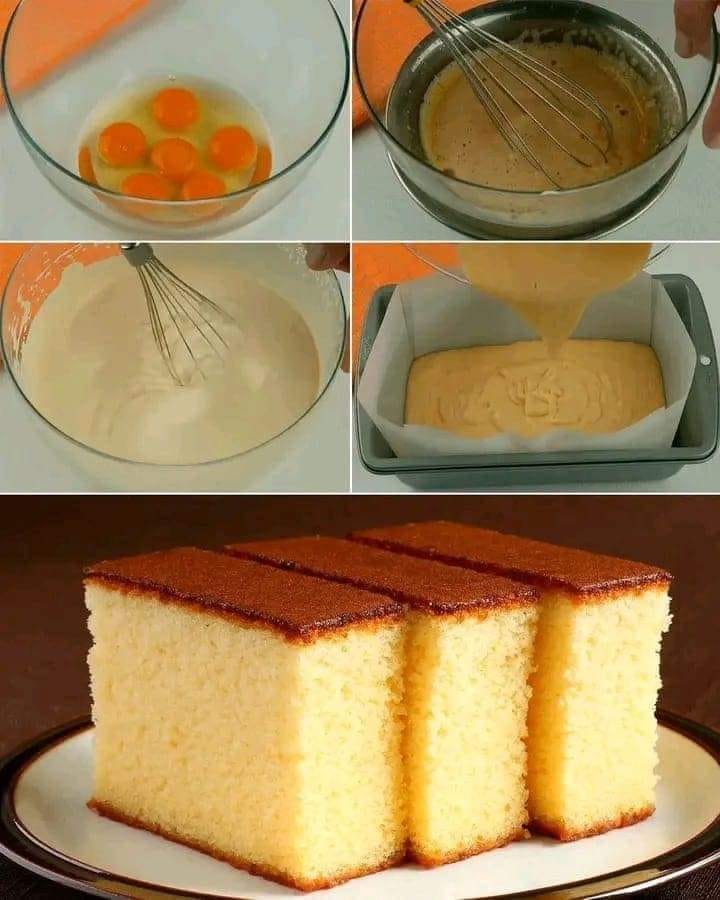
Step 1: The Warm Whisk
Fill a pot with an inch of water and bring it to a simmer. In a spotlessly clean metal bowl, combine your room-temperature eggs and sugar. Place the bowl over the simmering water (make sure the bottom doesn’t touch the water). Start beating immediately with an electric mixer on high speed. You’ll beat for a full 6 minutes. Watch the magic happen as the pale yellow mixture transforms into a thick, pale, and voluminous ribbon of batter. This warm whisking is the heart of the recipe, creating the stable foam that is your cake’s foundation.
Pro tip: The mixture is ready when it falls from the beaters in a thick ribbon that holds its shape on the surface for a few seconds.
Step 2: A Honeyed Note
Remove the bowl from the heat. Drizzle in your honey. Now, continue beating on medium speed for about 30 seconds. This incorporates the honey evenly and helps cool the mixture down slightly. The aroma at this point is incredible—sweet and floral. You’ll notice the batter remains beautifully thick and airy.
Step 3: The Gentle Fold
Sift your strong flour over the egg mixture. I do this in three parts. Sift the first third over the top, then use your mixer on the lowest setting or a whisk to incorporate it for just a few seconds. Repeat with the second third, and finally the last third. Mix just until the flour disappears. A few streaks are okay; overmixing is your enemy here as it will deflate all that beautiful air you worked so hard to create.
Chef’s secret: I use a whisk for the final incorporation. It cuts through the batter more gently than mixer paddles, preserving precious air bubbles.
Step 4: Pan and Prepare
Line your loaf pan (an 8×4 or 9×5 inch works well) with parchment paper, letting it overhang on the sides for easy removal. Pour the batter into the pan. It will be gloriously thick and bubbly. Now, take a skewer or chopstick and run it through the batter in a large zigzag pattern. This pops any oversized air bubbles, ensuring your final cake has that iconic, fine, and even texture without giant holes.
Step 5: The Two-Temperature Bake
Place your pan in a preheated 180°C (350°F) oven. Bake for 10-15 minutes until the top is a deep, glorious brown. Now, act quickly! Open the oven, lay a sheet of kitchen parchment directly on top of the cake, and reduce the temperature to 170°C (340°F). This prevents the top from burning while the inside bakes through. Continue baking for about 55 minutes total. The cake is done when a skewer inserted into the center comes out clean.
Step 6 & 7: The Wrap and Rest
As soon as the cake comes out of the oven, remove it from the pan using the parchment paper sling. Immediately wrap the entire hot cake tightly in plastic wrap. This traps the steam inside. Place the wrapped cake on a flat plate, seam-side down. Now, the hardest part: walk away. Let it rest at room temperature for a full 12 hours. This waiting period is what transforms the cake from simply baked to sublimely moist and tender.
Step 8: The Final Reveal
After its long rest, unwrap your cake. You’ll notice it has settled and feels denser. Use a sharp serrated knife to trim off the dry edges for a pristine look. Slice and serve at room temperature. Enjoy it plain to appreciate its delicate honey flavor, or with a cup of tea and a spoonful of Chantilly cream for pure decadence.
Timing Your Castella Creation
Good things take time, and Castella is no exception.
- Prep Time: 25 minutes
- Cook Time: 55 minutes
- Resting Time: 12 hours (essential!)
- Total Time: 13 hours 20 minutes
Castella Storage Secrets
Proper storage is key to maintaining that perfect texture. Once rested, you can keep the whole cake, tightly wrapped in its plastic, at room temperature for up to 3 days. The plastic wrap keeps it from drying out.
If you need to store it longer, wrap the cake or individual slices tightly in plastic wrap and then in aluminum foil. It will freeze beautifully for up to a month. Thaw it overnight in the refrigerator, then bring it to room temperature before serving.
Never store Castella cake in the refrigerator unwrapped. The fridge is a dry environment and will steal the precious moisture from your cake, making it stale and crumbly much faster.
My Best Tips and Advice
- Eggs are everything: Truly, let them sit out for an hour. Cold eggs won’t whip to the same magnificent volume.
- Weigh your flour: For absolute accuracy, use a kitchen scale. Too much flour is a common cause of a dense cake.
- Trust the process: The 12-hour rest seems strange, but it’s the step that defines Castella. Don’t skip it!
- Use a sharp knife: A serrated knife dipped in hot water and wiped dry between cuts will give you clean, beautiful slices.
Presentation Ideas to Shine
Slice it thick and serve on a simple white plate for a minimalist, elegant look. For a special brunch, layer slices with fresh whipped cream and berries for a Castella shortcake. Cube the cake and skewer it with fruit for a fun dessert kebob. You can also gently toast slices in a pan for a warm, crispy-edged treat with your morning coffee.
Six Delicious Castella Variations to Try
- Matcha Castella: Sift 2 tablespoons of high-quality matcha powder with the flour for a beautiful green tea flavor and color.
- Chocolate Castella: Replace 30g of the flour with 30g of high-quality cocoa powder, sifted.
- Brown Sugar Castella: Substitute the white sugar with dark muscovado sugar for a rich, caramel depth.
- Citrus Castella: Add the zest of one lemon or orange to the egg mixture for a bright, sunny twist.
- Double Honey Castella: Use a strongly flavored honey like buckwheat or chestnut and add an extra tablespoon.
- Marble Castella: Divide the batter in half. Mix cocoa powder into one half. Layer and swirl the two batters in the pan before baking.
Common Castella Mistakes to Avoid
Mistake 1: Using Cold Eggs
Cold eggs straight from the fridge simply will not trap as much air when you beat them. Your foam will be thinner and less stable, resulting in a flat, dense cake that doesn’t achieve the classic tall rise. Always plan ahead. Take your eggs out at least an hour before you start baking. If you’re short on time, place them in a bowl of warm (not hot) water for 10 minutes to gently take the chill off.
Mistake 2: Overmixing the Flour
Once you add the flour, you must switch to a gentle hand. Overmixing with a powerful electric mixer on high speed will deflate all the precious air bubbles you created during the warm whisking stage. This leads to a tough, rubbery cake instead of a light and springy one. Fold the flour in gently by hand with a whisk or spatula, mixing only until no dry streaks remain. A few small lumps are far better than an overworked batter.
Mistake 3: Skipping the 12-Hour Rest
I know, it’s tempting to cut into that beautiful golden cake right away. Resist! The resting period wrapped in plastic is not optional; it’s the final step of the recipe. As the cake cools wrapped tight, the steam re-absorbs evenly throughout the crumb. This process is what gives Castella its signature moist, velvety, and almost bouncy texture. Slicing it early will give you a good cake, but waiting gives you an authentic Castella experience.
Mistake 4: Wrong Oven Temperature
Starting with an oven that’s too hot will cause the top to brown and even burn before the inside is cooked. Not reducing the temperature and covering the top means the crust becomes too hard and thick. Follow the two-stage baking process closely. The initial high heat gives you that beautiful crust and oven spring. The lower temperature with the parchment cover allows the center to bake through gently without further darkening the top.
Your Castella Cake Questions Answered
Can I make Castella cake without a stand mixer?
Absolutely! A handheld electric mixer works perfectly for this recipe. The key is using a metal or heatproof glass bowl that fits snugly over your pot of simmering water. Just be prepared to hold the mixer for the full 6-7 minutes of whipping—it’s a great arm workout! Ensure you beat at the highest speed to incorporate as much air as possible during the crucial warm-whisking stage.
Why is my Castella cake dense and not fluffy?
A dense Castella usually points to two issues: not enough air in the initial egg foam, or deflating that foam later. First, ensure your eggs are truly at room temperature and that you beat them over the warm water for the full time until very thick and pale. Second, check your flour incorporation. Are you mixing it in on too high a speed or for too long? Fold gently and just until combined. Also, double-check your oven temperature with a thermometer; an oven that runs too cool can prevent proper rise.
What does “strong flour” mean and what can I use instead?
“Strong flour” is another term for bread flour. It has a higher protein content (usually 12-13%) than all-purpose flour. This protein forms more gluten, which might sound bad for cake, but in Castella, it provides the necessary structure to support all those air bubbles without collapsing. If you don’t have it, all-purpose flour (around 10-11% protein) is a fine substitute. Your cake might be slightly more tender and less chewy, which many people still love.
Do I really have to let it rest for 12 hours?
Yes, for the authentic texture, you really do. The wait allows the moisture from the steaming process to redistribute evenly throughout the entire cake. This is what creates that uniquely moist, fine, and cohesive crumb that doesn’t crumble when you slice it. Think of it like a good stew—it’s always better the next day. If you slice it early, it will taste good but be more crumbly and cake-like, missing the distinctive Castella chew.
My cake sank in the middle. What went wrong?
A sunken center is often a sign of underbaking or a sudden temperature change. The cake’s structure isn’t set fully in the middle, so it collapses. Make sure you’re baking it long enough—use the skewer test and ensure it comes out completely clean. Also, avoid opening the oven door frequently during baking, especially in the first 40 minutes. The draft can cause a fragile cake to fall. Finally, don’t let the cake cool in a drafty area right out of the oven.
Can I add flavors or mix-ins to Castella cake?
Traditionally, Castella is a pure, simple cake. However, you can add subtle flavors. The best way is to incorporate zest, spices, or tea powders (like matcha) that are finely sifted with the flour. Avoid heavy or wet add-ins like chocolate chips or fruit pieces, as they will sink to the bottom and can deflate the delicate batter. For a flavor boost, you can also brush the finished, cooled cake with a simple syrup infused with citrus or liqueur.
How should I store leftover Castella?
Keep it wrapped tightly in plastic wrap at room temperature. The plastic is crucial—it locks in the moisture. Stored this way, it stays perfect for 3-4 days. You can also freeze it. Wrap the whole cake or individual slices first in plastic, then in foil, and freeze for up to a month. Thaw in the fridge overnight. Do not store it uncovered in the refrigerator, as the dry fridge air will make it stale quickly.
What kind of honey is best for Castella cake?
A mild, light-colored honey like clover or acacia is classic and lets the cake’s delicate texture shine. However, don’t be afraid to experiment! A stronger honey like wildflower or orange blossom will impart a more pronounced flavor. Just avoid very dark, robust honeys like buckwheat if you’re new to the recipe, as their strong taste can overpower the cake. The quality of the honey directly influences the flavor of your final cake.
Why do I put parchment paper on top of the cake while baking?
This ingenious trick is all about controlling the bake. The initial high heat gives the cake its beautiful rise and dark golden crust. But if left at that high heat, the top would burn long before the dense center was cooked. Laying a sheet of parchment directly on top acts as a shield. It slows down the browning on the surface while the gentle, reduced heat continues to cook the cake all the way through without drying it out.
Can I use a different size or shape of pan?
You can, but it will change the baking time and the final texture. A traditional Castella is baked in a square or rectangular wooden frame that’s fairly deep. A standard 8×4 or 9×5 inch loaf pan is a good home substitute. If you use a wider pan (like an 8-inch square), your cake will be shorter and will bake faster—start checking for doneness at 40 minutes. The deep loaf shape helps achieve that characteristic tall slice with a fine, even crumb from top to bottom.
The Joy of a Simple, Perfect Cake
Baking a Castella cake is more than following a recipe; it’s a quiet lesson in patience and precision. From the rhythmic whir of the mixer over the steam to the agonizingly wonderful wait as it rests, every step has a purpose. The reward is a cake that is stunning in its simplicity—fragrant with honey, golden to the eye, and impossibly tender to the bite. It’s a humble masterpiece that reminds us the best things are worth waiting for. So, gather your four simple ingredients, take a deep breath, and bake something truly special. You’ve got this.
Castella Cake
Ingredients
Equipment
Method
- Fill a pot with an inch of water and bring it to a simmer. In a clean metal bowl, combine the eggs and sugar. Place the bowl over the simmering water and beat with an electric mixer on high speed for 6 minutes until thick and pale.
- Remove the bowl from heat and drizzle in honey. Beat on medium speed for 30 seconds.
- Sift in the strong flour in three parts, mixing on low speed or gently with a whisk until just combined.
- Line an 8x4 or 9x5 inch loaf pan with parchment paper. Pour the batter into the pan and create a zigzag pattern through the batter with a skewer or chopstick to pop air bubbles.
- Preheat oven to 180°C (350°F) and bake for 10-15 minutes until the top is brown. Cover the cake with parchment, reduce temperature to 170°C (340°F), and continue baking for about 55 minutes.
- Once done, remove from the pan using the parchment sling and wrap the cake tightly in plastic wrap. Let rest at room temperature for 12 hours.
- After resting, unwrap the cake, trim the edges with a serrated knife, and slice to serve.