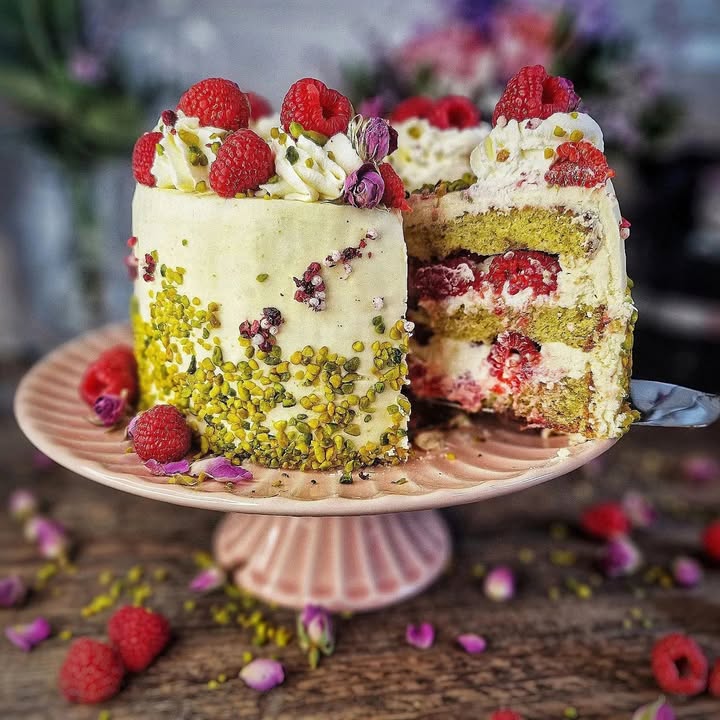
My Quest for the Perfect Raspberry-Pistachio Cake
I have a confession. I used to think making a stunning, multi-layer cake was for “other people.” The pros, the bakers with fancy kitchens. That changed the day I first saw the gorgeous layers of this raspberry-pistachio cake. The vibrant pink raspberries peeked through creamy white filling, all hugged by a pale green pistachio sponge. It was love at first sight. After a few hilarious kitchen experiments (we don’t talk about the leaning tower of cake), I perfected this recipe. It’s now my ultimate showstopper for special days, and trust me, if I can do it, you absolutely can.
A Cake Born from a Happy Kitchen Accident
This cake doesn’t have a centuries-old history. Its origin story is much more relatable. It started with a bag of pistachios and a punnet of raspberries that needed using up. I wanted something more exciting than muffins. The idea of a nutty, moist base paired with the tangy burst of fresh berries just made sense. The white chocolate ganache was a later, glorious addition. It turns a lovely cake into something truly luxurious. It’s a modern classic born from pantry-raiding creativity, and that’s my favorite kind of recipe.
Why You’ll Fall in Love With This Raspberry-Pistachio Cake
This isn’t just a cake. It’s a whole experience. First, the flavors are a dream team: rich pistachio, zesty raspberry, and creamy white chocolate. Second, while it looks like it came from a high-end bakery, the steps are totally manageable. The secret is breaking it into stages. Make the sponge and ganache one day, assemble the next. No rush, no fuss. Finally, the look on your friends’ faces when you bring it to the table? Pure magic. It’s a flavor and visual masterpiece that earns you serious hostess points.
When to Whip Up This Showstopping Cake
This cake is celebration food. It’s perfect for birthdays, Mother’s Day brunch, or a fancy anniversary dessert. I love making it for summer garden parties—the colors just pop outdoors. It’s also my secret weapon for potlucks because it always, always gets compliments. Basically, any event where you want to say “I care enough to make something amazing” is the right occasion for this raspberry-pistachio delight.
Everything You’ll Need for Your Cake
For the Pistachio Sponge Base:
- 4 large eggs, at room temperature
- 100g (about 1/2 cup) granulated sugar
- 80g (1/3 cup) neutral oil (like vegetable or canola)
- 50g (about 1/3 cup) all-purpose flour
- 50g (1/2 cup) finely ground pistachios
- 1 teaspoon baking powder
- 60g (2 oz) white chocolate, chopped
For the White Chocolate Ganache:
- 600g (about 21 oz) white chocolate, finely chopped
- 200ml (about 3/4 cup + 1 tbsp) heavy cream
For the Raspberry Cream Filling:
- 100ml (about 1/3 cup + 1 tbsp) heavy cream, cold
- 1 pack (like Dr. Oetker Whip It) cream stiffener
- 1 pack vanilla sugar (or 1 tsp vanilla extract)
- 50g (1/4 cup) granulated sugar
- 200g (7 oz) full-fat cream cheese, softened
- 150g (5.3 oz) plain yogurt (full-fat is best)
- 250g (about 2 cups) fresh raspberries
For Decoration:
- 200ml (about 3/4 cup + 1 tbsp) heavy cream, cold
- 1 pack vanilla sugar (or 1 tsp vanilla extract)
- 1 pack cream stiffener
- Extra fresh raspberries and chopped pistachios
Easy Swaps: No Stress Substitutions
Don’t have every single item? No panic! Here are my go-to swaps:
- Ground Pistachios: You can use almond flour for a similar nutty base. The color will just be different.
- Fresh Raspberries: Frozen raspberries work too! Thaw and drain them very well to avoid a soggy cake.
- White Chocolate: Use a good quality baking bar, not chips. Chips have additives that can make the ganache gritty.
- Yogurt: Sour cream is a fantastic 1:1 substitute and adds a lovely tang.
- Cream Stiffener: You can use 2 extra tablespoons of powdered sugar per cream pack to help stabilize the whipped cream.
Let’s Bake! Your Step-by-Step Guide
Step 1: Make the Pistachio Sponge
Start by heating your oven to 175°C (350°F). Grab a big bowl and beat those room-temperature eggs and sugar together. You want them pale, thick, and fluffy. This takes about 5 minutes with a mixer. In another bowl, whisk the flour, ground pistachios, and baking powder. Now, gently fold the dry mix into the egg mixture, alternating with the oil. Go slow to keep that air in. Melt the white chocolate and let it cool for a minute before folding it in too. The batter will smell amazing—nutty and sweet. Pour it into a lined 18cm (7-inch) springform pan.
Pro tip: Running your ground pistachios through a fine sieve with the flour gets rid of any big, chunky bits for a finer crumb.
Step 2: Bake and Cool Overnight
Slide the pan into the oven and bake for about 40 minutes. You’ll know it’s done when a skewer poked in the center comes out clean. The top will be a beautiful golden brown. This is the first test of patience! Let the cake cool completely in the pan. Then wrap it well and let it sit on the counter overnight. This rest makes it easier to slice into perfect, even layers tomorrow.
Step 3: Prepare the White Chocolate Ganache
While the cake bakes, make the ganache. Finely chop all that white chocolate and put it in a heatproof bowl. Heat the cream in a saucepan until it just starts to boil. Immediately pour the hot cream over the chocolate. Let it sit for 2 minutes, then stir slowly with a whisk. You’ll see it turn into a smooth, glossy, dreamy pool. Cover it with plastic wrap touching the surface so a skin doesn’t form. Let this cool on the counter overnight too. It will thicken up perfectly.
Step 4: Create the Raspberry Cream Filling
The next day, it’s assembly time! First, make the filling. Whip the 100ml of cold cream with the cream stiffener, vanilla sugar, and granulated sugar until you have stiff peaks. In another bowl, mix the softened cream cheese and yogurt until smooth. Now, gently fold the cream cheese mix into the whipped cream. Be gentle to keep it light and airy. Look at that gorgeous, cloud-like filling! Wash your raspberries and pat them dry.
Step 5: Assemble the Cake Layers
Take your cooled cake and carefully slice it horizontally into three even layers. Grab your ganache and whip it with a hand mixer for a minute until it’s lighter in color and spreadable. Put about one-third of it into a piping bag fitted with a plain tip. Place your first cake layer on a plate or cake stand. Pipe a tall ring of ganache around the very edge—this is a dam that holds the filling in. Inside that ring, spread half of your cream filling. Gently press half of the raspberries into the cream. Top with the second cake layer and repeat the process. Crown it with the third and final cake layer.
Chef’s tip: A dab of ganache on the cake board helps keep the bottom layer from sliding around while you work.
Step 6: Frost, Decorate, and Chill
Now, take the remaining whipped ganache and spread a thin coat all over the top and sides of the cake. This is the crumb coat. It doesn’t need to be perfect. Chill the cake for at least 4 hours to set everything. For the final decoration, whip the 200ml of cream with vanilla sugar and stiffener. Pipe pretty swirls on top and artfully arrange fresh raspberries and chopped pistachios. Your masterpiece is complete!
Your Raspberry-Pistachio Cake Timeline
- Prep Time (Day 1): 30 minutes
- Baking Time: 40 minutes
- Cooling/Resting Time (Overnight): 8+ hours
- Prep & Assembly Time (Day 2): 45 minutes
- Final Chilling Time: 4+ hours
- Total Time (mostly hands-off): About 14 hours
My Secret for the Fluffiest Cake
The absolute key to that light, airy sponge is beating the eggs and sugar long enough. Don’t rush it! When you lift the beaters, the mixture should fall back in thick ribbons that hold their shape on the surface for a few seconds. This incorporates air, which is your main leavening agent. Properly whipped eggs make all the difference between a good cake and a great one.
A Little Berry History
Did you know raspberries are part of the rose family? It’s true! Their sweet-tart flavor is actually a fantastic foil for rich ingredients like cream and nuts. In this cake, their bright acidity cuts through the sweet white chocolate and creamy filling, creating a perfectly balanced bite. That’s not just delicious—it’s smart baking science.
Gather Your Tools
- 18cm (7-inch) springform pan
- Stand mixer or hand mixer
- Mixing bowls (various sizes)
- Whisk and spatulas
- Saucepan
- Piping bag and plain round tip (optional but helpful)
- Serrated knife or cake leveler
- Cake turntable (helpful for frosting)
How to Store Your Beautiful Cake
Because of the fresh cream and fruit, this cake needs to live in the refrigerator. Always store it in a cake carrier or loosely covered with a dome. Don’t wrap it tightly in plastic wrap, as it can ruin your beautiful decorations.
The cake is best eaten within 2-3 days. The sponge stays moist, and the flavors continue to meld beautifully. The raspberries will soften a bit, but that just lets their juices seep into the cream a little—it’s wonderful.
You can freeze the ungarnished, fully assembled cake (before adding the final whipped cream and fresh berry decor). Wrap it tightly in several layers of plastic wrap and freeze for up to a month. Thaw overnight in the fridge before adding your final decorations and serving.
My Best Tips for Success
- Measure accurately: Baking is a science. Use a kitchen scale for the best results.
- Patience is your friend: Don’t try to assemble the cake with warm sponge or runny ganache. Let everything cool completely.
- Dry those berries: Make sure your raspberries are completely dry before adding them to the filling. Extra moisture can make the cake layers soggy.
- If your ganache is too thick to spread after whipping, let it sit at room temperature for 10-15 minutes to soften slightly.
Make It Look Even More Spectacular
- Dust the top with a little edible gold dust for a truly luxurious touch.
- Create a “naked cake” effect by using less ganache on the sides, letting the layers show through.
- Use a mix of whole raspberries and slightly crushed ones on top for texture.
- Serve each slice with a tiny extra drizzle of melted raspberry coulis on the plate.
Delicious Recipe Variations to Try
Love this cake but want to mix it up? Here are six tasty spins on the classic.
- Lemon-Berry Twist: Add the zest of one lemon to the cake batter and use a mix of raspberries and blueberries for a patriotic or summery vibe.
- Chocolate Hazelnut Dream: Swap pistachios for ground hazelnuts and use milk or dark chocolate in the ganache. Fill with a chocolate-hazelnut spread mixed into the cream.
- Tropical Escape: Use shredded coconut in the sponge and fill with a cream mixed with passionfruit pulp and diced mango.
- Matcha Green Tea Delight: Replace the ground pistachios with 2 tablespoons of matcha powder for a vibrant green, earthy-flavored base.
- Berry Cheesecake Fusion: Add an extra 100g of cream cheese to the filling and use a graham cracker crust base instead of the sponge for a layered no-bake cheesecake style.
- Individual Mini Cakes: Bake the batter in muffin tins (reduce time to ~20 mins). Layer the mini cakes in jars with the filling for adorable personal desserts.
Common Mistakes to Avoid
Mistake 1: Using Warm Ganache or Cake for Assembly
This is the biggest cause of cake disasters. If your ganache is warm or your cake layers aren’t completely cool, the filling will melt and slide right out. The cake layers can also crumble when you try to cut or frost them. Always follow the overnight resting step. It makes the cake firm and easier to handle, and lets the ganache thicken to the perfect spreading consistency.
Mistake 2: Not Creating a Ganache Dam
Skipping the step of piping a thick ring of ganache around the edge of each layer might seem like a time-saver. It’s not. That dam acts as a barrier, holding the soft cream filling and juicy raspberries securely inside the cake. Without it, the filling can squish out the sides when you add the next layer, making a mess and leaving the center of your cake underfilled.
Mistake 3: Overmixing the Batter After Adding Flour
Once you add the flour and ground pistachios to the whipped eggs, you need a gentle touch. Vigorously beating or over-stirring at this stage knocks out all the precious air bubbles you just worked so hard to create. This results in a dense, flat sponge instead of a light and fluffy one. Use a spatula and fold gently, just until you see no more dry flour pockets.
Mistake 4: Adding Wet Raspberries to the Filling
Raspberries hold a lot of water. If you don’t wash and thoroughly dry them, that extra moisture will seep into your cream filling and soften the cake layers, making them soggy. Always wash your berries ahead of time and lay them out on a paper towel to air dry completely before you start assembling the cake.
Your Raspberry-Pistachio Cake Questions, Answered
Can I make this cake entirely in one day?
Technically yes, but I really don’t recommend it. The overnight cool is crucial for texture and structure. The cake needs that time to settle, and the ganache needs time to thicken properly. Rushing it will lead to a messy assembly and a less elegant final product. Planning ahead is the true secret to this recipe’s success and your peace of mind.
My ganache is too runny. What did I do wrong?
A runny ganache usually means the cream-to-chocolate ratio was off, or the chocolate wasn’t chopped finely enough. Ensure you’re using the exact weights. If it’s still runny after cooling, you can try re-heating it gently and adding a bit more finely chopped chocolate, or simply pop it in the fridge for 20-minute intervals, stirring in between, until it thickens. Whipping it with a mixer will also help thicken it up.
Can I use frozen raspberries instead of fresh?
Yes, but with a very important step. You must thaw the frozen raspberries completely in a colander over a bowl to catch all the juice. Then, pat them dry extremely well with paper towels. They will be more fragile, so handle them gently. Sometimes frozen berries can be more tart, so you might want a tiny bit more sugar in the filling.
What if I don’t have a springform pan?
You can use a regular 7-inch cake pan. Just make sure to line the bottom with parchment paper. To remove the cake, let it cool for 10 minutes, then run a thin knife around the edge. Place a plate on top, flip it over, and gently lift the pan. You might need to tap the bottom to release it.
Can the cream cheese filling be made ahead?
You can make the cream cheese and yogurt mixture ahead and keep it covered in the fridge. However, wait to whip the cream and fold them together on the day of assembly. Whipped cream can weep or deflate if made too far in advance, so for the best texture, combine everything a few hours before you build the cake.
Why is my cake dense and not fluffy?
This almost always goes back to the eggs. They must be at room temperature to whip up to their fullest volume. Also, ensure you beat the eggs and sugar for a full 5-7 minutes until very thick and pale. Finally, check your baking powder isn’t expired. Old leavening agents lose their power.
How do I get perfectly even cake layers?
Use a long, serrated bread knife. First, mark a line around the side of the cake at the halfway point as a guide. Then, using a slow sawing motion, keeping the knife level, rotate the cake as you cut. A cake leveler tool is a great inexpensive investment if you bake layered cakes often.
Can I use a different nut?
Absolutely! Almonds or hazelnuts would be fantastic. Just make sure they are finely ground. You can buy them pre-ground as “meal” or “flour,” or pulse whole nuts in a food processor until very fine (but stop before they turn to butter!).
How far in advance can I decorate the cake?
You can fully assemble and frost the cake with the ganache the day before serving. I recommend adding the final whipped cream decoration and fresh berries on the actual day of serving. This keeps the berries looking fresh and perky and the whipped cream piped shapes looking their best.
Is there a non-dairy alternative for this cake?
Creating a fully non-dairy version is complex due to the multiple dairy components. You could try using dairy-free cream cheese, coconut cream for whipping, and a high-quality dairy-free white chocolate. However, results can vary significantly in texture and flavor, so it would require some experimentation.
Time to Celebrate Your Baking Win!
There you have it—my tried-and-true path to creating the most stunning raspberry-pistachio cake. Remember, the secret ingredient is always a little bit of love (and a lot of patience for cooling!). Don’t be intimidated by the layers or the ganache. Take it step-by-step, enjoy the process, and get ready for the applause. This cake is more than a dessert; it’s a statement of sweet, creamy, nutty joy. Now go preheat that oven and make some magic! Your friends and family are in for a real treat.
Luxurious Seafood Bisque
Ingredients
Equipment
Method
- Preheat oven to 175°C (350°F). Beat eggs and sugar together until pale and fluffy.
- In a separate bowl, whisk flour, ground pistachios, and baking powder. Fold into the egg mixture, alternating with oil.
- Melt white chocolate, let it cool, and fold into the batter. Pour into a lined 18cm (7-inch) springform pan.
- Bake for about 40 minutes until a skewer comes out clean. Cool completely in the pan, then wrap and leave at room temperature overnight.
- For ganache, heat cream until boiling, pour over chopped white chocolate, let sit, and then whisk until smooth. Cool overnight.
- The next day, whip cold cream with stiffener and vanilla sugar to stiff peaks. Mix softened cream cheese and yogurt until smooth, then fold in whipped cream.
- Slice cooled cake into three layers. Whip ganache until lighter and spreadable, pipe a dam of ganache on the first layer, spread half of the filling, and add raspberries. Repeat with the second layer.
- Place and frost the top layer, then apply a crumb coat of ganache and chill for at least 4 hours.
- For decoration, whip cream with sugar and stiffener, pipe swirls, and top with fresh raspberries and chopped pistachios.