
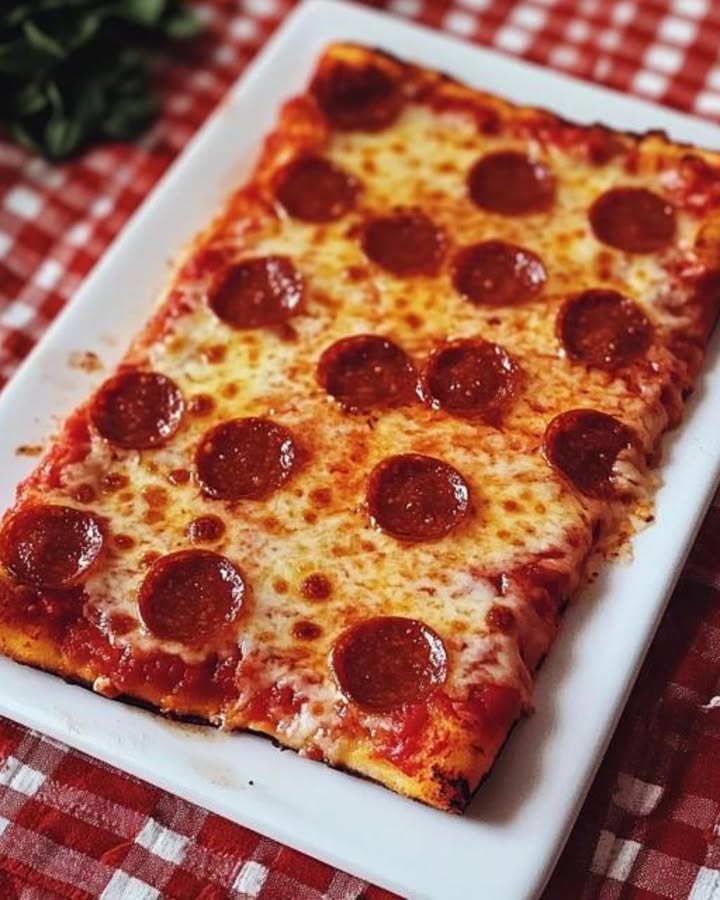
Remember those golden days of elementary school lunches when the cafeteria served up that cheesy, perfectly greasy rectangle pizza? You know, the one you devoured with a grin while sitting at tiny plastic tables. I’ve been on a mission to recreate that magical slice—and trust me, this recipe hits all the right nostalgia buttons. Meet your new favorite throwback dish: **Retro Rectangle Pizza**. It’s gooey, crispy, and oh-so-tasty—just like you remember!
The Magic Behind Retro Rectangle Pizza
Growing up, pizza day was every kid’s dream. There’s something comforting about food that takes us back to simpler times. This old-school pizza is rooted in cafeteria-style recipes, where practicality met flavor. The rectangular shape? That’s all about efficiency, making it easy to cut and serve to a crowd. After testing countless dough recipes and toppings, I nailed this version that combines the best of both worlds: homemade love with a dash of lunchroom charm.
Why This Recipe Is Your Next Favorite
This Retro Rectangle Pizza is a winner for so many reasons. First off, it’s *incredibly simple*. No fancy techniques or hours of prep required—just good old-fashioned cooking. The crust achieves that perfect balance between chewy and crisp, while the toppings are as classic as they come. Plus, the whole family will cheer when they see this pizza emerge from the oven. Pro tip: The smell alone might transport you straight back to childhood!
Perfect Occasions for Retro Rectangle Pizza
Need an idea for game night or a weekend gathering? This pizza is your answer. Imagine passing around big slices of gooey, cheesy goodness while watching your favorite sports team play—it’s unbeatable! Or how about surprising your kids (and yourself) with a blast-from-the-past Friday dinner? It works wonders for potlucks too since its size feeds plenty without much fuss.
Ingredients for Retro Rectangle Pizza
- 2 tsp active dry yeast
- 2 2/3 cups all-purpose flour
- 3/4 cup nonfat dry milk powder
- 2 tbsp + 1 1/4 tsp granulated sugar
- 1/4 tsp salt (adjust up to 1/2 tsp for more flavor)
- 1 1/4 tsp vegetable oil
- 1 2/3 cups warm water
- 16 oz part-skim mozzarella cheese, shredded
- 2 cups prepared pizza sauce
- 22 slices pepperoni, minced
Substitution Options
No problem if you don’t have everything on hand. Swap out the mozzarella for provolone or Monterey Jack if desired. Vegan friends? Try plant-based cheese instead. For gluten-free eaters, look for a substitute flour blend. Missing fresh-made sauce? Canned marinara or even spaghetti sauce works fine too.
Preparation Guide
Step 1: Preheat the Oven
Kick things off by preheating your oven to 475°F—a nice hot temp ensures a crispy crust. Meanwhile, grab an 18″x13″ sheet pan and give it a light spray with cooking grease. A slick surface helps prevent sticking and makes cleanup easier later.
Step 2: Prepare the Dough
In a mixing bowl, whisk together the yeast, flour, milk powder, sugar, and salt until evenly distributed. Pour in the vegetable oil and gradually stir in the warm water. Keep stirring until the mixture turns into a thick batter. Don’t stress if it’s sticky—that’s exactly what we want! The texture reminds me of pancake batter…yum.
Step 3: Resting Time
Here’s where patience pays off. Spread the dough across the greased sheet pan using a spatula. Aim for an even layer without pressing down too hard. Let the dough relax for 20-30 minutes. Pro tip: Use this time to prep toppings or sip some coffee—it’s self-care hour!
Step 4: Blind Bake the Crust
Pop the rested dough into the oven for 12-15 minutes. You’ll know it’s ready when the edges start pulling away from the sides—a beautiful sight! This step builds structure so your final pie holds up under all that gooey goodness.
Step 5: Add Those Toppings
Now comes the fun part. Sprinkle 4 oz of cheese over the crust. Follow that with a generous spread of pizza sauce—you can make swirl patterns if you’re feeling artsy. Top it off with the remaining cheese and minced pepperoni. Doesn’t that combination smell divine already?
Step 6: Final Bake
Back into the oven it goes for another 12 minutes. Watch closely as the cheese melts into a bubbly sea and the edges turn golden brown. The aroma wafting through your kitchen is worth every second of anticipation.
Step 7: Slice and Serve
Let the finished pizza rest for 5-10 minutes before slicing it into neat rectangles. Why? It allows the toppings to settle and makes serving super easy. Dive in and enjoy every gooey, nostalgic bite!
Chef’s Secret
For maximum crispiness, finish reheating leftovers in a hot skillet before broiling for a minute or two. Trust me; it reignites that just-out-of-the-oven magic. Also, adding a pinch of red pepper flakes to the sauce gives it a subtle kick that pairs beautifully with the buttery crust.
Timing Breakdown
Prep Time: 30 mins | Cook Time: 24 mins | Total Time: ~1 hr
An Interesting Fact About Pepperoni
Did you know pepperoni isn’t Italian? Yep, it’s completely American-born! Created in the early 20th century, it quickly became the star topping of choice nationwide. Pair that history with our Retro Rectangle Pizza, and you’ve got cultural fusion on a plate.
Necessary Equipment
To nail this recipe, you’ll need a large baking sheet, a mixing bowl, a rubber spatula, and an oven thermometer. These tools keep the process smooth and efficient. Nothing beats the satisfaction of knowing you’re equipped for success!
Storage Tips
Leftovers freeze beautifully. Place individual slices in freezer-safe bags, and they’ll last up to three months. Reheat them in the oven for optimal crispiness—microwaving tends to leave the crust soggy.
If refrigerating, store the pizza in an airtight container for up to four days. Cover tightly to maintain freshness and prevent odors from seeping in.
Pro tip: Always let the pizza cool completely before storing. Hot food creates condensation, which can ruin the texture upon reheating.
Tips and Advice
- Double the batch and freeze half for busy nights.
- Experiment with different cheeses like cheddar or Parmesan for variety.
- Use parchment paper to line the pan for effortless removal and cleaning.
Presentation Tips
Serve your Retro Rectangle Pizza stacked high like bricks for dramatic effect. Garnish each plate with a sprinkle of basil leaves or red pepper flakes for color contrast. Pair it with small bowls of ranch dressing or garlic dip for dunking fun.
Healthier Alternatives
Explore these six variations to cater to specific dietary needs:
- Whole Wheat Crust: Substitute all-purpose flour with whole wheat for fiber-rich goodness.
- Veggie Loaded Pizza: Pile on bell peppers, onions, spinach, and mushrooms for extra nutrients.
- Cauliflower Crust: Try a grain-free option using cauliflower rice mixed with eggs and cheese.
- Gluten-Free Version: Swap in gluten-free flour blends tailored for pizza dough.
- Low-Carb Delight: Thin out the crust and load up on meaty toppings like chicken sausage.
- Dairy-Free Choice: Replace cheese with cashew cream or nutritional yeast for a cheesy tang.
More Recipes You’ll Love
Looking for other crowd-pleasing meals? Try whipping up a hearty Mediterranean Chicken and Couscous Bowl next time you want bold flavors. For something zesty, check out my go-to Spicy Honey Lime Chicken Thighs. If comfort food calls your name, the creamy Creamy Garlic Butter Chicken and Rice Skillet is pure bliss. And don’t miss the One Pot Lemon Herb Chicken Orzo, which proves simplicity never tasted so good!
Common Mistakes to Avoid
Mistake 1: Skipping the Resting Step
The dough needs time to rise properly—not resting long enough results in flat, dense pizza. Patience is key! Set a timer and let the dough take its sweet time to puff up.
Mistake 2: Overloading with Toppings
Too many toppings weigh the crust down, making it soggy. Balance is crucial here. Stick to moderate amounts so every bite stays delightfully crunchy.
Mistake 3: Neglecting Hydration Levels
Yeast thrives best in moist environments. Make sure your warm water isn’t too hot—it should feel lukewarm, not scalding. Need hydration tips? Check out expert advice from health professionals.
Mistake 4: Rushing the Cooling Process
Not letting the pizza cool slightly leads to messy cuts. Those first few moments solidify the cheese beautifully, making slicing cleaner and easier.
Want More Main Dish Inspiration?
Browse the full collection of main dish recipes here, including quick weeknight dinners and show-stopping feasts.
FAQ
Can I use instant yeast instead of active dry yeast?
Absolutely! Instant yeast works just as well. No need to dissolve it separately—simply mix it directly into the dry ingredients.
How do I make the crust thinner?
Split the dough between two smaller pans or stretch it wider across the same pan. Just keep an eye on baking times—they may decrease slightly.
What kind of sauce complements this pizza best?
Tomato-based sauces pair wonderfully due to their acidity balancing the richness of the cheese and pepperoni. Classic marinara is always a safe bet.
Can I prep the dough ahead of time?
Totally! Mix the dough the night before, cover it tightly, and store it in the fridge. When ready to bake, simply bring it to room temp and proceed.
Why does the recipe call for nonfat dry milk powder?
The milk powder adds softness and tenderness to the crust. Can’t find it? Regular milk stirred into the water works similarly.
Is there a way to speed up rising time?
Place the dough in a warm spot—or near a preheating oven—to encourage faster fermentation.
How do I reheat frozen pizza slices?
Set your oven to 350°F and place slices directly on the rack. Bake for 8-10 minutes until heated through.
Can I add veggies to this pizza?
Go wild! Sautéed mushrooms, chopped olives, or roasted red peppers elevate the flavor profile while keeping the nostalgia alive.
Does this recipe freeze well?
Yes! Wrap cooled slices individually and freeze for up to 3 months. They’re perfect for impromptu pizza nights.
What utensils are essential for slicing?
A sharp chef’s knife or pizza wheel ensures clean cuts without tearing the delicate crust.
Final Thoughts
There’s nothing quite like reliving a piece of childhood through a delicious Retro Rectangle Pizza. Whether you’re hosting a party or treating yourself to a cozy meal, this recipe promises happiness in every bite. Now get cooking—you deserve a little trip down memory lane.
Retro Rectangle Pizza
Ingredients
Equipment
Method
- Preheat your oven to 475°F and spray an 18"x13" sheet pan with cooking grease.
- In a mixing bowl, whisk together yeast, flour, milk powder, sugar, and salt.
- Pour in the vegetable oil and gradually stir in warm water until the mixture is thick.
- Spread the dough evenly across the greased sheet pan and let it rest for 20-30 minutes.
- Blind bake the crust in the oven for 12-15 minutes until the edges pull away from the sides.
- Sprinkle 4 oz of cheese over the crust, add pizza sauce, remaining cheese, and minced pepperoni.
- Bake for another 12 minutes until cheese is bubbly and edges are golden brown.
- Let the pizza rest for 5-10 minutes before slicing into rectangles.