The Gâteau Breton: Your New Favorite Treat
Have you ever tasted a slice of pure, golden butter? I swear, that’s the best way to describe a perfect Breton cake. The first time I tried it in a tiny French bakery, I was hooked. It wasn’t overly sweet or fussy. It was dense, rich, and melted on my tongue with the most incredible flavor. I knew I had to learn to make it at home. After many trials (and happy neighbors who got to taste-test), I’ve perfected this authentic Breton cake recipe. It’s simpler than you think and absolutely foolproof. Let’s bake some magic together!
A Slice of Brittany’s History
This cake is more than dessert; it’s a piece of French heritage. The true **Gâteau Breton** comes from the region of Brittany, famous for its phenomenal butter and sea salt. Historically, it was a special treat, often baked for weddings and harvest festivals because its sturdy, buttery texture meant it could last and travel well. You’ll sometimes see intricate Celtic cross patterns etched on top. My version keeps it classic and simple. While some modern twists add prunes or jam fillings, the purist in me loves the original best. It celebrates those three core ingredients: butter, sugar, and egg yolks. It’s a testament to how simple things, done right, can be extraordinary.
Why You’ll Fall in Love With This Authentic Breton Cake
You’ll love this recipe because it’s a baker’s dream. It requires no fancy techniques or equipment. It’s incredibly forgiving. The flavor is insanely good – imagine the best shortbread cookie you’ve ever had, but in cake form. It’s perfect for making ahead, as its flavor actually deepens after a day or two. Plus, it looks so impressive with its shiny, golden top. My kids call it “the sunshine cake,” and it always gets a “wow” at my book club. It’s the kind of humble dessert that makes people feel special and cared for.
Perfect Occasions for a Breton Cake
This cake is your secret weapon for so many events. It’s elegant enough for a dinner party but simple enough for a weekend treat. I love serving it with afternoon coffee or tea. It’s fantastic for picnics and potlucks because it travels without a fuss. Pack it in a lunchbox for a delicious surprise. It’s also a wonderful homemade gift. Bake one, wrap it in parchment paper, tie it with twine, and you’ve got a present that says, “I think you’re amazing.” Holiday gatherings? Absolutely. It pairs beautifully with a glass of cider or a sweet dessert wine.
Gathering Your Ingredients
Here’s what you’ll need for this classic recipe. The beauty is in its simplicity!
- 250 g of salted butter – This is non-negotiable. Use good-quality, European-style salted butter if you can. It’s the star.
- 250 g of sugar – Plain granulated sugar works perfectly.
- 250 g of all-purpose flour
- 6 egg yolks – Save the whites for meringues or an omelet!
- 1 packet of baking powder (about 2 tsp)
- 1 tablespoon of rum (optional) – This adds a lovely, subtle depth.
- 1 extra egg yolk for glazing
Clever Substitution Options
Out of something? Don’t worry! Here are some easy swaps. If you only have unsalted butter, just add a big pinch of fine sea salt to the mix. No rum? Try a tablespoon of vanilla extract or even a teaspoon of pure almond extract for a different note. For a gluten-free version, a good 1-to-1 gluten-free flour blend can work, though the texture may be slightly more crumbly. The key is to keep the ratios the same. The recipe is very adaptable, which is one of the reasons I make it so often.
How to Make Your Authentic Breton Cake
Let’s get baking! Clear a space, put on some music, and enjoy the process. The smell alone is worth it.
Step 1: Prepare Your Oven and Pan
Start by turning on your oven to 170°C (340°F). This gives it plenty of time to heat evenly. While it warms up, generously butter your cake pan. I use a 9-inch springform or a deep tart pan. Then, dust it lightly with flour, tapping out the excess. This little step is your insurance policy for a perfect, easy release later. Trust me, no one wants a beautiful cake stuck in the pan!
Step 2: Cream the Butter and Sugar
Take your butter out ahead of time so it’s beautifully soft. Place it in a large mixing bowl with the sugar. Using a wooden spoon or a spatula, work them together. You want to beat them until the mixture is pale, fluffy, and completely smooth. You’ll see the color lighten noticeably. There should be no lumps of butter. This step incorporates air, which helps give the cake its tender crumb. Pro tip: If your butter isn’t soft enough, you can cut it into small cubes to help it soften faster.
Step 3: Incorporate the Egg Yolks
Now, add your six golden egg yolks, one at a time. Mix thoroughly after each addition before adding the next. This patience ensures the emulsion stays smooth and creamy. The mixture will become gloriously rich and yellow, almost like a thick custard. If you add them all at once, the batter might split or look curdled. Just take your time here—it’s a meditative part of the process.
Step 4: Add the Dry Ingredients
Sift the flour and baking powder directly into the bowl. This prevents any lumps and aerates the flour for a lighter texture. Gently fold everything together with your spatula. Stop as soon as you no longer see streaks of flour. The dough will be quite thick and hold its shape—this is perfect! Overmixing can make the cake tough, so a light hand is key.
Step 5: The Optional Rum Boost
If you’re using the rum, now’s the time to stir it in. It blends in easily and fills the kitchen with a wonderful, warm aroma. This is my little secret for an extra layer of flavor that keeps people guessing what’s in it. It doesn’t make the cake taste alcoholic at all; it just adds a beautiful, rounded note. If you skip it, your cake will still be fantastic.
Step 6: Shape the Cake Dough
Transfer your lovely, soft dough into your prepared pan. Use a spatula or your fingers to press it down evenly. Aim for a smooth, flat surface. You can even dip your fingers in a little water to prevent sticking while you press. The top doesn’t need to be perfectly smooth, as the glaze will cover it, but try to get it level for even baking.
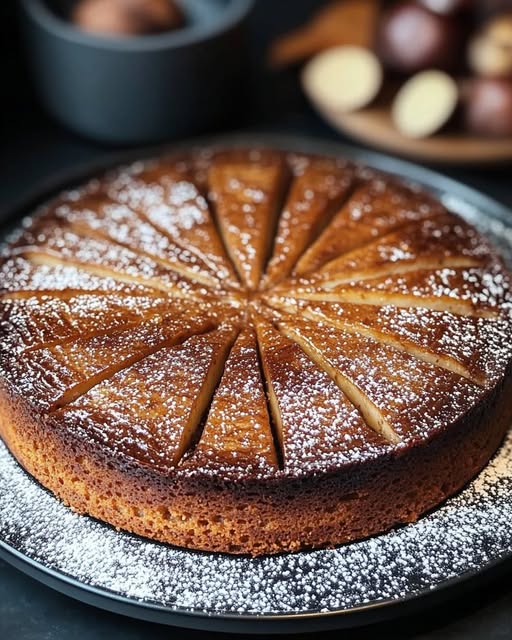
Step 7: Create the Signature Glaze
Take that extra egg yolk and beat it gently in a small bowl with a teaspoon of water. Using a pastry brush, gently paint the entire surface of the cake with this golden wash. This is what gives the authentic Breton cake its stunning, glossy, dark golden top. Be generous but gentle. You can even use a fork to trace a traditional criss-cross or Celtic knot pattern in the wet glaze before baking.
Step 8: Bake to Golden Perfection
Carefully place the pan in the center of your preheated oven. Bake for 40 to 45 minutes. You’ll know it’s done when the top is a deep, uniform golden brown and the edges just begin to pull away from the pan. Chef’s tip: Do not overbake! The center might still look a tiny bit soft, but it will set as it cools. An overbaked cake loses its wonderful moist, dense texture.
Step 9: The All-Important Cool Down
This is the hardest part: waiting. Let the cake cool completely in its pan on a wire rack. This can take a few hours. The cake continues to cook from residual heat and sets its structure as it cools. Trying to cut it warm will lead to a crumbly mess. I know it’s tempting, but patience rewards you with perfect, clean slices.
Timing Your Breton Cake Success
- Prep Time: A quick 15 minutes of active work.
- Cook Time: 45 minutes of baking magic.
- Cooling Time: At least 2 hours (I often let it sit overnight).
- Total Time: About 1 hour active, plus cooling.
- Servings: Easily serves 8-10 people, as a little goes a long way.
The Chef’s Secret Weapon
My absolute secret? Use the best salted butter you can find. Since butter is the dominant flavor, its quality shines through. I splurge on a good French or Irish salted butter for this recipe. The higher fat content and the flavor of the salt make all the difference. It’s the one ingredient I never compromise on for this cake.
A Buttery Bit of Extra Info
In Brittany, they take their butter so seriously there’s even an AOP (Protected Designation of Origin) for “Beurre Breton.” The cows graze on seaside pastures, which is said to give the butter a unique, slightly salty, and mineral-rich flavor. While you don’t need AOP butter for a delicious cake, it’s fun to know you’re working with an ingredient that has such a proud history.
Necessary Equipment
- One 9-inch springform or deep cake pan
- A large mixing bowl
- A wooden spoon or flexible spatula
- A whisk or fork for the glaze
- A pastry brush (or your fingers in a pinch!)
- Wire cooling rack
Storing Your Masterpiece
This cake stores beautifully. Once completely cool, you can keep it right in its pan or transfer it to a plate. Simply cover it loosely with aluminum foil or place a cake dome over it. It does not need to be refrigerated.
At room temperature, your authentic Breton cake will stay fresh and delicious for up to 5 days. The texture actually improves after a day, becoming even more tender and cohesive. If your kitchen is very warm, you can refrigerate it, but let it come back to room temperature before serving for the best flavor and texture.
You can also freeze this cake for longer storage. Wrap the whole cake or individual slices tightly in plastic wrap, then in foil. It will keep frozen for up to 2 months. Thaw overnight at room temperature when you’re ready for a treat.
My Best Tips and Advice
- Butter temperature is key: Too cold and it won’t cream; too warm and the cake can be greasy. It should be soft enough that your finger leaves a clear indent.
- Weigh your ingredients! Baking is a science, and using a kitchen scale for the flour, sugar, and butter ensures perfect results every single time.
- Don’t rush the cooling. I know, I’ve said it before, but it’s the number one reason for a crumbly cake.
- Serve it plain, or fancy it up with a dollop of crème fraîche or a sprinkle of berries on the side.
Presentation Points for Your Table
- Dust with a light snowfall of powdered sugar just before serving.
- Serve on a simple, elegant cake stand to let its golden beauty shine.
- Pair each slice with a small cup of strong espresso or a glass of apple cider.
- For a festive touch, add a few fresh raspberries and a mint leaf on the side of the plate.
Healthier and Fun Variations to Try
While the classic is unbeatable, here are some fun twists on the authentic Breton cake recipe.
- Citrus Zest: Add the grated zest of one lemon or orange to the butter and sugar for a bright, sunny flavor.
- Almond Breton Cake: Replace 50g of the flour with finely ground almonds for a nuttier taste and texture.
- Chocolate Chip: Fold in 100g of dark chocolate chips or chopped chocolate for a delightful surprise in every bite.
- Lavender Honey: Replace 50g of the sugar with lavender-infused honey for a beautifully floral, sophisticated cake.
- Spiced Version: Add a teaspoon of warm spice mix (like cinnamon, cardamom, or ginger) to the flour for a cozy, autumn feel.
- Gluten-Free Breton Cake: Use a reliable cup-for-cup gluten-free flour blend. The result is still wonderfully rich and satisfying.
Common Mistakes to Avoid
Mistake 1: Using Cold Butter
This is probably the most common error. If your butter is straight from the fridge, it won’t cream properly with the sugar. You’ll end up with a lumpy, heavy mixture that won’t incorporate the eggs well. The result is a dense, greasy cake that doesn’t rise as it should. Always plan ahead and let your butter sit out on the counter for at least an hour before you start baking. It should be soft but not melted or oily.
Mistake 2: Overmixing After Adding Flour
Once you add the flour, you need to switch to a gentle hand. Vigorous mixing develops the gluten in the flour, which leads to a tough, chewy cake instead of the desired tender, crumbly texture. We want a shortbread-like quality. Simply fold the flour in until you no longer see any dry streaks. It’s okay if the dough looks a bit shaggy—it will come together as you press it into the pan.
Mistake 3: Skipping the Glaze or Using the Wrong Wash
That glossy, dark gold top is the signature of an authentic Breton cake. Using a whole egg or milk for the glaze won’t give you the same rich color or shine. The high fat content in the egg yolk creates that perfect, deep lacquer. Also, be sure to apply it evenly. A patchy glaze leads to uneven browning. Take your time with the pastry brush for a professional-looking finish.
Mistake 4: Cutting the Cake While It’s Warm
I understand the temptation! The smell is incredible. But this cake is very delicate when hot. Slicing it too soon will cause it to crumble and fall apart. It needs time to set and firm up as it cools. The wait is worth it for clean, beautiful slices that hold their shape. Let it cool in the pan on a rack for at least two hours, or even better, overnight.
Mistake 5: Overbaking the Cake
Because of its dense nature, it’s easy to think a Breton cake needs more time. Overbaking dries it out and can make the edges hard. The cake is done when the top is a deep golden brown and a toothpick inserted near the center comes out with just a few moist crumbs attached. It will continue to cook from residual heat as it cools. Remember, a slightly underdone center is better than an overdone cake.
Your Breton Cake Questions, Answered
Can I use unsalted butter instead?
You absolutely can. The traditional recipe calls for salted butter (“demi-sel”) because the salt heightens the butter’s flavor and balances the sweetness. If you only have unsalted butter, just add a good pinch (about 1/4 to 1/2 teaspoon) of fine sea salt to the flour before mixing it in. The salt is a key flavor component, so don’t leave it out entirely.
Why so many egg yolks? What do I do with the whites?
The egg yolks provide richness, fat, and a beautiful yellow color. They also help bind the dense dough without adding too much liquid, which would change the texture. Don’t waste the whites! You can make meringues, pavlova, or macarons. They’re great for a healthy egg-white omelet or scramble. You can also freeze them in an ice cube tray for later use.
My dough is very thick and hard to spread. Is that normal?
Yes, that’s completely normal! This is not a runny, liquid cake batter. It’s a stiff, cookie-dough-like consistency. Don’t add any extra liquid. Just use your hands or a spatula to press it firmly and evenly into the prepared pan. The heat of the oven will soften it slightly as it bakes, allowing it to settle into a perfectly smooth surface.
Can I make this cake ahead of time?
This is one of the best make-ahead desserts. In fact, its flavor improves after a day or two. The ingredients meld together, and the texture becomes even more perfect. You can bake it up to three days before you need it. Store it well-covered at room temperature. This makes it a stress-free choice for parties and gatherings.
What’s the best way to cut a Breton cake?
Use a sharp, thin-bladed knife. For the cleanest cuts, you can gently wipe the blade with a damp cloth between each slice. Because the cake is so dense and buttery, a sawing motion works better than pressing straight down. Cut it into slender slices or small squares, as it is very rich and a little goes a long way.
Why did my cake sink in the middle?
A slight dip in the center is traditional for a Breton cake. However, a significant sink can happen if the oven temperature was too low, the baking powder was old and lost its potency, or the cake was underbaked. Ensure your oven is properly preheated and use fresh baking powder. The cake is done when it’s deeply golden and a skewer comes out clean.
Can I add fruit or jam to this recipe?
While not traditional for the purist version, a fruit layer is a popular variation. You can spread a thin layer of good-quality apricot or prune jam (a classic in Brittany) over the bottom half of the dough before adding the rest on top. Just be sure to seal the edges well so the jam doesn’t leak out during baking.
Is this cake similar to a pound cake?
They share some similarities, like a rich, buttery flavor. However, a Breton cake is much denser, crumblier, and shorter in texture, more like a giant cookie or shortbread. It uses only egg yolks, not whole eggs, and traditionally has a higher butter-to-flour ratio than a standard pound cake, giving it its unique, melt-in-your-mouth quality.
How do I know when it’s perfectly baked?
Look for three signs: First, the top should be a deep, even golden brown. Second, the edges will have just started to pull away very slightly from the sides of the pan. Third, and most importantly, a toothpick or skewer inserted into the center should come out with a few moist crumbs attached, but not wet batter. It will continue to set as it cools.
Can I double this recipe?
I don’t recommend simply doubling and baking it in one larger pan. The center may not cook through properly. For a larger crowd, it’s better to make two separate batches and bake them in two identical pans. This ensures even baking and the perfect texture you’re looking for in your authentic Breton cake.
The Simple Joy of a Perfect Cake
So there you have it—the secret to a truly spectacular French dessert that requires no fancy skills. This authentic Breton cake is proof that the best things in life are often the simplest. It’s about quality ingredients and a little bit of care. Every time I make it, I’m transported back to that little bakery. Now, my kitchen smells like that memory. I hope this recipe becomes a cherished favorite in your home, too. Bake it, share it, and enjoy the golden, buttery delight. Happy baking
Authentic Breton Cake
Ingredients
Equipment
Method
- Preheat the oven to 170°C (340°F) and butter a 9-inch springform or deep tart pan, dusting with flour.
- Cream the softened butter and sugar in a large mixing bowl until pale and fluffy.
- Add the egg yolks one at a time, mixing thoroughly after each addition.
- Sift the flour and baking powder into the bowl and gently fold together until just combined.
- If using, stir in the optional rum for added flavor.
- Transfer the dough to the prepared pan, pressing it down evenly.
- Beat the extra egg yolk with a teaspoon of water and brush the mixture over the cake's surface.
- Bake for 40 to 45 minutes until the top is a deep golden brown.
- Allow the cake to cool completely in the pan on a wire rack before slicing.