Welcome to My Baked Ziti with Ground Beef Kitchen
Last Tuesday night, my daughter walked through the door after soccer practice and asked the question every parent knows too well: “What’s for dinner?” The smell of bubbling cheese and tomato sauce filled our kitchen, and her face lit up instantly. She knew exactly what was in the oven. Baked Ziti with Ground Beef has that magical power in our house. It turns hungry, tired kids into happy campers within seconds.
I’ve been making this dish for over fifteen years now. It started when my neighbor Maria shared her family recipe with me at a block party. She scribbled it on a napkin, and I’ve been tweaking it ever since. This classic Italian-American comfort food has saved me on countless busy weeknights and impressed guests at more dinner parties than I can count.
What makes this recipe special is its forgiving nature. You can prep it ahead, freeze it for later, or throw it together in under an hour. The combination of tender pasta, savory meat sauce, and melted cheese creates something that feels like a warm hug on a plate. My kids request it for their birthdays more often than cake these days.
Whether you’re cooking for picky eaters, feeding a crowd, or just want leftovers that taste even better the next day, this best baked ziti recipe delivers every single time. I’m excited to walk you through each step so you can create this magic in your own kitchen.
What is Baked Ziti and Why You’ll Love It
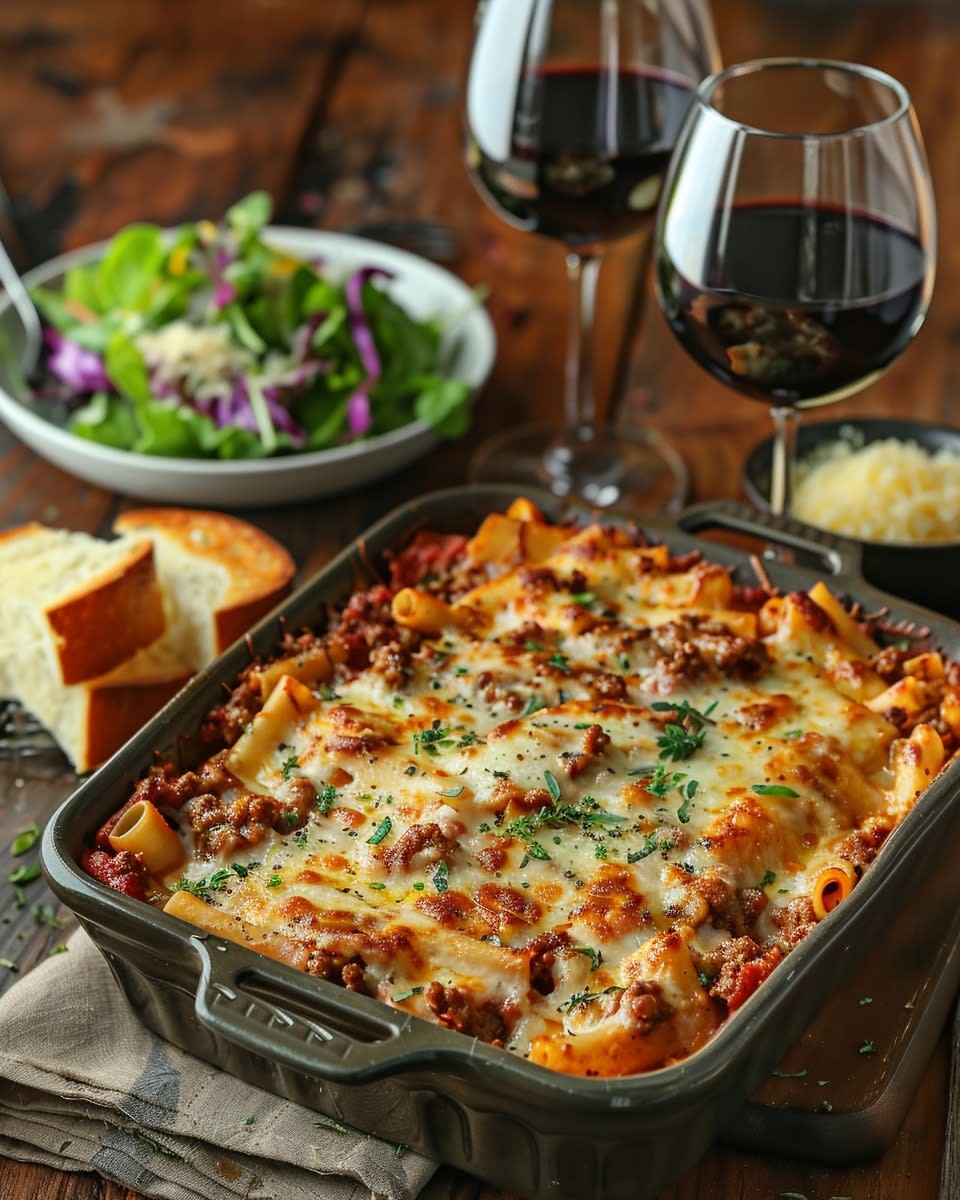
Let me paint you a picture of what baked ziti really is. Imagine tube-shaped pasta coated in rich tomato sauce with browned ground beef, mixed with creamy ricotta, and topped with a golden layer of bubbly mozzarella. That’s baked ziti in its most delicious form.
This hearty casserole originates from Southern Italy, though it’s become a staple in American homes over the decades. The ziti pasta shape is key here. These smooth or ridged tubes are about two inches long and have a hollow center that catches all that wonderful sauce. Every bite gives you the perfect ratio of pasta, meat, and cheese.
People often ask me how baked ziti differs from lasagna. While both are baked pasta dishes with similar ingredients, baked ziti is much simpler to assemble. You don’t need to layer everything precisely like lasagna requires. Just mix most ingredients together, dump them in a pan, top with cheese, and bake. It’s the lazy cook’s dream, and I mean that as the highest compliment.
The beauty of this dish lies in its flexibility. My recipe for baked ziti with meat sauce uses ground beef, but you can easily swap that for Italian sausage. In fact, baked ziti with sausage adds a nice kick of fennel and spice that some families prefer. My husband loves when I use half beef and half sausage for extra flavor depth.
Not everyone eats meat, and that’s perfectly fine. Baked ziti no meat versions work beautifully with just marinara sauce and vegetables. I’ve made meatless baked ziti with mushrooms, spinach, and extra cheese that even my meat-loving father-in-law devoured. The pasta and cheese provide enough heartiness that you won’t miss the meat.
Why This Baked Ziti Recipe Works Every Time
I’ve tested dozens of variations over the years. I’ve tried the baked ziti Pioneer Woman version with its ranch seasoning twist. I’ve attempted baked ziti Giada style with fresh herbs and Italian cheeses. Each recipe taught me something valuable, and I’ve combined the best elements into what I’m sharing with you today.
What makes this the best baked ziti recipe comes down to a few key choices. First, I brown the meat properly. Too many people rush this step, but getting a good sear on your ground beef creates flavor you can’t achieve any other way. Those crispy, caramelized bits are pure gold.
Second, I use a combination of cheeses. The baked ziti with meat and ricotta cheese recipe approach gives you creaminess inside the dish. The ricotta melts into pockets of smooth, mild richness. Then mozzarella on top provides that stretchy, gooey quality everyone craves. Some recipes add parmesan for a sharp, salty finish.
I’ve also experimented with baked ziti with sour cream instead of ricotta. This creates a tangier flavor profile that cuts through the richness of the meat and tomato sauce. My sister swears by this method, and I’ll admit it’s delicious. The sour cream adds moisture and prevents the pasta from drying out during baking.
For those seeking an authentic baked ziti experience, traditional Italian versions keep things simpler than American adaptations. They often skip the ricotta entirely and focus on quality tomato sauce, good pasta, and fresh mozzarella. Both approaches have merit, and I encourage you to try different versions until you find your favorite.
The Secret to Restaurant-Quality Results at Home
Here’s something most recipes won’t tell you: the pasta cooking time matters more than you think. I undercook my ziti by about three minutes. It seems wrong when you’re draining pasta that’s still quite firm, but remember it will continue cooking in the oven. Overcooked pasta turns mushy and loses its structure.
Another trick involves letting your meat sauce simmer for at least twenty minutes. This isn’t just about cooking the meat through. The extra time allows flavors to marry and the sauce to thicken properly. Watery sauce leads to soupy baked ziti, and nobody wants that.
I always reserve some pasta water before draining. This starchy liquid is liquid gold for adjusting your sauce consistency. If your meat sauce looks too thick, a splash of pasta water loosens it up while adding body. This chef’s trick works for any pasta dish.
Room temperature matters too. I let my ricotta mixture sit out while I prepare everything else. Cold ricotta doesn’t mix as smoothly with the hot pasta and can create clumps. Small details like this separate good baked ziti from great baked ziti.
The final secret is patience after baking. I know that bubbling, golden-brown casserole looks irresistible straight from the oven. But waiting ten minutes allows everything to set up properly. Your slices will hold their shape instead of sliding into a puddle on the plate. Use that time to make a quick salad or garlic bread.
My family gathers around the table with excitement every time I make this dish. The aroma alone gets everyone talking and laughing before we even take the first bite. That’s the real magic of Baked Ziti with Ground Beef. It brings people together and creates memories around simple, delicious food.


Gathering Your Ingredients for Perfect Baked Ziti
Now that you understand what makes this dish work so well, let’s talk about what you’ll actually need to grab from your pantry and fridge. I’m the kind of cook who likes to lay everything out on the counter before I start. My husband teases me about it, but having all my ingredients ready prevents that frantic moment when you’re halfway through cooking and realize you’re missing something crucial.
The star of the show is obviously the ziti pasta. You’ll need about a pound for a standard 9×13 baking dish. If you can’t find ziti at your store, don’t panic. Penne, rigatoni, or even mostaccioli work just fine. The important thing is choosing a tube-shaped pasta with enough structure to hold up to baking. I once tried making this with spaghetti during a snowstorm when my pantry was bare, and let me tell you, it was a disaster. The texture was all wrong.
For the meat component, I typically use one and a half pounds of ground beef. I go for 85/15 because it has enough fat to create flavor without making the dish greasy. The leaner 90/10 works too, but you might want to add a drizzle of olive oil while browning to prevent dryness. Ground chuck gives you that rich, beefy taste that makes this comfort food sing.
Your sauce base needs about 24 ounces of good marinara sauce. I’m not picky about brands here. Sometimes I use jarred sauce from Rao’s when I’m feeling fancy, other times it’s whatever’s on sale. What matters more is adding your own touches to it, which we’ll get into shortly. By the way, if you’re into experimenting with different pasta sauces, you might enjoy trying something completely different like my Turkish Yogurt Beef Pasta for a tangy twist on beef and pasta combinations.
The cheese situation requires three players. First up is 15 ounces of ricotta cheese. Full-fat ricotta gives you the creamiest results, though part-skim works if you’re watching calories. I’ve noticed ricotta varies wildly between brands. Some are thick and smooth, others are grainy and watery. Galbani and Polly-O are my go-to brands because they’re consistently creamy.
Next, you’ll need about two cups of shredded mozzarella cheese. I buy the low-moisture variety because fresh mozzarella releases too much water during baking. Half goes into the pasta mixture, and the other half blankets the top for that gorgeous golden crust. Shredding your own from a block tastes better than pre-shredded, but I won’t judge if you take the shortcut. We’re all busy.
Finally, grab half a cup of grated Parmesan cheese. Please, I’m begging you, skip the green can stuff. Real Parmigiano-Reggiano or even Grana Padano makes such a difference. It adds a nutty, salty depth that completes the cheese trifecta. If you’ve ever made Spinach Ricotta Stuffed Shells, you know how important quality cheese is to Italian-style baked pasta dishes.
Fresh herbs transform this from good to exceptional. I keep fresh basil and oregano on my windowsill year-round. You’ll want about a quarter cup of chopped basil and a tablespoon of oregano. Dried herbs work in a pinch, but use less since they’re more concentrated. The smell of fresh basil mixing with tomato sauce is one of life’s simple pleasures.
Here’s something interesting. Some folks swear by adding sour cream instead of ricotta. My friend Janet makes her baked ziti with sour cream, and it creates this tangy richness that’s honestly addictive. If you go this route, use the same amount as you would ricotta. The texture ends up slightly looser but equally delicious.
Don’t forget the supporting cast: one medium onion, four cloves of garlic, salt, black pepper, red pepper flakes if you like heat, and a bit of sugar to balance the tomato acidity. I also keep a box of chicken or beef broth handy for adjusting consistency.
Building Your Meat Sauce from the Ground Up
Alright, this is where the real cooking begins. Your meat sauce makes or breaks this entire dish. I’ve eaten plenty of mediocre baked ziti where someone just dumped raw ground beef and cold sauce together. That’s not what we’re doing here.
Start by heating a large, deep skillet over medium-high heat. I use my 12-inch cast iron because it distributes heat evenly and goes from stovetop to oven if needed. Add your ground beef to the dry pan. Yes, dry. The beef has enough fat that you don’t need oil initially.
Here’s where people usually mess up. They start poking and stirring the meat immediately. Resist that urge. Let it sit undisturbed for about three minutes. You want that beautiful brown crust forming on the bottom. That’s called the Maillard reaction, and it creates incredible depth of flavor. When you finally do break it up, use a wooden spoon or potato masher to create small crumbles rather than large chunks.
Once your beef is about 70% browned, add your diced onion right into the same pan. Funny enough, I used to cook the onions first in a separate step, but combining them lets the onions pick up all those meaty bits stuck to the pan. Cook everything together for another five minutes until the onions turn translucent and sweet-smelling.
Push everything to the sides of your pan and add minced garlic to the center. Give it just 30 seconds until it becomes fragrant. Garlic burns easily, and burnt garlic tastes bitter and awful. Trust me, I’ve ruined more than one batch by getting distracted by my phone during this step.
Now pour in your marinara sauce. Some people make their own sauce from scratch with canned tomatoes, and that’s wonderful if you have time. I usually don’t. A good jarred marinara doctored up properly tastes nearly as good as homemade. Add a teaspoon of sugar to cut the acidity, a pinch of red pepper flakes for warmth, and whatever dried Italian herbs you like.
This is the crucial part: let everything simmer together for at least 20 minutes. I actually prefer 30 if I’m not rushing. Reduce the heat to low, partially cover the pan, and let those flavors get to know each other. The sauce should thicken and reduce slightly. Stir occasionally to prevent sticking.
If you’re making baked ziti with sausage instead of ground beef, remove the casings first and treat it exactly the same way. Italian sausage brings fennel, garlic, and sometimes heat that adds complexity. I’ve also done half beef and half sausage for the best of both worlds. That combination reminds me of the rich meat sauces in dishes like One Pot Creamy Chicken Alfredo Pasta, where the protein really shines through.
For those making baked ziti no meat or meatless baked ziti, you’ll skip the browning step entirely. Instead, sauté your onions and garlic in olive oil, then add vegetables like mushrooms, zucchini, or spinach. Let them cook down before adding sauce. Mushrooms especially provide an umami richness that somewhat mimics meat. I dice them small so my kids don’t pick them out.
The authentic baked ziti approach from Southern Italy often uses a simple tomato sauce without meat at all, focusing on quality ingredients and proper technique. My grandmother’s version was just tomatoes, garlic, basil, and good olive oil simmered for hours. Sometimes simple is best.
Taste your sauce and adjust the seasoning. It should be slightly oversalted at this point because the pasta and cheese will dilute it later. This is also when I add fresh herbs if I’m using them. Basil goes in at the end to preserve its bright flavor. Oregano can handle longer cooking.
One last trick I learned from watching too many cooking shows: add a pat of butter at the end. Just one tablespoon stirred in creates a silky, restaurant-quality finish. The sauce coats the pasta more evenly and tastes richer. It’s a small detail that makes people wonder what your secret is.
If your sauce looks too thick, thin it with pasta cooking water or broth. Too thin? Let it simmer uncovered for another ten minutes. The consistency should coat a spoon but still pour easily. Think somewhere between marinara and bolognese. That perfect texture ensures your recipe for baked ziti with meat sauce comes out cohesive rather than dry or soupy.
While your sauce simmers, you’ve got time to prep your cheese mixture and get your pasta water boiling. This overlapping of tasks is how you get dinner on the table efficiently. I’ve gotten pretty good at timing everything so the sauce finishes right when my pasta is done. It’s like a delicious orchestra where everything comes together at once. Similar to making Garlic Butter Shrimp Linguine, timing is everything when coordinating multiple components.


Bringing It All Together: Assembling Your Baked Ziti
Alright, you’ve got your sauce bubbling away and your kitchen smells absolutely incredible. Now comes the fun part where everything transforms from separate components into that glorious casserole we’ve been working toward. Before you do anything else, crank your oven to 375°F. I learned the hard way that starting to assemble before preheating means you’re standing there with a full pan, waiting for the oven to heat up while your pasta gets cold and sad.
While your oven heats, get a large pot of water boiling for the pasta. And I mean large. You need at least six quarts of water with a generous handful of salt. My Italian neighbor once told me the water should taste like the sea, and she wasn’t wrong. Undersalted pasta water equals bland pasta, and no amount of sauce fixes that.
Drop your pound of ziti into the rolling boil. Set your timer for exactly three minutes less than the package directions suggest. Seriously, I’m not kidding about this. If the box says eleven minutes, cook for eight. The pasta seems way too firm when you drain it, almost crunchy in the center. That’s exactly what you want. It’ll finish cooking in the oven, and this prevents that mushy texture nobody enjoys.
Here’s something I do that most recipes skip: I save a full cup of that starchy pasta water before draining. Keep it in a mug right next to your work area. You might need it to loosen your sauce or adjust consistency later. It’s insurance against a dry casserole.
Drain your pasta but don’t rinse it. Rinsing washes away the surface starch that helps sauce cling to each tube. Just give the colander a good shake and return the pasta to the empty pot. This is when I add about half my meat sauce directly to the pasta and toss everything together. Coating the pasta before it hits the baking dish ensures every single piece gets flavored.
Now let’s talk about the cheese situation. In a separate bowl, combine your ricotta, one egg, half the mozzarella, half the Parmesan, a pinch of salt, and some black pepper. That egg might seem weird, but it acts as a binder and gives the ricotta a custardy texture once baked. Beat everything together with a fork until smooth and creamy.
If you’re going the baked ziti with sour cream route instead, the method stays the same. Just swap the ricotta for an equal amount of full-fat sour cream. My sister swears this version has better tang and moisture. She’s not wrong, though I prefer the traditional milder ricotta flavor most of the time.
Grab your 9×13 baking dish. I use a deep one because shallow pans lead to overflow disasters in the oven. Spray it with cooking spray or rub it with butter. Skipping this step means you’ll be chiseling burnt cheese off the edges later, and that’s no fun for anyone.
Here’s where opinions differ wildly. Some people do careful layers like lasagna. I used to do that too, following every baked ziti Pioneer Woman and baked ziti Giada recipe I could find. Then one frantic weeknight, I just dumped everything together and mixed it in the pan itself. Guess what? It tasted exactly the same, and I saved fifteen minutes.
So here’s my actual method: Pour half your sauced pasta into the prepared dish. Dollop spoonfuls of the ricotta mixture all over, then spread it gently with the back of your spoon. It doesn’t need to be perfectly smooth. Add the remaining pasta on top, then pour your remaining meat sauce over everything. Use a fork to poke holes here and there so the sauce seeps down into the lower layers.
But if you’re a traditionalist making an authentic baked ziti or following a specific recipe for baked ziti with meat sauce, go ahead and do proper layers. Start with a thin layer of meat sauce on the bottom to prevent sticking. Then pasta, ricotta mixture, meat sauce, mozzarella, and repeat. End with sauce and a generous blanket of the remaining mozzarella and Parmesan on top.
That cheese topping is crucial. Don’t be stingy here. A thick layer of cheese creates that golden, bubbling crust everyone fights over. I make sure to spread it all the way to the edges because the corner pieces with their extra crispy cheese are the best part.
For a more indulgent twist on the baked ziti with meat and ricotta cheese recipe, try spreading a thin layer of sour cream between the pasta layers even if you used ricotta. I know it sounds excessive, but that extra tanginess cuts through the richness beautifully. My uncle does this at every holiday gathering, and his pan always disappears first.
Cover your assembled dish tightly with aluminum foil. This is important for the first part of baking because it traps steam and helps everything heat through evenly without the top burning. I press the foil shiny-side down but honestly, I don’t think it matters much despite what the internet argues about.
Slide your covered pan into that preheated 375°F oven. Set your timer for 25 minutes. During this time, the pasta finishes cooking, the cheese melts into gooey perfection, and all those flavors marry together. Your house will smell so good that family members start hovering around the kitchen asking when dinner’s ready.
After 25 minutes, carefully remove the foil. Watch out for the steam blast that’ll hit you right in the face if you’re not careful. I’ve learned to stand back and peel from the far edge. Return the uncovered dish to the oven for another 15 to 20 minutes.
You’re looking for a golden-brown top with cheese bubbling enthusiastically around the edges. Some darker spots are perfect. Those crispy bits have concentrated flavor that makes people close their eyes when they eat them. If your top isn’t browning enough, turn on the broiler for the last two minutes. But stay right there watching because the difference between perfectly browned and burnt happens in about 30 seconds under a broiler.
When you pull out your finished masterpiece, it looks and smells like something from a fancy Italian restaurant. But here’s the hardest part: you absolutely must let it rest for 10 to 15 minutes before serving. I know it’s torture. That bubbling, gorgeous casserole is calling your name.
However, cutting into it immediately results in a lava-hot, soupy mess that slides all over the plate. Resting allows the cheese to set up and the sauce to thicken slightly. Your slices will hold their shape beautifully, making for much nicer presentation. Use this time to throw together a quick salad or toast some garlic bread.
By the way, if you’re making baked ziti no meat or meatless baked ziti, the assembly and baking process stays exactly the same. Your vegetable-loaded marinara works perfectly with the same technique. I’ve made vegetarian versions with roasted eggplant, sautéed mushrooms, and fresh spinach that even my meat-loving family devoured without complaint. Funny enough, my brother once ate three helpings before realizing there wasn’t any meat in it.
For baked ziti with sausage, everything proceeds identically except your sauce has that extra fennel and spice going on. Sometimes I remove the casings from Italian sausage links and crumble them like ground beef. Other times I slice cooked sausages into coins for a more rustic look. Both methods work great.
Here’s something interesting about making the best baked ziti recipe: it actually tastes better the next day. The flavors have more time to develop, and reheated slices are somehow even more delicious. I sometimes make this on Sunday specifically for Monday and Tuesday leftovers. My kids take it in their lunch thermoses and come home with empty containers every time.
Speaking of meal planning, thinking about long-term eating habits makes a difference in how we approach comfort food. According to the National Institutes of Health’s guidance on long-term healthy eating, balancing indulgent dishes with vegetables and whole grains throughout the week helps maintain both satisfaction and nutrition. I serve this rich pasta alongside a big green salad and call it balanced.
You can absolutely prep this entire dish ahead of time. Assemble it completely, cover it tightly with plastic wrap and then foil, and refrigerate for up to 24 hours before baking. You’ll need to add about 10 extra minutes to the covered baking time since it’s starting cold. This makes it perfect for entertaining because all the work happens earlier when you’re not stressed about guests arriving.
Freezing works beautifully too. I often make two pans, bake one for dinner, and freeze the second unbaked. Wrap it extremely well in plastic wrap and two layers of heavy-duty foil. It’ll keep for up to three months. Thaw it overnight in the fridge before baking as directed. Alternatively, you can bake it frozen by adding 30 to 40 minutes to the cooking time while keeping it covered.
If you’re passionate about different pasta preparations and want to explore more comforting options, you’ll find plenty of inspiration browsing through various pasta and noodles recipes that each bring their own special twist to weeknight dinners.
When serving, I like to let people add extra Parmesan and red pepper flakes at the table. A sprinkle of fresh basil on top makes it look restaurant-fancy with minimal effort. Pair it with garlic bread for sopping up extra sauce, and you’ve got a complete meal that satisfies even the pickiest eaters.
The beauty of this dish is that it scales beautifully. Making it for just two people? Cut everything in half and use an 8×8 pan. Feeding a crowd? Double the recipe and use a large roasting pan. The technique stays exactly the same regardless of size. I’ve made this in individual ramekins for dinner parties, and guests love having their own personal portion with extra crispy edges.
Every time I pull this Baked Ziti with Ground Beef from the oven, I feel like I’ve accomplished something meaningful. It’s not complicated cooking, but it’s the kind of food that brings people together around the table. We linger over second helpings, talking and laughing, and that’s what home cooking should do. It should nourish both body and soul, creating moments we remember long after the dishes are washed.
Frequently Asked Questions About Baked Ziti
What makes the best baked ziti recipe stand out from others?
The best baked ziti recipe balances properly cooked pasta, well-seasoned meat sauce, and the right cheese combination. The secret lies in undercooking the pasta slightly, letting your sauce simmer long enough to develop flavor, and not skimping on quality cheese. Attention to small details like letting the dish rest before serving and achieving that golden-brown top separates mediocre versions from exceptional ones. It’s really about technique as much as ingredients.
Can I use other types of pasta if I can’t find ziti?
Absolutely, and I do this all the time. Penne, rigatoni, mostaccioli, or even large shells work perfectly fine. The key is choosing a pasta shape with enough structure to hold up during baking and ideally one that catches sauce well. Tube-shaped or ridged pasta works best because smooth, long pasta like spaghetti doesn’t have the same texture once baked. I’ve even used cavatappi in a pinch, and it turned out great with all those spiral ridges holding onto the cheese.
How can I make baked ziti without meat that’s still satisfying?
Making baked ziti no meat or meatless baked ziti is easier than you’d think. Sauté vegetables like mushrooms, zucchini, spinach, or eggplant until they’re nicely browned, then mix them with your marinara. Mushrooms especially provide an umami depth that mimics meatiness. You can also add more cheese or include white beans for protein and heartiness. The pasta and cheese provide enough substance that most people won’t miss the meat at all, and it’s a great way to pack in extra vegetables.
What’s the real difference between baked ziti and lasagna?
Both are Italian-American baked pasta dishes with similar ingredients, but the main difference is assembly. Lasagna requires precise layering of flat noodles with filling between each layer, which takes more time and attention. Baked ziti simply mixes tubular pasta with sauce and cheese, then gets topped with more cheese before baking. It’s much faster and more forgiving. Think of baked ziti as lasagna’s easier, less fussy cousin that still delivers all that cheesy, saucy goodness we crave from baked pasta.
What are the differences between recipes like baked ziti Pioneer Woman or baked ziti Giada?
Different chefs put their own spin on this classic. The baked ziti Pioneer Woman version often includes ranch seasoning mix for extra flavor and sometimes cream cheese for richness. Baked ziti Giada tends toward more authentic Italian preparations with fresh herbs and sometimes Fontina cheese instead of just mozzarella. Some recipes use all ricotta, others use sour cream, and some skip dairy in the filling entirely. The basic concept remains the same, but these variations let you customize based on what flavors appeal to your family most.
Can I prepare baked ziti ahead of time for easier entertaining?
Yes, and this is actually one of my favorite features of this dish. You can assemble it completely up to 24 hours in advance, cover it tightly, and refrigerate until you’re ready to bake. Just remember to add about 10 extra minutes to the baking time since it’s starting cold from the fridge. This makes it perfect for dinner parties, holiday gatherings, or busy weeknights when you want a home-cooked meal without the last-minute stress. Everything’s ready to go when you need it.
How should I store leftover baked ziti to keep it fresh?
Let your baked ziti cool to room temperature, then transfer portions to airtight containers. It’ll stay fresh in the refrigerator for up to four days. I actually think it tastes even better on day two after the flavors have had more time to marry. Reheat individual portions in the microwave for about two minutes, or reheat the whole pan covered with foil in a 350°F oven for about 20 minutes. Add a splash of water or broth before reheating if it looks dried out.
Can I freeze baked ziti for later meals?
Freezing works wonderfully with this dish. You can freeze it either before or after baking. For unbaked, assemble completely, wrap extremely well in plastic wrap and heavy-duty foil, and freeze for up to three months. Thaw overnight in the fridge before baking as usual. For already-baked ziti, let it cool completely, portion it out, and freeze in airtight containers. Frozen baked portions reheat beautifully in the microwave or oven. I always keep a portion or two in my freezer for emergency dinners.
What side dishes pair well with baked ziti?
Since baked ziti is rich and hearty, I balance it with lighter sides. A simple green salad with vinaigrette cuts through the richness perfectly. Garlic bread is traditional and great for sopping up sauce, though it adds more carbs. Roasted vegetables like broccoli, green beans, or asparagus add color and nutrition to the plate. My family loves it with Caesar salad and crusty bread. Some people serve it with a side of meatballs, but honestly, the dish is filling enough on its own.
How do I prevent my baked ziti from coming out too dry or too watery?
Dry baked ziti usually means the pasta was overcooked initially or the sauce was too thick. Remember to undercook the pasta by three minutes and keep your meat sauce on the looser side before mixing. Watery baked ziti happens when your sauce hasn’t simmered long enough to thicken or you used too much liquid. Make sure to simmer your meat sauce for at least 20 minutes uncovered toward the end so excess moisture evaporates. Letting the finished dish rest for 10 minutes also allows everything to set up properly and prevents that soupy consistency.
I hope this helps you create a Baked Ziti with Ground Beef that becomes a regular request in your household. Don’t be afraid to make it your own by adjusting seasonings or trying different cheese combinations until you find what your family loves most. The best recipe is always the one that gets everyone excited to gather around your table.
Ingredients
Equipment
Method
- Préchauffez le four à 375°F (190°C).
- Dans une grande poêle, faites dorer la viande hachée à feu moyen-vif sans remuer pendant environ 3 minutes.
- Une fois la viande dorée, ajoutez l'oignon en dés et faites cuire jusqu'à ce qu'il soit translucide.
- Poussez le mélange sur le côté et ajoutez l'ail émincé, en cuisinant jusqu'à ce qu'il soit parfumé.
- Incorporez la sauce marinara avec du sucre, du sel, du poivre et des herbes optionnelles; laissez mijoter pendant au moins 20 minutes.
- Pendant ce temps, faites bouillir une grande casserole d'eau salée et faites cuire les ziti pendant 3 minutes de moins que les instructions du paquet; égouttez mais ne rincez pas.
- Dans un bol, mélangez la ricotta, l'œuf battu, la moitié de la mozzarella, la moitié du parmesan et les assaisonnements.
- Incorporez la moitié de la sauce à la viande avec les ziti égouttés dans la casserole.
- Dans un plat de cuisson graissé de 9x13, étalez la moitié du mélange de pâtes, déposez le mélange de ricotta, puis couvrez avec le reste des pâtes et de la sauce à la viande.
- Couvrez avec du papier d'aluminium et faites cuire pendant 25 minutes, puis retirez le papier et ajoutez le reste des fromages sur le dessus; faites cuire pendant encore 15-20 minutes jusqu'à ce qu'il soit doré et bouillonnant.
- Laissez reposer pendant 10-15 minutes avant de couper et de servir.