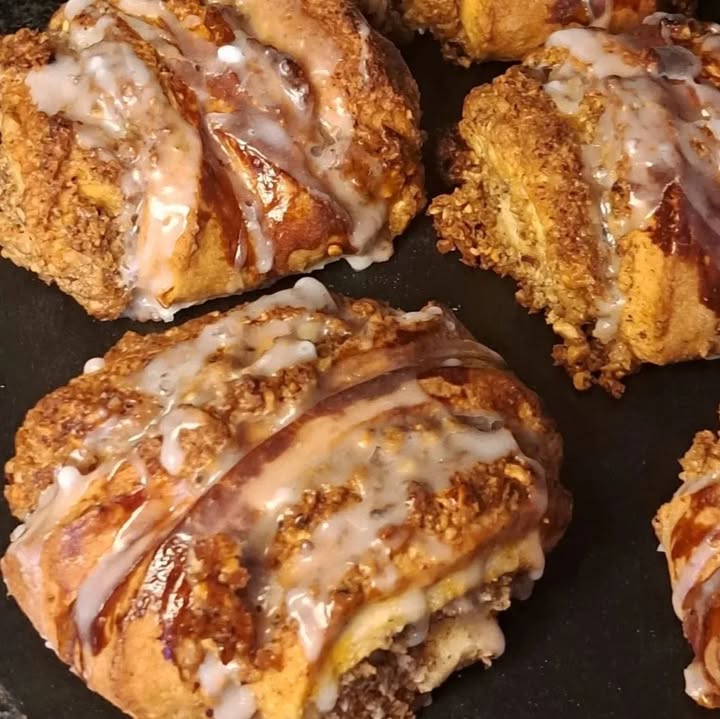
A Twist on Tradition: My “Cinnamon Scroll” Nut Rolls
You know that amazing smell when you walk past a bakery? The one that makes you stop and take a deep, happy breath? That was my kitchen today. I was making our family’s favorite nut rolls, but I gave them a cheeky little makeover. Instead of the usual round loaf, I made them look like gorgeous, rustic scrolls. I pressed them flat with a wooden spoon, just like German Franzbrötchen. The result? More of that delicious, buttery nut filling bubbling to the surface in every single bite. They were a total game-changer.
The Humble Nut Roll Gets a Glow-Up
Nut rolls are a treasure in many European bakeries. They’re a symbol of home, patience, and sweet rewards. My grandma made hers in a perfect spiral, sliced into thick, shareable rounds. They were beautiful. But I’m a bit impatient, and I love lots of filling and crispy edges. One day, I was making cinnamon rolls and thought, “What if I treated the nut roll dough the same way?” That’s how these “Cinnamon Scroll” nut rolls were born. It’s a fun mix of old-world tradition and my own modern, messy, kitchen-happy spin.
Why These Nut Rolls Will Steal Your Heart
First, they fill your home with the most incredible scent of baking nuts, butter, and cinnamon. It’s pure comfort. Second, the texture is magic. The dough bakes up fluffy and soft, while the filling gets a bit crispy on top. Every bite has the perfect balance of sweet, nutty, and cozy spice. And honestly, they look so impressive on a plate, like you spent all day in a fancy patisserie. The secret’s in that simple press with a spoon handle!
When to Bake a Batch of This Happiness
These aren’t just for holidays, though they’d be a star on any Christmas morning or Easter brunch table. I love making them for a cozy weekend breakfast, a treat for the school bake sale, or as a “just because” gift for a neighbor. They make any coffee date feel special and are the perfect edible “thank you.” Basically, any occasion that calls for a hug in food form is the right occasion.
Gathering Your Ingredients for Nut Roll Success
Let’s get everything on the counter! You’ll need simple things, likely already in your pantry.
For the Dough:
- 200 ml (a little under 1 cup) lukewarm milk
- 80 g (about ⅓ cup + 1 tbsp) granulated sugar
- 20 g fresh yeast (or one ¼-oz packet of active dry yeast)
- 60 ml (¼ cup) neutral oil, like vegetable or canola
- 1 egg (we’ll separate the yolk for later)
- 1 packet (about 1 tbsp) vanilla sugar, or 1 tsp vanilla extract
- 4 “glasses” of flour (using a 200ml glass as measure), roughly 500-520g (about 4 cups + 2 tbsp)
- 1 tbsp soft butter
For the Filling:
- 1 glass (200ml measure) ground hazelnuts
- 1 glass (200ml measure) chopped hazelnuts
- 6 tbsp granulated sugar
- 2 packets vanilla sugar (or 2 tsp vanilla extract)
- 70 ml (⅓ cup) melted butter
- 70 ml (⅓ cup) milk
- 1 small tsp ground cinnamon
For the Glaze:
- 1 glass (200ml measure) powdered sugar
- Fresh lemon juice, just a little
No Hazelnuts? No Problem! Try These Swaps
Don’t worry if you’re missing something. Baking is about creativity!
For the nuts: Walnuts or pecans work wonderfully. You can use all ground or all chopped, but the mix gives great texture.
For the milk: Any milk you have works—whole, 2%, or even a plant-based version like almond or oat milk.
For the fresh yeast: Use one standard packet (7g or 2¼ tsp) of active dry yeast. Just dissolve it in the lukewarm milk with the sugar.
For the vanilla sugar: Substitute with an equal amount of granulated sugar and add 1 tsp of vanilla extract to the wet ingredients.
Let’s Make These Irresistible “Cinnamon Scroll” Nut Rolls!
Step 1: Wake Up the Yeast and Make the Dough
Start by taking your lukewarm milk. It should feel like a warm bath, not hot, or you’ll harm the yeast. Stir in the sugar and the fresh yeast until it all dissolves. This is the magical moment where your baking begins. In a large bowl, combine the yeast mixture, oil, the egg white (save that yolk!), and vanilla. Start adding the flour, one glass at a time, mixing as you go. Once it comes together, turn it out onto a floured surface. Knead for about 5-7 minutes until it’s smooth and elastic. Now, add that tablespoon of soft butter and knead it right in. The dough will become silky and wonderful.
Pro tip: A good test is the “windowpane test.” Stretch a small piece of dough. If you can stretch it thin enough to see light through it without it tearing, it’s perfect!
Step 2: The First Rise – Let It Rest and Grow
Place your beautiful, soft dough ball into a lightly oiled bowl. Turn it once to coat it in oil. This prevents a dry skin from forming. Cover the bowl with a clean kitchen towel or plastic wrap. Find a warm, draft-free spot in your kitchen. I like the turned-off oven with the light on. Let the dough rest here for about one hour. It should double in size, looking all puffy and proud. This waiting time is perfect for making the incredible filling.
Step 3: Mix the Dreamy Nut Filling
While the dough rises, make the star of the show. In a medium bowl, combine the ground and chopped hazelnuts, sugar, vanilla sugar, and cinnamon. Pour in the melted butter and milk. Stir everything together until it resembles a thick, fragrant paste. The smell alone is divine – nutty, buttery, and sweet with a hint of warm spice. Set this aside until your dough is ready.
Step 4: Roll, Fill, and Create the Scroll Shape
Punch down the risen dough to release the air. On a lightly floured surface, roll it out into a large rectangle, about ¼ inch thick. Spread the nut filling evenly over the entire surface, leaving just a tiny border along one long edge. Now, starting from the opposite long side, roll the dough up tightly, like a jelly roll. Pinch the seam to seal it.Use a sharp knife to cut the roll into strips about 1.5 inches wide. Here’s the fun part! Take the handle of a wooden spoon and press it firmly straight down into the center of each roll. This flattens it and pushes the filling up in gorgeous swirls.
Chef’s tip: For easy cutting, use unflavored dental floss. Slide it under the roll, cross the ends over the top, and pull. It gives clean cuts without squishing.
Step 5: Bake to Golden Perfection
Place your shaped scrolls on a baking tray lined with parchment paper. Give them a little space to spread. Lightly beat the reserved egg yolk with a teaspoon of water or milk. Gently brush this egg wash over the tops of each roll. This is what gives them that gorgeous, shiny, deep golden-brown color. Bake in a preheated oven at 350°F (180°C) for about 20-25 minutes. They’re done when they sound hollow if tapped on the bottom and are a beautiful golden brown.
Step 6: The Sweet Lemon Glaze Finish
Let the baked rolls cool on the tray for about 10 minutes. They should still be warm but not piping hot. In a small bowl, mix the powdered sugar with just enough lemon juice to make a thick but pourable glaze. Drizzle this artfully over the warm nut rolls. The slight tang of lemon cuts through the sweetness perfectly. The glaze will set as they cool completely.
Your Baking Timeline
- Prep Time: 30 minutes
- Rising Time: 1 hour
- Cook Time: 25 minutes
- Cooling & Glazing: 15 minutes
- Total Time: About 2 hours 10 minutes
The Secret to the Best Texture
The real magic happens with that spoon handle press. Don’t be shy! Press down firmly right through the center. This not only creates the signature look but also ensures the filling oozes up and caramelizes slightly on the surface. It gives you the perfect mix of soft dough, creamy filling, and delightful crispy bits all in one bite.
A Little Nutty History
Did you know recipes similar to nut rolls traveled to America with Central and Eastern European immigrants? They were often called “potica,” “kolach,” or “orechovník.” Bakers used rich, local nuts and whatever sweeteners they had. My twist with the scroll shape is just the latest chapter in this delicious, ever-evolving story of home baking.
Tools You’ll Need in Your Kitchen
- Large mixing bowl
- Measuring cups and spoons or a kitchen scale
- Rolling pin
- Wooden spoon (for mixing AND shaping!)
- Sharp knife or dental floss
- Baking sheet
- Parchment paper
- Pastry brush (for the egg wash)
How to Keep Your Nut Rolls Fresh and Tasty
Once completely cool, store these nut rolls in an airtight container at room temperature. They will stay fresh and delicious for 2-3 days. The glaze helps keep them moist. If you live in a very humid climate, you can store them in the fridge to prevent the glaze from getting sticky, but let them come to room temperature before serving for the best flavor and texture.
For longer storage, these scrolls freeze beautifully. Wrap them individually in plastic wrap and then place them in a freezer bag. They can be frozen for up to 2 months. When you’re ready for one, simply thaw it at room temperature or warm it gently in the oven or microwave. It’s like having a fresh bakery treat anytime!
I do not recommend storing them in the fridge for more than a day unless necessary, as the cool, dry air can actually dry out the bread faster. The counter is their happy place.
My Top Tips for Guaranteed Success
- Lukewarm is key: Always test your milk or water for the yeast on your wrist. It should feel warm, not hot.
- Flour power: The amount of flour can vary based on humidity. Add the last glass gradually until the dough is soft and just slightly sticky, not dry.
- Patience with the rise: If your kitchen is cool, the rise might take longer. Give it time until it’s truly doubled.
- Sharp cuts: Use a very sharp knife or floss to cut the rolls for clean shapes that won’t deform.
Making Them Look Like They Came from a Bakery
- Arrange them on a simple wooden board or a vintage cake stand.
- Dust with a little extra powdered sugar just before serving for a snowy effect.
- Serve with fresh berries on the side for a pop of color and freshness.
- Package them in a clear cellophane bag tied with twine for a lovely homemade gift.
Six Fun Flavor Twists to Try
1. Chocolate-Hazelnut Bliss: Stir 3 tablespoons of cocoa powder into the nut filling. Add a handful of chocolate chips for melty pockets.
2. Apple-Cinnamon Walnut: Replace hazelnuts with walnuts. Mix in ½ cup of finely diced, peeled apple into the filling for a fruity twist.
3. Almond Joy Inspired: Use ground almonds and add ½ cup of shredded coconut to the filling. A drizzle of chocolate glaze on top is a must!
4. Espresso Pecan: Use pecans. Dissolve 1 tablespoon of instant espresso powder in the milk before adding it to the filling for a coffee kick.
5. Apricot & Pistachio: Swap hazelnuts for pistachios. Spread a thin layer of apricot jam on the dough before adding the nut filling.
6. Savory Cheese & Herb: Skip the sugar and vanilla in the dough. Fill with a mix of grated cheese (like cheddar and parmesan), fresh herbs, and a little garlic powder.
Common Mistakes to Avoid for Perfect Nut Rolls
Mistake 1: Killing the Yeast with Hot Liquid
This is the number one reason dough doesn’t rise. If your milk or water is too hot, it will kill the yeast cells. Your dough will just sit there, sad and flat. Always aim for “lukewarm.” A good trick is to test it on the inside of your wrist. It should feel warm and comfortable, not hot. If you can’t feel the temperature, it’s just right.
Mistake 2: Not Letting the Dough Rise Fully
I know, waiting is hard! But the first rise is crucial for developing flavor and creating that light, airy texture. Don’t rush it by putting the dough in a cold spot. Find a warm place, like an oven with just the light on. The dough is ready when it has clearly doubled in size and holds an indentation when you gently poke it with a finger. This patience pays off in every fluffy bite.
Mistake 3: Rolling the Dough Too Thin
If you roll your dough rectangle too thin, it can tear when you add the filling and roll it up. You also won’t get that lovely, substantial bread layer around the filling. Aim for about a ¼-inch thickness. It should be sturdy enough to handle but still pliable. This ensures your scrolls have the perfect dough-to-filling ratio.
Mistake 4: Skipping the Egg Wash
That simple step of brushing with egg yolk might seem optional, but it’s not just for looks. The egg wash creates a barrier that helps the rolls brown evenly and beautifully. It gives them a professional, glossy finish and a slightly crispier top crust. Without it, they can look pale and dull. Don’t skip this two-minute step for bakery-level results!
Mistake 5: Overbaking Until Dry
These rolls go from perfectly golden to dry if left in the oven too long. Ovens vary, so start checking a few minutes before the recipe suggests. Look for a rich, golden-brown color on top. The bottoms should also be lightly browned. They should sound slightly hollow when tapped. Remember, they will continue to cook a little as they cool on the tray.
Your Nut Roll Questions, Answered
Can I use instant yeast instead of fresh yeast?
Absolutely! You can substitute fresh yeast with instant yeast. Use one standard packet (about 2 ¼ teaspoons or 7 grams). The main difference is you can mix instant yeast directly into the dry flour. There’s no need to dissolve it in liquid first. This can save a bit of time. Just mix it with your measured flour before adding the wet ingredients. The rising times will be very similar. Both yeasts will give you a great rise if handled correctly.
My dough didn’t rise. What went wrong?
Oh no, this is frustrating. The most common culprit is the yeast. Either the liquid was too hot and killed it, or the yeast was old and inactive. Always check the expiration date. Your kitchen might also be too cold. Yeast loves a warm, cozy environment. Next time, try placing your covered bowl in an oven that’s been turned off but had the light on for a few minutes. This creates a perfect, draft-free warm spot. If you suspect the yeast, test it by mixing a little with warm water and sugar. It should get foamy within 10 minutes.
Can I make the dough ahead of time?
Yes, you can! This is a great time-saver. After the first rise, you can punch down the dough, wrap it tightly in plastic wrap, and refrigerate it overnight. The cold slows the yeast way down, developing even more flavor. The next day, take the dough out and let it sit at room temperature for about 30-60 minutes before rolling and filling. You can also freeze the dough after the first rise for up to a month. Thaw it slowly in the fridge overnight before using.
What can I use if I don’t have a wooden spoon handle for shaping?
No wooden spoon? No problem. You can use the handle of any sturdy utensil, like a thick spatula or a slim rolling pin. You could even use the blunt edge of a large chef’s knife. The goal is to have a clean, rounded object to press down firmly through the center of each roll. You want to almost, but not quite, cut through the bottom. This creates that classic Franzbrötchen-inspired “scroll” shape that lets the filling peek out.
How do I prevent the filling from leaking out everywhere?
A little leaking is normal and can make delicious crispy bits. To minimize it, make sure you leave a small border (about half an inch) along one long edge of your dough when spreading the filling. This clean edge will help seal the roll when you pinch it closed. Also, don’t overfill. A good, even layer is better than a thick, lumpy one. Finally, make sure your roll is sealed tightly along the seam and at the ends before you cut it.
Can I use different nuts like walnuts or almonds?
Please do! This recipe is wonderfully adaptable. Walnuts, pecans, almonds, or even pistachios all work beautifully. Just make sure they are ground or chopped to a similar texture. I love the mix of ground and chopped for varied bite, but using all one texture is fine too. Each nut brings its own unique flavor. Walnuts give a more earthy taste, while almonds are a bit sweeter. Feel free to experiment and find your family’s favorite combination.
Why is my glaze too runny or too thick?
Getting the glaze consistency right is easy to fix. If it’s too runny, you added too much lemon juice. Just whisk in a bit more powdered sugar, a tablespoon at a time, until it thickens. If it’s too thick and won’t drizzle, it needs more liquid. Add more lemon juice (or milk or water) just a few drops at a time, whisking well between additions. You’re aiming for a thick but pourable consistency that will slowly drip off your whisk.
How do I know when the nut rolls are done baking?
Use your senses! First, look: they should be a deep, golden brown on top and lightly browned on the bottom. Second, touch: the tops should feel firm, not soft or doughy. Finally, the sound test: carefully lift one roll and tap the bottom. It should sound hollow. If you’re unsure, you can also use an instant-read thermometer. The internal temperature should be around 190°F (88°C). If they look done but sound doughy, bake for just 2-3 more minutes and check again.
Can I make these nut rolls vegan?
You can certainly try a vegan version with a few swaps. For the dough, use a plant-based milk (like almond or soy) and a neutral oil. Replace the egg with a “flax egg” (1 tbsp ground flaxseed mixed with 3 tbsp water, let sit 5 mins). For the filling, use plant-based butter and milk. Skip the egg wash; instead, you can brush them with a little plant milk or maple syrup to encourage browning. The texture will be slightly different but still delicious.
Is it okay to freeze the baked nut rolls?
Freezing is a fantastic way to enjoy them later. Let the baked and glazed rolls cool completely. Wrap each one individually in plastic wrap, then place them all in a heavy-duty freezer bag or airtight container. They’ll keep well for 2-3 months. To serve, thaw them at room temperature, still wrapped, to prevent condensation. For a fresh-baked taste, warm them in a 300°F oven for 5-10 minutes after thawing.
The Sweet Reward of a Baking Adventure
So, there you have it. My special “Cinnamon Scroll” nut rolls, a twist on a classic that makes my whole house smell like a European bakery. They’re easier than they look and so much fun to make. That moment you press the wooden spoon into the dough is pure kitchen magic. I hope you give them a try. Share them with someone you love, with a big cup of coffee, and enjoy the simple, sweet joy of homemade baking. Happy baking!
Buttery Pretzel Bites
Ingredients
Equipment
Method
- Wake up the yeast by stirring sugar and fresh yeast into lukewarm milk until dissolved.
- In a large bowl, combine the yeast mixture, oil, egg white, and vanilla, then gradually add flour until a dough forms.
- Knead the dough on a floured surface for 5-7 minutes until smooth, then knead in soft butter.
- Place the dough in a lightly oiled bowl, cover, and let it rise in a warm spot for about 1 hour until doubled in size.
- Meanwhile, prepare the nut filling by mixing ground and chopped hazelnuts, sugar, vanilla sugar, and cinnamon in a bowl, then adding melted butter and milk to combine.
- Roll the risen dough into a large rectangle on a floured surface and spread the filling, leaving a small border.
- Roll the dough tightly from one long side and seal the seam, then cut into strips about 1.5 inches wide.
- Press the handle of a wooden spoon into the center of each roll to create the scroll shape.
- Place scrolls on a parchment-lined baking sheet, brush with an egg wash made from the reserved yolk mixed with water or milk, and bake at 350°F (180°C) for 20-25 minutes until golden brown.
- Allow to cool for about 10 minutes, then mix powdered sugar with lemon juice to create a glaze and drizzle over the rolls.