Why You’ll Fall in Love with Cheeseburger Garlic Bombs
Picture this: it’s a Friday evening, and you’re staring into the fridge, wondering what to whip up that will make everyone smile. That’s when I stumbled upon Cheeseburger Garlic Bombs. These little bites of heaven are packed with flavor, easy to make, and absolutely irresistible. My kids couldn’t stop raving about them, and even my husband—who claims he doesn’t like “fancy food”—was sneaking seconds. Trust me, once you try these, they’ll become your go-to dish for busy nights or fun gatherings.
A Bite-Sized History of Cheeseburger Garlic Bombs
While Cheeseburger Garlic Bombs might sound modern, their roots are simple and humble. The concept likely evolved from classic cheeseburgers, where juicy beef meets melty cheese. Adding garlic and Parmesan gives it an Italian twist, making it a cross-cultural flavor bomb. I first tried these at a friend’s house during a game night. They disappeared so fast that I had to beg her for the recipe. Since then, I’ve tweaked it to perfection, adding my own flair like extra garlic (because who can resist?) and fresh herbs.
Why This Recipe is a Must-Try
What makes Cheeseburger Garlic Bombs stand out? First, the flavors are bold yet comforting—savory beef, creamy cheese, and a punch of garlic. Second, they’re super versatile. Whether you’re hosting a party or just need a quick dinner, these bombs fit the bill. Plus, they’re hands-on fun to make, which is great for involving the kids in the kitchen. And let’s not forget how easy cleanup is compared to traditional burgers!
Perfect Occasions to Serve Cheeseburger Garlic Bombs
These bombs shine at casual gatherings like backyard barbecues, game nights, or potlucks. They’re also perfect as an appetizer for holidays like the Fourth of July or Thanksgiving. If you’re looking for something kid-friendly for a birthday party, these are a hit. And honestly, they’re just as good on a random Tuesday when you want something indulgent but not too complicated.
Ingredients for Your Cheeseburger Garlic Bombs
- 500 g of ground beef
- 1 finely chopped onion
- 2 cloves of minced garlic
- 1 cup shredded cheddar cheese
- ½ cup grated Parmesan cheese
- 1 teaspoon salt
- ½ teaspoon black pepper
- 1 tablespoon olive oil
- Fresh parsley for garnish
Substitution Options
- Ground beef: Swap with ground turkey or chicken for a lighter option.
- Cheddar cheese: Use Monterey Jack or mozzarella if you prefer milder flavors.
- Parmesan: Substitute with Romano or Asiago for a similar nutty taste.
- Fresh parsley: Try cilantro or basil for a different herbaceous kick.
Step 1: Preparing the Meat Mixture
In a large mixing bowl, combine the ground beef, chopped onion, minced garlic, salt, and pepper. Use your hands to mix everything thoroughly. Don’t overwork the meat—it should stay tender. Pro tip: Wet your hands slightly to prevent sticking. As you knead, notice how the vibrant red of the beef blends with the golden flecks of onion. This step sets the stage for those mouthwatering flavors.
Step 2: Forming the Bombs
Divide the mixture into equal portions, about the size of a golf ball. Flatten each portion into a disc, place a small cube of cheddar cheese in the center, then roll it back into a ball. Make sure the cheese is fully enclosed; otherwise, it might ooze out while cooking. Imagine the anticipation of biting into one of these gooey centers later!
Step 3: Cooking the Bombs
Heat olive oil in a skillet over medium heat. Place the bombs in the pan, leaving space between each one. Cook them for about 4-5 minutes per side until browned and cooked through. The aroma of sizzling beef and garlic will fill your kitchen, making everyone rush to the table. Chef’s tip: For extra crispiness, finish them under the broiler for 2 minutes.
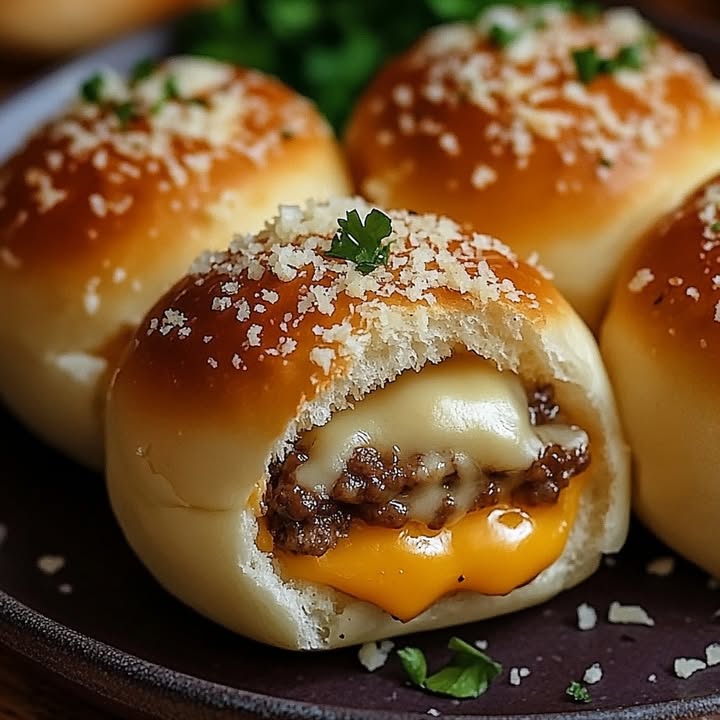
Step 4: Adding the Finishing Touches
Once cooked, sprinkle the tops with grated Parmesan and garnish with fresh parsley. The golden crust contrasts beautifully with the green herbs. Serve them warm, and watch them disappear faster than you can say “cheeseburger.”
Timing Breakdown
- Prep time: 15 minutes
- Cooking time: 20 minutes
- Total time: 35 minutes
Chef’s Secret
To elevate the flavor, add a dash of Worcestershire sauce to the meat mixture. It adds depth without overpowering the other ingredients. Another trick? Chill the bombs for 10 minutes before cooking to help them hold their shape better.
An Interesting Fact About Cheeseburger Garlic Bombs
Did you know that combining beef and cheese dates back centuries? Ancient Romans paired cheese with meat dishes, believing it enhanced digestion. While our modern take is far from ancient, it’s clear why this combo has stood the test of time.
Necessary Equipment
- Large mixing bowl
- Skillet or frying pan
- Spatula
- Measuring spoons
- Cutting board and knife
Storage Tips
If you have leftovers (though unlikely), store them in an airtight container in the fridge for up to three days. Reheat in the oven at 350°F for 10 minutes to retain crispiness. Freezing is another option; wrap individual bombs in plastic wrap, then freeze in a sealed bag for up to two months. Thaw overnight in the fridge before reheating.
When reheating, avoid the microwave as it can make the exterior soggy. Instead, use the oven or toaster oven for best results. Always check that the internal temperature reaches 165°F to ensure safety.
Tips and Advice
- Use freshly grated Parmesan instead of pre-shredded for better flavor.
- Don’t skip seasoning the meat—it’s key to balancing the richness of the cheese.
- For a smoky twist, grill the bombs instead of pan-frying.
Presentation Ideas
- Serve on a wooden board with toothpicks for easy grabbing.
- Garnish with microgreens or edible flowers for a pop of color.
- Pair with dipping sauces like ketchup, aioli, or BBQ sauce in mini bowls.
Healthier Alternatives
Here are six ways to lighten up your Cheeseburger Garlic Bombs:
- Turkey version: Replace beef with lean ground turkey.
- Veggie option: Use plant-based meat substitutes like Beyond Beef.
- Low-carb: Skip the bun and serve with cauliflower rice.
- Dairy-free: Use vegan cheese and omit Parmesan.
- Gluten-free: Ensure all ingredients are certified gluten-free.
- Herb-infused: Add spinach or kale to the meat mixture for extra nutrients.
Common Mistakes to Avoid
Mistake 1: Overcrowding the Pan
Cooking too many bombs at once leads to steaming rather than browning. Leave enough space between each piece to allow proper searing. Pro tip: Cook in batches if needed.
Mistake 2: Skipping Resting Time
Rushing to cook right after forming the bombs can cause them to fall apart. Letting them rest firms up the structure. Aim for at least 10 minutes in the fridge.
Mistake 3: Using Cold Cheese
If the cheese isn’t soft, it won’t melt evenly inside the bomb. Take it out of the fridge 15 minutes before assembling.
FAQs
Can I make these ahead of time?
Absolutely! Prepare the bombs, cover them, and refrigerate for up to 24 hours. When ready, simply cook as instructed.
Are these suitable for vegetarians?
Not traditionally, but you can adapt by using plant-based meat and dairy-free cheese.
How do I keep the cheese from leaking?
Make sure the meat completely encases the cheese. Chilling the bombs helps seal the edges.
What sides pair well with these?
Try roasted veggies, a simple salad, or crispy fries for balance.
Can I bake instead of frying?
Yes! Bake at 400°F for 20-25 minutes, flipping halfway through.
Do I need special tools?
No fancy gadgets required—just basic kitchen tools like a skillet and spatula.
Is this recipe kid-friendly?
Definitely! Kids love the gooey cheese center and savory flavors.
How spicy are these?
They’re mild unless you add hot sauce or spices. Adjust to your preference.
Can I double the recipe?
Of course! Just ensure your pan is large enough or cook in shifts.
What’s the best way to reheat?
Oven or toaster oven works best to maintain texture and flavor.
A Final Word on Cheeseburger Garlic Bombs
There’s something magical about Cheeseburger Garlic Bombs—they’re comforting, flavorful, and downright addictive. Whether you’re feeding a crowd or treating yourself, this recipe delivers every time. So grab your ingredients, roll up your sleeves, and get ready to create a dish that everyone will rave about. Happy cooking!