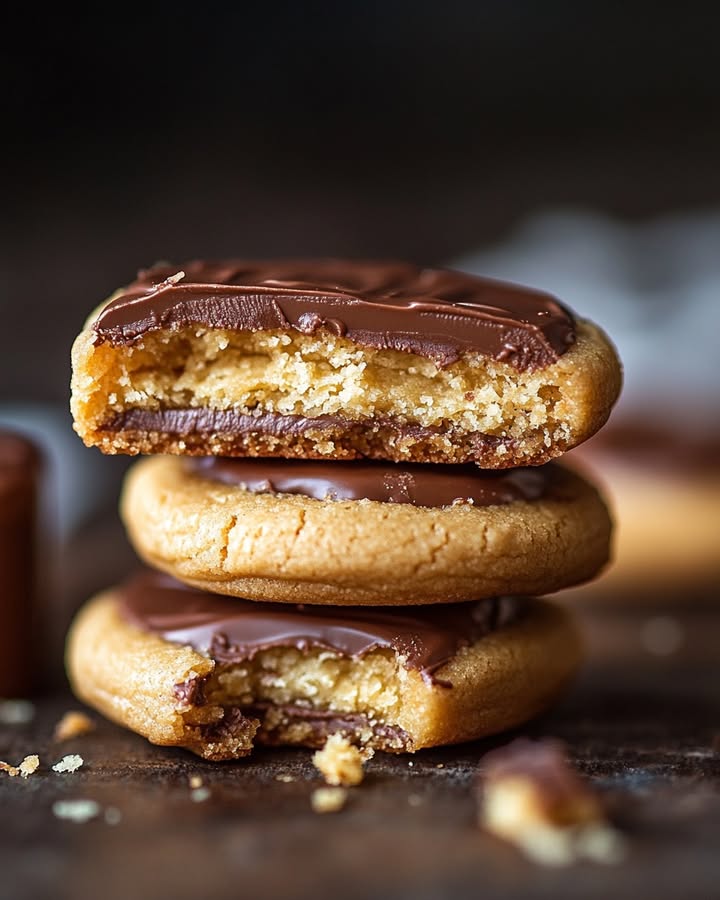
You know that moment when you’re hit with a serious sweet tooth, but the drive to the store feels like a trek across the Sahara? I had one of those, and staring into my pantry, I had a flash of genius. What if I could capture the perfect, impossible-to-resist magic of a Twix bar—but in a homemade cookie? Friends, after a few delightful (and delicious) experiments, I found the answer. These Homemade Twix-Inspired Cookies are my new obsession. They have that irresistible trio: a buttery shortbread base, a soft, chewy caramel layer, and a glossy blanket of chocolate. It’s the kind of treat that makes you close your eyes and sigh with pure happiness.
The Story Behind the Sweetness: From Candy Aisle to Cookie Jar
The classic Twix bar has been a lunchbox staple and movie-night favorite for decades. Its genius is in its layers: crunch, chew, and melt. I wanted to bring that same joy into my kitchen, but with a homemade touch that feels more special. This isn’t just about copying a candy bar. It’s about creating a from-scratch version where you can taste the real butter in the cookie and control the quality of the chocolate. My kids now call these “Mom’s Magic Cookies,” and hearing that is better than any five-star review. It connects the fun of a familiar treat with the love of home baking.
Why You’ll Fall in Love With This Twix Cookie Recipe
First, they are surprisingly simple! No fancy techniques are needed. The dough comes together in minutes, and the caramel is as easy as melting candies. Second, the texture is a dream. The cookie stays crisp under the gooey caramel, and the chocolate adds that final smooth finish. They’re also incredibly versatile for gifting, parties, or that “I deserve a treat” moment. Plus, making them fills your house with the most amazing buttery, sugary smell. It’s pure comfort.
When to Whip Up a Batch of These Caramel Chocolate Delights
These cookies are little stars for any occasion! Pack them in cute boxes for a heartfelt homemade gift. Bring a platter to a potluck and watch them disappear faster than you can say “caramel.” They’re perfect for holiday cookie swaps, birthday parties, or simply as a weekend baking project with the family. Anytime you need a guaranteed smile, these cookies deliver.
What You’ll Need: The Ingredients List
For the Cookie Base:
- 1 cup unsalted butter, softened
- 1/2 teaspoon salt
- 1 cup powdered sugar
- 1 teaspoon vanilla extract
- 2 1/2 cups all-purpose flour
For the Caramel Layer:
- 11 oz (about 40 pieces) soft caramel candies, unwrapped
- 2 tablespoons evaporated milk or heavy cream
For the Chocolate Layer:
- 2 cups high-quality melting chocolate wafers or semi-sweet chocolate chips
Easy Swaps: Substitution Options
No problem! Here are some easy swaps:
- Butter: Salted butter works; just omit the added salt in the dough.
- Caramels: A 14-oz can of store-bought dulce de leche can be used straight from the can—just warm it slightly for easier spreading.
- Evaporated Milk: Heavy cream or whole milk are fine substitutes.
- Chocolate: Use any chocolate you love: dark, milk, or even white chocolate for a fun twist.
- Gluten-Free: Use a 1:1 gluten-free all-purpose flour blend for the cookie base.
Let’s Bake! Your Step-by-Step Guide to Twix Cookie Heaven
Step 1: Make the Buttery Shortbread Base
Start by preheating your oven to 350°F (175°C). Line your baking sheets with parchment paper. In a large bowl, cream the softened butter and powdered sugar together. You want it light and fluffy, which takes about 2-3 minutes with a mixer. The mixture will turn a pale, creamy yellow. Beat in the vanilla extract. Now, gently add the flour and salt. Mix just until the dough comes together in a soft, pliable ball. The aroma of sweet butter and vanilla is your first reward.
Step 2: Shape and Bake to Golden Perfection
On a lightly floured surface, roll the dough out to about 1/4-inch thickness. Use a small round cutter (about 1.5 to 2 inches in diameter) to cut out your cookies. Place them on the prepared baking sheets. They don’t spread much, so you can place them fairly close. Bake for 14-16 minutes. You’re looking for the edges to get just the faintest hint of golden brown. Let the cookies cool completely on the baking sheet. This step is crucial for a crisp base that won’t get soggy under the caramel.
Pro tip: If your dough gets too soft, pop it in the fridge for 15 minutes before rolling. This makes it much easier to handle.
Step 3: Create the Gooey Caramel Layer
Unwrap all those caramels—it’s the most tedious part, I promise! Combine them with the evaporated milk in a medium saucepan over medium-low heat. Stir constantly as the caramels melt into a smooth, glossy, thick sauce. This should take about 5-7 minutes. Once melted, remove from heat and let it cool for just a minute. Then, spoon a small amount onto the center of each cooled cookie and gently spread it almost to the edges. The caramel will start to set as it cools, becoming delightfully chewy.
Step 4: The Grand Finale: The Chocolate Coat
Melt your chocolate in a microwave-safe bowl in 30-second bursts, stirring well after each interval, until perfectly smooth. You can also use a double boiler on the stovetop. Using a spoon or a small offset spatula, spread a layer of melted chocolate over the set caramel on each cookie. Work quickly before the chocolate begins to set. You can make elegant swirls on top with the tip of your spoon for a professional look.
Step 5: Let Them Set and Enjoy the Rewards
Allow the chocolate to harden completely at room temperature. For faster setting, you can place the tray of cookies in the refrigerator for about 15 minutes. Once set, these little gems are ready to devour! The satisfying snap of the chocolate, the pull of the caramel, and the crumble of the cookie is a textural symphony.
Chef’s tip: For an extra touch, sprinkle a tiny pinch of flaky sea salt over the wet chocolate. It elevates all the flavors beautifully.
Your Baking Timeline
Here’s a quick breakdown of the time investment:
- Prep Time: 25 minutes
- Cook Time: 16 minutes
- Setting Time: 45 minutes
- Total Time: About 1 hour 25 minutes
- Servings: Makes about 24-30 cookies
A Little Extra Secret from My Kitchen
For an even more authentic “Twix” experience, I sometimes add a tiny pinch of salt to the shortbread dough itself. It doesn’t make them taste salty, but it makes the buttery, sweet flavor really pop and balances the later layers perfectly. It’s my not-so-secret weapon for depth of flavor.
Fun Fact: The Name Game
Did you know the name “Twix” was originally “Raider” in many parts of Europe? It was renamed Twix in the 1990s to unify the brand. The name is thought to be a portmanteau of “twin sticks.” Our cookie version is a fun homage to that iconic duo of texture and taste.
Gear Up: Necessary Equipment
- Mixing bowls
- Electric hand mixer or stand mixer
- Rolling pin
- Round cookie cutter (1.5-2 inch diameter)
- Baking sheets
- Parchment paper
- Medium saucepan
- Microwave-safe bowl
- Offset spatula or butter knife for spreading
Keeping Your Cookies Fresh: Storage Tips
Once fully set, store these Twix-inspired cookies in a single layer in an airtight container. You can separate layers with parchment paper if you need to stack them. They will keep beautifully at room temperature for up to 5 days.
For longer storage, these cookies freeze exceptionally well. Place them in a single layer on a baking sheet to freeze solid, then transfer to a freezer-safe bag or container. They can be frozen for up to 2 months.
To serve frozen cookies, simply let them thaw at room temperature for about 30 minutes. The caramel and chocolate will soften perfectly, and the shortbread base will remain crisp.
Tips and Advice for Baking Success
- Ensure your butter is softened, not melted, for the perfect cookie texture.
- Let the caramel cool for just a minute before spreading so it doesn’t melt the shortbread.
- If your caramel gets too thick while you’re working, gently re-warm it with another teaspoon of evaporated milk.
- For a drizzled look instead of a full coat, you can dip just half the cookie in the melted chocolate.
Dress to Impress: Presentation Ideas
- Stack them in a clear glass jar tied with a ribbon for a charming gift.
- Arrange on a vintage cake stand for a party.
- Drizzle with a contrasting chocolate (white on dark) for a fancy finish.
- Place each cookie in a small parchment paper cup, like you see in bakeries.
Mix It Up: 6 Tasty Recipe Variations
1. Salted Dark Chocolate: Use dark chocolate for the coating and finish each cookie with a flake of sea salt.
2. Peanut Butter Twix: Add 1/4 cup of creamy peanut butter to the melted caramel layer.
3. Cookie Cutter Fun: Use fun-shaped cutters like hearts for Valentine’s Day or trees for Christmas.
4. Nutty Crunch: Sprinkle finely chopped toasted pecans or almonds onto the wet chocolate layer.
5. Coconut Dream: Mix 1/2 cup of toasted coconut into the shortbread dough.
6. Espresso Kick: Add 1 teaspoon of instant espresso powder to the melted chocolate for a mocha twist.
Common Mistakes to Avoid
Mistake 1: Rolling the Dough Too Thick or Too Thin
If the dough is rolled too thick, the cookie base will be doughy and underbaked in the center. If it’s too thin, it can burn easily and become too fragile to hold the layers. Aim for that consistent 1/4-inch thickness. Using rolling pin guides or even two wooden dowels on either side of the dough can help immensely.
Mistake 2: Spreading Caramel on Warm Cookies
This is the biggest culprit for soggy bottoms! The heat from the cookie will melt the caramel too much, causing it to seep into and soften the shortbread. Always, always let your cookie bases cool completely on the baking sheet before adding any toppings. Patience is key here.
Mistake 3: Overheating the Chocolate
Chocolate burned in the microwave becomes grainy, lumpy, and unusable. Always melt it in short bursts and stir well between each interval. The residual heat will continue to melt the chocolate. If you need to, you can melt it over a double boiler for more control. Smooth, gently melted chocolate is what gives that perfect professional snap.
Mistake 4: Using the Wrong Caramel
Hard, old caramels or caramel ice cream topping won’t work well. Old caramels won’t melt smoothly, and ice cream topping is too runny and won’t set. Use fresh, soft, wrapped caramel squares for the right chewy texture. The two tablespoons of milk are essential to get a spreadable consistency.
Your Twix Cookie Questions, Answered
Can I make the cookie dough ahead of time?
Absolutely! You can prepare the shortbread dough, wrap it tightly in plastic wrap, and refrigerate it for up to 3 days. You can also freeze the dough disk for up to a month. Let it thaw slightly in the fridge before rolling it out. This makes the recipe perfect for getting a head start on holiday baking or breaking up the work over a couple of days.
Why did my caramel turn out hard instead of chewy?
A hard caramel layer usually means it was cooked for too long or at too high a temperature. When melting the caramels with the milk, keep the heat on medium-low and stir constantly just until they are fully melted and smooth. As soon as there are no lumps, take it off the heat. The residual heat will keep it fluid enough to spread but it will firm up to a perfect chew as it cools on the cookie.
My chocolate is streaky or won’t melt smoothly. What happened?
This is called “seizing,” and it happens when a tiny bit of moisture gets into the melting chocolate. Even a drop of water or steam can cause it to turn grainy. Always make sure your bowl and utensils are completely dry. If it seizes, you can sometimes save it by stirring in a tiny amount of neutral oil (like vegetable oil) until it smoothes out again, though the texture might be slightly different.
Can I use homemade caramel instead of caramels?
Yes, you can! If you have a favorite homemade soft caramel recipe, by all means use it. Just make sure it’s a thick, spreadable consistency once cooled slightly, not a thin sauce. A soft-ball stage caramel works wonderfully. This is a great way to control the ingredients and avoid additives if you prefer.
How do I get a really neat chocolate coating?
For a super clean, professional look, try dipping the cookies instead of spreading. Hold the cookie by its base and dip the top (caramel side down) into the melted chocolate. Lift it out, let the excess drip off, and then place it on parchment paper to set. This gives a smooth, even coat. A fork can also help with dipping and draining.
Are these cookies freezer-friendly?
They are excellent freezer cookies! Once fully set, freeze them in a single layer on a baking sheet. After they’re frozen solid, transfer them to a freezer bag or airtight container. They’ll keep for 2-3 months. Thaw at room temperature for 30 minutes before serving. The texture holds up remarkably well.
What’s the best chocolate to use for melting?
For the easiest, smoothest results, use chocolate specifically labeled as “melting wafers” or “candy coating.” They are designed to melt smoothly and set with a snap. High-quality chocolate chips or baking chocolate bars work too, but they can be more temperamental. If using chocolate chips, adding a teaspoon of coconut oil can help make the coating more fluid for dipping.
My cookies puffed up while baking. What did I do wrong?
A little puff is normal, but if they puffed up a lot, you may have over-mixed the dough after adding the flour. Over-mixing develops the gluten in the flour, which can lead to a tougher, puffier cookie. Mix the flour in just until no dry streaks remain. Also, make sure your baking powder or soda isn’t accidentally in the recipe—this dough shouldn’t have any leavener!
Can I make these bars instead of individual cookies?
You sure can! Press the shortbread dough evenly into a parchment-lined 9×13 inch pan. Bake at 350°F for about 18-20 minutes, until lightly golden. Cool completely, then spread the caramel and chocolate layers over the entire top. Once set, lift the whole slab out using the parchment and cut into squares or bars.
How long do they stay fresh, and how should I store them?
Stored properly in an airtight container at room temperature, they stay fresh and delicious for 4-5 days. The layers hold up beautifully. If your kitchen is very warm, you might want to store them in a cooler spot or even in the fridge to prevent the chocolate from getting too soft. Just let them come to room temp for the best texture before eating.
The Joy of Homemade Magic
There’s something incredibly satisfying about recreating a beloved store-bought treat in your own kitchen. These Homemade Twix-Inspired Cookies are more than just a dessert. They’re a fun project, a love-filled gift, and a guaranteed way to make any day a little sweeter. The crunch, the chew, the chocolatey finish—it’s a combination that never fails. So, tie on your apron, preheat that oven, and get ready to bake a batch of pure joy. Trust me, your cookie jar (and your friends) will thank you.
Cheesy Arepas Delight
Ingredients
Equipment
Method
- Preheat your oven to 350°F (175°C) and line baking sheets with parchment paper.
- Cream the softened butter and powdered sugar in a large bowl until light and fluffy, about 2-3 minutes.
- Beat in the vanilla extract.
- Gently add the flour and salt, mixing just until the dough comes together in a soft ball.
- Roll the dough out to about 1/4-inch thickness on a floured surface and cut into round cookies.
- Place cookies on prepared baking sheets and bake for 14-16 minutes until edges are faintly golden.
- Let the cookies cool completely on the baking sheet.
- In a medium saucepan, combine unwrapped caramels and evaporated milk over medium-low heat, stirring until melted and smooth, about 5-7 minutes.
- Let the melted caramel cool slightly, then spoon onto the center of each cooled cookie, spreading almost to the edges.
- Melt the chocolate in a microwave-safe bowl in 30-second bursts, stirring until smooth.
- Spread a layer of melted chocolate over the caramel on each cookie quickly before it sets.
- Allow chocolate to harden completely at room temperature or place cookies in the refrigerator for faster setting.