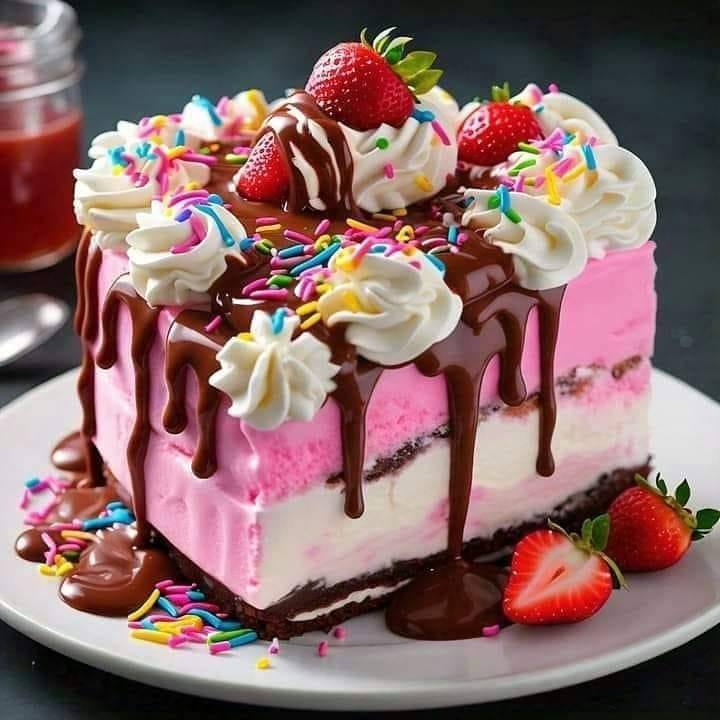
Chocolate and Strawberry Fantasy Ice Cream Cake: Your New Summer Obsession
Is there anything more joyful than the first scoop of a homemade ice cream cake on a warm day? This Chocolate and Strawberry Fantasy Ice Cream Cake is my ultimate crowd-pleaser. I created it for my daughter’s birthday last July, and now it’s requested at every family gathering. It’s the perfect blend of rich chocolate, sweet strawberry creaminess, and that wonderful cold crunch. Let’s make some delicious memories together.
From a Kitchen Mishap to a Family Favorite
This recipe was born from a happy accident. I was making a simple ice cream pie for a last-minute BBQ. I had a tub of strawberry ice cream melting on the counter and some leftover chocolate ganache from another project. In a moment of “why not?” inspiration, I layered it all together. The result was so stunning and delicious that it felt like a fantasy come true. While ice cream cakes have been around for ages, this particular combination feels both classic and special. The deep chocolate cookie crust stands up to the creamy ice cream, and the glossy ganache topping makes it look like it came from a fancy bakery.
Why You’ll Love This Dreamy Dessert
You will adore this recipe because it’s surprisingly simple but looks impressive. The flavors are a timeless pair—chocolate and strawberry just belong together. It’s a make-ahead dream, freeing you up to enjoy your own party. The textural play between the crunchy crust, the smooth ice cream, the sticky jam, and the firm chocolate shell is pure magic. It’s a dessert that feels indulgent and refreshing all at once.
Perfect Occasions for This Showstopper
This ice cream cake is your secret weapon for celebrations. It’s ideal for birthday parties, especially summer birthdays. Bring it to a Fourth of July picnic or a neighborhood potluck—it travels well in a cooler. It’s also a glorious way to end a fancy dinner at home or to simply say “I love you” on a regular Tuesday. Any day becomes special with a slice of this.
What You’ll Need: The Ingredients
Gather these simple ingredients for your fantasy cake:
- For the crust: 1 cup chocolate sandwich cookies (Oreo type), crushed; ¼ cup melted butter.
- For the ice cream layer: 1 quart strawberry ice cream, slightly softened; ½ cup strawberry jam.
- For the chocolate ganache: 1 cup semisweet chocolate chips; ½ cup heavy cream.
- For the whipped cream: 1 cup heavy cream; 2 tablespoons powdered sugar.
No Stress Substitutions
Don’t have something? No problem! Use graham crackers or vanilla wafers for the crust. Swap strawberry ice cream for vanilla, chocolate, or even raspberry. Any berry jam or chocolate sauce will work. For the ganache, you can use a high-quality store-bought hot fudge sauce warmed until pourable.
Crafting Your Fantasy: The Step-by-Step
Step 1: Building the Chocolate Foundation
Start by crushing your chocolate cookies into fine crumbs. I like to put them in a zip-top bag and roll a glass over them—it’s oddly satisfying! Mix the dark, fragrant crumbs with the melted butter until it looks like wet sand. Press this mixture firmly into the bottom of a 9-inch springform pan. The firm pack is key for a crust that holds its own. Pop it into the freezer for 10 minutes to set. Pro tip: Use the bottom of a measuring cup to press the crust evenly and firmly.
Step 2: The Strawberry Dream Layer
Let your strawberry ice cream sit out for about 10-15 minutes until it’s spreadable but not soupy. Pull the crust from the freezer. Spread and swirl the soft, pink ice cream over the cold, dark crust. The contrast is beautiful. Now, take your strawberry jam and drizzle it in ribbons or dollops over the ice cream. Use a knife or toothpick to gently marble it for a gorgeous effect. Freeze again for 30 minutes, until firm. Chef’s tip: Warm the jam for 10 seconds in the microwave to make drizzling easier.
Step 3: The Glossy Chocolate Blanket
This is the glamorous step! Heat the heavy cream until it’s just steaming, then pour it over the chocolate chips in a heatproof bowl. Let it sit for one minute to melt the chocolate gently. Then, stir slowly until a smooth, dark, and glossy ganache forms. It should pour like a luxurious silk ribbon. Carefully pour this over the firm strawberry layer, tilting the pan to help it spread to the edges. The swift, glossy pour is my favorite part. Freeze for another 10 minutes to set the chocolate shell. Pro tip: For a perfect pour, start in the center and let it flow outward naturally.
Step 4: The Fluffy Finale
Just before serving, make the whipped cream topping. Chill a bowl and your beaters for best results. Pour in the cold heavy cream and powdered sugar. Whip on medium-high speed until soft peaks form—they should hold their shape but still look fluffy and light. Spread or pipe this cloud of cream over the top of your fully set cake. This fresh, cool topping balances the rich chocolate shell perfectly. Your masterpiece is complete!
Timing is Everything
- Prep Time: 25 minutes
- Freeze Time: 50 minutes (in stages)
- Total Time: 1 hour 15 minutes (plus overnight freeze for best slicing)
- Servings: 12 happy people
The Chef’s Secret
For an extra burst of flavor and texture, sprinkle a handful of freeze-dried strawberry pieces onto the ice cream layer before adding the ganache. They stay crunchy and add an intense strawberry punch that is simply unforgettable.
A Sweet Slice of History
While the origin of ice cream cake is a bit fuzzy, it became a party staple thanks to the Carvel franchise in the 1930s. Our homemade version takes that fun, nostalgic concept and dresses it up with a rich ganache and fresh whipped cream. It’s a nod to the past with a decidedly delicious, modern twist.
Your Toolkit
- 9-inch springform pan (essential for easy release!)
- Food processor or zip-top bag and rolling pin for crushing cookies
- Mixing bowls
- Measuring cups and spoons
- Electric hand mixer or stand mixer
- Spatula
- Small saucepan or microwave-safe bowl for ganache
Keeping the Fantasy Fresh
Store your ice cream cake, tightly covered with plastic wrap or in an airtight container, in the freezer for up to 2 weeks. The springform pan sides can be placed back on for storage. To prevent freezer odors from seeping in, wrap the whole pan in a layer of aluminum foil after the plastic wrap.
The whipped cream topping is best added right before serving. If you need to store the cake fully decorated, know that the whipped cream may become icy over time. You can also freeze the cake without the whipped cream, then add the fresh topping just as you serve it.
For slicing, use a sharp knife that you run under hot water and wipe dry between each cut. This gives you beautiful, clean slices every single time.
Tips and Advice for Success
- Quality counts: Use a strawberry ice cream you love eating on its own.
- Patience is a virtue: Don’t skip the freezing steps between layers. This prevents them from bleeding together.
- Easy release: Run a warm towel around the outside of the springform pan before unclasping it.
- Plan ahead: For the cleanest slices, freeze the finished cake overnight.
Presenting Your Masterpiece
Place the cake on a gorgeous cake stand. Garnish with fresh strawberries, chocolate shavings, or a sprinkle of leftover cookie crumbs. For a patriotic look, add blueberries and extra strawberry slices. Serve on chilled plates to keep it cold longer at the table.
Explore These Delicious Variations
- Cookies and Cream Fantasy: Use cookies and cream ice cream and fold extra cookie chunks into the ice cream layer.
- Tropical Dream: Use coconut ice cream and mango or passion fruit jam. Top with toasted coconut.
- Salted Caramel Pretzel: Use a pretzel crust, vanilla bean ice cream, and a salted caramel sauce instead of ganache.
- Very Berry: Use vanilla ice cream and swirl in mixed berry jam. Top with fresh raspberries.
- Mint Chocolate Chip Fantasy: Use mint chocolate chip ice cream. Add a drop of peppermint extract to the whipped cream.
- Adult Coffee Break: Use coffee ice cream and a chocolate-espresso ganache. Garnish with chocolate-covered espresso beans.
Common Mistakes to Avoid
Mistake 1: Using Rock-Hard Ice Cream
Spreading ice cream straight from the freezer is frustrating and can tear your crust. It leads to an uneven layer and a messy kitchen. Always let your ice cream soften on the counter for 10-15 minutes. You want it to be the consistency of thick frosting—easy to spread but not melted.
Mistake 2: Skipping the Freezing Steps Between Layers
Adding warm ganache to soft ice cream is a recipe for a muddy, melty mess. The layers will blend together instead of staying distinct. Those short 10-30 minute freezer times are not suggestions. They are crucial for setting each layer so the next one can be added cleanly. Patience here gives you a beautiful, professional-looking cross-section.
Mistake 3: A Soggy, Crumbly Crust
This happens when you don’t press the crust firmly enough or use too little butter. The crust needs to be compacted to form a solid base that holds its shape when cut. Press it down as hard as you can with the bottom of a cup. The mixture should feel like packed sand. A loose crust will fall apart on your plate.
Mistake 4: Overwhipping the Cream
Whipped cream goes from soft peaks to stiff peaks to butter very quickly. Overwhipped cream looks grainy and is difficult to spread or pipe neatly. Watch closely and stop beating as soon as the beaters leave a soft, defined mark in the cream that slowly holds its shape. If you accidentally go too far, stir in a few more tablespoons of liquid cream to smooth it out.
Your Chocolate and Strawberry Fantasy Questions, Answered
Can I make this cake ahead of time?
Absolutely! This cake is perfect for making ahead. You can assemble it completely (including the ganache) and freeze it, tightly wrapped, for up to two weeks. I recommend adding the fresh whipped cream topping the day you plan to serve it for the best texture and flavor. Let the cake sit at room temperature for about 10 minutes before slicing to make it easier to cut.
What if I don’t have a springform pan?
Don’t worry! A deep-dish pie plate will work in a pinch. The presentation will be different, but it will still taste amazing. Lining a regular cake pan with plastic wrap with plenty of overhang can also work; you use the plastic to lift the frozen cake out before serving. The springform pan just makes the process foolproof.
Can I use a different flavor of ice cream?
Of course! That’s the beauty of this recipe. Vanilla, chocolate, raspberry, or even cookies and cream ice cream are all fantastic choices. Match or contrast your jam and garnish to complement your chosen ice cream flavor. The basic method stays the same, so feel free to get creative and make it your own.
How do I get clean slices of ice cream cake?
Clean slices are all about the right tool and technique. Use a sharp, thin-bladed knife. Run the blade under very hot water for a few seconds, wipe it completely dry with a towel, and then make your cut in one smooth, confident motion. Repeat the hot water and drying step for every single slice. This melts through the hard layers just enough to give you a perfect, photo-ready piece every time.
Why is my ganache cracking when I cut the cake?
A cracking ganache typically means it was frozen too solid or made with too high a ratio of chocolate to cream. Ensure your ganache is pourable when you apply it. Letting the cake sit out for 5-10 minutes before cutting allows the ganache to warm slightly and become more pliable, preventing cracks. A slightly higher cream ratio also keeps it softer when frozen.
Can I use fresh strawberries instead of jam?
Fresh strawberries are delicious, but they contain a lot of water that turns icy in the freezer. For the best texture in the middle layer, jam is preferable because it stays somewhat soft. If you want fresh berry flavor, macerate chopped strawberries with a little sugar to draw out moisture, then drain them well before swirling into the ice cream. Or, simply use fresh berries as a garnish on top when serving.
Is there a way to make this recipe no-bake friendly?
This entire recipe is no-bake! The only appliance you might use is the microwave to melt butter for the crust and heat cream for the ganache. Those steps can also be done in a small saucepan on the stove. Everything else is mixing, spreading, and freezing. It’s the ultimate no-oven-required dessert for hot summer days.
How long can the finished cake sit out during a party?
To keep its perfect shape and texture, try not to let the cake sit out at room temperature for more than 30 minutes total. Serve it from the freezer, and put any remaining slices back in the freezer promptly. You can keep it on a chilled platter or nestled in a larger pan filled with ice to help it stay cold longer on a buffet table.
Can I make this dairy-free or vegan?
You can certainly try! Use dairy-free chocolate sandwich cookies and plant-based butter for the crust. Choose a high-quality vegan strawberry ice cream. For the ganache, use full-fat coconut cream and dairy-free chocolate chips. The whipped cream topping can be made from chilled coconut cream or a store-bought vegan whipped topping. The textures and freezing times may vary slightly, but the concept will work beautifully.
My crust is sticking to the pan. How can I prevent this?
For an absolutely guaranteed easy release, line your springform pan with a circle of parchment paper on the bottom before adding the crust. You do not need to grease the sides. When ready to serve, run a thin knife around the very edge of the cake between the cake and the pan wall before unclasping the spring. The bottom parchment will let you slide the cake onto a plate easily.
The Sweet Finale
This Chocolate and Strawberry Fantasy Ice Cream Cake is more than just a dessert. It’s a celebration in a pan. It’s the joy of creating something beautiful and delicious with your own hands. It’s the sound of happy sighs around the table. Whether it’s for a big party or a small family treat, this recipe is designed to bring smiles. So go ahead, gather your ingredients, and treat yourself to a slice of pure, frosty fantasy. You deserve it!
Cheesy Bacon Chicken
Ingredients
Equipment
Method
- Crush chocolate cookies into fine crumbs and mix with melted butter until it resembles wet sand. Press into the bottom of a 9-inch springform pan and freeze for 10 minutes.
- Let strawberry ice cream soften for 10-15 minutes, then spread over the crust. Drizzle strawberry jam and gently marble it into the ice cream. Freeze again for 30 minutes.
- Heat heavy cream until steaming, pour over chocolate chips, and stir until smooth to create ganache. Pour ganache over the frozen strawberry layer and freeze for another 10 minutes.
- Whip heavy cream and powdered sugar until soft peaks form, then spread or pipe over the top of the cake.