Picture this: it’s 5:45 PM, the kids are buzzing, and my stomach is starting its own grumbling chorus. The dreaded “what’s for dinner?” question is looming. That’s exactly when my friend Lisa texted me a lifesaver: her recipe for what she called “Loaded Cheesy Pocket Tacos.” I was skeptical—anything that combines “loaded,” “cheesy,” and “quick” usually promises more than it delivers. But let me tell you, I was wrong. These little folded wonders weren’t just a hit; they started a weekly tradition in our house. The best part? They’re so simple, you can practically make them with your eyes closed (though I don’t recommend it!). I’m so excited to share this family favorite with you.
The Simple Story Behind These Cheesy Beef Tacos
Let’s be honest, traditional tacos are fantastic. But sometimes you want that same flavor in a neat, handheld package you can bake. That’s the beauty of these “pocket” tacos. They take inspiration from classic ground beef tacos and flautas, then wrap it all up into a crispy, portable bundle. I think of them as a love letter to busy weeknights. While many cultures have their own version of a stuffed and folded flatbread, this particular combo—seasoned beef, creamy salsa-cheese spread, and melty cheddar—is a purely modern, make-it-work-for-you kind of magic. It’s the recipe that says, “Yes, you can have a delicious, comforting meal without spending all night in the kitchen.”
Why You’ll Fall Head Over Heels for This Recipe
Why will you love these Loaded Cheesy Pocket Tacos? Let me count the ways! First, the texture is everything: a crispy, buttery tortilla shell gives way to a warm, creamy, and savory filling. Second, it’s a one-pan wonder for the filling, and assembly is a fun family activity. Third, they are incredibly versatile—perfect for dipping, fantastic for leftovers, and a total crowd-pleaser. They taste like you fussed for hours, but the secret is it comes together in about 30 minutes. It’s the kind of recipe that makes you feel like a kitchen superstar with minimal effort.
Perfect Occasions for Your Cheesy Pocket Tacos
This recipe is your new go-to for almost any gathering! They are perfect for game day finger food, cut into halves for easy grabbing. They make a brilliant quick weeknight dinner that even picky eaters adore. Having a casual movie night with friends? A platter of these is better than any store-bought snack. They’re also great for packed lunches (they reheat like a dream) and potlucks because they travel so well. Basically, any time you need a guaranteed win, these cheesy beef tacos are your answer.
What You’ll Need: The Ingredients List
Gathering your ingredients is the first step to taco bliss! Here’s everything you’ll need:
- 1 packet of taco seasoning
- 1 pound ground beef (I use 80/20 for the best flavor)
- 1/2 cup salsa (choose your heat level!)
- 8 ounces cream cheese, softened
- 2 tbsp melted butter
- 1 cup Cheddar cheese, shredded
- 12 six-inch tortillas (flour tortillas work best for folding)
No Problem! Handy Substitution Options
Don’t have something on hand? No worries! This recipe is wonderfully forgiving.
- Ground Beef: Swap for ground turkey, chicken, or a plant-based crumble.
- Taco Seasoning: Use 2 tbsp of your own homemade blend if you have one.
- Salsa: Tomato sauce or enchilada sauce can work in a pinch.
- Cream Cheese: For a lighter version, use Neufchâtel cheese.
- Cheddar Cheese: Monterey Jack, a Mexican blend, or even pepper jack are great.
- Flour Tortillas: Corn tortillas can be used, but warm them first so they don’t crack.
Let’s Get Cooking: Your Step-by-Step Guide
Ready to create some magic? Follow these simple steps for the most delicious cheesy beef tacos you’ve ever had.
Step 1: Cook the Ground Beef
Grab a large skillet and place it over medium heat. Crumble in your ground beef. Listen to that satisfying sizzle! Cook it, breaking it apart with your spoon, until it’s no longer pink and has beautiful brown bits. Once it’s cooked through, carefully drain the excess grease into a jar (not down the drain!). This leaves you with perfectly cooked, flavorful beef ready for seasoning. Pro tip: Don’t rush the browning; those little crispy bits add tons of flavor.
Step 2: Season the Beef
Now, sprinkle that packet of taco seasoning right over the hot beef. The aroma will instantly fill your kitchen with that classic, cozy taco smell. Follow the package instructions, which usually involve adding a bit of water. Let it simmer for a few minutes until the liquid is absorbed and the beef is coated in a fragrant, spiced glaze. This step turns plain beef into the star of your cheesy pocket tacos.
Step 3: Prepare the Cream Cheese Mixture
While the beef simmers, let’s make the creamy glue that holds everything together. In a medium bowl, take your softened cream cheese. Use a hand mixer or a sturdy whisk to whip it until it’s smooth and spreadable. Then, fold in your 1/2 cup of salsa. Watch as the white cream cheese transforms into a lovely, pinkish, speckled mixture. This combo adds a cool, tangy creaminess that balances the spiced beef perfectly.
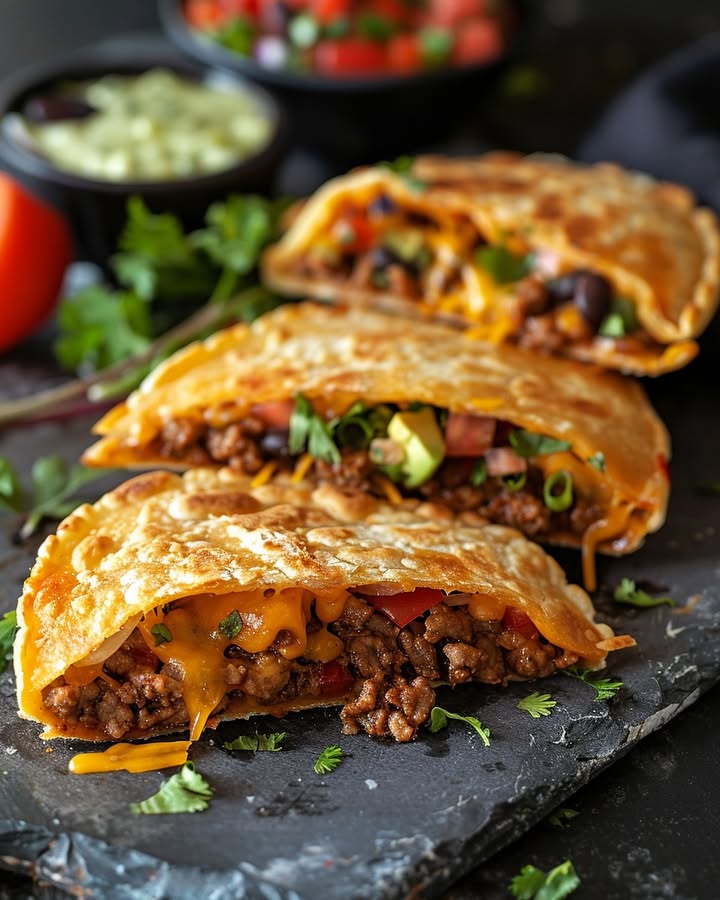
Step 4: Assemble the Tacos
Time for the fun part! Lay your tortillas out on a clean surface. Spread a heaping tablespoon of the cream cheese mixture in the center of each one. Next, add a generous spoonful of your seasoned beef on top, spreading it gently over the cream cheese. Finally, shower it with a hearty pinch of shredded cheddar cheese. You want each bite to be a gooey, cheesy delight!
Step 5: Form the Pockets
Now, fold them up like a burrito. Fold the bottom flap up over the filling, then fold in the sides, and finally roll it up snugly to create a neat, secure pocket. Place them seam-side down on your prepared baking sheet. Seeing them all lined up, ready for their buttery bath, is so satisfying. Chef’s tip: Don’t overstuff them! Too much filling will cause a blowout in the oven.
Step 6: Prepare for Baking
Preheat your oven to a nice, toasty 350°F (175°C). Lightly spray your baking sheet with cooking spray so nothing sticks. Arrange your folded pocket tacos on the sheet with a little space between them. Using a pastry brush, gently paint the tops of each tortilla with the melted butter. This simple step is the secret to that gloriously golden, crisp crust.
Step 7: Bake to Perfection
Slide your baking sheet into the hot oven. Bake for about 15 minutes. You’re waiting for that perfect moment when the tortillas turn a deep, golden brown and become crispy to the touch, and you can hear the cheese bubbling happily inside. Your kitchen will smell absolutely incredible. That’s your cue—they’re done!
Let’s Talk Timing
One of the best things about these Loaded Cheesy Pocket Tacos is how quickly they come together.
- Prep Time: 15 minutes
- Cooking Time: 15 minutes
- Total Time: About 30 minutes from fridge to table!
My Chef’s Secret for the Best Cheesy Beef Tacos
Here’s my little secret weapon: let the cream cheese mixture sit for 10 minutes after mixing. This allows the flavors from the salsa to really penetrate the cream cheese, creating a more cohesive and flavorful layer. It makes a noticeable difference in every bite!
A Little Extra Food for Thought
Did you know the combination of protein from the beef and calcium from the cheese isn’t just tasty, it’s a great team for your body? It’s a fun way to pack in essential nutrients like protein and calcium into a meal everyone loves. That’s a win-win in my book!
Your Kitchen Toolbox
You don’t need fancy gear for this recipe! Here’s what you’ll use:
- Large skillet
- Mixing bowls
- Hand mixer or whisk
- Baking sheet
- Pastry brush (or just use a spoon for the butter)
- Spatula and mixing spoons
Storing Your Loaded Cheesy Pocket Tacos
Got leftovers? Lucky you! Let the pocket tacos cool completely after baking. Then, place them in a single layer in an airtight container. They’ll keep in the fridge for up to 3 days. This prevents them from getting soggy from trapped steam.
To reheat, the oven or air fryer is your best friend. Pop them in at 350°F for about 10 minutes, or until hot and crispy again. The microwave will work in a pinch, but it does soften the tortilla.
You can also freeze these before baking! Assemble the pockets, place them on a parchment-lined baking sheet, and freeze until solid. Then transfer to a freezer bag. When ready to eat, bake from frozen, adding about 5-10 extra minutes to the cooking time.
Tips & Tricks for Taco Success
- Warm your tortillas for 10 seconds in the microwave before assembling. This makes them much more pliable and less likely to tear.
- Use a cookie scoop for the beef and cream cheese mixtures. It keeps your portions even and makes assembly super fast.
- For extra crispy edges, lightly spray the tops with cooking spray in addition to the butter.
- Set up a “pocket taco bar” with bowls of fillings and let everyone assemble their own! It’s a fun way to get the family involved.
How to Serve Them in Style
Presentation makes everything more fun! Try these ideas:
- Serve them on a big platter with bowls of sour cream, guacamole, and extra salsa for dipping.
- Slice them in half on a diagonal and stand them up in a basket lined with a colorful napkin.
- For a party, stick small colorful flags or toothpicks in each one to label different fillings (like “mild” or “spicy”).
- Add a bright, fresh side like a simple corn and black bean salad or a crisp green salad.
Feeling Creative? Try These 6 Variations!
Once you master the basic Loaded Cheesy Pocket Taco, the world is your oyster! Here are six delicious twists:
- Buffalo Chicken: Swap the beef for shredded cooked chicken tossed in buffalo sauce. Use a ranch-cream cheese mix instead of salsa.
- Breakfor-Tacos: Fill with scrambled eggs, cooked sausage, and cheddar cheese. Perfect for brunch!
- Veggie-Packed: Sauté bell peppers, onions, corn, and black beans. Use them as the main filling with the cream cheese spread.
- Philly Cheesesteak: Sauté thin slices of steak with onions and peppers. Mix a little provolone into the cream cheese.
- Pizza Pockets: Use Italian sausage, pizza sauce mixed into the cream cheese, and top with mozzarella.
- BBQ Pulled Pork: Fill with leftover pulled pork and mix some BBQ sauce into the cream cheese. Top with coleslaw after baking!
Speaking of easy, one-pan dinners, if you love the simplicity of this recipe, you’ll adore our One Pot Lemon Herb Chicken and Orzo. It’s another weeknight lifesaver!
Common Mistakes to Avoid
Avoiding these common pitfalls will guarantee perfect cheesy pocket tacos every single time.
Mistake 1: Using Cold Cream Cheese
This is the biggest one! If your cream cheese is straight from the fridge, it will be lumpy and impossible to spread smoothly. It can also tear your tortillas. Always plan ahead and let your cream cheese sit on the counter for at least 30 minutes before you start cooking. Soft cream cheese mixes beautifully and spreads like a dream.
Mistake 2: Overstuffing the Tortillas
It’s so tempting to load them up with that delicious filling! But if you add too much, you won’t be able to fold and seal them properly. The filling will spill out during baking, leaving a mess on your pan. A good rule is about 2 tablespoons of the cream cheese-beef combo per tortilla. Less is more for a neat, sealed pocket.
Mistake 3: Skipping the Butter Brush
You might think a quick spray of oil is enough. But melted butter is the secret ingredient for flavor and browning. It gives the tortilla that rich, golden, slightly crisp texture that takes it from good to “can’t-stop-eating” good. Don’t skip this simple step! A pastry brush makes it easy.
Mistake 4: Not Draining the Beef Enough
If you leave too much grease in the skillet after browning the beef, your taco filling will be soggy and oily. This moisture can seep into the tortilla, making it gummy instead of crisp. Take the extra minute to drain the beef well in a colander or tilt the skillet and spoon out the excess fat. Your pockets will thank you.
Frequently Asked Questions
Can I make these cheesy beef tacos ahead of time?
Absolutely! You have two great options. First, you can assemble them completely, place them on a baking sheet, cover tightly, and refrigerate for up to 24 hours before baking. Just add a couple of extra minutes to the bake time since they’ll be cold. Second, you can freeze the unbaked pockets for up to 3 months. Freeze them flat on a baking sheet first, then transfer to a bag. Bake from frozen, adding 5-10 minutes.
What’s the best way to reheat leftovers?
The oven or air fryer is the champion for reheating. They will restore the crispy texture of the tortilla. Reheat at 350°F for about 10 minutes, or until hot through. The microwave is the fastest method, but it will soften the shell. If you use the microwave, try finishing it in a hot, dry skillet for a minute to re-crisp.
Can I use corn tortillas instead of flour?
You can, but it requires a little extra care. Corn tortillas are more brittle and prone to cracking when folded cold. To use them, warm each corn tortilla briefly in a dry skillet or wrapped in a damp paper towel in the microwave until pliable. Then, assemble and bake as directed. The flavor will be different but still delicious!
My cream cheese mixture is lumpy. What did I do wrong?
The cream cheese was likely too cold. It’s very difficult to get cold cream cheese smooth without overworking it. Make sure it’s truly softened at room temperature. If you’re in a pinch, you can gently warm it in the microwave in 10-second bursts, but be careful not to melt it. Using a hand mixer also helps achieve a smoother blend than a spoon.
What can I serve with these pocket tacos?
They are a complete meal on their own, but I love serving them with sides that add freshness or contrast. A simple green salad, Mexican street corn (elote), a quick black bean salad, or just some lime wedges and cilantro are perfect. For dipping, offer salsa, sour cream, guacamole, or a jalapeño ranch dressing. They are incredibly versatile!
Can I use a different meat?
Of course! This recipe is very adaptable. Ground turkey, chicken, or pork work wonderfully. For a vegetarian version, a seasoned plant-based ground “meat” or even well-drained and mashed black beans are fantastic alternatives. Just season your substitute well to keep the flavor profile bold and exciting.
Why did my tortillas burst open in the oven?
This usually happens for one of two reasons: overstuffing or not sealing them properly. Make sure you are not adding too much filling. Also, when you fold, make sure the final seam is on the bottom and you’ve rolled it tightly. If you’re worried, you can secure the final seam with a toothpick before baking (just remember to remove it before eating!).
Is there a lower-carb option?
Yes, you can use low-carb or keto-friendly tortillas, which are widely available now. Just check that they are pliable enough to fold. You could also try making them into a “casserole” style by layering the fillings in a baking dish, topping with cheese, and baking until bubbly. Serve it with a spoon!
How can I make these spicier?
To turn up the heat, start by using a hot or extra hot taco seasoning packet. Choose a spicy salsa, or add a finely chopped jalapeño (seeds and all) to the beef while it cooks. You can also use Pepper Jack cheese instead of cheddar. A dash of cayenne pepper in the cream cheese mixture will also do the trick!
Can I cook these in an air fryer instead of an oven?
You sure can, and they come out extra crispy! Preheat your air fryer to 370°F. Place the pocket tacos in the basket in a single layer (don’t overcrowd). Lightly spray with oil and cook for 6-8 minutes, flipping halfway through, until golden brown and crispy. This is a fantastic method for cooking smaller batches quickly.
I hope you and your family love these Loaded Cheesy Pocket Tacos as much as mine does. They’ve saved countless busy evenings and turned into a fun food we all look forward to. For more fantastic, family-friendly dinner ideas like this, be sure to explore our entire collection of delicious main dish recipes. Whether you’re craving something light like our Mediterranean Chicken and Couscous Bowl, something with a kick like these Spicy Honey Lime Chicken Thighs, or something wonderfully comforting like a Creamy Garlic Butter Chicken and Rice Skillet, we have so many recipes to share with you. Happy cooking, and enjoy every delicious, cheesy bite!
Cheesy Beef Tacos
Ingredients
Equipment
Method
- Cook the ground beef in a large skillet over medium heat until no longer pink, then drain excess grease.
- Sprinkle taco seasoning over the cooked beef and follow package instructions, usually adding water, then simmer until liquid is absorbed.
- In a medium bowl, whip softened cream cheese until smooth, then fold in salsa.
- Lay tortillas out and spread a tablespoon of cream cheese mixture in the center of each.
- Add a spoonful of seasoned beef on top of the cream cheese mixture, then sprinkle shredded cheddar cheese over the beef.
- Fold the tortillas up like a burrito and place seam-side down on a baking sheet.
- Preheat oven to 350°F (175°C) and lightly spray baking sheet with cooking spray.
- Brush the tops of each folded taco with melted butter and bake for about 15 minutes or until golden brown and crispy.