
Let me tell you about the dessert that made me feel like a real pastry chef for the first time. This is not just a cheesecake. This is my show-stopping, jaw-dropping White Chocolate Raspberry Truffle Cheesecake. It’s my go-to when I want to see my husband’s eyes light up or impress my book club. The magic is in the layers: a rich Oreo crust, a creamy white chocolate filling swirled with tangy, jewel-toned raspberry sauce. It looks and tastes like it came from a high-end bakery, but you make it with love in your own kitchen. I’ve perfected this recipe over years, and I’m thrilled to share it with you.
A Slice of Indulgence: The Story Behind This Truffle Cheesecake
This recipe is my proud homemade take on a restaurant favorite. While the exact origins are a well-kept secret, the combination of white chocolate and raspberry is a classic for a reason. It’s a dance of luxury and fruitiness that feels special. My version started after one too many expensive slices at a fancy dinner. I thought, “I can make this!” After several trials (some delicious, some… less so), I cracked the code. The Oreo crust adds a deep chocolate note that balances the sweetness. The cheesecake itself is velvety and dense, studded with melted white chocolate bits. Every bite tells the story of a fun kitchen adventure, and now it’s part of our family’s celebration tradition.
Why This Recipe Will Be Your New Favorite
You will absolutely adore this White Chocolate Raspberry Cheesecake. First, the flavors are a perfect match. Sweet, creamy white chocolate meets the bright, tart pop of raspberry. It’s a combination that sings. Second, while it looks impressive, the steps are straightforward. The water bath is your best friend for that perfect, crack-free top. Finally, it feeds a crowd and can be made ahead. This takes the stress out of entertaining. You get to be the hero who brings out this gorgeous masterpiece!
When to Whip Up This Spectacular Dessert
- Holiday Gatherings: It’s a star on any Thanksgiving or Christmas table.
- Birthdays: Skip the store-bought cake and make a personalized gift from the heart.
- Anniversaries & Romantic Dinners: Nothing says “I love you” like a homemade gourmet dessert.
- Potlucks & Parties: Get ready for recipe requests and empty plates.
- Just Because: Sometimes a Tuesday deserves a slice of heaven.
Gathering Your Ingredients for White Chocolate Raspberry Truffle Cheesecake
For the Crust:
- 2 packages (about 28 cookies) of Oreo cookies, cream filling removed
- 1 stick (1/2 cup) of unsalted butter, melted
For the Raspberry Sauce:
- 2 cups fresh or frozen raspberries (no need to thaw if frozen)
- 1/2 cup granulated sugar
- 1 tablespoon fresh lemon juice
For the Cheesecake Filling:
- 4 (8 oz) packages full-fat cream cheese, at room temperature
- 1 1/4 cups granulated sugar
- 1/2 cup full-fat sour cream, at room temperature
- 1 teaspoon pure vanilla extract
- 4 large eggs, at room temperature
- 4 oz good-quality white chocolate, finely chopped
For the Garnish:
- 2 oz white chocolate, for shaving
- 1 cup heavy whipping cream, cold
- 1/4 cup powdered sugar
- Fresh raspberries
- Remaining raspberry sauce
Smart Ingredient Swaps
No fresh raspberries? Frozen work perfectly for the sauce. For the crust, any chocolate sandwich cookie will do. Out of sour cream? Full-fat plain Greek yogurt is a great substitute. If you’re not a white chocolate fan, you can omit it from the filling, but it adds a lovely truffle-like texture. For a nuttier crust, you could use 2 cups of graham cracker crumbs mixed with the melted butter.
Creating Your Masterpiece: Step-by-Step
Step 1: Craft the Chocolate Crust
First, preheat your oven to 475°F (245°C). Grab your food processor and let it whirl those Oreo cookies (cream centers removed) into fine, dark crumbs. It should look like rich, black sand. Pour these crumbs into a bowl and drizzle the melted butter over them. Mix until every crumb is coated and the mixture holds together when pinched. Dump it into your 9-inch springform pan. Use the bottom of a sturdy drinking glass to press the crumbs firmly and evenly across the bottom and about an inch up the sides. The smell is already amazing! Pro tip: Pop the crust in the freezer now. This firms up the butter so it won’t crumble when you add the filling.
Step 2: Simmer the Ruby Raspberry Sauce
While the crust chills, make your raspberry magic. In a medium saucepan, combine the raspberries, sugar, and lemon juice. Turn the heat to medium. Watch as the berries begin to soften, release their gorgeous red juice, and bubble. Stir it frequently with a wooden spoon, gently crushing the berries as they cook. Let it simmer for about 10 minutes until it’s thick and jammy. Now, for a super smooth sauce, press it through a fine-mesh sieve into a bowl. This removes the seeds, leaving you with a stunning, velvety puree. Let this cool to room temperature. The sweet-tart aroma will fill your kitchen!
Step 3: Whip Up the Luxurious Filling
For the heart of the cheesecake, your ingredients must be at room temperature. This is the secret to a silky-smooth filling without lumps. In your stand mixer with the paddle attachment, beat the cream cheese on medium until it’s completely smooth and creamy. Stop and scrape down the bowl. Add the sugar, sour cream, and vanilla. Mix on high for a good minute or two until it’s fluffy and well combined. Reduce the speed to medium-low. Add the eggs, one at a time, letting each fully incorporate before adding the next. Mix just until everything is blended. Overmixing adds too much air, which can cause cracks.
Step 4: Layer and Swirl with Love
Take your crust from the freezer. Sprinkle the 4 oz of chopped white chocolate evenly over the bottom. This creates little pockets of melted truffle in the finished cake. Pour in half of your creamy cheesecake filling and smooth the top. Now, drizzle about 1/4 cup of your cooled raspberry sauce over this layer. Take a butter knife and gently swirl it through the filling to create beautiful red ribbons. Pour the rest of the filling on top. Smooth it out, then add another few tablespoons of sauce and swirl again. Be gentle—you want swirls, not a muddled mess.
Step 5: Bake in a Water Bath
This step is crucial for gentle, even cooking. Place your springform pan into a large oven bag (my leak-proof trick!) or wrap the bottom and sides tightly in a double layer of heavy-duty foil. Set the pan inside a large roasting pan. Bring a kettle of water to a boil. Carefully pour the hot water into the roasting pan until it comes halfway up the sides of the springform pan. Gently place the whole setup in the oven. Bake at 475°F for 12 minutes, then without opening the door, reduce the heat to 350°F (175°C). Bake for another 60 minutes. The top will be lightly golden and set, but the center will still have a slight jiggle.
Step 6: The Patience Game: Cooling and Chilling
When the bake time is up, turn the oven off. Crack the door open just an inch, and let the cheesecake cool inside the oven for 2 hours. This slow cooling helps prevent dramatic temperature changes that lead to cracks. After 2 hours, remove it from the water bath and the roasting pan. Let it cool completely on the counter. Then, cover the top with plastic wrap and refrigerate it overnight. I know it’s hard to wait, but this sets the texture perfectly.
Step 7: The Final Flourishes
You’re in the home stretch! Just before serving, use a vegetable peeler to shave curls from your 2 oz white chocolate bar. Set these delicate curls aside. Pour the cold heavy cream and powdered sugar into a clean, cold mixer bowl. Using the whisk attachment, whip on high until stiff peaks form—this takes about 5-6 minutes. Be careful not to over-whip into butter!
Step 8: The Grand Finale: Serving
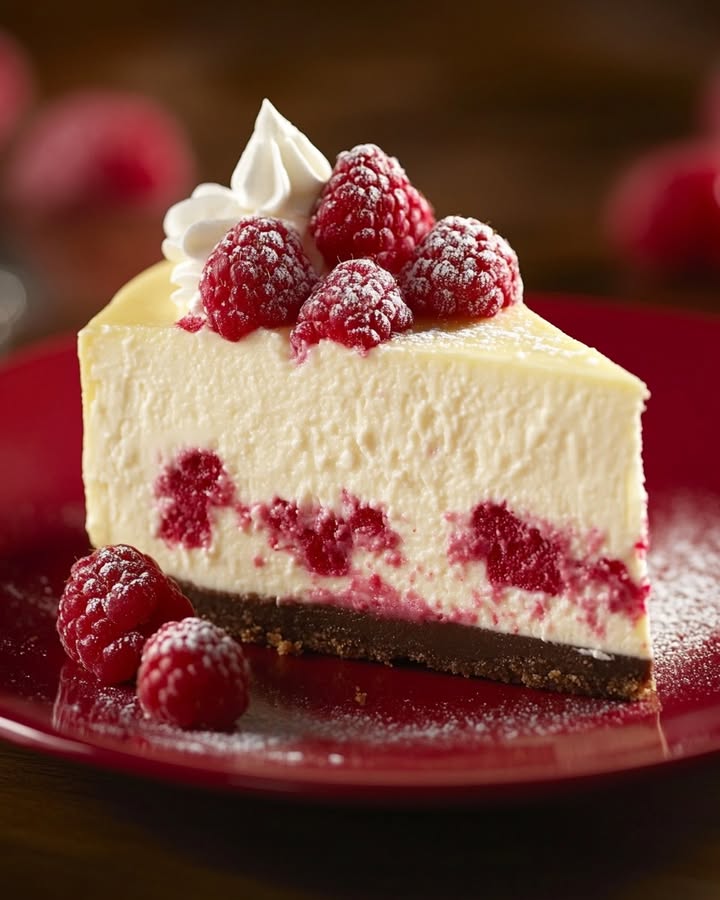
Run a thin knife around the edge of the chilled cheesecake and release the springform pan clasp. Carefully transfer the cake to a serving plate. Sprinkle the gorgeous white chocolate shavings all over the top. Pipe or dollop the fresh whipped cream around the edges. Artfully place fresh raspberries on the cream. Finally, warm the leftover raspberry sauce slightly for a drizzle that cascades beautifully over each slice. Prepare for applause!
Your Cheesecake Timeline
Prep Time: 45 minutes (plus sauce cooling)
Cook Time: 1 hour 12 minutes
Cooling/Chilling Time: 10+ hours (overnight)
Total Time: About 12 hours (mostly hands-off)
Servings: 12-16 slices
My Chef’s Secret: The Room Temperature Rule
My number one, cannot-skip secret is room temperature everything for the filling. Cold cream cheese will never blend smoothly, no matter how long you mix. It leaves tiny lumps. Take your cream cheese, sour cream, and eggs out of the fridge at least 2 hours before you start. This simple step guarantees a luxuriously velvety filling that bakes evenly and flawlessly.
A Sweet Bit of Extra Info
Did you know the term “truffle” in this cheesecake doesn’t refer to the mushroom? It refers to the classic chocolate truffle candy, which is a round, creamy, chocolate-centered confection often dusted with cocoa. Our cheesecake mimics that experience with its rich, creamy white chocolate-filled center swirled with fruit. It’s like a giant, sliceable truffle!
Equipment You’ll Need
- 9-inch springform pan
- Stand mixer or hand mixer
- Food processor
- Large roasting pan for water bath
- Oven bag or heavy-duty aluminum foil
- Fine-mesh sieve
- Medium saucepan
- Rubber spatula and butter knife for swirling
Storing Your White Chocolate Raspberry Truffle Cheesecake
Once served, any leftover cheesecake should be covered tightly with plastic wrap or stored in an airtight container in the refrigerator. It will keep beautifully for up to 5 days. The flavors actually deepen and meld on the second day, making it even more delicious.
For longer storage, you can freeze the whole cheesecake or individual slices. Wrap the un-sliced, chilled cheesecake tightly in several layers of plastic wrap, then a layer of aluminum foil. It can be frozen for up to 2 months. Thaw it overnight in the refrigerator before serving.
If you have leftover raspberry sauce, store it in a sealed jar or container in the fridge for up to a week. You can also freeze the sauce for later use. It’s fantastic on pancakes, yogurt, or ice cream!
Tips and Advice for Cheesecake Glory
- No Peeking: Resist the urge to open the oven door during baking or the initial cooling. Sudden temperature drops are a cheesecake’s enemy.
- Scrape the Bowl: Frequently scrape down the sides and bottom of your mixing bowl during the filling stage. This ensures everything is evenly mixed.
- Easy Slicing: For picture-perfect slices, dip a sharp knife in hot water, wipe it dry, and then cut. Repeat for each slice.
- Plan Ahead: This is a make-ahead dessert. The overnight chill is non-negotiable for the perfect sliceable texture.
Presentation Ideas to Wow Your Guests
- Serve on a beautiful cake stand for immediate elevation.
- Drizzle each individual plate with raspberry sauce before placing the slice on top.
- Add a sprig of fresh mint next to the raspberries for a pop of green.
- For a holiday touch, sprinkle with edible gold dust or festive sprinkles.
- Serve with a small side of extra whipped cream for those who want more.
Six Delicious Recipe Variations to Try
1. Dark Chocolate Raspberry Truffle Cheesecake: Swap the white chocolate in the filling for dark chocolate. Use a dark chocolate cookie for the crust. The deeper flavor is incredible.
2. Lemon Blueberry Swirl Cheesecake: Replace the raspberry sauce with a blueberry sauce. Add 2 tablespoons of lemon zest to the cheesecake filling. It’s bright and summery.
3. Chocolate Chip Cookie Dough Cheesecake: Use a chocolate chip cookie crust. Omit the raspberry swirl. Fold mini chocolate chips and pieces of edible cookie dough into the filling.
4. Peanut Butter Cup Cheesecake: Use an Oreo or Nutter Butter crust. Swirl melted peanut butter instead of raspberry sauce. Top with chopped peanut butter cups.
5. Salted Caramel Apple Cheesecake: In the fall, swap the raspberry for an apple compote swirl. Drizzle the top with salted caramel sauce and a sprinkle of sea salt.
6. Mini Cheesecakes: Use a muffin tin with liners. Make mini crusts, fill, and swirl. Bake for a shorter time (about 20-25 mins). Perfect for parties!
Common Mistakes to Avoid with Your Cheesecake
Mistake 1: Using Cold Ingredients
This is the most common error. Cold cream cheese and eggs do not incorporate smoothly. You’ll end up with a lumpy filling, no matter how long you mix. Lumps can lead to an uneven bake and a less-than-creamy texture. Always plan ahead. Let your dairy and eggs sit on the counter for a few hours until they are no longer cold to the touch. Your mixer will thank you, and your filling will be silky smooth.
Mistake 2: Skipping the Water Bath
It might seem like an extra, messy step, but the water bath is your insurance policy. Cheesecake is delicate and needs gentle, moist heat to cook evenly without cracking or curdling. Baking it directly on the rack often causes the edges to overcook and pull away from the center, leading to a giant crack. The steam from the water bath creates a perfect environment. Use the oven bag trick to make it leak-proof and simple.
Mistake 3: Overmixing the Filling
Once you add the eggs, less is more. Overmixing on high speed incorporates too much air into the batter. Those air bubbles expand in the oven and then collapse as the cake cools. This is a major cause of cracks and a puffy, then sunken, texture. After adding the eggs, mix on low or medium-low speed just until each egg disappears. Stop the mixer as soon as the last bit of yellow yolk is blended in.
Mistake 4: Not Letting it Cool Slowly
Pulling a hot cheesecake out of the oven and plopping it on the counter is a shock. The sudden temperature change makes the center fall and the top crack. Patience is key. Letting it cool in the turned-off oven with the door cracked allows it to gradually adjust to the cooler air. This slow process helps the structure set firmly, giving you that perfect, dense-yet-creamy New York-style texture.
Mistake 5: Cutting Into a Warm Cheesecake
I know the temptation is real! But a cheesecake needs time to fully set. If you cut into it before it has chilled overnight, it will be a gooey, messy puddle—no matter how done it looked in the oven. The long chill in the fridge is the final setting stage. It allows the fats to firm up so you get a clean, beautiful slice. Make it a day ahead. Your future self will be so glad you did.
Your White Chocolate Raspberry Truffle Cheesecake Questions, Answered
Can I use frozen raspberries for the sauce?
Absolutely! Frozen raspberries work perfectly for the raspberry sauce. There’s no need to thaw them first. Just add them directly to the saucepan with the sugar and lemon juice. Frozen berries are often picked at their peak and can be more economical than fresh, especially when making a cooked sauce. The result will be just as flavorful and vibrantly colored as using fresh berries.
Why did my cheesecake crack on top?
Cracks usually happen from one of three things: overmixing the batter (adding too much air), a sudden temperature change (like opening the oven door or cooling too fast), or overbaking. Following the water bath method, the slow cooling in the oven, and mixing the eggs gently on low speed are your best defenses. But remember, a cracked cheesecake still tastes incredible! Just cover it with whipped cream and berries, and no one will ever know.
Do I have to strain the raspberry sauce?
You don’t have to, but I highly recommend it. Straining removes all the tiny raspberry seeds, giving you a super smooth, luxurious sauce that swirls beautifully and feels elegant on the palate. If you don’t mind the seeds and prefer a more rustic texture, you can skip this step. Just mash the cooked berries well with a fork or potato masher.
How can I tell when the cheesecake is done baking?
The cheesecake is done when the edges are set and slightly puffed, but the center (about a 3-inch circle in the middle) still has a slight jiggle when you gently shake the pan. It should look set, not liquidy. Remember, it will continue to cook and firm up as it cools in the turned-off oven. Overbaking is a sure path to a dry texture and cracks, so it’s better to err on the side of a slightly jiggly center.
Can I make this without a stand mixer?
Yes, you can! A hand-held electric mixer will work just fine. Make sure your cream cheese is very soft. Beat it well in a large bowl before adding the other ingredients. You’ll just need a little more elbow grease and time to get it perfectly smooth. Just be sure to scrape the bowl often with a spatula to incorporate everything evenly.
What’s the best white chocolate to use?
Look for a bar of baking white chocolate or high-quality white chocolate chips. Check the ingredients list—it should list cocoa butter. Avoid white chocolate “coating” or “morsels” that use vegetable oil instead. A good white chocolate will melt smoothly and provide a rich, creamy flavor, not just sweetness. Ghirardelli or Baker’s brands are good, widely available options.
How far ahead can I make this cheesecake?
This cheesecake is an ideal make-ahead dessert. You can bake it up to two days before you plan to serve it. Keep it covered in the refrigerator. The flavors meld and improve. You can even freeze it (ungarnished) for up to 2 months. Add the fresh whipped cream, berries, and final drizzle of sauce on the day you serve it for the best presentation and texture.
My springform pan leaks. What can I do?
This is a common fear! My favorite foolproof method is to use a large oven bag. Simply place the springform pan inside the bag and gather the excess bag underneath the pan before placing it in the water bath. If you don’t have an oven bag, wrap the bottom and up the sides of the pan tightly with two layers of heavy-duty aluminum foil. This usually keeps any water from seeping in.
Can I use a different pan?
A springform pan is essential for this recipe. The removable sides allow you to get the tall, beautiful cheesecake out without destroying it. A regular cake pan won’t work because you can’t remove the cake in one piece. If you’re in a pinch, you could use a deep-dish pie plate, but you’ll likely have extra batter, and you’ll serve it directly from the dish.
The top of my cheesecake browned too much. What happened?
The initial high-temperature bake is designed to give it that lovely light golden color. If it got darker than you wanted, your oven might run hot. Use an oven thermometer to check its accuracy. Next time, you can tent the top loosely with a piece of aluminum foil halfway through the lower-temperature baking stage if you see it browning quickly.
The Final Slice
There you have it—my cherished recipe for a truly spectacular White Chocolate Raspberry Truffle Cheesecake. It’s more than a dessert; it’s a project of love that yields delicious rewards. Don’t be intimidated by the steps. Take your time, enjoy the process of swirling that beautiful red sauce into the creamy filling, and trust the method. When you present this stunning cake and watch the first slice come out clean, you’ll feel like a rock star. So grab your apron, preheat that oven, and get ready to make some sweet memories. Happy baking
Cheesy Burger Soup
Ingredients
Equipment
Method
- Preheat oven to 475°F (245°C) and process Oreo cookies into fine crumbs.
- Mix cookie crumbs with melted butter and press into a 9-inch springform pan.
- Chill the crust in the freezer.
- In a saucepan, combine raspberries, sugar, and lemon juice; simmer for 10 minutes and strain to remove seeds.
- In a mixer, beat cream cheese until smooth, then add sugar, sour cream, and vanilla; mix until fluffy.
- Add eggs one at a time, mixing on low speed until just blended.
- Sprinkle chopped white chocolate over the crust and pour in half the cheesecake filling.
- Drizzle raspberry sauce over the filling and swirl gently, then pour in the remaining filling.
- Prepare a water bath and bake in the oven for 12 minutes, then reduce temperature to 350°F (175°C) and bake for 60 minutes.
- Let cheesecake cool in the oven with the door ajar for 2 hours, then refrigerate overnight.
- Whip heavy cream and powdered sugar, then garnish cheesecake with whipped cream, raspberries, and chocolate shavings.