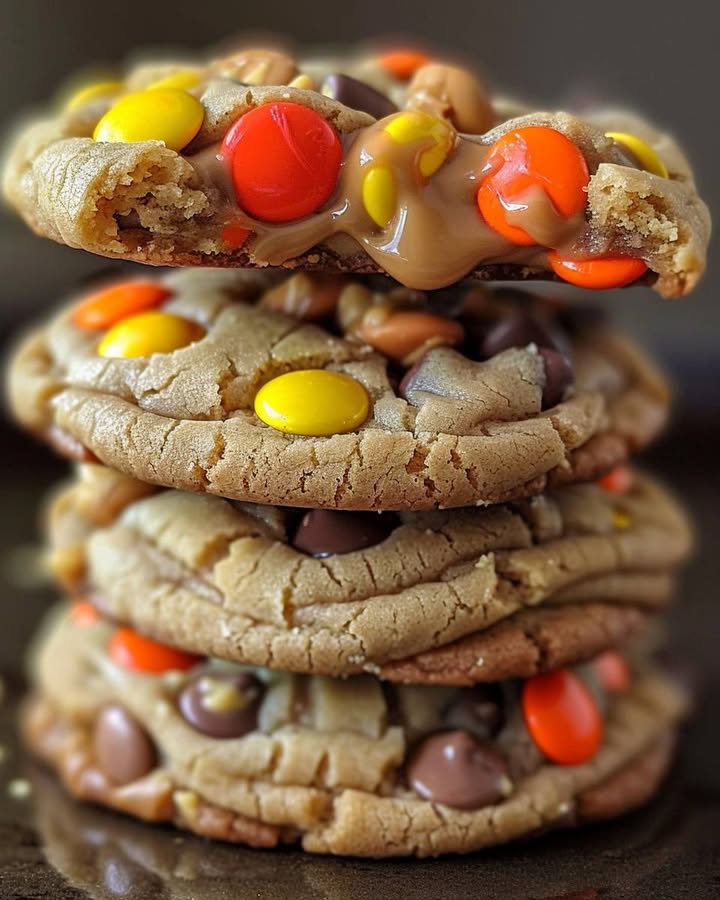
The Ultimate Fusion: Mini Reeses Pieces Stuffed Cookies
Have you ever had a craving so specific it feels like a mission? I sat there one day dreaming of a cookie that wasn’t just with peanut butter cups, but all about them. I wanted the chocolate, the peanut butter, the crunchy candy shell—all in one glorious, warm, chewy bite. After a few playful (and delicious) experiments in my kitchen, I landed on these magical Mini Reeses Pieces Stuffed Cookies. They’re not just cookies; they’re surprise packages of joy. Every single bite guarantees a gooey, creamy peanut butter center that makes my kids (and my inner child) do a little happy dance.
A Sweet Mash-Up Story
Reese’s Peanut Butter Cups need no introduction. They are an iconic American candy bar, a perfect marriage of chocolate and peanut butter invented in the 1920s. But the tiny, colorful Reeses Pieces? They burst onto the scene in a much bigger way in 1982, famously hitching a ride to fame in the movie E.T. the Extra-Terrestrial. Their crunchy shell and melty peanut butter center made them an instant snack favorite. This recipe is my love letter to that classic combo. It takes the beloved stuffed cookie trend and infuses it with pure candy nostalgia. It’s a modern twist on a timeless flavor, perfect for today’s bakers who love a fun, shareable treat.
Why You’ll Absolutely Adore This Recipe
If you’re a peanut butter and chocolate fan, this is your sign from the universe to preheat the oven. Here’s why these cookies are about to become your new favorite:
- Double the Peanut Butter: You get it in the creamy filling and the candy pieces. It’s a flavor explosion!
- Fun to Make: Stuffing the cookies feels like a cute craft project. It’s incredibly satisfying to create those little peanut butter pockets.
- Maximum Crowd-Pleaser: I’ve brought these to every gathering, from book club to a kids’ soccer party. The plate is always empty first.
- Surprisingly Simple: The process is straightforward. If you can make basic chocolate chip cookies, you can absolutely master this stuffed version.
The Perfect Time to Bake a Batch
These cookies are more than just dessert; they’re little edible celebrations. They shine at:
- Game Day Gatherings: Skip the basic chips and dip. These cookies will make you the MVP of the snack table.
- Holiday Cookie Exchanges: Stand out from the sea of sugar cookies with this unique and decadent option.
- School Bake Sales: They sell out instantly. Trust me, I’ve been the “cookie mom” more than once!
- “Just Because” Treats: A rough Tuesday afternoon is dramatically improved by the smell of these baking. It’s self-care, with sprinkles… well, with candy pieces.
What You’ll Need: Your Cookie Toolkit
Gather these simple ingredients. Seeing them all together is half the fun!
For the Cookies:
- 1 cup unsalted butter, softened
- 1 cup light brown sugar, packed
- 1/2 cup granulated sugar
- 2 large eggs
- 2 teaspoons vanilla extract
- 2 1/2 cups all-purpose flour
- 1 teaspoon baking soda
- 1/2 teaspoon salt
- 1 cup Mini Reeses Pieces
- 1/2 cup semi-sweet chocolate chips (optional, for drizzling)
For the Secret Filling:
- 1 cup creamy peanut butter
Smart Swaps & Substitutions
Don’t have something? No panic! Here are some easy fixes:
- Butter: Salted butter works; just omit the extra 1/2 teaspoon salt from the recipe.
- Peanut Butter: For a stronger peanut flavor, use natural peanut butter (just stir it well first). For allergies, sunflower seed butter is a great alternative.
- Flour: For a slightly chewier cookie, swap 1/4 cup of the all-purpose flour for bread flour.
- Candy: No Mini Reeses Pieces? Regular-sized ones chopped up, or even peanut butter chips, will work in a pinch.
Let’s Bake! Your Step-by-Step Guide to Cookie Bliss
Put on some music, tie on your apron, and let’s create something amazing. I’ll walk you through every step.
Step 1: Cream the Butter and Sugars
In your largest mixing bowl, add the softened butter, brown sugar, and white sugar. Beat them together with a hand mixer or stand mixer for a good 2-3 minutes. You want it to become light, fluffy, and pale in color. This isn’t just mixing; you’re creaming in little air bubbles that will make your cookies tender. The scent of brown sugar and butter at this stage is pure comfort. Pro tip: Your butter is perfectly softened when you can press a fingerprint into it easily. Too melted will make greasy cookies!
Step 2: Add the Eggs and Vanilla
Crack in one egg at a time, beating well after each addition. This helps the eggs emulsify properly into the butter and sugar, creating a smooth, cohesive base. Finally, pour in that lovely vanilla extract. That sweet, fragrant aroma will start to fill your kitchen. The mixture might look a little curdled after adding the eggs—don’t worry! It will come together beautifully once you add the flour.
Step 3: Combine the Dry Ingredients
In a separate, medium bowl, grab your whisk. Whisk together the flour, baking soda, and salt. This evenly distributes the leavening agent so every cookie rises the same. Now, with your mixer on low speed, gradually add the dry ingredients to the wet bowl. Mix just until no more white streaks of flour remain. Overmixing here is the enemy of a soft cookie—it develops the gluten and leads to toughness.
Step 4: Fold in Mini Reeses Pieces
This is the colorful part! Dump that whole cup of vibrant Mini Reeses Pieces into the dough. Put away the mixer and use a sturdy spatula or wooden spoon. Gently fold the candy into the dough until they’re evenly scattered. The dough will be thick and studded with colorful bits. It already looks like a party.
Step 5: Preheat and Prepare Baking Sheets
Turn your oven on to 350°F (175°C). This gives it plenty of time to reach the perfect, even temperature. While it heats, line your baking sheets with parchment paper or silicone baking mats. This is my non-negotiable secret for perfect cookies: no sticking, easy cleanup, and even browning.
Step 6: Form the Dough Balls
Now for the magic trick—the stuffing! I use a #40 cookie scoop (about 1.5 tablespoons) for perfect portions. Scoop a ball of dough and flatten it slightly in your palm. Use a small spoon or a melon baller to place about 1 teaspoon of creamy peanut butter right in the center. Try to keep it away from the very edges.
Step 7: Seal and Shape
Carefully fold the edges of the dough up and over the peanut butter center. Pinch the seams closed to fully encase the filling. Then, gently roll it between your palms to form a smooth ball. Place each stuffed cookie ball on your prepared sheet, spacing them about 2 inches apart. They need a little room to spread and become their beautiful, golden selves.
Step 8: Bake the Cookies
Slide the sheets into your preheated oven. Bake for 10-12 minutes. You’re looking for set edges that are lightly golden. The centers will still look a little soft and puffy—that’s perfect! They will set up as they cool. Let them rest on the hot baking sheet for 5 minutes; this finishes the cooking without over-baking. Then, move them to a wire rack to cool completely. Chef’s tip: For super round cookies, take a round cookie cutter or a large glass and gently swirl it around each cookie right when it comes out of the oven to “tuck” in the edges.
Step 9: The Optional (But Highly Recommended) Drizzle
Once the cookies are completely cool, you can gild the lily. Melt your semi-sweet chocolate chips gently in the microwave (30-second bursts, stirring in between). Drizzle the melted chocolate over the cookies with a fork or a small piping bag. It adds a beautiful professional touch and that last hit of chocolate. Let the drizzle set before stacking or serving.
The Clock is Ticking: Your Baking Timeline
Here’s a quick breakdown so you can plan your baking session perfectly:
- Prep Time: 20 minutes (it goes fast once you get rolling!)
- Cooking Time: 12 minutes per batch
- Cooling Time: 15-20 minutes
- Total Time: About 50 minutes
- Servings: Makes approximately 24 glorious cookies
My Secret Weapon for the Perfect Cookie
Here’s my little secret that makes all the difference: chill the stuffed dough balls for 15-20 minutes before baking. I know, I know, it’s hard to wait! But this simple step firms up the butter. It prevents the cookies from spreading too thin and losing their beautiful, plump shape. It also helps that peanut butter center stay perfectly tucked inside. It’s the difference between a good cookie and a bakery-worthy one.
A Fun Candy Fact
Did you know the original colors for Reeses Pieces were orange, yellow, and brown? The tan or brown pieces were meant to represent… well, peanut butter! They later added green and blue to the mix, making them even more fun for baking. So when you’re folding in those colorful bits, you’re mixing in a little bit of candy history.
Gear Up: Necessary Equipment
You don’t need fancy tools, but these basics will make it a breeze:
- Large and medium mixing bowls
- Hand mixer or stand mixer
- Whisk
- Rubber spatula or wooden spoon
- Measuring cups and spoons
- Cookie scoop (highly recommended for even size!)
- Baking sheets
- Parchment paper or silicone baking mats
- Wire cooling rack
Keeping the Goodness Fresh: Storage Tips
These cookies store beautifully, but they rarely last long at my house! For maximum freshness, store the completely cooled cookies in an airtight container at room temperature. Place a piece of plain bread in the container with them. The cookies will draw moisture from the bread, staying soft and chewy for up to 4 days. It’s an old baker’s trick that really works!
You can also freeze both the unbaked dough balls and the baked cookies. To freeze unbaked dough, form and stuff the cookies, then place them on a baking sheet to flash freeze until solid. Once frozen, transfer them to a freezer bag. You can bake them straight from frozen, just add 1-2 extra minutes to the bake time. It’s like having fresh-baked cookies on demand!
For baked cookies, let them cool completely, then layer them between sheets of parchment paper in a freezer-safe container. They’ll keep for up to 3 months. Thaw at room temperature or gently warm them in the microwave for a few seconds to get that just-baked feel again.
My Best Tips & Friendly Advice
- Room Temp is Key: Using room temperature eggs and butter is crucial for a smooth, emulsified dough.
- Don’t Over-Bake: They will continue to cook on the hot tray. Look for golden edges, not golden all over.
- Seal Well: Take an extra second to really pinch the dough seams shut. This keeps the peanut butter from oozing out during baking.
- Bake in Batches: Always use cool baking sheets. Putting dough on a hot sheet will cause it to spread immediately.
Make Them Look Gorgeous: Presentation Ideas
Making them look pretty is half the fun of sharing!
- Stack them on a cute cake stand with a little dusting of powdered sugar.
- For a gift, place them in a clear cellophane bag tied with a brown and orange ribbon (Reese’s colors!).
- Serve them on a platter with a bowl of extra Reeses Pieces for sprinkling.
- Pair them with a tall, cold glass of milk for the ultimate photo op.
Mix It Up! 6 Delicious Recipe Variations
Love the base recipe? Try these fun twists next time:
- Dark Chocolate Drizzle: Use dark chocolate chips for the drizzle. It cuts the sweetness with a rich, sophisticated flavor.
- Peanut Butter Chip Swap: Replace the Mini Reeses Pieces with peanut butter chips. This creates an even more intense, uniform peanut butter flavor throughout the cookie.
- “Inside-Out” Reeses: Chop up full-size Reeses Peanut Butter Cups and use those as the mix-in instead of the Pieces. You’ll get big chunks of chocolate and peanut butter.
- Saltiest Sweet: Sprinkle a tiny pinch of flaky sea salt on top of each cookie right when it comes out of the oven. The salty-sweet combo is incredible.
- Cookie Sandwich: Sandwich a small scoop of vanilla ice cream between two cooled cookies for the ultimate ice cream cookie sandwich. Roll the edges in mini Reeses Pieces.
- Gluten-Free Goodness: Use a 1:1 gluten-free all-purpose flour blend. The texture will be slightly different but still absolutely delicious.
Common Mistakes to Avoid
Let’s steer clear of a few easy pitfalls to guarantee cookie perfection.
Mistake 1: Using Butter That’s Too Soft or Melted
This is the number one reason cookies spread into flat pancakes. If your butter is oily or melted, it can’t hold air during creaming. Your cookies will lack structure and bake out thin and greasy. The fix is simple: plan ahead. Take your butter out of the fridge about an hour before you start. You want it cool to the touch but soft enough to easily indent with your finger.
Mistake 2: Overmixing the Dough After Adding Flour
Once you add the flour, gluten starts to develop. The more you mix, the tougher and chewier (in a bad way) your cookies become. Mix the dry ingredients in on low speed, and stop the moment you no longer see dry flour streaks. It’s okay if there’s a tiny bit left; the final folding of the candy will incorporate it.
Mistake 3: Not Sealing the Peanut Butter Filling Completely
If you see peanut butter leaking out the sides as they bake, the seal wasn’t tight enough. When you shape the ball, really pinch that seam and then roll it smooth in your hands. A good seal means every bite has a hidden, molten core instead of a burned, leaked-out mess on your baking sheet.
Mistake 4: Overcrowding the Baking Sheet
Giving your cookies a 2-inch perimeter isn’t just a suggestion. They need space for hot air to circulate so they bake evenly. Crowded cookies will bake into each other, creating odd shapes and uneven cooking. It’s worth baking in batches with cool sheets for perfect, round results every time.
Your Questions, Answered (FAQ)
Can I use natural peanut butter for the filling?
Yes, you can! The oil separation in natural peanut butter can sometimes make it a bit trickier to work with. For the best results, stir your natural peanut butter very well right before using it. You might even want to chill it for 15-20 minutes to help it firm up slightly, making it easier to scoop and seal inside the dough ball. The flavor will be more intensely peanutty, which is a great thing!
My cookies spread too much. What did I do wrong?
Too much spread usually comes from butter that’s too warm or dough that’s too warm. First, make sure your butter was just softened, not melted. Second, try my secret weapon: chilling! After you form the stuffed dough balls, pop the whole baking sheet in the fridge for 15-20 minutes before baking. This re-solidifies the butter and gives the cookies a chance to hold their shape in the oven’s initial heat. It makes a huge difference.
Can I make the dough ahead of time and bake later?
Absolutely, and it’s a great time-saver! You can prepare the stuffed dough balls, place them on a baking sheet, and freeze them until solid. Once frozen, transfer them to a freezer bag. They can be stored for up to 3 months. When you’re ready to bake, you don’t even need to thaw them. Just place the frozen dough balls on a parchment-lined sheet and add 1-2 extra minutes to the baking time. Fresh, warm cookies anytime!
Why did my peanut butter filling melt out everywhere?
This usually means the seal wasn’t complete or the peanut butter was too close to the edge of the dough pocket. When you place the teaspoon of filling, aim for the dead center. As you fold the dough over, make sure it completely encases the filling and pinch that seam firmly. Rolling it into a smooth ball helps lock everything in. A good seal keeps the surprise inside where it belongs.
Can I use regular-sized Reeses Pieces instead of mini?
You sure can. The mini ones distribute more evenly and are easier to bite into, but regular ones work just fine. You might want to give them a rough chop with a knife before folding them in. This creates smaller pieces that won’t overwhelm each bite and helps them distribute more evenly throughout the dough. It’s a great solution if the mini ones are hard to find.
How do I get my chocolate drizzle to look pretty?
The key is temperature and tool. Let your melted chocolate cool for a minute so it’s not super runny. You can use a small spoon, but for more control, put it in a small plastic sandwich bag and snip a tiny corner off. You now have a makeshift piping bag! Practice drizzling in zig-zags or circles over a plate first. Light, quick motions give you the best lines. Let it set completely before serving.
Can I add other mix-ins to these cookies?
Get creative! This is a fantastic base dough. While the Mini Reeses Pieces are the star, you could add 1/2 cup of chopped salted peanuts for extra crunch. A handful of rolled oats would add a nice texture, too. Just keep the total volume of add-ins around 1 to 1.5 cups so the dough can still hold together properly for stuffing.
Are these cookies super sweet?
They are a decadent dessert cookie, for sure. The brown sugar, candy, and peanut butter all contribute to the sweetness. If you prefer less sweetness, you can reduce the granulated sugar by a couple of tablespoons. Using a dark chocolate for the drizzle also helps balance the sweetness with a richer, slightly bitter note. They’re meant to be a treat, so enjoy them in moderation with a nice cold drink!
What’s the best way to soften butter quickly?
We’ve all forgotten to take the butter out! Cut the cold butter into small chunks and spread them out on a plate. They will come to room temperature much faster than a solid stick. You can also microwave it, but be very careful. Use 5-second bursts at 10% power, checking after each. You want it soft, not melted. A few seconds too long can ruin it for creaming.
How do I know exactly when the cookies are done baking?
Look, don’t time. Oven temperatures vary. At around 10 minutes, check the edges. They should be set and have turned a light golden brown. The centers will still look puffy, soft, and slightly underdone. This is perfect. They will continue to cook from residual heat on the hot baking sheet. Taking them out at this stage guarantees a chewy center and a crisp edge.
Ready, Set, Bake!
Well, there you have it—my full heart and soul poured into this Mini Reeses Pieces Stuffed Cookies recipe. This isn’t just a list of steps; it’s my tried-and-true method for creating pure baking magic. I’ve made these more times than I can count, sharing them with neighbors, cheering up friends, and creating core memories with my kids in the kitchen. The smell alone is worth the effort. So grab that bag of colorful candy, scoop that peanut butter, and get ready for the compliments to roll in. Happy baking, my friend. Don’t forget to save one for the baker!
Cheesy Caesar Chicken
Ingredients
Equipment
Method
- Cream the butter, brown sugar, and granulated sugar in a large mixing bowl for 2-3 minutes until light and fluffy.
- Add the eggs one at a time, beating well after each, then mix in the vanilla extract.
- In a separate bowl, whisk together the flour, baking soda, and salt.
- Gradually add the dry ingredients to the wet mixture on low speed until just combined.
- Fold in the Mini Reeses Pieces with a spatula until evenly distributed.
- Preheat the oven to 350°F (175°C) and line baking sheets with parchment paper.
- Scoop a ball of dough, flatten it, and place 1 teaspoon of peanut butter in the center.
- Enclose the peanut butter by folding the dough over and rolling it into a smooth ball.
- Place the stuffed cookie balls on the prepared baking sheets, spaced 2 inches apart.
- Bake for 10-12 minutes until edges are lightly golden and centers are puffy.
- Let cookies rest on the baking sheet for 5 minutes, then transfer to a wire rack to cool completely.
- For optional drizzle, melt chocolate chips, drizzle over cooled cookies, and allow to set.