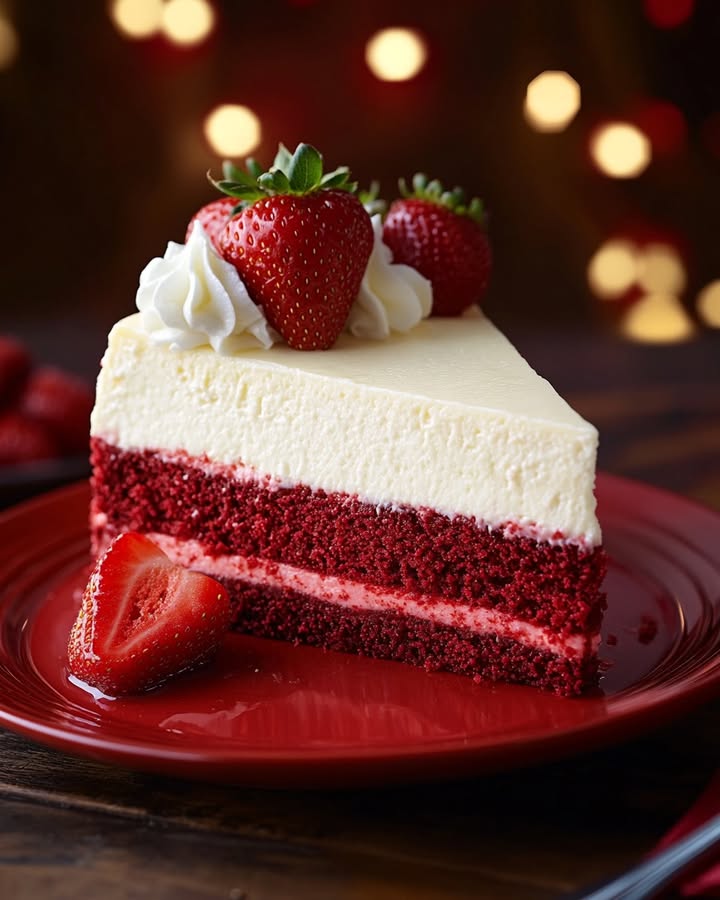
Heavenly Strawberry Red Velvet Cheesecake: A Slice of Pure Joy
You know that feeling when you take a bite of something so good, you just have to close your eyes and smile? That’s exactly what happened the first time I made this Heavenly Strawberry Red Velvet Cheesecake. I was trying to create a showstopper for my niece’s birthday, something that combined her favorite things: red velvet cake, creamy cheesecake, and fresh strawberries. The result was pure magic—a stunning, decadent, and surprisingly easy layered dessert that now gets requested for every single family gathering. It’s the love child of a classic red velvet and a New York-style cheesecake, all dressed up in a gorgeous strawberry glaze. Trust me, your dessert table will thank you.
A Tale of Two Classics: The Story of This Dreamy Dessert
Red velvet cake has a rich history, often tied to the South and famous bakeries like the Waldorf-Astoria. Its signature tang comes from buttermilk and a hint of cocoa, with that vibrant red color making it a celebration staple. Cheesecake, of course, dates back to ancient Greece! My version is a thoroughly modern mash-up. I wanted the moist, tender crumb of red velvet to cradle the smooth, rich cheesecake layer. The fresh strawberry topping is my personal twist—it cuts through the richness with a bright, fruity sweetness. It’s a dessert that honors tradition but isn’t afraid to play and create something new and utterly delicious.
Why You Will Fall Head Over Heels For This Cake
This isn’t just another cake recipe. It’s a textural wonderland. You get the soft, slightly chocolaty red velvet base, the dense and creamy cheesecake middle, and the juicy, glossy strawberry crown. It’s visually stunning with those dramatic red and white layers peek-a-booing under a ruby-red topping. Best of all, while it looks like you slaved for hours, the steps are simple and broken down. You bake each layer separately, so there’s no fussy water bath for the cheesecake. It’s a foolproof path to becoming a dessert hero.
Perfect Occasions for Your Strawberry Red Velvet Masterpiece
This cake screams “special occasion”! It’s perfect for Valentine’s Day (that red color is a dead giveaway), Mother’s Day brunch, birthdays, or as the grand finale to a holiday dinner. I’ve even made it as a “just because” treat to cheer up a friend. It brings such joy to the table. Anytime you want to show someone you care with a homemade, spectacular dessert, this is your recipe. It turns an ordinary Tuesday into a celebration.
Gathering Your Ingredients for Success
Let’s get everything ready! Using room-temperature ingredients is the secret key for smooth batters.
For the Red Velvet Cake:
- 1 ½ cups all-purpose flour
- 1 cup granulated sugar
- 1 tsp baking powder
- ½ tsp baking soda
- ½ tsp salt
- 2 tbsp unsweetened cocoa powder
- ½ cup unsalted butter, softened
- 2 large eggs, room temperature
- 1 cup buttermilk, room temperature
- 1 tsp vanilla extract
- 1 tbsp red food coloring (gel works best)
For the Cheesecake Layer:
- 16 oz (2 blocks) cream cheese, softened
- ¾ cup granulated sugar
- 2 large eggs, room temperature
- 1 tsp vanilla extract
- ½ cup sour cream
For the Strawberry Topping:
- 1 cup fresh strawberries, chopped
- ¼ cup granulated sugar
- 1 tbsp cornstarch
- 2 tbsp water
For the Frosting (Optional but recommended!):
- 8 oz cream cheese, softened
- ½ cup unsalted butter, softened
- 4 cups powdered sugar, sifted
- 1 tsp vanilla extract
No Stress Substitutions
Out of something? Don’t panic! Here are easy swaps.
- Buttermilk: Make your own! Add 1 tbsp lemon juice or white vinegar to 1 cup of milk. Let it sit for 5 minutes until it curdles.
- Sour Cream: Plain, full-fat Greek yogurt is a great stand-in.
- Fresh Strawberries: Frozen strawberries work perfectly for the topping. No need to thaw, just cook a minute or two longer.
- Food Coloring: For a natural color, you can use beet powder, though the red won’t be as vibrant.
Creating Your Heavenly Strawberry Red Velvet Cheesecake
Let’s bake! Clear some counter space and put on some fun music. We’re building something amazing.
Step 1: Bake the Cheesecake Layer First
Start by preheating your oven to 325°F (163°C). This lower temperature is key for a creamy, crack-free cheesecake. In a large bowl, beat the softened cream cheese until it’s completely smooth. No lumps allowed! Gradually beat in the sugar until the mixture is silky. Add the eggs, one at a time, letting each blend in fully. Finally, mix in the vanilla and sour cream until everything is just combined. Pro tip: Don’t overmix after adding the eggs, as this can incorporate too much air and cause cracks. Pour this creamy dream into a 9-inch springform pan. Bake for 35-40 minutes until the edges are set but the center still has a slight jiggle. Let it cool completely on a wire rack. It will firm up as it chills.
Step 2: Whip Up the Vibrant Red Velvet Layer
Now, raise your oven temperature to 350°F (175°C). Grease and flour a 9-inch round cake pan. In a medium bowl, whisk together the flour, baking powder, baking soda, salt, and cocoa powder. This aerates the dry ingredients. In a separate large bowl, cream the softened butter and sugar together until it’s light and fluffy. Beat in the eggs, one by one. The mixture will turn pale yellow and thick. Now for the fun part! Blend in the vanilla, buttermilk, and that bold red food coloring. The batter will become a gorgeous, deep red. Gently fold in the dry ingredients until no white streaks remain. Pour the batter into your prepared pan and smooth the top. Bake for 30-35 minutes until a toothpick comes out clean. Let it cool in the pan for 10 minutes, then turn it out onto a rack to cool completely.
Step 3: Simmer the Simple Strawberry Topping
While your cakes cool, make the strawberry magic. In a small saucepan, combine the chopped strawberries, sugar, cornstarch, and water. Stir everything together over medium heat. As it heats up, the strawberries will release their juices and the mixture will start to bubble and thicken into a glossy glaze. This takes about 5-7 minutes. Remove it from the heat and let it cool to room temperature. It will thicken even more as it sits.
Step 4: Make the Fluffy Cream Cheese Frosting
This step is optional, but I highly recommend it! It adds another layer of creamy goodness. In a clean bowl, beat the softened cream cheese and butter together until perfectly smooth and creamy. Gradually add the sifted powdered sugar, about a cup at a time, beating well after each addition. Finally, beat in the vanilla. Keep mixing until the frosting is light and fluffy. If it seems too thick, you can add a teaspoon of milk.
Step 5: The Grand Assembly
This is the best part. Place your completely cooled red velvet cake layer on your serving plate or cake stand. If the top is domed, you can level it with a serrated knife for a flat surface. Carefully run a knife around the edge of your springform pan and release the chilled cheesecake layer. Gently place it on top of the red velvet base. If you’re using frosting, spread a generous layer over the top of the cheesecake. Now, spoon that beautiful, cooled strawberry topping over the center, letting some drip down the sides artistically. For the final touch, garnish with fresh strawberry halves and maybe some chocolate shavings. Chef’s tip: For super clean slices, dip your knife in hot water and wipe it dry between each cut.
Step 6: Serve and Accept the Compliments
Slice, serve, and get ready for the “oohs” and “aahs.” Each piece reveals those stunning layers. The combination of textures and flavors is absolutely heavenly. Store any leftovers (if there are any!) covered in the fridge.
Your Baking Timeline
Planning is everything for a relaxed baking experience.
- Prep Time: 40 minutes (mostly hands-on mixing)
- Cook Time: 1 hour 15 minutes (for both layers)
- Cooling/Chilling Time: At least 4 hours (crucial for setting!)
- Total Time: About 6 hours (mostly unattended)
- Servings: 10-12 happy people
Chef’s Secret for the Ultimate Texture
My absolute number one trick for this cake is patience during cooling. You must let the cheesecake layer cool completely at room temperature, then chill it in the fridge for at least 3-4 hours before assembling. A properly chilled cheesecake is firm and won’t smoosh or slide when you stack the layers. It makes assembly a breeze and gives you that perfect, clean cut slice.
A Fun Fact About Red Velvet
That iconic red color wasn’t always from food dye! In the early 1900s, the reaction between natural cocoa (which was more acidic then), buttermilk, and vinegar would subtly tint the cake a reddish-brown. Bakers realized this and started playing with beet juice for color. Today, we use food coloring for that dramatic scarlet hue, but the buttermilk and vinegar (or baking soda) reaction is still part of what gives red velvet its unique, slightly tangy flavor.
Necessary Equipment
You likely have most of this in your kitchen already!
- 9-inch springform pan (essential for the cheesecake)
- 9-inch round cake pan
- Stand mixer or hand mixer
- Mixing bowls (various sizes)
- Whisk and spatulas
- Measuring cups and spoons
- Small saucepan
- Wire cooling racks
Storing Your Heavenly Creation
Because of the creamy cheesecake layer and fresh strawberry topping, this cake must be stored in the refrigerator. Cover it loosely with plastic wrap or place it in a cake carrier. It will keep beautifully for up to 5 days. The flavors actually meld and get even better on day two!
You can also freeze the unfrosted and untopped cake layers separately for longer storage. Wrap the cooled red velvet and cheesecake layers tightly in plastic wrap and then aluminum foil. They can be frozen for up to 2 months. Thaw overnight in the fridge before assembling with fresh frosting and topping.
I do not recommend freezing the fully assembled cake with the strawberry topping, as it will become watery when thawed. The frosting holds up fine, but the fresh berry texture will be lost.
Tips & Advice for Baking Bliss
- Room temp is key: Cold cream cheese lumps, and cold eggs don’t incorporate well. Take them out at least an hour before you start.
- Don’t overmix the cake batter: Once you add the dry ingredients, mix just until combined. Overmixing leads to a tough cake.
- Use gel food coloring: It’s more concentrated than liquid, so you get a vibrant red without adding extra liquid to the batter.
- Cool cakes completely: Assemblying warm layers is a recipe for a soggy, sliding mess. Patience is a virtue here.
Presentation Tips to Wow Your Guests
- Place the whole cake on a beautiful cake stand for instant elegance.
- Before slicing, add a few whole, perfect strawberries with their green tops on for a natural look.
- Dust the plate edges with a little powdered sugar or cocoa powder for a professional touch.
- Serve each slice with a dollop of whipped cream on the side.
Healthier & Fun Recipe Variations
Want to mix it up? Here are six delicious twists on the classic.
- Gluten-Free Red Velvet Cheesecake: Swap the all-purpose flour for a 1-to-1 gluten-free baking blend. Ensure your cocoa powder is certified GF.
- Mini Cheesecake Bites: Bake the red velvet batter in a lined muffin tin to make small cups. Top each cooled cup with a scoop of cheesecake mixture and bake. Perfect for parties!
- Chocolate Ganache Drizzle: Skip the strawberry topping and pour a rich dark chocolate ganache over the frosted cake for a decadent twist.
- Lemon Blueberry Version: Omit cocoa and red dye for a vanilla cake. Add lemon zest to the cake and cheesecake. Top with a blueberry compote instead of strawberry.
- Red Velvet Cheesecake Bars: Press the red velvet batter into a 9×13 pan as a crust. Pour cheesecake over top and bake. Cut into easy-to-serve bars.
- Lighter Version: Use reduced-fat cream cheese and Neufchâtel, and swap half the sugar in the cake for a natural sweetener like monk fruit. The texture will be slightly different but still tasty.
Common Mistakes to Avoid
Mistake 1: Using Cold Ingredients
This is the biggest culprit for lumpy cheesecake batter and dense cake. Cold cream cheese will never become smooth, no matter how long you beat it. Cold eggs and buttermilk can also cause the batter to curdle or not emulsify properly. Always plan ahead and let your dairy and eggs sit on the counter for about an hour before you begin baking. Your batter will be silky smooth, promising a perfect texture in the final bake.
Mistake 2: Overbaking the Cheesecake Layer
Nobody likes a dry, cracked cheesecake. The key to creaminess is taking it out of the oven while the center is still slightly wobbly. It will continue to cook from residual heat as it cools. Check it a few minutes before the timer goes off. The edges should be set, but if you gently jiggle the pan, the center (about the size of a lemon) should have a little jiggle. It will firm up perfectly as it chills. Overbaking is the main cause of cracks and a grainy texture.
Mistake 3: Assembling the Layers While Warm
Impatience can ruin your beautiful layers. If you put the cheesecake on top of a warm red velvet cake, the heat will start to melt the creamy filling. It can cause sliding, sinking, or a soggy cake base. Similarly, warm cheesecake is too soft to handle. Let both layers cool completely to room temperature, and thoroughly chill the cheesecake in the fridge. A cold, firm cheesecake is much easier to handle and stack for a picture-perfect result.
Mistake 4: Overmixing the Cake Batter
Once you add the flour to the red velvet batter, you need to switch to a gentle hand. Overmixing develops the gluten in the flour, which leads to a tough, chewy cake instead of a tender, soft crumb. Mix the dry ingredients in just until you no longer see streaks of white flour. A few small lumps are okay. It’s better to undermix slightly than to overmix. Use a spatula to fold by hand for the last few strokes to ensure everything is incorporated without overworking it.
Frequently Asked Questions
Can I make this cake a day ahead?
Absolutely! In fact, I highly recommend it. Making this cake a day in advance allows all the flavors to meld together beautifully. Simply bake and cool the layers, make the strawberry topping, and store everything separately in the fridge. Assemble the cake a few hours before you plan to serve it. This makes the whole process much less stressful and gives you a dessert that tastes even better.
Why did my red velvet cake turn out dry?
A dry cake usually means it was overbaked or the flour was overmeasured. Always spoon your flour into the measuring cup and level it off with a knife—don’t scoop directly from the bag, as this packs in too much flour. Also, set a timer and check your cake a few minutes early. Ovens can vary. The cake is done when a toothpick inserted into the center comes out with just a few moist crumbs attached, not completely clean.
Can I use a different pan if I don’t have a springform?
For the cheesecake layer, a springform pan is really the best tool because the removable sides make it easy to get the cheesecake out without damaging it. If you’re in a pinch, you can use a regular 9-inch cake pan lined with parchment paper with overhanging edges to help lift it out. Be very careful when loosening the edges with a thin knife.
My strawberry topping is too runny. How can I fix it?
If your topping is too thin, you likely need to cook it a bit longer to allow the cornstarch to fully thicken the juices. Mix another teaspoon of cornstarch with a tablespoon of cold water to make a slurry. Bring your runny topping back to a simmer and whisk in the slurry. Cook for another 1-2 minutes until it thickens to a glaze consistency. Let it cool completely before using.
Can I use frozen strawberries for the topping?
Yes, frozen strawberries work great! There’s no need to thaw them first. Just add the frozen berries directly to the saucepan with the sugar, cornstarch, and water. They will release more liquid as they cook, so you may need to simmer them for an extra 2-3 minutes to reduce and thicken the sauce properly.
How do I prevent cracks in my cheesecake?
To avoid cracks, don’t overmix the batter after adding the eggs, and don’t overbake. Also, avoid sudden temperature changes. Once baked, run a thin knife around the edge of the cheesecake to release it from the pan—this prevents it from pulling and cracking as it cools and shrinks. Let it cool gradually in the oven with the door cracked open for an hour before moving it to the counter.
Is the frosting necessary?
The frosting is optional but highly recommended. It adds a wonderful creamy layer that complements the tangy cheesecake and sweet berries. If you want to skip it, you can just spread the strawberry topping directly over the cheesecake layer. The cake will still be delicious, just a little less decadent.
What’s the best way to cut a clean slice?
For picture-perfect slices, use a long, thin, sharp knife. Dip the blade in very hot water, wipe it completely dry with a clean towel, and then make your cut. The heat helps the knife glide through the cold, firm layers without dragging. Wipe the blade clean and re-dip in hot water for each slice.
Can I leave out the red food coloring?
You can, but then it’s simply a “velvet” cake! The color won’t be red, but the delicious flavor will all be there. The cake will have a reddish-brown hue from the cocoa. If you want natural color, try using 1-2 tablespoons of beet powder, though the color will be more muted.
My cake layers stuck to the pan. Help!
Properly preparing your pans is crucial. For the red velvet cake, grease the pan with butter or baking spray, then dust it lightly with flour, tapping out the excess. For the cheesecake, the springform pan should also be greased. Parchment paper on the bottom is an extra insurance policy. Always let cakes cool for about 10 minutes in the pan before trying to remove them; this allows them to firm up slightly.
The Final Slice
So there you have it—my tried-and-true recipe for a truly Heavenly Strawberry Red Velvet Cheesecake. It’s a labor of love that pays off in every single decadent bite. Whether it’s for a birthday, a holiday, or just a Tuesday that needs brightening, this cake brings people together and creates sweet memories. Don’t be intimidated by the layers. Just take it one step at a time, practice a little patience with the cooling, and you’ll have a stunning dessert that looks like it came from a fancy bakery. Now go preheat that oven, and get ready to bake some joy!
Chorizo Egg Delight
Ingredients
Equipment
Method
- Preheat your oven to 325°F (163°C) for the cheesecake layer.
- Beat the softened cream cheese until smooth in a large bowl.
- Gradually add sugar and mix until silky.
- Add the eggs one at a time, mixing in the vanilla and sour cream last until just combined.
- Pour into a 9-inch springform pan and bake for 35-40 minutes until edges are set; cool completely.
- Increase oven temperature to 350°F (175°C) for the red velvet layer.
- Grease and flour a 9-inch round cake pan.
- Whisk together flour, baking powder, baking soda, salt, and cocoa powder in a medium bowl.
- Cream softened butter and sugar until light and fluffy.
- Beat in eggs, then mix in vanilla, buttermilk, and red food coloring until blended.
- Fold in dry ingredients until no streaks remain; pour batter into prepared pan.
- Bake for 30-35 minutes until a toothpick comes out clean; cool for 10 minutes then transfer to a wire rack.
- Meanwhile, for the strawberry topping, combine strawberries, sugar, cornstarch, and water in a saucepan.
- Heat over medium until bubbling and thickened for 5-7 minutes; cool to room temperature.
- For the frosting, beat cream cheese and butter until smooth; slowly add powdered sugar and vanilla and mix until fluffy.
- Level the cooled red velvet cake if needed and place it on a serving plate.
- Carefully layer the cheesecake on top of the red velvet base.
- If using, spread frosting over the cheesecake.
- Pour cooled strawberry topping over the cheesecake and garnish as desired.
- Serve and enjoy!