Chocolate Raspberry Mousse Cake: A Slice of Pure Joy
Have you ever dreamed of a dessert that stops conversation? I mean the real, fork-midair, wide-eyed silence kind of stop. That’s what this Chocolate Raspberry Mousse Cake does. It’s not just a cake; it’s a decadent, triple-layered celebration in a pan. I created this showstopper for my best friend’s surprise party, and let me tell you, the memory of her face—first in shock, then in pure bliss—is baked right into this recipe for me. It’s my absolute go-to when I want to make someone feel incredibly, deliciously special.
A Little History of This Layered Masterpiece
While mousse cakes are a classic of the French patisserie, this particular combination is a modern love story. Chocolate and raspberry have been culinary soulmates for ages. Bakers and chefs realized that the sharp, bright zip of raspberry cuts through the deep, dark richness of chocolate perfectly. Putting them into distinct, silky mousse layers, separated by a fudgy brownie base, is like building a flavor skyscraper! It’s a modern twist on tradition, focusing on pure flavor and stunning visual appeal. My version adds that creamy vanilla mousse crown for balance, making it a true three-act drama of taste.
Why You’ll Fall Head Over Heels for This Cake
First, the texture is pure magic. You get the firm, chocolatey base, then three distinct, cloud-like layers that melt on your tongue. The flavors dance from deep chocolate to tart berry to sweet vanilla. It looks like it came from a high-end bakery, but the process is totally approachable. It’s a make-ahead dream, which means no stress on the day you serve it. Honestly, the hardest part is waiting for it to set! The pride you’ll feel presenting this is worth every single minute.
When to Whip Up This Showstopper
This cake is a celebration in itself. It’s perfect for birthdays, anniversaries, or a fancy holiday dessert like Valentine’s Day or Christmas. I’ve also been known to make it “just because” for a girls’ night in—because why not? It’s the ultimate dessert to bring to a potluck where you want to be the undisputed dessert champion. Any occasion that calls for a little extra ooh-la-la is the right occasion for this cake.
Gathering Your Chocolate Raspberry Mousse Cake Ingredients
Using a kitchen scale (in grams/ounces) is the best way to ensure perfect results, but I’ve included cup measurements too!
For the Brownie Layer:
- 3.33 oz (¾ cup) all-purpose flour
- 2 oz (⅔ cup) unsweetened cocoa powder
- ½ tsp salt
- ½ tsp baking powder
- 4 oz unsalted butter
- 7.75 oz (1 cup + 2 tbsp) granulated sugar
- 2 large eggs, at room temperature
- 2 tsp vanilla extract
For the Chocolate Mousse:
- 9 oz semi-sweet chocolate, finely chopped
- 1 ¾ cups heavy cream, divided use
- Pinch of salt
- 2 tsp unflavored powdered gelatin
- 2 tbsp water
For the Raspberry Mousse:
- 1 ½ cups fresh raspberries (Note: see tips if using frozen)
- 9 oz white chocolate, finely chopped
- 1 ½ cups heavy cream, divided use
- Pinch of salt
- 2 tsp unflavored powdered gelatin
- 2 tbsp water
- Pink gel food coloring, optional
For the Vanilla Mousse:
- 9 oz white chocolate, finely chopped
- 1 ½ cups heavy cream, divided use
- 4 tbsp honey
- Pinch of salt
- 2 tsp unflavored powdered gelatin
- 2 tbsp water
- 2 tsp vanilla bean paste or vanilla extract
To Finish:
- 4 oz semi-sweet chocolate, finely chopped
- 4 oz heavy cream
- 1 pint fresh raspberries
- Chocolate curls or other decorations
Easy Ingredient Swaps and Substitutions
Don’t panic if you’re missing something! Here are some swaps that work beautifully:
- For the Fresh Raspberries: You can use frozen raspberries for the puree. Thaw, blend, and strain. For the mousse layer and decoration, fresh is best, but you could use chopped strawberries.
- Gelatin: This is crucial for setting the mousse. Agar-agar can be used as a vegetarian substitute, but follow package instructions for quantity and method.
- White Chocolate: Use a good quality baking bar. White chocolate chips have stabilizers and might not melt as smoothly.
- Honey in Vanilla Mousse: Maple syrup or light corn syrup will work in a pinch.
Crafting Your Chocolate Raspberry Mousse Cake: Step-by-Step
Step 1: Bake the Fudgy Brownie Base
First, get your oven humming at 350°F (175°C). Line your 9-inch cake pan with parchment and give it a good spray. In a small bowl, whisk together your dry ingredients—flour, cocoa powder, salt, and baking powder. It will smell like chocolatey promise. In a saucepan, melt the butter, then stir in the sugar. Let it cool a bit so it doesn’t cook the eggs! Whisk in the eggs one by one until the mixture is glossy and smooth. Stir in the vanilla. Gently fold in the dry ingredients. The batter will be thick and heavenly. Spread it in your pan and bake for 22-24 minutes. A toothpick should come out with a few moist crumbs, not clean. Let it cool completely right in the pan. Pro tip: Letting the sugar-butter mixture cool prevents scrambled eggs in your batter!
Step 2: Assemble Your Building Site
This is your construction zone. You’ll need a 9-inch springform pan or a pan with a removable bottom, with sides at least 3 inches tall. Line the inner wall with an acetate cake collar (my secret for clean sides!) or a tall strip of parchment paper. Place a cake cardboard circle in the bottom, then carefully lift your cooled brownie and place it right on top. It’s now ready for its luxurious layers.
Step 3: Create the Velvety Chocolate Mousse Layer
Place your finely chopped semi-sweet chocolate in a bowl with ¾ cup of cream and a pinch of salt. Microwave in short bursts, stirring each time, until it’s a silky, dark pool. Let it cool to just warm. Meanwhile, sprinkle the gelatin over the water in a tiny dish. Let it sit to “bloom” (it will get spongy), then microwave for 15 seconds to melt it. Whisk this liquid gelatin into your warm chocolate—this is what gives the mousse its perfect sliceable texture. Whip 1 cup of cream to soft peaks. Gently fold half into the chocolate to lighten it, then fold in the rest. Pour this dreamy cloud over your brownie base and smooth the top. Pop it in the fridge for 25 minutes to set.
Step 4: Whip Up the Bright Raspberry Mousse
Now for the pink layer! Take ½ cup of your fresh raspberries and blend them into a bright puree. Push it through a sieve to get rid of the seeds—you need about ¼ cup of smooth puree. Combine the white chocolate, raspberry puree, ½ cup cream, and salt. Melt and cool as before. Add the melted gelatin. Whip another 1 cup of cream and fold it in. Gently fold in the remaining whole raspberries. This gives little bursts of tart fruit! Add a tiny drop of pink food color if you want a more vibrant look. Spread this beautifully pink mousse over the set chocolate layer. Back in the fridge it goes for another 25 minutes.
Step 5: Top It Off with Honey-Vanilla Mousse
The final layer! Combine white chocolate, ½ cup cream, honey, and salt. Melt and cool. Add the melted gelatin. Whip the last 1 cup of cream and fold it in. Finally, stir in that glorious vanilla bean paste. The little black specks are so elegant. Pour this over the raspberry layer and smooth it perfectly. Now, the hard part: patience. Let the whole cake chill in the fridge for at least 4 hours, but overnight is truly best. Chef’s tip: Letting it set overnight means perfectly clean layers when you slice.
Step 6: The Grand Finale: Ganache and Decoration
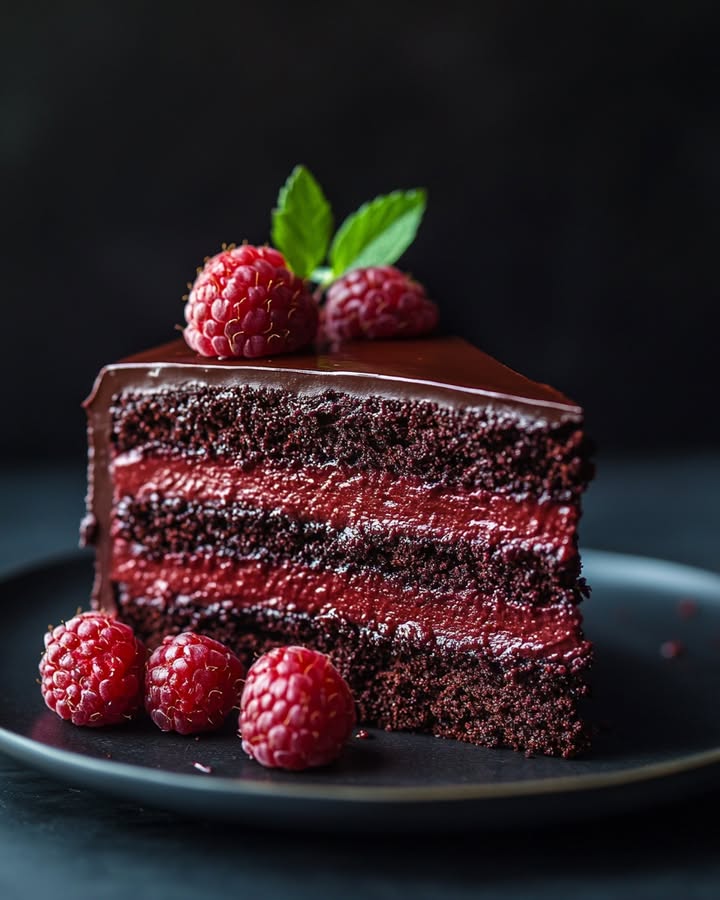
The big reveal! Carefully remove the cake from the pan and peel off the acetate collar. Place it on your serving platter. To make the shiny ganache, heat 4 oz of cream until it simmers. Pour it over the 4 oz of chopped semi-sweet chocolate. Let it sit for a minute, then whisk until it’s a glossy, dark mirror. Pour it slowly over the top of the cake. Use a spatula to gently push it over the edges for those gorgeous drips. Immediately decorate with a crown of fresh raspberries and chocolate curls. Let the ganache set in the fridge before slicing.
Step 7: Slicing for the Perfect Presentation
For those pristine, bakery-style slices, your cake needs to be cold and your knife needs to be hot. Run a sharp, thin-bladed knife under very hot water. Wipe it dry, then make a clean cut straight down. Wash and reheat the knife between every single slice. It’s a bit of work, but the result is stunning. Let the slices sit at room temperature for 10-15 minutes before serving. This lets the mousse soften to its dreamy, melt-in-your-mouth texture.
Timeline for Your Chocolate Raspberry Mousse Cake
- Prep Time: 1 hour 30 minutes
- Cook Time: 24 minutes
- Chilling Time: 5 hours (minimum) or overnight
- Total Time: 7 hours (including chill)
- Servings: 12-16 elegant slices
A Secret from My Kitchen to Yours
Here’s my little secret for the fluffiest mousse: make sure your melted chocolate mixture is at the right temperature before folding in the whipped cream. If it’s too hot, it will melt the cream. If it’s too cold, the gelatin might start to set and you’ll get lumps. Aim for about 95-100°F (35-38°C)—just warm to the touch, not hot. This ensures a silky, smooth, and airy mousse every single time.
A Fun Fact About Your Ingredients
Did you know the raspberry’s flavor compounds are some of the most powerful in the fruit world? They can be detected even when combined with much stronger flavors like chocolate. That’s why just a small amount of raspberry puree can make its bright, tangy presence known in a sea of rich chocolate and cream. Nature’s little flavor powerhouse!
Equipment You’ll Need to Make This Cake
- 9-inch cake pan (for brownie base)
- 9-inch springform pan or tall cake pan with removable bottom
- Acetate cake collar or parchment paper strips
- Stand mixer or hand mixer
- Microwave-safe bowls
- Saucepan
- Fine-mesh sieve
- Rubber spatulas
- Kitchen scale (highly recommended)
Storing Your Masterpiece
This cake is a dream for making ahead. Once fully set and decorated, you can keep it covered in the refrigerator for up to 3 days. The flavors actually meld and improve over that time. Make sure it’s covered tightly with plastic wrap or in a cake carrier to prevent it from absorbing any fridge odors.
Can you freeze Chocolate Raspberry Mousse Cake? You can, but with a caveat. The texture of the mousse will change slightly upon thawing, becoming a bit less airy. If you must freeze it, do so undecorated (no ganache or fresh berries). Wrap the entire cake tightly in several layers of plastic wrap, then in foil. Freeze for up to 1 month.
To serve a frozen cake, thaw it overnight in the refrigerator. Then, add your ganache and fresh decorations just before serving. Individual slices can also be frozen on a tray before being wrapped up, perfect for a single indulgent treat anytime.
My Best Tips for Mousse Cake Success
- Chop Chocolate Finely: Smaller pieces melt more evenly and quickly, preventing you from overheating the cream.
- Room Temperature Eggs: For the brownie layer, this is key for a smooth, emulsified batter that bakes up evenly.
- Don’t Over-whip the Cream: Stop whipping when the cream holds soft peaks. Over-whipped cream is difficult to fold in smoothly and can make the mousse grainy.
- Gelatin is Your Friend: Don’t skip it! It’s what allows this tall cake to hold its shape when sliced. Make sure it’s fully dissolved before adding it to the warm chocolate.
- Taste Your Raspberries: If your fresh raspberries are very tart, you might want a tiny sprinkle of sugar in the puree. If they’re sweet, you’re golden!
Presentation Ideas to Wow Your Guests
- Dust the finished plate with a light sprinkling of edible gold dust or cocoa powder.
- Add fresh mint leaves alongside the raspberries for a pop of green.
- Serve with a small dollop of lightly sweetened whipped cream on the side.
- For a restaurant-style look, drizzle each plate with a raspberry coulis (strained raspberry puree) before placing the slice.
- Use a variety of berries for decoration—blackberries, blueberries, and red currants look stunning.
Lighter & Different Chocolate Raspberry Mousse Cake Twists
Want to play with the recipe? Here are some delicious variations:
- Gluten-Free Bliss: Swap the all-purpose flour in the brownie for a 1-to-1 gluten-free baking blend. Easy!
- Dairy-Free Dream: Use high-quality dairy-free chocolate. Substitute the heavy cream with full-fat canned coconut milk (chilled, use the solid cream part for whipping).
- Nutty Crunch: Add ½ cup of finely chopped toasted hazelnuts or almonds into the brownie batter for texture.
- Berry Swap: Try this with blackberry puree instead of raspberry for a deeper, more earthy berry flavor.
- Orange Zest: Add a tablespoon of orange zest to the chocolate mousse layer for a classic chocolate-orange combo.
- Mocha Magic: Dissolve 1 tbsp of instant espresso powder into the warm cream for the chocolate mousse layer.
Common Mistakes to Avoid for a Perfect Cake
Mistake 1: Not Letting the Mousse Layers Set
This is the biggest cause of messy, runny layers. Each mousse layer needs its full 25 minutes in the fridge to set enough to support the next layer. If you pour the raspberry mousse onto a chocolate layer that’s still liquid, they will mix. The layers will be muddy, not distinct. Set a timer! The final overnight chill is non-negotiable for a clean slice.
Mistake 2: Adding Hot Chocolate to Whipped Cream
If your melted chocolate and cream mixture is too hot when you fold in the whipped cream, it will instantly deflate the cream. You’ll lose all that airy texture, resulting in a dense, heavy mousse. Always let the melted mixture cool until it’s just warm to the touch (about body temperature). Test it by dabbing a bit on your wrist. It should feel warm, not hot.
Mistake 3: Using Low-Quality Chocolate
Since chocolate is the star of this dessert, its quality matters. Cheap chocolate or chocolate chips often contain waxes and stabilizers. They don’t melt as smoothly and can taste waxy. Invest in a good baking bar of semi-sweet and white chocolate. The flavor will be richer, smoother, and far more professional.
Mistake 4: Skipping the Acetate Collar or Liner
If you just pour the mousse into a bare springform pan, the sides of your cake might look rough or have air bubbles. The acetate collar gives you flawlessly smooth, professional-looking sides. If you don’t have acetate, parchment paper works—just make sure it’s tall enough and pressed firmly against the pan.
Your Chocolate Raspberry Mousse Cake Questions, Answered
Can I make this cake without gelatin for a vegetarian version?
Yes, you can substitute agar-agar powder for the gelatin. However, it’s not a simple 1-to-1 swap. Agar sets at a higher temperature and behaves differently. You must follow the specific instructions and quantities on your agar-agar package for setting dairy-based mousses. Test it in a small batch first to get the setting strength right for your beautiful layered cake.
My mousse seems lumpy. What did I do wrong?
Lumps usually come from two places. First, the gelatin wasn’t fully dissolved before being added to the mix. Make sure you melt the bloomed gelatin completely—it should be a clear liquid. Second, the melted chocolate mixture might have been too cool when you added the whipped cream, causing the gelatin to start setting prematurely. Always work with the mixtures while they are still pleasantly warm, not hot and not cold.
Can I use all dark chocolate instead of semi-sweet and white?
Absolutely! For a more intense, less sweet cake, you can use dark chocolate (60-70% cacao) in place of the semi-sweet for the chocolate layer. For the other layers, using all dark chocolate would completely change the flavor profile. You could make a triple-dark chocolate mousse cake with different percentages, or simply do a two-layer cake with just the brownie and a dark chocolate mousse.
How far in advance can I decorate the cake with fresh raspberries?
For the best appearance, add the fresh raspberries and final decorations right before serving, after the ganache has set. If you refrigerate the cake for more than a few hours with fresh berries on top, they can weep moisture and sometimes get mushy. Adding them at the last minute ensures they look plump, fresh, and vibrant.
Why did my ganache turn out grainy or separate?
A grainy ganache often means it was whisked too vigorously, incorporating air bubbles. A separated ganache (looking oily) means the cream was too hot and “split” the emulsion. The fix is simple: if it’s grainy, let it sit for a minute, then stir gently. If it’s separated, try adding a tablespoon of cool cream and whisk gently until it comes back together. Always pour hot cream over the chocolate and let it sit before slowly stirring from the center outward.
Is there a way to make this cake nut-free?
This recipe is naturally nut-free as written. Just always double-check the labels on your chocolate and other ingredients to ensure they are processed in a facility that is safe for your needs. Some chocolate brands may have cross-contamination warnings.
My brownie layer is very hard/cakey. How can I make it fudgier?
A fudgier brownie base is all about the bake time. Ovens can vary. Pull the brownie out when a toothpick inserted has a few moist crumbs clinging to it, not when it comes out completely clean. The residual heat will finish the cooking. Also, be careful not to overmix the batter once you add the flour, as this develops gluten and can lead to a tougher texture.
Can I use frozen fruit for the raspberry mousse filling?
You can use frozen raspberries to make the seedless puree. Thaw them completely, blend, and strain. Do not use frozen berries for folding into the mousse or for decoration, as they will be too watery and can make the mousse layer soggy. For the best texture and look, use fresh berries for those parts.
What can I use instead of a springform pan?
If you don’t have a springform pan, a regular 9-inch cake pan with high sides will work. You’ll need to line it completely with plastic wrap, leaving a large overhang. Once set, you can use the plastic wrap to lift the entire cake out of the pan. It’s a bit trickier, but it works in a pinch!
The white chocolate seized up when I tried to melt it. Help!
White chocolate is very sensitive to heat and moisture. Seizing happens when even a drop of water gets into the melting chocolate, or if it’s overheated. Always make sure your bowl and utensils are completely dry. Melt it slowly with the cream as directed in the recipe—the cream protects it. If it does seize, try stirring in an extra tablespoon of warm cream to try to bring it back. Prevention is key!
The Sweet Reward of Your Effort
Making this Chocolate Raspberry Mousse Cake is a labor of love, I won’t lie. But when you bring it to the table and see the looks on everyone’s faces, every single step is worth it. It’s more than a dessert; it’s an experience, a memory maker. So take your time, enjoy the process, and get ready to accept your well-earned applause. You’ve just created something truly extraordinary. Now, go slice it up and share the joy!