The Ultimate Showstopper: Cadbury Double Crust Oreo Cheesecake
Have you ever had a dessert so decadent you could hear it whisper sweet nothings? That’s this cheesecake. I made it for my husband’s birthday, and I kid you not, there was a moment of complete silence at the table. The only sounds were forks clinking and happy sighs. It’s the kind of treat that turns a regular Tuesday into a celebration. I knew I had to share it with you.
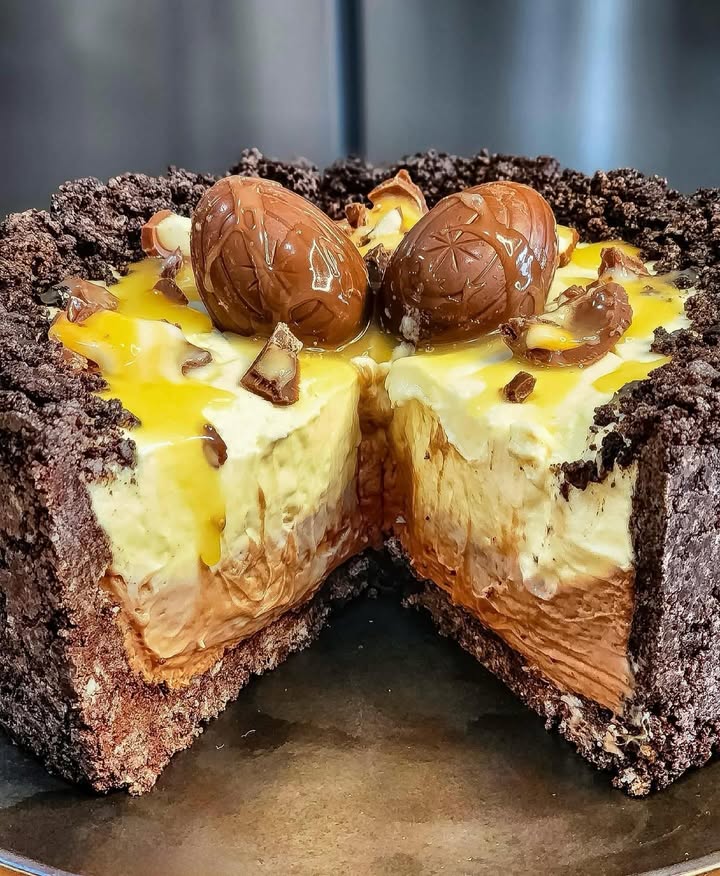
A Tale of Two Chocolates
This recipe didn’t start in a fancy bakery. It started in my kitchen during the Easter season. My kids had a Cadbury Double Crust Oreo Egg, and the idea just clicked. A cheesecake that captures that same magic! We’ve all seen classic New York-style cheesecakes, but the double chocolate, double crust twist makes it wonderfully modern. It’s a tribute to the treats we love, all dressed up in cheesecake form. It’s pure joy on a plate.
Why You’ll Fall in Love With This Recipe
This isn’t just any dessert. It’s a textural dream! You get the crunchy Oreo crust, the velvety-smooth white chocolate filling, and the rich, glossy milk chocolate ganache on top. It’s visually stunning with minimal fuss. The flavors are perfectly balanced—not too sweet, with the cream cheese tang cutting through the chocolate. Best of all, while it looks like something from a patisserie window, the steps are straightforward. You can totally do this.
Perfect Occasions for This Spectacular Dessert
This cheesecake is your secret weapon for any event that calls for a “wow” factor. Think birthdays (it’s a total crowd-pleaser), Easter brunch (perfect for that seasonal chocolate theme), potlucks where you want to be the hero, or even a fancy date night at home. I’ve also made it as a “just because” treat to cheer up a friend. It always delivers smiles. It’s that special.
Ingredients You’ll Need
- Crust:
- 24 Oreo cookies, crushed (filling included!)
- 1/4 cup melted butter
- White Chocolate Cheesecake Filling:
- 1 pound (two 8-oz blocks) cream cheese, softened
- 3/4 cup granulated sugar
- 7 ounces white chocolate, melted
- 1 teaspoon vanilla extract
- 3 large eggs, at room temperature
- 1/2 cup sour cream
- Milk Chocolate Topping:
- 7 ounces milk chocolate (Cadbury is perfect!), finely chopped
- 1/4 cup heavy cream
Easy Ingredient Swaps
Don’t stress if you’re missing something! For the crust, any chocolate sandwich cookie works. If you’re out of white chocolate, you can use an extra 1/2 cup of white chocolate chips. For the topping, dark chocolate or semi-sweet makes a lovely, slightly less sweet alternative. If you need a non-dairy version, use dairy-free cream cheese and a plant-based cream for the ganache.
Let’s Make That Dreamy Cheesecake!
Step 1: Building the Chocolate Crust
Start by turning those Oreos into fine, dark crumbs. I use a food processor, but a zip-top bag and a rolling pin work just as well—and it’s great for stress relief! Pour the melted butter over the crumbs. Mix until it looks like wet sand and holds together when you pinch it. Now, firmly press this mixture into the bottom and up the sides of your 8×5 pan. I like to use the bottom of a flat glass to get it really compact. Pop it in the fridge to set. This chill time helps prevent a soggy bottom later. Pro tip: Leave a little crumb mixture aside to sprinkle on top for garnish before serving!
Step 2: Crafting the White Chocolate Filling
Preheat your oven to 325°F (160°C). In a large bowl, beat the softened cream cheese and sugar until it’s completely smooth and creamy. No lumps allowed! This might take a few minutes. Slowly pour in the melted, slightly cooled white chocolate and mix it in. The sweet, vanilla scent is heavenly. Add the vanilla, then the eggs, one at a time, mixing just until each disappears into the batter. Finally, fold in the sour cream for that perfect tang and creamy texture. Gently pour this dreamy, pale filling over your chilled crust.
Step 3: The Baking & Chilling Dance
Carefully place the pan in the oven. Bake for 45 to 50 minutes. You’re looking for the edges to be set, but the center should still have a slight, gentle wiggle—like Jell-O. It will firm up as it cools. Turn the oven off, crack the door open, and let the cheesecake cool inside for about an hour. This prevents cracks! Then, let it cool completely on the counter before covering it and moving it to the fridge. It needs at least 4 hours, but overnight is best. Patience is key for the perfect slice.
Step 4: The Glossy Chocolate Finish
Once your cheesecake is completely chilled, make the ganache. Chop your milk chocolate finely and put it in a heatproof bowl. Heat the heavy cream until it’s steaming hot but not boiling. Pour the hot cream over the chocolate and let it sit for a full two minutes. This melts it gently. Then, start stirring from the center outwards until you have a smooth, silky, glossy chocolate waterfall. Let it cool for 5 minutes so it’s not super runny, then pour it over the cheesecake, spreading it to the edges. A final chill for an hour sets the topping into a gorgeous, crackable shell. Chef’s tip: For a marbled effect, drizzle a little melted white chocolate over the milk chocolate ganache before it sets and swirl it with a toothpick.
Your Cheesecake Timeline
- Prep Time: 30 minutes
- Cook Time: 50 minutes
- Cooling & Chilling Time: 6 hours (or overnight)
- Total Time: About 7 hours 20 minutes (mostly hands-off)
Chef’s Secret for a Crack-Free Top
The ultimate secret? Room temperature ingredients and no over-mixing. Let your cream cheese, eggs, and sour cream sit out for at least an hour. This allows them to blend smoothly without you having to over-beat. Over-beating incorporates too much air, which expands and collapses in the oven, leading to cracks. Mix just until each ingredient is incorporated. Slow and steady wins the smooth, beautiful cheesecake race.
A Sweet Little Fact
Did you know the “double crust” in the Cadbury egg’s name inspired this recipe’s structure? I loved the idea of a chocolate surprise inside and out. Using the Oreos for the crust and the ganache for the top creates that same delightful “double” chocolate experience. It’s a fun nod to a classic treat, all grown up.
Essential Tools for the Job
- 8×5 inch pie or springform pan
- Food processor or zip-top bag & rolling pin (for Oreos)
- Electric mixer (hand or stand)
- Mixing bowls (various sizes)
- Rubber spatula
- Small saucepan or microwave-safe bowl
How to Store Your Masterpiece
This cheesecake must be stored in the refrigerator. Once the ganache topping is fully set, cover the pan tightly with plastic wrap or aluminum foil. The cold environment keeps the creamy filling firm and safe to eat.
Properly stored, your cheesecake will stay delicious for up to 5 days. The flavors actually meld and get better after a day or two! Make sure it’s covered well to prevent it from absorbing other fridge odors.
You can also freeze this cheesecake for longer storage. Wrap the whole cheesecake or individual slices tightly in plastic wrap, then in foil. It will keep for up to 2 months. Thaw it overnight in the fridge before serving.
Tips and Advice for Success
- For super clean slices, dip your sharp knife in hot water and wipe it dry between each cut.
- If you see small lumps in your cream cheese mixture, don’t panic! Press the filling through a fine-mesh strainer before pouring it into the crust.
- Use a water bath for absolute perfection. Wrap the bottom of your springform pan in foil, place it in a larger roasting pan, and pour hot water halfway up the sides of the cheesecake pan before baking.
- Let the cheesecake come to room temperature for about 20 minutes before serving for the best flavor and texture.
Presentation Ideas to Impress
- Garnish each slice with a dollop of whipped cream, a fresh raspberry, and a mini Oreo cookie.
- Drizzle extra melted white and milk chocolate in zig-zags over the plate before placing the slice.
- Add a light dusting of cocoa powder or edible gold dust for a fancy touch.
- Serve with a small glass of cold milk or a shot of espresso for the adults.
Healthier & Fun Recipe Variations
Love the idea but want to mix it up? Here are six delicious twists!
- Peanut Butter Swirl: Add 1/2 cup of creamy peanut butter to the filling and swirl it with a knife before baking.
- Mint Chocolate Delight: Add 1/2 teaspoon of peppermint extract to the white chocolate filling and use dark chocolate for the topping.
- Cookies & Cream: Fold 1 cup of roughly chopped Oreo pieces into the cheesecake batter before pouring it into the crust.
- Berry Burst: After adding the ganache, top with a layer of fresh strawberry slices or a homemade raspberry sauce.
- Caramel Drizzle: Skip the ganache and top the chilled cheesecake with a generous drizzle of salted caramel sauce.
- Lighter Version: Use reduced-fat cream cheese and Neufchâtel cheese, and swap the sour cream for plain Greek yogurt.
Common Mistakes to Avoid
Mistake 1: Using Cold Ingredients
This is the number one cause of a lumpy cheesecake batter. Cold cream cheese doesn’t blend smoothly with sugar. You end up over-mixing to try to get rid of lumps, which adds too much air. Always take your cream cheese, eggs, and sour cream out of the fridge at least an hour before you start. They should feel cool to the touch, not cold.
Mistake 2: Over-baking the Cheesecake
A cheesecake is done when the center is still a bit wobbly, not rock-solid. It keeps cooking from residual heat as it cools. If you bake it until the center is completely firm, it will be dry and dense. Use the jiggle test: gently shake the pan. The outer few inches should look set, but a small area in the center (about the size of a quarter) should have a slight, smooth jiggle.
Mistake 3: Skipping the Gradual Cool-Down
Taking a hot cheesecake straight from the oven to the cold fridge is a shock. This sudden temperature change almost guarantees a huge crack down the middle. Let it cool slowly. First in the turned-off oven with the door ajar, then on the counter, and finally in the fridge. This gentle cooling helps it set evenly and stay beautiful.
Mistake 4: Cutting Into a Warm Cheesecake
I know it’s tempting, but you must wait! A cheesecake needs time for its structure to fully set in the fridge. If you cut it while it’s still warm or only partially chilled, it will be gooey and fall apart. The clean, perfect slices you see in pictures come from a fully chilled cheesecake. Make it a day ahead—your patience will be rewarded.
Frequently Asked Questions
Can I use a different size pan?
You can, but you’ll need to adjust the baking time. A standard 9-inch pan will result in a slightly thinner cheesecake, so check for doneness 5-10 minutes earlier. For a taller cheesecake in a 7-inch or 8-inch springform pan, you may need to add 10-15 minutes to the baking time. Always rely on the visual and jiggle tests rather than the clock alone.
My ganache split or looks gritty. What happened?
This usually happens if the cream was too hot or you stirred too vigorously. If it splits (looks oily), try whisking in a teaspoon of room-temperature milk or cream to bring it back together. If it’s gritty, the chocolate might have been overheated or had water get into it. Gently re-warm the mixture over a double boiler and stir until smooth.
Can I make this without a springform pan?
Absolutely! A regular 8×5 or 9-inch pie dish works fine. The only trick is serving it. You’ll need to slice and scoop it out rather than lifting out a perfect piece. For easier removal, line your pie dish with parchment paper, letting some hang over the edges, so you can lift the whole cheesecake out after it’s frozen for an hour.
How do I know if my cream cheese is “softened” enough?
It should yield easily when you press it with your finger, like very soft butter. You should be able to make a deep indentation without much force. If it’s still cold and firm, microwave a whole block on low power (10-20% power) for 15-second intervals, turning it over each time, until just softened. Don’t let it melt.
Why did my crust slide down the sides while baking?
This happens if the crust wasn’t packed firmly enough or if it wasn’t chilled before adding the filling. Make sure you really press the crust mixture up the sides, using something flat like a measuring cup to compact it. A good 20-minute chill in the fridge or 10 minutes in the freezer helps it hold its shape when the heavy filling is poured in.
Can I use chocolate chips instead of baking chocolate for the ganache?
You can, but be cautious. Chocolate chips contain stabilizers to help them hold their shape, so they don’t melt as smoothly into ganache. For the best, silkiest texture, use a good quality baking bar chocolate. If you must use chips, add an extra tablespoon of cream to help with the consistency.
Do I have to use a water bath?
No, it’s not strictly necessary, especially for a denser-style cheesecake like this one. The sour cream helps prevent cracking. However, a water bath (or bain-marie) creates a steamy oven environment that leads to the absolute creamiest texture and minimizes the risk of cracks. If you want professional-level results, it’s worth the extra step.
How far in advance can I make this?
This cheesecake is a fantastic make-ahead dessert. Its flavor improves after a day. You can make it fully, with the ganache topping, and keep it covered in the fridge for up to 3 days before serving. You can also freeze it (without garnishes) for up to 2 months. It’s the perfect dessert for stress-free entertaining.
What’s the best way to melt the white chocolate?
White chocolate burns easily. The safest method is a double boiler: place the chopped chocolate in a heatproof bowl over a pot of barely simmering water (don’t let the bowl touch the water). Stir gently until melted. You can also microwave it in 20-second bursts at 50% power, stirring well after each burst, until smooth.
My topping is too thick/thin. How can I fix it?
Ganache thickness depends on the cream-to-chocolate ratio and temperature. If it’s too thick to pour, warm it gently for 5-10 seconds in the microwave and stir. If it’s too thin and runny, let it cool at room temperature for a bit longer to thicken up. You want it to be pourable but not liquid—like warm pudding.
Time to Indulge!
And there you have it—the ultimate show-stopping, conversation-starting, happiness-inducing Cadbury Double Crust Oreo Cheesecake. It’s a labor of love that pays off with every single bite. Don’t be intimidated by the steps; just take your time and enjoy the process. I promise, when you see that first perfect slice and hear the first “wow” from your guests, you’ll know it was all worth it. Now, go preheat that oven and get ready to create something truly magical. Happy baking!
Oreo Cheesecake with White Chocolate Filling
Ingredients
Equipment
Method
- Crush the Oreo cookies into fine crumbs and mix with melted butter until it resembles wet sand.
- Press the mixture into the bottom and up the sides of an 8x5 inch pan, then refrigerate to set.
- Preheat your oven to 325°F (160°C) and beat the cream cheese and sugar together until smooth.
- Mix in the melted white chocolate, then add vanilla and eggs, one at a time, mixing until incorporated.
- Fold in the sour cream and pour the filling over the chilled crust.
- Bake for 45 to 50 minutes until the edges are set while the center has a slight jiggle.
- Turn off the oven and leave the cheesecake to cool inside for about an hour, then cool completely on the counter.
- Chill in the refrigerator for at least 4 hours or overnight.
- For the ganache, heat the heavy cream until steaming and pour it over the chopped milk chocolate. Let sit for 2 minutes then stir until smooth.
- Pour the ganache over the chilled cheesecake, spreading it evenly, and chill for another hour to set.