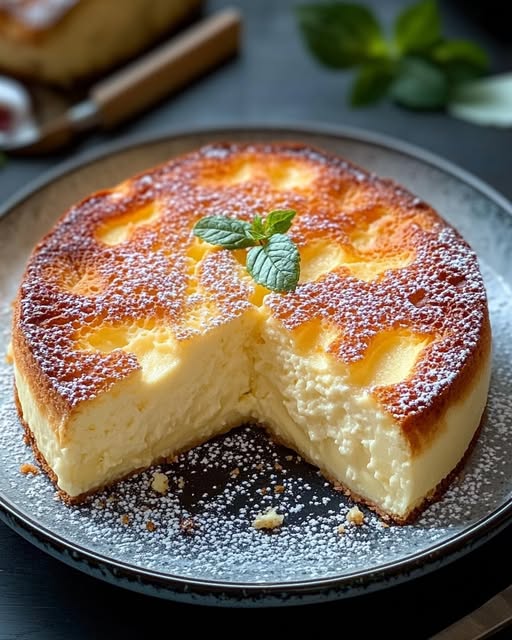
My Creamy Yogurt Cake: The Easiest, Most Reliable Treat in My Kitchen
You know those days when you need a cake, like, yesterday? Maybe the kids just announced they have a bake sale tomorrow. Or your in-laws are popping over for coffee in an hour. My heart used to sink a little. Until I found this recipe. This Creamy Yogurt Cake is my kitchen guardian angel. It uses the humble yogurt pot as its measuring cup, comes together in one bowl, and bakes into something magical. It’s the cake I’ve made more times than I can count, and it never lets me down.
The Story Behind This Simple Yogurt Cake
This recipe is a modern twist on a classic French “gâteaux au yaourt.” In France, children often learn to bake using the empty yogurt pot to measure all the other ingredients. It’s a beautiful, foolproof method. My version takes that simple, nostalgic base and amps up the creaminess with an extra yogurt. I tested it by adding a touch more oil for a supremely moist crumb and that magical vanilla extract. The result? A cake that’s both a trip down memory lane and a totally new favorite. It’s tradition, but simpler and creamier.
Why You Will Adore This Creamy Cake
Let me count the ways! First, it’s unbelievably easy. You literally mix wet ingredients, then dry, and boom—you’re done. No fancy techniques. Second, the texture is dreamy. That extra yogurt creates a soft, tender, almost pudding-like crumb that melts in your mouth. Third, it’s incredibly versatile. Eat it plain, dust it with sugar, or dress it up with fruit. It’s the friendly, forgiving cake that wants you to succeed.
Perfect Times to Bake This Yogurt Sponge Cake
This cake is your answer for almost any occasion. It’s perfect for a quick weeknight dessert with the family. It shines at a casual weekend brunch, paired with fresh berries. It’s sturdy enough to pack for a picnic but elegant enough to serve to guests with a dollop of whipped cream. I’ve even baked it in a loaf pan and sliced it for lunchboxes. It’s truly an all-purpose, any-day treat.
Gathering Your Ingredients for the 3-Yogurt Cake
Here’s your simple shopping list. The beauty is, you probably have most of this already!
- 3 plain yogurts (about 150g each, use the emptied pot to measure!)
- 2 large eggs, at room temperature
- 200g (1 cup) granulated sugar
- 250g (about 2 cups) all-purpose flour
- 1 packet (2 ¼ tsp) baking powder
- 100ml (scant ½ cup) neutral vegetable oil (like canola or sunflower)
- 1 teaspoon pure vanilla extract
Simple Swaps: Your Ingredient Substitutions
Out of something? No panic! This recipe is very adaptable.
- Yogurt: Greek yogurt will make it denser and richer. Dairy-free yogurt works too.
- Flour: For a lighter cake, you can use cake flour. For a gluten-free version, use a 1:1 gluten-free flour blend.
- Sugar: You can reduce the sugar slightly to 170g if you prefer a less sweet cake.
- Oil: Melted, cooled butter or a mild olive oil can replace the vegetable oil for a different flavor.
- Vanilla: The seeds from a vanilla bean or a dash of almond extract are lovely alternatives.
How to Make Your Magical Moist Yogurt Cake
Ready for some stress-free baking? Let’s do this step-by-step. I’ll walk you through it.
Step 1: Preheat and Prepare
Start by heating your oven to 180°C (350°F). This gives it time to reach the perfect, even temperature. While it warms up, take your cake pan (a 9-inch round or loaf pan works great) and grease it well with butter or non-stick spray. A light dusting of flour over the butter will ensure your cake releases like a dream. Pro tip: I sometimes use a parchment paper circle at the bottom for absolute security. Set your pan aside and let’s get mixing!
Step 2: Whip Up the Egg Base
Grab a large mixing bowl. Crack in the two eggs and pour in all the sugar. Now, take a whisk and beat them together with some energy! You’re not just mixing; you’re incorporating air. Do this for a good 2-3 minutes until the mixture turns pale, fluffy, and falls from the whisk in a thick ribbon. This step is the secret to a light crumb. You’ll see the color change from dark yellow to a lovely creamy off-white. It’s already starting to look like cake batter!
Step 3: Combine Everything into a Smooth Batter
Time to bring it all together. Scoop in your three yogurts and pour in the oil and vanilla. Give it a good whisk until it’s smooth and creamy. Now, place a sieve over the bowl and add your flour and baking powder. Sifting them in prevents lumps and ensures the leavening is evenly distributed. Gently fold everything together with a spatula. Stop as soon as you no longer see streaks of flour. The batter will be thick, creamy, and beautifully smooth. Chef’s tip: A few tiny lumps are okay—over-mixing is the enemy of a tender cake!
Step 4: Transfer to the Pan
Pour your gorgeous, creamy batter into your prepared pan. Use your spatula to scrape out every last bit—you deserve it all! Gently tap the pan on the counter a couple of times. This releases any large air bubbles that could create tunnels in your finished cake. You’ll see the batter settle evenly into the pan. It’s ready for its oven transformation.
Step 5: Bake to Golden Perfection
Carefully place the pan in the center of your preheated oven. Now, resist the urge to open the door for at least the first 30 minutes! The cake needs steady heat to rise properly. Start checking at the 35-minute mark. The cake should be a deep, golden brown on top and just starting to pull away from the sides. The real test? Insert a skewer or toothpick into the very center. It should come out clean, with maybe a few moist crumbs, but no wet batter. If it needs more time, bake in 5-minute increments.
Step 6: Cool and Serve Your Creation
Once baked, take the cake out and let it cool in its pan on a wire rack for about 15 minutes. This lets it set so it doesn’t fall apart. Then, run a knife around the edge, place a plate on top, and confidently flip it over. It should release with a soft *plop*. Let it cool completely before slicing. I know, the wait is torture! But this prevents a gummy texture. Then, slice, serve, and enjoy your masterpiece.
Timing Your Yogurt Cake Adventure
This is why I call it a “quick” cake. From start to finish, you’re looking at under an hour of real effort.
- Prep Time: A breezy 10 minutes.
- Cook Time: 35 to 40 minutes of hands-off baking time.
- Cooling Time: About 30-40 minutes (be patient, it’s worth it!).
- Total Time: Around 50 minutes of active work, plus cooling.
- Servings: This makes 8 generous slices of pure happiness.
My Chef’s Secret for the Best Cake
Here’s my little trick: use full-fat yogurt. I’ve tested this with low-fat and Greek, and while they work, full-fat plain yogurt gives you the ultimate creamy, moist, and tender crumb. It adds a slight richness that makes the cake taste much more luxurious than its simple ingredients suggest. It’s the difference between a good cake and a “wow, what did you put in this?” cake.
A Fun Fact About Your Main Tool: The Yogurt Pot
The empty yogurt pot isn’t just trash—it’s your built-in measuring cup! This tradition, popular in French homes, is a brilliant way to teach kids about ratios and baking without scales. It makes the recipe scalable and foolproof. If you have a 125g pot, you just use that same pot for the sugar, flour, and oil. It’s a charming piece of culinary history right in your kitchen.
What You’ll Need to Make It
No special equipment needed! Just basic kitchen tools:
- A large mixing bowl
- A whisk and a spatula
- A 9-inch round cake pan or a 9×5 inch loaf pan
- Measuring cups/spoons or a kitchen scale
- A wire cooling rack
- A sieve or sifter for the flour (optional but helpful)
Storing Your Delicious Yogurt Cake
Once completely cool, you can keep your cake right on the counter. Just cover it with a cake dome or wrap it tightly in plastic wrap. It will stay beautifully moist for 2-3 days at room temperature. The yogurt helps it retain its soft texture.
If you want to keep it longer, freezing is a great option. Wrap individual slices or the whole cake (once fully cooled) tightly in plastic wrap, then a layer of aluminum foil. It will freeze perfectly for up to 3 months. Thaw overnight in the fridge or for a few hours on the counter.
I don’t recommend storing it in the refrigerator unless your kitchen is very hot and humid. The fridge can actually dry out baked goods. The counter is its happy place!
My Best Tips and Advice for Success
- Room temp is best: Using eggs and yogurt at room temperature helps them blend smoothly and gives a better rise.
- Don’t over-mix: Once you add the flour, mix just until combined. Over-working the gluten will make the cake tough.
- Test for doneness: Ovens vary. Use the toothpick test as your guide, not just the timer.
- Cool completely before glazing: If you add a lemon glaze or powdered sugar, let the cake cool so it doesn’t melt and disappear.
Pretty Ways to Present Your Cake
Make it look as good as it tastes! Here are a few of my go-to presentation ideas:
- A simple dusting of powdered sugar through a small sieve looks elegant and classic.
- Drizzle with a lemon glaze (just mix powdered sugar with fresh lemon juice).
- Top with fresh berries and a dollop of lightly sweetened whipped cream.
- Serve each slice with a side of fruit compote or a scoop of vanilla ice cream.
6 Fun Variations to Try Next Time
This recipe is a perfect blank canvas. Once you master the basic 3-Yogurt Cake, try these twists!
- Lemon Zest Delight: Add the zest of two lemons to the batter with the wet ingredients. It adds a beautiful, sunny fragrance.
- Berry Burst Cake: Toss a cup of fresh or frozen blueberries (or raspberries) in a tablespoon of flour, then gently fold them into the batter just before baking.
- Chocolate Chip Version: Fold in ¾ cup of semi-sweet chocolate chips for a treat that kids (and adults) will go crazy for.
- Coconut Dream: Replace 50g of the flour with unsweetened shredded coconut and use coconut yogurt for a tropical twist.
- Orange & Almond: Use almond extract instead of vanilla and add the zest of one orange. Sprinkle sliced almonds on top before baking.
- Whole Wheat & Honey: Substitute half the all-purpose flour with whole wheat flour and replace half the sugar with honey. It’s a denser, heartier option.
Common Mistakes to Avoid with Your Yogurt Cake
Even easy recipes have pitfalls. Avoid these to guarantee perfect results every single time.
Mistake 1: Using Cold Ingredients Straight from the Fridge
This is a super common one. Cold eggs and yogurt don’t blend as smoothly into the batter. This can result in a denser, less evenly mixed cake. The oil might even separate a little. To avoid this, simply take your eggs and yogurt out of the fridge about 30 minutes before you start baking. They’ll blend into a beautifully smooth, creamy batter that bakes up light and airy.
Mistake 2: Over-Mixing the Batter After Adding Flour
Once you add the flour, you need to switch from vigorous whisking to gentle folding. Over-mixing activates the gluten in the flour. Think of gluten as tiny elastic bands. The more you mix, the tighter and tougher those bands become. This leads to a chewy, tough cake instead of a soft, tender one. Mix just until the last streaks of flour disappear. A few small lumps are absolutely fine.
Mistake 3: Opening the Oven Door Too Early
I know it’s tempting to peek! But opening the oven door in the first 25-30 minutes of baking is a recipe for disaster. The sudden drop in temperature can cause your beautiful, rising cake to collapse in the center. The heat needs to stay steady for the cake structure to set properly. Trust the process and the timer. Use the oven light to check on its color until it’s time for the toothpick test.
Mistake 4: Not Testing for Doneness Properly
Relying solely on the timer is a gamble. Every oven is different, and even small variations in pan material can affect baking time. Poking the cake too early can leave a hole, but not testing at all can lead to an under-baked, gummy center. The right way? Start checking at the minimum bake time. Insert a toothpick or skewer into the very center of the cake. If it comes out clean or with a few dry crumbs, it’s done. If there’s wet batter, give it 5 more minutes and test again.
Your Creamy Yogurt Cake Questions, Answered
Can I use flavored yogurt instead of plain?
You can, but be careful. Flavored yogurts (like vanilla or strawberry) almost always have added sugar. If you use them, I recommend reducing the granulated sugar in the recipe by about 50g (¼ cup) to avoid an overly sweet cake. Also, be aware they might have added color or bits of fruit that will change the final look and texture slightly. For the most reliable result, plain yogurt is best.
Why did my cake sink in the middle after baking?
A sunken cake is usually a sign of two things: too much leavening or under-baking. First, double-check your baking powder. Is it fresh? Using an old or expired one, or using baking soda by mistake, can cause issues. Second, the cake might have looked done on the outside but was still wet inside. The structure couldn’t hold, so it collapsed. Always use the toothpick test in the very center. Also, ensure you’re not over-mixing, as that can weaken the structure too.
Can I make this cake dairy-free or gluten-free?
Absolutely! For a dairy-free version, simply use a plain, unsweetened plant-based yogurt (almond, soy, or coconut yogurt work well). The texture may be slightly different but will still be delicious. For gluten-free, swap the all-purpose flour for a good 1:1 gluten-free baking blend that contains xanthan gum. Do not use plain gluten-free flour like rice or almond flour alone, as they won’t provide the right structure.
My cake is very dense. What did I do wrong?
A dense cake often points to over-mixing (activating too much gluten) or using cold ingredients that didn’t incorporate properly. It could also mean your baking powder is old and lost its power. Next time, ensure ingredients are room temp, fold the flour in gently, and check your baking powder’s expiration date. Measuring the flour incorrectly (scooping directly from the bag packs it down) can also add too much flour, leading to density.
Can I add fruit like apples or bananas to this batter?
You can, but you need to account for the extra moisture. For fruits like grated apple or mashed banana (about 1 cup), I recommend reducing the yogurt by one (so use only 2 yogurts instead of 3). Toss any chopped fruit in a little flour before folding it in to prevent it from sinking to the bottom. The cake will be heavier and moister but delicious!
What’s the best way to get a clean slice of cake?
For the cleanest slices, use a long, thin-bladed knife. Run it under very hot water, wipe it dry, and then slice. The heat helps the knife glide through the tender crumb without tearing or sticking. Wipe and re-heat the knife between each cut. Also, make sure your cake is completely cooled. A warm cake will tear and crumble when you try to slice it.
Can I double this recipe?
Yes, you can double it easily. Just use a larger bundt pan or two standard 9-inch cake pans. Keep a close eye on the baking time—it may need a few extra minutes due to the larger volume of batter. Always rely on the visual cues (golden brown, pulling from sides) and the toothpick test to determine when it’s perfectly baked.
Is it normal for the top of the cake to crack a little?
Yes, a slight crack or dome on top is completely normal for this type of simple, moist cake! It’s often a sign of good oven spring (the initial rapid rise). It doesn’t affect the taste or texture at all. In fact, I think it gives it a lovely, homemade character. If you prefer a perfectly flat top, you can try lowering your oven temperature by 10°C (25°F) and baking a little longer.
How can I tell if my baking powder is still good?
This is a great question, as old baking powder is a common cause of cake fails. To test it, put about ½ teaspoon of baking powder in a small cup. Pour a few tablespoons of hot water over it. If it fizzes and bubbles vigorously immediately, it’s still active. If the reaction is weak or non-existent, it’s time for a new box. Baking powder typically lasts 6-12 months after opening.
Can I make this into muffins or cupcakes instead?
Definitely! This batter works wonderfully for muffins. Simply line a muffin tin with papers and fill each cup about ⅔ full. The baking time will be much shorter—start checking at around 18-20 minutes. They are done when a toothpick inserted into the center of a muffin comes out clean. You’ll get about 12-14 perfect, portable treats.
Go Forth and Bake Your Masterpiece!
So there you have it—my go-to, never-fail, creamy yogurt cake. It’s more than just a recipe; it’s a reliable friend in the kitchen for busy mornings, last-minute guests, or when you just need a simple, satisfying sweet treat. I hope it becomes a beloved staple in your home, just like it is in mine. Remember, baking should be fun and stress-free. This cake is the perfect place to start. Now, go grab those yogurts and get mixing. Your delicious, homemade cake is waiting!
Creamy Yogurt Cake
Ingredients
Equipment
Method
- Preheat the oven to 180°C (350°F) and grease a 9-inch round or loaf pan.
- In a large mixing bowl, crack the eggs and add sugar, then whisk for 2-3 minutes until pale and fluffy.
- Add the three yogurts, oil, and vanilla to the egg mixture, whisking until smooth and creamy.
- Sift in the flour and baking powder, then gently fold until just combined, without over-mixing.
- Pour the batter into the prepared pan, tapping it lightly to settle.
- Bake in the center of the preheated oven for 35-40 minutes until golden brown and a toothpick comes out clean.
- Let the cake cool in the pan for 15 minutes, then invert onto a wire rack to cool completely before slicing.