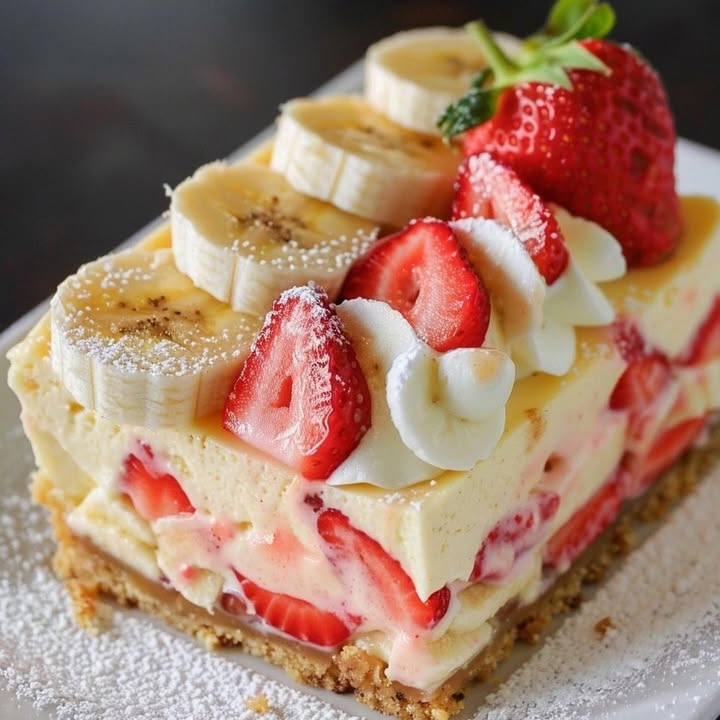
Strawberry Banana Cheesecake Bars: The Dessert That Has It All
You know that magical feeling when you take a bite of something so perfect, you just have to close your eyes and savor it? That’s what happened the first time I made these Strawberry Banana Cheesecake Bars. I was looking for a dessert that would please everyone at our family potluck—the kids, the picky uncle, and my cheesecake-obsessed best friend. This recipe was my hero. It’s like a sunny summer day and a cozy dessert all wrapped into one irresistible bar.
A Little Slice of Happy History
Cheesecake itself has ancient roots, but these bars are a wonderfully modern twist. Traditional cheesecake can feel formal and fussy. The bar form, though? It’s friendly, shareable, and perfect for today’s casual get-togethers. The combo of strawberry and banana is a classic for a reason—it reminds us of childhood smoothies and fruit salads, but all grown up in a rich, creamy filling. In my kitchen, this recipe has become a new tradition for birthday parties and “just because” Tuesday nights.
Why You’ll Absolutely Adore This Recipe
Let me count the ways! First, the texture is incredible. You get the crunchy graham cracker crust, the velvety smooth filling packed with juicy fruit, and a cloud of whipped cream on top. It’s a party in your mouth. Second, it’s surprisingly simple. No water bath, no fancy techniques. And finally, it’s a total crowd-pleaser. These bars look gorgeous on a plate and taste even better. They feel special without requiring a pastry degree.
Perfect Occasions for These Cheesecake Bars
This is your new go-to dessert for almost any event! I love bringing them to picnics and barbecues because they’re easy to transport and serve. They’re a star at baby showers and bridal luncheons—the pink and yellow fruit just screams celebration. Honestly, they’re also the perfect “cheer-up” dessert. Had a long week? A small square of this happiness with a cup of coffee is the best therapy.
What You’ll Need: The Ingredients List
Gathering your ingredients is the first step to dessert bliss. Here’s your shopping list:
For the Base:
- 1 1/2 cups graham cracker crumbs
- 1/4 cup granulated sugar
- 1/2 cup (1 stick) unsalted butter, melted
For the Filling:
- 16 oz (two 8-oz blocks) full-fat cream cheese, softened
- 1 cup granulated sugar
- 1 teaspoon pure vanilla extract
- 3 large eggs, at room temperature
- 1 cup sliced fresh strawberries
- 1 cup sliced ripe bananas
For the Topping:
- 1/2 cup whipped cream (or whipped topping)
- Extra strawberries and bananas for garnish
- Powdered sugar for a light dusting
No Problem! Handy Substitution Options
Out of something? Don’t panic! Here are some easy swaps:
- Graham Cracker Crumbs: You can use crushed digestive biscuits, vanilla wafers, or even shortbread cookies.
- Butter: For a dairy-free version, use a plant-based butter alternative.
- Cream Cheese: Full-fat is best for texture, but you can use reduced-fat. Avoid fat-free, as it won’t set properly.
- Fruit: Blueberries or raspberries work beautifully in place of strawberries. For the banana, you could use 1 cup of mango puree for a different tropical twist.
Let’s Make Some Magic: The Preparation
Get ready for some simple, joyful baking. I promise, the aroma alone is worth it!
Step 1: Building the Buttery Base
Start by preheating your oven to 350°F (175°C). Line an 8×8 or 9×9 inch baking pan with parchment paper, letting the edges hang over for easy lifting later. In a medium bowl, combine the graham cracker crumbs and sugar. Pour in that glorious melted butter. Stir it all together until the mixture looks like wet sand and holds together when you pinch it. Pour it into your prepared pan and press it down firmly and evenly with the bottom of a cup. This crust is the foundation of your bars, so a good, solid press is key. Pop it in the fridge to set while you make the filling.
Pro tip: For an extra-secure crust, you can bake it alone for 8 minutes before adding the filling, but it’s not strictly necessary with this recipe.
Step 2: Crafting the Creamy, Fruity Filling
In a large bowl, beat the softened cream cheese with an electric mixer until it’s completely smooth and lump-free. This might take a minute or two. Add the sugar and vanilla extract and beat again until the mixture is silky. Now, add the eggs one at a time, beating on low speed after each addition until just combined. You want to avoid over-beating here. Finally, with a gentle hand, use a spatula to fold in the sliced strawberries and bananas. You’ll see beautiful streaks of pink and pale yellow swirling through the creamy white batter.
Chef’s tip: Make sure your cream cheese and eggs are at room temperature! This is the #1 secret to a smooth filling without lumps. Cold cream cheese will leave little bits in your batter.
Step 3: The Big Bake and the Patient Chill
Take your crust out of the fridge. Pour the beautiful pink-speckled filling over the crust and spread it out evenly. Place the pan in the preheated oven and bake for 35-40 minutes. The edges should be set, but the center should still have a slight jiggle—like Jell-O when you gently shake the pan. The top may develop a very light golden hue. Once baked, remove the pan from the oven and let it cool completely on a wire rack. This is crucial. Then, cover it and refrigerate for at least 3 hours, but overnight is truly the best of the best for perfect slicing.
Step 4: The Grand Finale Topping
This is the fun part! Once your bars are completely chilled, use the parchment paper “handles” to lift the whole slab out of the pan and onto a cutting board. Slice into squares with a sharp knife wiped clean between cuts for neat edges. Just before serving, add a dollop of whipped cream to each bar. Top with a fresh slice of strawberry and banana. For the final touch, place a little powdered sugar in a fine-mesh sieve and give it a gentle tap over the top for a snowy, beautiful finish. Ready to enjoy!
Timing is Everything
Let’s break down the clock so you can plan your baking adventure:
- Prep Time: 20 minutes
- Bake Time: 40 minutes
- Cooling Time: 1 hour at room temperature
- Chilling Time: At least 3 hours (overnight preferred)
- Total Time (Including Chill): About 4 hours 30 minutes
- Servings: 12 generous bars
My Chef’s Secret for the Best Bars
My secret weapon is a tiny pinch of salt in the cream cheese filling. You won’t taste it as “salty,” but it makes the strawberry and banana flavors pop and cuts the sweetness perfectly. Add about 1/8 teaspoon when you add the vanilla. It’s a simple trick that adds a professional depth of flavor.
A Fun Fruit Fact
Did you know strawberries are the only fruit with seeds on the outside? One average strawberry has about 200 seeds! Those tiny seeds add a lovely little texture to our creamy cheesecake filling. And bananas are technically berries, while strawberries are not. Isn’t that a fun bit of trivia to share while you serve these?
Necessary Equipment for Success
You don’t need any fancy gear. Here’s the short list:
- 8×8 or 9×9 inch baking pan
- Parchment paper
- Mixing bowls (medium and large)
- Electric hand mixer or stand mixer
- Rubber spatula
- Measuring cups and spoons
- Wire cooling rack
Keeping Your Bars Fresh: Storage Tips
These cheesecake bars need to live in the refrigerator. Once topped, they are best eaten the same day. However, the plain, chilled bars (without whipped cream and fresh fruit garnish) store beautifully.
Place them in an airtight container with layers separated by parchment paper. They will stay fresh and delicious for up to 4 days. The crust may soften slightly by day four, but the flavor will still be amazing.
You can also freeze these bars for longer storage. Wrap individual bars tightly in plastic wrap and then place them in a freezer-safe bag or container. They can be frozen for up to 2 months. Thaw overnight in the refrigerator before garnishing and serving.
My Best Tips and Advice
- Room Temperature is Key: I can’t stress this enough. Soft cream cheese and room-temperature eggs blend smoothly and prevent a lumpy or cracked filling.
- Don’t Over-mix: Once you add the eggs, mix on low speed just until combined. Over-beating incorporates too much air, which can cause the cheesecake to rise and then fall and crack.
- Slice Fruit Thinly: Thin slices of strawberry and banana distribute more evenly and are easier to slice through later.
- Clean Cuts: For picture-perfect bars, dip a sharp knife in hot water, wipe it dry, and then make each cut. Clean the knife between cuts.
Presentation Ideas to Wow Your Guests
- Serve on a pretty platter with mint leaves scattered around for a pop of green.
- For a party, cut them into bite-sized pieces and serve as mini desserts on a tiered stand.
- Drizzle a little strawberry or caramel sauce on the plate before placing the bar on top.
- Use a small cookie cutter to cut a shape from a banana slice and place it on top of the whipped cream.
Healthier & Delicious Recipe Variations
Love the idea but want to mix it up? Here are six tasty twists:
- Gluten-Free Bliss: Use certified gluten-free graham crackers or almond flour for the crust.
- Lighter Version: Swap in reduced-fat cream cheese and Greek yogurt for half the cream cheese. Use a sugar substitute designed for baking.
- Tropical Dream: Replace strawberries and bananas with 1 cup of well-drained crushed pineapple and 1/2 cup of shredded coconut folded into the filling.
- Chocolate Berry: Add 1/2 cup of mini chocolate chips to the filling. Use chocolate graham crackers for the crust.
- Lemon Blueberry Burst: Omit the vanilla and add 2 tablespoons of lemon juice and 1 tablespoon of zest to the filling. Fold in blueberries instead of strawberries and bananas.
- No-Bake Option: Use a no-bake cheesecake filling mix, prepare according to package directions, fold in the fruit, pour over the crust, and just chill.
Common Mistakes to Avoid
Avoid these simple pitfalls for perfect bars every single time.
Using Cold Ingredients Straight From the Fridge
This is the most common error. Cold cream cheese will never become completely smooth, leaving you with a lumpy filling. Cold eggs are harder to incorporate and can lead to over-mixing. Always plan ahead. Take your cream cheese and eggs out at least 30-60 minutes before you start baking. The cream cheese should feel soft to the touch.
Over-Baking the Cheesecake Filling
It’s easy to think a cheesecake needs to be completely firm in the oven. It doesn’t! Over-baking causes a dry, dense texture and major cracks. Your cheesecake is done when the edges are puffed and set, but the center—about a 2-3 inch circle—still has a noticeable jiggle when you gently shake the pan. It will firm up perfectly during the long chill.
Skipping the Long Chill Time
Impatience is the enemy of good cheesecake. Slicing into warm cheesecake is a messy disaster. The filling needs that long, slow chill in the refrigerator to fully set its structure. Cutting too soon will give you soup-like bars. For the absolute best texture, follow the “overnight” instruction. It’s worth the wait, I promise.
Not Pressing the Crust Firmly Enough
A crumbly, loose crust that falls apart can ruin the experience. When you press the graham cracker mixture into the pan, really press it down hard and evenly. Use the flat bottom of a glass or measuring cup to compact it. A firm crust gives you a solid base that holds up to the creamy filling and clean slicing.
Your Strawberry Banana Cheesecake Bars Questions, Answered
Can I use frozen fruit instead of fresh?
I don’t recommend using frozen strawberries or bananas without thawing and draining them extremely well. Frozen fruit releases a lot of water as it bakes, which can make your filling watery and prevent it from setting properly. If you must use frozen, thaw the fruit completely in a strainer over a bowl. Press out every bit of excess liquid with paper towels before folding them into the batter. Even then, fresh is always best for this recipe.
Why did my cheesecake crack on top?
Cracks usually happen from over-mixing (adding too much air), over-baking, or a sudden temperature change. To avoid them, mix the filling just until smooth after adding eggs, don’t over-bake (remember the jiggle!), and let the bars cool gradually on a rack before refrigerating. But hey, if it cracks, don’t worry! That’s what the delicious whipped cream and fruit topping are for—they hide everything beautifully.
How can I tell if the bars are fully set and ready to slice?
The best test is the chill time, not the oven time. After baking, the center will be jiggly. After a full 3-4 hours in the fridge, the entire slab should be firm to a gentle touch. If you’re still unsure, give it the full overnight chill. When you lift the bars out with the parchment paper, the whole block should move as one solid piece without any slump. That’s your green light for slicing.
Can I make these bars ahead of time?
Absolutely, and I highly recommend it! These bars are actually better the next day. You can bake and chill them completely (without the final whipped cream and fresh fruit garnish) up to two days in advance. Keep them covered in the fridge. Add the fresh toppings right before you serve them. This makes them a fantastic, stress-free dessert for parties and gatherings.
My crust is sticking to the pan. How can I prevent this?
Parchment paper is your best friend here. Make sure you line your pan with it, leaving some overhang on two opposite sides to act as “handles.” This lets you lift the entire cheesecake slab out of the pan before you even think about slicing. Spraying the paper lightly with non-stick spray can also help the crust release cleanly from the paper after chilling.
Can I double this recipe?
Yes, you can easily double all the ingredients. Use a 9×13 inch baking pan instead. Your bake time may increase slightly. Start checking at around 45 minutes, looking for that set edge and jiggly center. You may need up to 50-55 minutes. All other instructions remain the same.
What’s the best way to slice clean bars?
For those gorgeous, clean edges, use a long, sharp knife. Run the knife under very hot water, wipe it completely dry with a towel, and then make your cut. The heat helps the knife slide smoothly through the cold filling and crust. Wipe the knife clean and re-heat it between every single cut for the neatest results.
Are there any nut-free alternatives for the crust?
The standard graham cracker crust in this recipe is naturally nut-free (just check your graham cracker label to be sure). Other great nut-free options are crushed vanilla wafers, Biscoff cookies, or even Golden Oreos (with the filling removed). All are mixed with the same amount of melted butter and sugar.
Can I use a different size pan?
You can. An 8×8 inch pan will give you slightly thicker bars and may need a few more minutes of bake time. A 9×9 inch pan yields thinner bars and may bake a few minutes faster. Avoid using a pan larger than 9×13 for a single batch, or your filling layer will be too thin. Always watch for the visual cues (set edges, jiggly center) more than the clock.
How should I store leftovers, and how long will they last?
Store any leftover bars (without the fresh fruit and whipped cream toppings) in an airtight container in the refrigerator. They will last for 3-4 days. The crust will soften a bit each day but they will still taste wonderful. Bars with fresh fruit garnish should be eaten the same day, as the fruit will weep and the whipped cream can deflate. You can store the base bars and add fresh toppings to individual servings as you eat them.
The Final, Sweet Slice
So there you have it! My all-time favorite dessert bar recipe that truly has it all: flavor, texture, simplicity, and wow factor. Whether you’re a seasoned baker or just starting out, these Strawberry Banana Cheesecake Bars are here to make you look like a superstar. They’ve saved the day at my house more times than I can count. Now, it’s your turn. Preheat that oven, slice up some fruit, and get ready for the compliments to roll in. Happy baking
Crispy Air-Fryer Onions
Ingredients
Equipment
Method
- Preheat your oven to 350°F (175°C) and line an 8x8 or 9x9 inch baking pan with parchment paper.
- In a medium bowl, combine the graham cracker crumbs and sugar, then mix with melted butter until it resembles wet sand.
- Press the mixture into the bottom of the prepared pan and refrigerate while making the filling.
- In a large bowl, beat the softened cream cheese until smooth, then add sugar and vanilla, mixing until silky.
- Add eggs one at a time, mixing on low speed until just combined.
- Gently fold in the sliced strawberries and bananas.
- Pour the filling over the crust and spread evenly. Bake for 35-40 minutes until edges are set and the center is slightly jiggly.
- Allow to cool completely on a wire rack, then cover and refrigerate for at least 3 hours, preferably overnight.
- Once chilled, lift the bars out of the pan using the parchment paper and slice into squares.
- Top each bar with a dollop of whipped cream, a slice of strawberry, and banana. Dust with powdered sugar before serving.