A Pie That Tastes Like a Hug
You know that feeling when you sneak a peanut butter cup from the candy bowl? The rich chocolate, the creamy peanut butter… pure bliss. Now, imagine that feeling transformed into a luscious, sliceable pie that will make your guests’ eyes go wide. That’s exactly what this Peanut Butter Cup Pie delivers. I first made it for my son’s birthday, and let me tell you, the table went silent. The only sound was forks clinking and happy sighs. It’s become our official “celebrate everything” dessert, and I’m so excited to share it with you.
From Candy Bar to Pie Dish: A Sweet Evolution
While peanut butter pies have graced American tables for decades, this version is a direct love letter to the iconic Reese’s Peanut Butter Cup. That perfect salty-sweet combo is a classic for a reason. My version takes the no-bake route, making it a lifesaver during busy weeks or hot summers. It’s a modern twist on tradition—less fussy than a layered cake but every bit as impressive. It’s the dessert that perfectly bridges the gap between nostalgic comfort and indulgent, decadent chocolate delight.
Why You’ll Adore This Decadent Chocolate Delight
This isn’t just another pie. It’s a guaranteed crowd-pleaser for three big reasons. First, it’s no-bake. Your oven gets a day off! Second, the texture is pure magic: a crunchy crust, a cloud-like peanut butter filling, and a silky chocolate layer on top. Finally, it’s incredibly customizable. Don’t have graham crackers? Use Oreos! Want it lighter? I’ve got tips for that too. It’s forgiving and foolproof, just like a good recipe should be.
When to Whip Up This Showstopper
This pie shines at any gathering where you want to spread joy. It’s perfect for potlucks because it travels like a dream. It’s a superstar at birthday parties (kids and adults alike go crazy for it). A slice with coffee turns an ordinary Tuesday into a mini-celebration. Honestly, “Tuesday” is a perfectly valid occasion for this creamy chocolate treat.
Everything You’ll Need
Gather these simple ingredients for your ultimate peanut butter pie recipe.
For the Crust:
- 1 ½ cups (180g) graham cracker crumbs
- ½ cup (115g) unsalted butter, melted
For the Peanut Butter Filling:
- 1 cup (250g) creamy peanut butter
- 8 oz (225g) cream cheese, softened
- 1 cup (100g) powdered sugar
- 1 tsp vanilla extract
- 1 cup (240ml) heavy cream
For the Chocolate Ganache:
- 6 oz (170g) semi-sweet chocolate, finely chopped
- ½ cup (120ml) heavy cream
For Garnish:
- 3-4 mini peanut butter cups, chopped
Easy Ingredient Swaps
- Graham Cracker Crumbs: Chocolate wafer cookies or crushed Oreos (filling removed) make a fantastic crust.
- Creamy Peanut Butter: Use a natural peanut butter, but make sure it’s well-stirred. For a twist, try almond or cashew butter.
- Heavy Cream: For the filling, full-fat coconut cream (chilled) can work. For the ganache, it must be real cream.
- Semi-Sweet Chocolate: Milk chocolate or dark chocolate chips are fine. I love the deeper flavor of dark chocolate for a true decadent chocolate delight.
Creating Your Dreamy Peanut Butter Cup Pie
Let’s get mixing! Follow these simple steps for a perfect no-bake chocolate pie.
Step 1: Build Your Crust Foundation
Start by mixing the graham cracker crumbs and melted butter in a medium bowl. It should look like wet sand and hold together when you pinch it. Dump the crumbs into your pie dish and press them firmly and evenly across the bottom and up the sides. I use the bottom of a measuring cup to get it nice and compact. Pop it in the fridge for about 15-20 minutes. This chill time is key for a crust that won’t crumble when you slice it. Pro tip: Press the crumbs up the sides first, then do the bottom. It’s easier!
Step 2: Whip Up the Peanut Butter Cloud
In a large bowl, beat the softened cream cheese until it’s smooth and fluffy. Add the peanut butter, powdered sugar, and vanilla. Beat it all together until it’s completely combined and silky. Now, in a separate, clean bowl, pour in the cold heavy cream. Whip it with electric mixers until you see stiff peaks form. This means when you lift the beaters, the cream stands straight up. Gently fold this fluffy whipped cream into the peanut butter mixture. Be patient and fold gently to keep all that wonderful air in. You’ll end up with a light, mousse-like filling that’s dreamy.
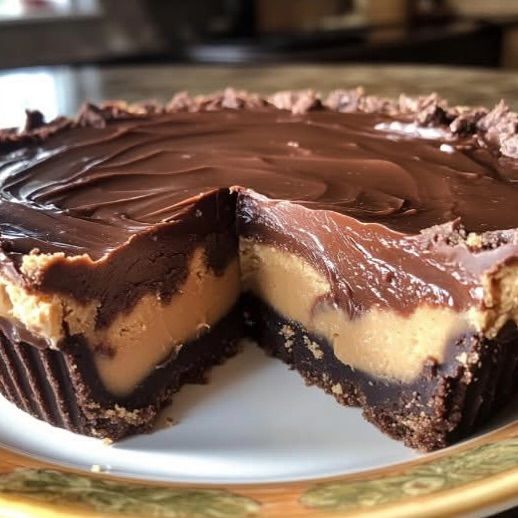
Step 3: Assemble the Layers
Pull your chilled crust from the fridge. Scoop all of that gorgeous peanut butter filling into the center. Using a spatula, spread it out evenly, making a smooth, inviting layer. I like to make little swirls on top with my spatula because it looks pretty under the chocolate. Once it’s smooth, give the dish a little tap on the counter to settle everything and remove any air pockets.
Step 4: Create the Silky Chocolate Ganache
Place your chopped chocolate in a heatproof bowl. Heat the heavy cream in a small saucepan until it’s just beginning to simmer—you’ll see little bubbles around the edge. Immediately pour the hot cream over the chocolate. Let it sit, untouched, for a full two minutes. This allows the heat to gently melt the chocolate. Then, starting in the center, stir slowly until the mixture becomes a single, glossy, and luxurious pool of dark chocolate ganache. Let it cool for just a minute or two so it’s still pourable but won’t melt the filling.
Step 5: Chill, Garnish, and Serve
Slowly pour the warm ganache over the peanut butter layer. Tilt the pie dish to help it spread to the edges for perfect coverage. Now, the hard part: waiting. Carefully transfer the pie to the refrigerator. Let it chill for at least 4 hours, but overnight is even better. This sets everything perfectly. Right before serving, chop up those mini peanut butter cups and sprinkle them generously over the top for that final, iconic touch.
Chef’s tip: For super clean slices, dip your knife in hot water and wipe it dry between each cut.
Your Pie Timeline
- Prep Time: 30 minutes
- Chill Time: 4 hours (minimum)
- Total Time: 4 hours 30 minutes
- Servings: 8-10 happy people
A Little Secret for the Best Texture
My secret weapon? Letting the cream cheese and peanut butter sit on the counter for a full hour before starting. When they are truly room temperature, they blend together seamlessly without any lumps. This creates the smoothest, creamiest filling possible. It makes a huge difference!
A Fun Fact About Peanut Butter
Did you know modern peanut butter was actually patented by a doctor? In the late 1800s, Dr. John Harvey Kellogg (yes, that Kellogg) created a version as a protein source for his patients. It’s come a long way from a health food to the star of our favorite no-bake desserts!
Helpful Tools for the Job
- 9-inch pie dish (glass or ceramic is best)
- Electric hand mixer or stand mixer
- Mixing bowls (various sizes)
- Rubber spatula
- Small saucepan
- Measuring cups and spoons
Keeping Your Pie Perfect
This pie stores beautifully in the refrigerator. Simply cover it tightly with plastic wrap or place it in a cake carrier. It will stay fresh and delicious for up to 4 days. The crust may soften slightly by day 3 or 4, but the flavor will still be amazing.
You can also freeze this pie for longer storage. Wrap the whole pie (or individual slices) tightly in plastic wrap and then in aluminum foil. Freeze for up to 2 months. When you’re ready, thaw it overnight in the refrigerator.
I do not recommend leaving this pie out at room temperature for more than an hour or two. Because of the dairy, it’s safest and tastiest when kept chilled until just before serving.
Tips for a Flawless Pie Every Time
- Use block-style cream cheese, not the spreadable kind in a tub. It has less water and sets firmer.
- Chill your mixing bowl and beaters before whipping the cream. Cold tools make whipping faster and give you better peaks.
- If your ganache seems too thick to pour, add a tiny splash of warm cream and stir. If it’s too thin, let it sit at room temperature for 5-10 minutes to thicken slightly.
Making it Look as Good as it Tastes
- Pipe extra whipped cream around the edges before adding the peanut butter cup garnish.
- Drizzle a little extra melted peanut butter over the chocolate ganache for a fancy swirled effect.
- Serve each slice on a plate with a drizzle of chocolate sauce and a sprinkle of sea salt.
- For a party, make mini pies in a muffin tin using cupcake liners! Just reduce the chill time.
Lighter & Healthier Twists to Try
Love the flavor but want a lighter version? Here are six delicious ideas for a healthier peanut butter pie.
- Greek Yogurt Swap: Replace half of the cream cheese with an equal amount of plain, full-fat Greek yogurt. It adds tang and protein while cutting calories.
- Banana Base: Blend a very ripe banana into the peanut butter filling. It adds natural sweetness, allowing you to reduce the powdered sugar.
- Avocado Chocolate Layer: For the ganache, blend ripe avocado with cocoa powder, a touch of maple syrup, and a splash of milk. It’s incredibly creamy and nutrient-rich.
- Date-Nut Crust: Skip the butter. Process dates, nuts (like almonds), and a pinch of salt in a food processor until it sticks together. Press into your dish.
- Coconut Cream Dream: Use chilled, solidified coconut cream instead of heavy cream for both the filling and ganache. It’s a great dairy-free option.
- Protein Power Pie: Mix a scoop of vanilla or chocolate protein powder into the peanut butter filling. It boosts the protein content for a more satisfying treat.
Common Mistakes to Avoid
Mistake 1: Using Cold Cream Cheese
This is the number one reason for a lumpy filling. Cold cream cheese will never blend smoothly with the peanut butter and sugar. You’ll end up with little white bits throughout your beautiful filling. Always plan ahead and let your cream cheese soften on the counter for at least an hour. If you forget, you can microwave it for 10-15 seconds, but be very careful not to melt it.
Mistake 2: Not Whipping the Cream Enough
If your heavy cream is still soft and pourable when you fold it in, your pie won’t set properly. It will be soupy and dense instead of light and fluffy. Whip the cream until you get stiff peaks. Test it by lifting the beaters straight up; the peak of cream should stand up firmly without drooping over. This gives structure to the whole pie.
Mistake 3: Pouring Hot Ganache
Pouring scalding hot ganache directly onto the peanut butter filling is a recipe for disaster. It will melt the creamy layer, causing the two to mix into a muddy mess instead of staying as distinct, beautiful strata. Let your ganache cool for 3-5 minutes after stirring. It should still be fluid and glossy but just warm to the touch. This gentle heat will set perfectly on top of the cold filling.
Mistake 4: Skipping the Chill Time
I know it’s tempting to slice in after just an hour or two. Don’t do it! This pie needs that full 4+ hours in the fridge to firm up properly. The filling needs time for the cream cheese to re-set and the whipped cream to stabilize. Cutting too early means a runny slice that won’t hold its shape on the plate. Patience is key for the perfect texture.
Your Peanut Butter Pie Questions, Answered
Can I make this pie ahead of time?
Absolutely! This pie is actually better when made ahead. You can prepare it up to two days in advance. Just keep it covered in the refrigerator. Add the chopped peanut butter cup garnish right before serving so they stay fresh and don’t get soggy. Making it ahead allows all the flavors to meld together perfectly and ensures it’s fully set for clean slicing.
Can I use natural peanut butter?
You can, but you need to be careful. Natural peanut butter tends to be oilier and can separate. Make sure you stir it very, very well before measuring. Also, the filling might be a bit softer. For the best, most consistent texture and sweetness, a standard commercial creamy peanut butter like Jif or Skippy is recommended. They have stabilizers that help the pie set firmly.
My ganache turned out grainy. What happened?
A grainy ganache usually means the cream was too hot and “seized” the chocolate, or water got into the mix. Always heat cream until it’s just steaming, not boiling vigorously. Also, ensure your bowl and utensils are completely dry. If it seizes, you can sometimes fix it by whisking in a tablespoon of warm cream until it smooths out again, but prevention is the best method!
How do I get clean slices?
For picture-perfect slices, use a thin, sharp knife. Dip the blade in very hot water, wipe it completely dry with a towel, and then make your cut. The warm knife will glide through the cold layers smoothly. Wipe the knife clean and re-dip it in hot water for each slice. This little trick is a game-changer for serving beautiful pieces of this creamy chocolate treat.
Is there a nut-free alternative?
Yes! To make a nut-free version, you can substitute the peanut butter with sunflower seed butter. It has a similar color and a lovely, slightly earthy flavor that pairs wonderfully with chocolate. Be sure to use a brand you like, as the flavor will be the star. All other steps in the recipe remain exactly the same.
Can I freeze leftover pie?
You sure can. Freeze individual slices on a parchment-lined baking sheet first, then wrap each one tightly in plastic wrap and foil. Or, wrap the whole pie well. It will keep for up to 2 months. Thaw overnight in the refrigerator. The texture may be slightly denser after freezing, but it will still taste delicious.
Why is my crust falling apart when I slice it?
This usually means the crust wasn’t pressed firmly enough into the pan, or it didn’t chill long enough before adding the filling. When you press the crust, really use some muscle! The crumbs should be compact. Also, that initial 15-20 minute chill in the fridge is non-negotiable—it solidifies the butter, acting like glue.
What can I use instead of heavy cream?
For the ganache, you really need heavy cream or whipping cream for the right consistency. For the whipped cream in the filling, you can try using well-chilled full-fat coconut cream. Scoop out the solid part and whip it just like dairy cream. It will add a slight coconut flavor, which can be a tasty twist!
My filling is too sweet. How can I adjust it?
If you prefer a less sweet dessert, you can reduce the powdered sugar in the filling by ¼ cup. Also, using a natural peanut butter (no added sugar) and a darker chocolate for the ganache (70% cacao) will greatly reduce the overall sweetness while highlighting the rich, nutty flavors.
Can I make this in a springform pan?
Definitely! A 9-inch springform pan works beautifully for this recipe. It makes the pie easier to slice and serve, giving you those perfect restaurant-style slices. Just be sure to wrap the bottom of the pan in foil if you’re worried about any leakage from the butter in the crust during chilling.
Go Ahead, Make Someone’s Day
This Peanut Butter Cup Pie is more than just a dessert. It’s a conversation starter, a birthday treat, a potluck victory, and a really good reason to gather around the table. It’s surprisingly simple to make, yet it delivers that wow factor every single time. So grab your mixing bowls, put on some fun music, and get ready to create a little slice of happiness. Don’t forget to save a slice for yourself—you’ve earned it!
Decadent Chocolate Delight
Ingredients
Equipment
Method
- Mix graham cracker crumbs and melted butter in a medium bowl until it resembles wet sand.
- Press the mixture firmly into a 9-inch pie dish, then refrigerate for 15-20 minutes to set.
- Beat softened cream cheese until smooth, then add peanut butter, powdered sugar, and vanilla.
- In a separate bowl, whip the heavy cream to stiff peaks, then gently fold it into the peanut butter mixture.
- Pour the filling into the chilled crust and smooth it out.
- Heat heavy cream in a saucepan until simmering, then pour over the chopped chocolate and let sit for 2 minutes.
- Stir the chocolate and cream gently until it forms a smooth ganache, then let it cool slightly.
- Pour the ganache over the peanut butter filling, spreading it evenly.
- Chill the pie for at least 4 hours or overnight before garnishing with chopped peanut butter cups.