Have you ever had one of those days where only something truly over-the-top and chocolatey will do? You know, the kind of treat that makes your eyes go wide and your inner child do a happy dance? That’s exactly what happened to me last Sunday. I was craving something special, a real showstopper, and let me tell you, these Decadent Cookies and Cream Oreo Rolls were the answer. They are a fluffy, buttery, Oreo-studded dream smothered in creamy frosting. One bite, and my whole family went quiet—the best kind of quiet, the “this is too good to talk” quiet.
The Story Behind These Irresistible Rolls
I’ve always been a cinnamon roll fanatic. It’s a weekend tradition in my house. But one day, my son looked at our classic batch and asked, “Mom, can you put Oreos in them?” Genius! That simple question launched our kitchen experiment. We tried crushing cookies into the dough, the filling, even the glaze. After a few (delicious) trials, we landed on this triple-Oreo threat. It’s a modern twist on a beloved classic, merging the comfort of homemade sweet rolls with the universal joy of cookies and cream. Now, it’s the most requested recipe by my friends—they always ask for the “Decadent Cookie Dough Cake” rolls, even though they’re not a cake at all!
Why You’ll Fall in Love With This Recipe
Why will you adore these? First, the flavor is pure magic. It’s like your favorite chocolate sandwich cookie decided to become a pillow-soft pastry. Second, they are surprisingly fun to make. Kneading the black cookie speckles into the dough is oddly satisfying. Finally, they are incredibly versatile. Perfect for a lazy brunch or a fancy dessert. They look like you fussed for hours, but the steps are simple and straightforward. Trust me, the look on people’s faces when you bring these out is worth every minute.
Perfect Occasions for These Dreamy Rolls
These rolls aren’t just for breakfast! They steal the show at so many events. Think birthday brunches, sleepover mornings, or as the grand finale at a casual dinner party. I love bringing them to potlucks—they always disappear first. They’re also a brilliant “cheer-up” treat. Made a batch for my neighbor after a tough week, and she said it was better than any therapy session. Holidays? Absolutely. Imagine a plate of these next to the Christmas ham or on an Easter buffet.
Gathering Your Ingredients
Let’s get everything ready! Using room-temperature ingredients is key for a happy dough.
- Dough:
- ¾ cup warm water (about 110°F)
- 2 teaspoons active dry yeast
- ⅓ cup granulated sugar (50 g)
- ½ cup whole milk (114 g), room temperature
- 1 large egg
- 1 large egg yolk
- 4 cups all-purpose flour (520 g)
- 1 teaspoon kosher salt
- 5 tablespoons unsalted butter (70 g), softened, cut into tablespoons
- ¾ cup finely chopped Oreo cookies
- Filling:
- ⅓ cup unsalted butter (76 g), softened
- 3 tablespoons granulated sugar (38 g)
- 1 cup finely chopped Oreo cookies
- Cream Cheese Frosting:
- 4 oz brick-style cream cheese (113 g), room temperature
- ¼ cup unsalted butter (57 g), softened
- ½ teaspoon vanilla extract
- Pinch of kosher salt
- 1 ½ cups confectioners’ sugar (170 g)
- Finely chopped Oreo cookies, for garnish
Easy Ingredient Swaps
Don’t have something? No panic! Here are simple swaps.
- Whole Milk: Any milk you have works—2%, skim, or even a plain, unsweetened almond milk.
- Active Dry Yeast: Instant yeast is a fine substitute. You can mix it right in with the dry flour.
- Granulated Sugar: Light brown sugar adds a nice caramel hint, especially in the filling.
- All-Purpose Flour: For a slightly more tender roll, you can use bread flour.
- Oreos: Any chocolate sandwich cookie will do! Try mint or peanut butter ones for a fun twist.
- Cream Cheese: For a simpler glaze, just mix confectioners’ sugar with a little milk and vanilla.
Making Your Decadent Cookies and Cream Oreo Rolls
Ready to create some magic? Follow these steps for perfect, fluffy rolls every time.
Step 1: Wake Up the Yeast
Start by taking your warm water. It should feel like a pleasant bath temperature, not hot. Sprinkle the yeast over it and add a teaspoon of the sugar. Give it a gentle stir and walk away for 5-7 minutes. When you come back, it should look bubbly and foamy, like a tiny cappuccino. This “proofing” step is your guarantee that the yeast is alive and ready to make your dough rise beautifully. If it doesn’t bubble, your yeast might be old, and it’s best to start fresh.
Step 2: Mix and Knead the Dough
In your stand mixer bowl, combine the bubbly yeast, warm milk, the rest of the sugar, the egg, and yolk. Whisk the salt into your flour in a separate bowl. With the dough hook on low, add about 2 cups of the flour mixture. Let it come together into a shaggy mass. Slowly add another cup of flour. As the dough starts to form a ball, add the softened butter, one tablespoon at a time. Let each piece get absorbed before adding the next. This patience creates a super rich and tender dough. Add the final cup of flour and knead on medium-low until the dough is smooth and pulls away from the bowl sides. Lastly, knead in the chopped Oreos until you see those delightful black specks everywhere. Pro tip: If your dough seems too sticky, add just one more tablespoon of flour at a time. You want it soft, not stiff.
Step 3: Let the Dough Rise
Place your beautiful speckled dough into a lightly oiled bowl. Turn it once to coat it lightly in oil. This prevents a dry skin from forming. Cover the bowl tightly with plastic wrap. Find a warm, draft-free spot in your kitchen. I like the oven with just the light on. Let it sit for about an hour. You’ll know it’s ready when you poke it gently and the indent remains. It should look puffy and doubled in size, full of air bubbles from the happy yeast.
Step 4: Roll and Add the Filling
Punch down the dough to release the air. It’s a fun little stress reliever! Turn it out onto a lightly floured surface. Using a rolling pin, roll it into a large rectangle, about 20×14 inches. Spread the softened butter for the filling all over the surface, right to the edges. It’s like frosting the world’s largest cookie. Sprinkle the sugar and the full cup of chopped Oreos evenly. Gently press the cookie bits into the butter so they stick.
Step 5: Shape and Cut the Rolls
Starting from one of the longer sides, roll the dough up tightly into a log. Try to keep it as even as possible. This will give you uniform rolls. To cut, use unflavored dental floss or a very sharp serrated knife. If using floss, slide it under the log, cross the ends over the top, and pull. It makes a clean cut without squishing the dough. Slice the log into 12 equal pieces. Place them cut-side up in your greased 9×13 inch pan. They should be cozy but not touching. Cover the pan with plastic wrap for their second rise.
Step 6: The Second Rise and Bake
Let the shaped rolls rest for 30-45 minutes. They will puff up and start to touch each other. Meanwhile, preheat your oven to 350°F (175°C). When the oven is hot, remove the plastic and bake the rolls for 30-33 minutes. They are done when they are a gorgeous golden brown on top and sound hollow if tapped. For absolute certainty, an instant-read thermometer in the center of a roll should read 185°F. Let them cool in the pan for just 5 minutes before frosting.
Step 7: Whip Up the Frosting
While the rolls cool slightly, make the frosting. In a medium bowl, beat the softened cream cheese and butter together until completely smooth and creamy. Scrape down the sides of the bowl. Add the vanilla, pinch of salt, and confectioners’ sugar. Beat on low at first to avoid a sugar cloud, then increase speed until the frosting is fluffy and light. It should be spreadable but hold its shape. Chef’s tip: For an extra Oreo punch, add a tablespoon of finely crushed Oreo cookie dust to the frosting itself.
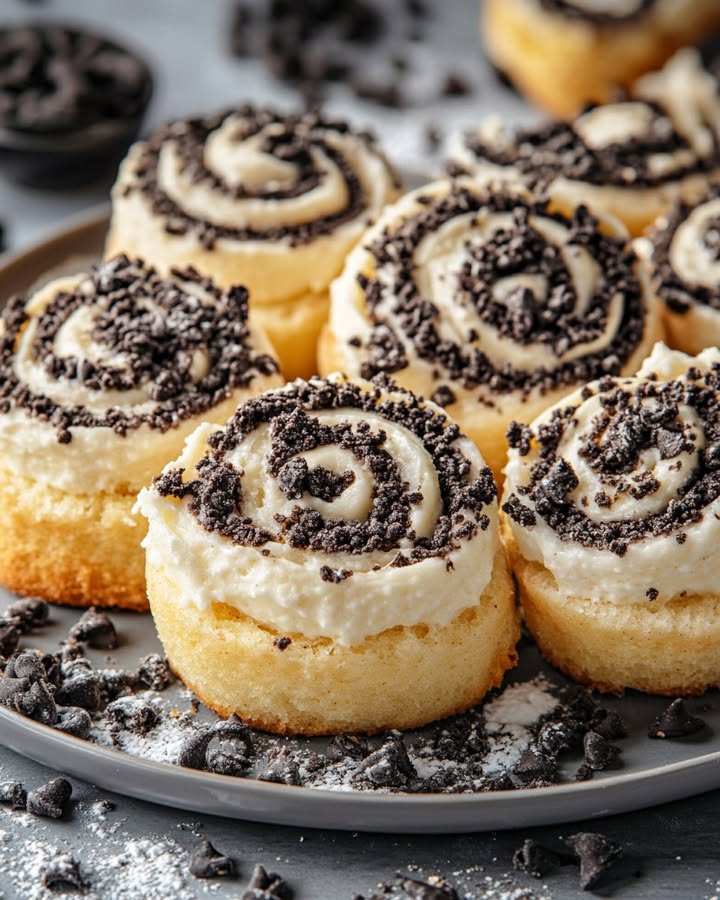
Step 8: Frost, Garnish, and Devour
This is the best part! Use a spoon or offset spatula to generously slather the warm rolls with the cream cheese frosting. The slight warmth will make the frosting melt just a little, creating a glossy, irresistible glaze. Immediately sprinkle the top with more chopped Oreos for that final crunch and visual wow factor. Serve them warm and gooey. Be prepared for requests for seconds.
Your Recipe Timeline
Here’s a quick look at how your time will be spent. Most of it is hands-off waiting for the dough to rise!
- Prep Time: 30 minutes
- Rise Time (1st & 2nd): 1 hour 45 minutes
- Cook Time: 32 minutes
- Cooling/Frosting Time: 10 minutes
- Total Time: About 3 hours
A Chef’s Little Secret
My secret weapon for supremely soft rolls every time? Tangzhong. It’s a simple cooked flour paste. Before you start the main dough, whisk 3 tablespoons of the recipe’s flour with ½ cup of the recipe’s milk (or water) in a small saucepan over medium heat. Cook, stirring constantly, until it thickens into a paste. Let it cool slightly before adding it with your wet ingredients. This Japanese-inspired trick locks in moisture, giving you rolls that stay soft for days.
A Fun Cookie Fact
Did you know the Oreo cookie was first introduced in 1912? It was actually a knock-off of a popular cookie called the Hydrox. Over a century later, Oreo is the world’s best-selling cookie, with over 40 billion produced each year. That’s enough to circle the earth multiple times! Using them in baking is a delicious nod to a true American icon.
Tools You’ll Need in Your Kitchen
You don’t need fancy gear, but a few tools make life easier.
- Stand mixer with dough hook (or strong arms for hand-kneading)
- Large mixing bowl
- Rolling pin
- 9×13 inch baking pan (a quarter sheet pan)
- Plastic wrap
- Sharp knife or dental floss for cutting
- Measuring cups and spoons
- Instant-read thermometer (optional but helpful)
Storing Your Homemade Treasures
If, by some miracle, you have leftovers, here’s how to keep them tasting fresh.
At Room Temperature: Unfrosted rolls can be kept covered on the counter for up to 24 hours. Once frosted, they are fine at room temperature for about 10-12 hours due to the dairy in the frosting.
In the Refrigerator: For longer storage, place any leftovers (frosted or not) in an airtight container. They will keep in the fridge for up to three days. The rolls will firm up when chilled.
In the Freezer: These freeze beautifully for future cravings. Wrap each unfrosted roll tightly in plastic wrap, then place them all in a heavy-duty freezer bag. They’ll keep for up to 2 months. Thaw overnight in the fridge or on the counter, then warm and frost before serving.
My Best Tips for Success
- Temperature is Everything: Ensure your milk, eggs, and butter are at true room temperature. This helps the dough ingredients bond smoothly for a better rise.
- Don’t Rush the Rise: Let the dough double in size, even if it takes longer than an hour. A cold kitchen means a slower rise. Patience makes fluffy rolls.
- Chop Oreos Finely: Use a food processor or put them in a bag and crush with a rolling pin. Large chunks can tear the delicate dough when rolling.
- Warm Before Serving: Leftover rolls taste best when gently reheated. The microwave trick with a cup of water works wonders to restore moisture.
Making Them Look Fancy
Presentation is part of the fun! Try these ideas:
- Drizzle melted chocolate or a simple vanilla glaze in zig-zags over the cream cheese frosting.
- Serve each roll in a parchment paper liner on a platter for a bakery-style look.
- Garnish with whole mini Oreos perched on top of each roll for a cute, polished finish.
- Add a scoop of vanilla ice cream on the side while the rolls are still warm for an ultimate dessert.
Lighter & Fun Variations to Try
Love the idea but want to mix it up? Here are six delicious spins on the Decadent Cookie Dough Cake theme.
- Chocolate Lover’s Dream: Add ¼ cup of cocoa powder to the dough and use chocolate chips in the filling. Frost with chocolate cream cheese frosting.
- Peanut Butter Oreo Rolls: Swirl ½ cup of creamy peanut butter into the filling along with the butter. Top the frosting with chopped peanut butter cups.
- Mint Chocolate Chip: Use Mint Oreos. Add ½ teaspoon of peppermint extract to the frosting. Garnish with dark chocolate shavings.
- Birthday Cake Funfetti: Omit the Oreos from the dough. Add ½ cup of rainbow sprinkles to the filling and frosting for a colorful party treat.
- Cookie Dough Stuffed: Make a simple edible cookie dough (no eggs) and place small chunks of it inside each roll before the second rise.
- Vegan “Oreo” Rolls: Use plant-based milk, butter, and cream cheese. Find vegan chocolate sandwich cookies. Use a flax egg (1 tbsp ground flax + 3 tbsp water).
Common Mistakes to Avoid
Avoid these simple errors for bakery-perfect rolls every single time.
Mistake 1: Using Hot Liquid for the Yeast
This is the most common way to kill your yeast. If your water or milk is too hot, it will deactivate the yeast. Your dough won’t rise at all. You’ll be left with dense, sad rolls. Always test the temperature. It should feel warm to the touch, around 110°F, but not hot. If you can’t hold your finger in it comfortably, it’s too hot. Let it cool down before adding the yeast.
Mistake 2: Adding Too Much Flour While Kneading
It’s tempting to keep adding flour when the dough is sticky. But adding too much creates a dry, tough, and heavy roll. The dough should be soft and slightly tacky, but not stick to your clean fingers. Trust the kneading process. A stand mixer usually needs the full 4 cups, but hand-kneading might need a little less. Add flour a single tablespoon at a time only if absolutely necessary after several minutes of kneading.
Mistake 3: Skipping the Second Rise
You let the dough rise once, so why wait again? This second rise is crucial. It lets the rolls relax after being shaped and cut. It allows the gluten to settle so they bake up light and fluffy, not dense and chewy. If you bake them right after shaping, they won’t have that perfect soft and airy texture. Set a timer for 30 minutes and let them puff up. It makes all the difference.
Mistake 4: Overbaking the Rolls
Dry rolls are a disappointment. Overbaking happens when we rely only on color. The tops might be golden, but the centers could still be doughy or, conversely, overdone. The best tool is an instant-read thermometer. Pull the rolls the moment they hit 185°F internally. This guarantees they are fully cooked but still supremely moist and tender.
Your Questions, Answered
Can I make these rolls ahead of time?
Absolutely! You have two great options. First, you can prepare the rolls through the second rise, cover the pan tightly, and refrigerate overnight. In the morning, let them sit at room temp for 30 minutes while the oven preheats, then bake. Second, you can freeze the unbaked, shaped rolls. After placing them in the pan, freeze until solid, then transfer to a bag. The night before baking, move them to the fridge to thaw, then let them rise on the counter before baking. Both methods give you fresh-baked rolls with minimal morning effort.
Why is my dough not rising?
A dough that won’t rise usually points to one of three issues. The most likely culprit is old or dead yeast. Always check the expiration date and proof it in warm water with sugar. If it doesn’t foam, start over with new yeast. The second issue is temperature. If your kitchen is cold, the yeast works very slowly. Find a warmer spot, like an oven with the light on. The third could be salt. Adding salt directly to the yeast can kill it. Always mix your salt with the flour first before adding it to the wet ingredients.
Can I use a different type of cookie?
Yes, you can get creative! Any firm, crunchy cookie that won’t dissolve into mush will work. Try biscoff cookies for a spicy-sweet flavor, graham crackers for a s’mores vibe, or even chopped-up pretzel-filled chocolate cookies for a sweet and salty twist. Just make sure to crush them to a similar fine chop so they distribute evenly and roll easily without tearing the dough.
My frosting is too runny. How can I fix it?
A runny frosting usually means the cream cheese or butter was too warm, or you need more sugar. First, pop the bowl of frosting into the refrigerator for 15-20 minutes to firm up the fats. Then, beat it again. If it’s still too soft to spread, you can gradually add a little more confectioners’ sugar, a quarter cup at a time, until it reaches your desired consistency. Remember, it will soften further on the warm rolls, so it should be slightly stiffer than you think in the bowl.
How do I get perfectly even rolls?
The trick is in the rolling and cutting. When you roll your dough into a rectangle, try to keep the edges as straight and even as possible. This gives you a uniform log. For cutting, I swear by unflavored dental floss. Slide it under the log, cross the ends over the top, and pull. It slices cleanly without smashing the layers. If using a knife, use a gentle sawing motion and don’t press down. Mark the log lightly with a knife into 12 sections first to guide your cuts.
Can I make this without a stand mixer?
You definitely can! It will just take a little more arm power. Mix the wet ingredients and the first portion of flour in a large bowl with a wooden spoon. Once it becomes too stiff to stir, turn it out onto a floured surface. Knead by hand, adding the butter a tablespoon at a time, and then the remaining flour. Knead for about 8-10 minutes until the dough is smooth and elastic. The process is the same, just more hands-on. Think of it as a great workout with a delicious reward.
What’s the best way to reheat a single roll?
To reheat without drying it out, use the microwave with a cup of water. Place the roll on a microwave-safe plate and put a small cup of water next to it. Heat on high for 20-30 seconds. The steam from the water keeps the roll moist while warming it through. For a crisper exterior, use a toaster oven or a conventional oven preheated to 300°F for 5-8 minutes. Avoid the microwave without water, as it tends to make the bread tough and chewy.
Are these the same as “Cookie Dough Cake”?
They’re similar in spirit but different in form! A “Decadent Cookie Dough Cake” is often a layered cake with cookie dough flavors. These rolls are like that idea transformed into a soft, pull-apart pastry. They capture all the beloved cookies and cream elements—the chocolate cookie bits, the sweet creaminess—but in a fun, shareable breakfast or dessert roll. So while the name might remind you of cake, you’re getting the delightful texture of a homemade sweet roll instead.
Can I use low-fat cream cheese for the frosting?
I don’t recommend it. Brick-style, full-fat cream cheese gives the frosting structure and a rich, tangy flavor. Low-fat or tub-style cream cheese has more water and additives. This can make your frosting too soft, runny, and sometimes even grainy. For the best texture and taste that holds up on the warm rolls, full-fat brick cream cheese is worth it. You’re already making a treat, so go for the good stuff!
How do I know when the rolls are fully baked inside?
The golden-brown top is a good sign, but the absolute best way to know is to use an instant-read thermometer. Insert it into the center of a middle roll. When it reads 185°F to 190°F, they are perfectly baked. If you don’t have a thermometer, gently pull apart two of the center rolls in the pan. The dough should look baked through, not wet or doughy. The internal color should be uniform, not streaky with uncooked dough.
Ready to Bake Some Joy?
There you have it! Everything you need to create these incredible Decadent Cookies and Cream Oreo Rolls. They might seem like a project, but each step is simple and so rewarding. The moment you pull that pan of puffy, chocolate-speckled rolls from the oven, you’ll feel like a champion. And the smiles (or silent, blissful chewing) from everyone who tries them? That’s the real prize. So tie on your apron, crush those Oreos, and get ready to make some unforgettable memories, one gooey, creamy bite at a time. Happy baking!
Decadent Cookie Dough Cake
Ingredients
Equipment
Method
- Proof the yeast by combining warm water, yeast, and a teaspoon of sugar; let it sit for 5-7 minutes until bubbly.
- In a stand mixer, combine the proofed yeast, warm milk, remaining sugar, egg, and yolk.
- In a separate bowl, mix the salt with the flour, then gradually add to the wet mixture while mixing on low speed until a shaggy mass forms.
- Slowly add softened butter, one tablespoon at a time, until absorbed.
- Mix in the remaining flour and knead until smooth, then knead in the chopped Oreos.
- Place the dough in an oiled bowl, cover with plastic wrap, and let rise in a warm spot for about an hour until doubled in size.
- Punch down the dough, roll into a 20x14 in rectangle, spread with filling butter and sprinkle with sugar and Oreos.
- Roll tightly from one long side into a log and cut into 12 equal pieces.
- Place cut rolls in a greased 9x13 inch pan, cover, and let rise for 30-45 minutes.
- Preheat the oven to 350°F (175°C) and bake rolls for 30-33 minutes until golden brown and hollow-sounding.
- Cool slightly before frosting with cream cheese frosting.
- Garnish with chopped Oreos and serve warm.