The Ultimate Salted Caramel Chocolate Cake: A Love Story in Layers
Have you ever had a dessert so good it made you pause? You know, the fork-in-mid-air, eyes-closed, “wow” kind of moment. That’s what this cake is for me. It’s not just a chocolate cake. It’s a deep, dark chocolate dream wrapped in a silky, sweet-salty caramel hug. I baked this for my husband’s birthday last year, and let’s just say the silence at the table was the best compliment I’ve ever received. Everyone was too busy savoring to speak!
A Bite of Sweet History
Chocolate and caramel are the classic power couple of the dessert world. Think of those fancy French salted butter caramels or the iconic American chocolate caramel candy bar. This cake is a grand, homemade tribute to that perfect pair. The “salted” part is a modern twist that chefs love because it cuts the sweetness and makes the chocolate flavor pop. My version is the result of many happy (and delicious) kitchen experiments, merging a moist, classic devil’s food cake with a luxurious homemade caramel. It’s tradition with a playful, modern edge.
Why You’ll Fall in Love With This Cake
First, it’s unforgettably delicious. The balance is just magic. Second, while it looks like a show-stopper from a bakery, it’s made with simple steps. You don’t need to be a pro! The cake batter comes together in one bowl, and the caramel, while it needs attention, is straightforward. The real joy is in the assembly—spreading, drizzling, layering. It’s a baking project that feels wonderfully satisfying.
Perfect Occasions for This Showstopper
This isn’t your everyday snack cake. This is your secret weapon for moments that matter.
- Birthday Celebrations: Ditch the box mix and give someone a truly memorable centerpiece.
- Dinner Parties: Impress your friends without saying a word. The cake does all the talking.
- Holiday Gatherings: It’s decadent enough for Thanksgiving or Christmas dessert tables.
- “Just Because” Treats: Sometimes, a Tuesday deserves a slice of spectacular.
Gathering Your Ingredients
Using good-quality cocoa powder makes a difference here! Here’s what you’ll need:
- 1 3/4 cups all-purpose flour
- 3/4 cup unsweetened cocoa powder
- 1 1/2 teaspoons baking powder
- 1 1/2 teaspoons baking soda
- 1 teaspoon salt
- 2 cups granulated sugar
- 2 large eggs, at room temperature
- 1 cup whole milk
- 1/2 cup vegetable oil
- 2 teaspoons pure vanilla extract
- 1 cup boiling water
- For the Salted Caramel Sauce: 1 cup sugar, 1/4 cup water, 6 tbsp unsalted butter, 1/2 cup heavy cream, 1 tsp flaky sea salt.
- For the Chocolate Frosting: 1 cup softened unsalted butter, 3 cups powdered sugar, 1/2 cup cocoa powder, 1/4 cup heavy cream, 1 tsp vanilla, 1/2 cup of your cooled caramel sauce.
Easy Ingredient Swaps
No stress if you’re missing something! Here are some swaps:
- Milk: Any milk you have works—2%, almond, or oat milk.
- Vegetable Oil: Canola oil or melted coconut oil are fine substitutes.
- Sea Salt: If you don’t have flaky sea salt, use 1/2 tsp fine sea salt in the caramel.
- Heavy Cream: For the caramel, full-fat coconut cream can work in a pinch.
Step-by-Step: Building Your Masterpiece
Step 1: Preheat and Prepare
Start by heating your oven to 350°F (175°C). This gives it time to reach the perfect temperature. Take your two 9-inch round cake pans and grease them generously with butter or baking spray. Then, dust them with a little flour or line the bottoms with parchment paper circles. This little ritual is your insurance policy for cakes that slide out beautifully later. Trust me, no one wants a cake that sticks!
Step 2: Mix the Dry Ingredients
Grab a large mixing bowl. Whisk together the flour, cocoa powder, baking powder, baking soda, and salt. As you stir, you’ll see the dark cocoa mixing with the white flour, creating a lovely, rich brown powder that already smells like chocolate. This step ensures your leaveners are evenly distributed, which is key for a cake that rises evenly without any bitter spots.
Pro tip: Sifting your cocoa and flour together can make the cake extra light, but a good whisk does the job just fine.
Step 3: Create the Cake Batter
In another bowl, combine the sugar, eggs, milk, oil, and vanilla. Whisk it until it’s smooth and slightly shiny. Now, pour the wet ingredients into the dry mixture. Stir gently until they’re just combined—a few lumps are okay! Finally, carefully stir in the boiling water. The batter will become very thin and liquid. Don’t panic! This is what makes the cake incredibly moist and tender.
Step 4: Bake to Perfection
Divide the thin batter evenly between your prepared pans. Slide them into the preheated oven. Set your timer for 30 minutes. The magical smell will start to fill your kitchen. Check at 30 minutes with a toothpick poked into the center. If it comes out with a few moist crumbs, it’s done. If it’s wet, give it another 3-5 minutes. Let the cakes cool in the pans for exactly 10 minutes before turning them out onto a wire rack. This prevents them from steaming themselves and getting soggy.
Step 5: Craft the Salted Caramel Sauce
This is the fun part! In a medium, light-colored saucepan (so you can see the color change), mix the sugar and water over medium heat. Stir just until the sugar dissolves. Then, stop stirring. Let it bubble and boil. Watch as it transforms from clear, to light gold, to a deep, gorgeous amber. This takes about 5-10 minutes. Take it off the heat and carefully whisk in the butter—it will bubble wildly! Then whisk in the heavy cream until smooth. Stir in the sea salt. Let this golden elixir cool completely. It will thicken as it sits.
Chef’s tip: Have your butter and cream measured and ready right by the stove. When the sugar is amber, you need to act quickly but safely.
Step 6: Whip Up the Chocolate Frosting
While the cakes and caramel cool, make the frosting. Beat the softened butter in a bowl until it’s pale and creamy. Sift in the powdered sugar and cocoa powder a little at a time, beating on low speed unless you want a sugar cloud in your kitchen! Once combined, add the cream, vanilla, and that 1/2 cup of cooled caramel. Crank the mixer to high and beat for 2-3 minutes. Watch it become fluffy, spreadable, and the color of milk chocolate. Taste it. You’re welcome.
Step 7: Assemble and Decorate
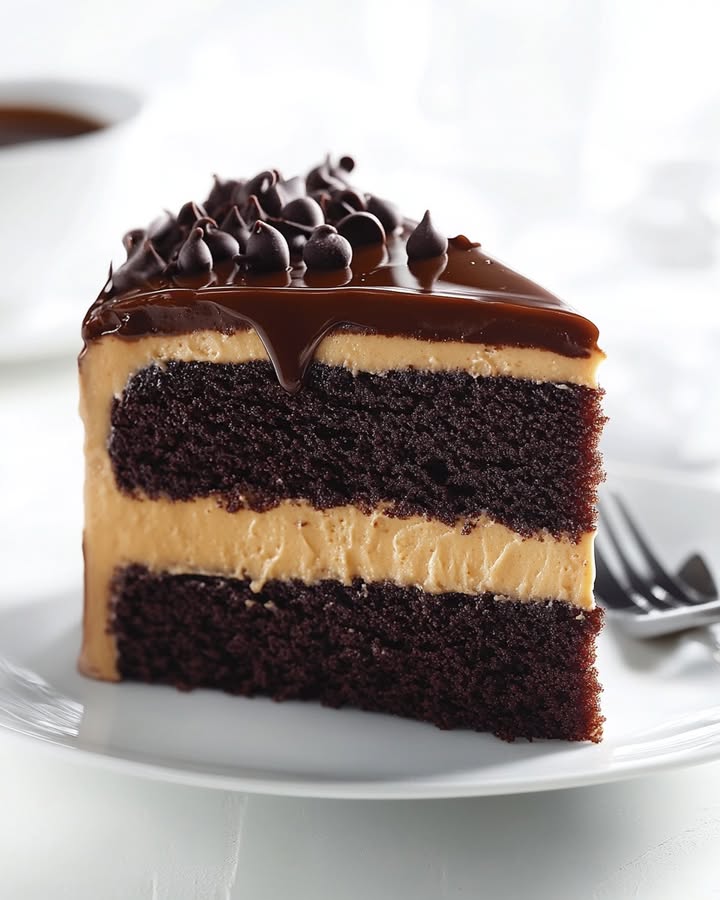
Place one cake layer on your cake stand or plate. Spread a thick, even layer of frosting over the top. Then, take a spoon and drizzle some of the remaining caramel sauce over the frosting. Gently place the second cake layer on top. Now, frost the top and sides of the whole cake with the rest of the frosting. Use a spoon or offset spatula to make pretty swirls. Finish with a final, artful drizzle of caramel over the top, letting it drip down the sides. A final pinch of flaky sea salt on top is the perfect, professional-looking finish.
Your Baking Timeline
- Prep Time: 30 minutes (active mixing and caramel making)
- Baking Time: 35 minutes
- Cooling Time: 1 hour (this is crucial!)
- Frosting & Assembly: 20 minutes
- Total Time: About 2 hours 25 minutes
- Servings: 12 happy people
Chef’s Secret: The Boiling Water Trick
The secret to this cake’s super-moist, restaurant-quality crumb is the cup of boiling water. It “blooms” the cocoa powder, intensifying its flavor. It also helps dissolve the sugar fully, creating a batter that bakes up incredibly tender. Don’t skip it or be scared by how thin the batter is. That’s the magic!
A Sweet Little Fact
The process of making caramel—simply heating sugar until it changes—is called “caramelization.” It creates hundreds of new flavor compounds, which is why caramel tastes so much more complex than plain sugar. Adding salt not only balances sweetness but actually makes those rich, buttery flavors even more noticeable to your taste buds. Science can be delicious!
Kitchen Tools You’ll Need
- Two 9-inch round cake pans
- Mixing bowls (large and medium)
- Whisk and spatula
- Electric hand mixer or stand mixer
- Light-colored medium saucepan
- Wire cooling rack
- Cake stand or serving plate
- Offset spatula for easy frosting (a butter knife works too!)
How to Store Your Salted Caramel Chocolate Cake
If your cake has leftover slices (a big if!), you’ll want to store them properly. The best way is to place the cake in a cake carrier or under a large, inverted bowl at room temperature. It will stay fresh and moist for up to 3 days.
For longer storage, you can refrigerate it for up to 5 days. Let the frosting firm up for an hour uncovered, then wrap the whole cake well in plastic wrap. The cold will make the cake firmer and the caramel thicker.
Bring refrigerated slices to room temperature for about 30 minutes before serving. This softens the frosting and the cake crumb, bringing back that just-made texture and full flavor.
Helpful Tips for Success
- Make the caramel sauce first. It needs time to cool and thicken before you use it in the frosting and for drizzling.
- Ensure your cake layers are completely cool before frosting. Warm cake will melt the frosting and make a mess.
- If your caramel sauce seizes or gets too hard, gently reheat it with a tablespoon of cream over low heat until smooth again.
- Use a serrated knife to slice the cake for clean, beautiful pieces.
Presentation Ideas to Wow Your Guests
- Garnish with chocolate shavings or a sprinkle of gold dust for a festive touch.
- Serve each slice with a small pitcher of extra warm caramel sauce on the side for true indulgence.
- Add a few fresh raspberries or strawberries on the plate for a pop of color and a tart contrast.
- For individual portions, bake the batter in cupcakes! Frost and drizzle as usual for personal-sized treats.
Love This? Try These Healthier Twists!
Craving the flavor but want a lighter option? Try these fun variations:
- Whole Wheat Wonder: Swap half the all-purpose flour for whole wheat pastry flour. It adds a nutty depth and extra fiber.
- Sweetener Swap: In the cake, replace the white sugar with coconut sugar for a lower glycemic index and richer taste.
- Greek Yogurt Frosting: Blend Greek yogurt with a little cocoa powder, honey, and a pinch of salt for a tangy, protein-rich topping.
- Mini Cake Portions: Bake the batter in a muffin tin to create portion-controlled cupcakes. Frost lightly.
- Date Caramel: Make a “caramel” sauce by blending soaked Medjool dates with a bit of milk, vanilla, and salt. It’s naturally sweet and rich in fiber.
- Avocado Chocolate Frosting: Blend ripe avocado with cocoa powder, maple syrup, and vanilla for a creamy, nutrient-dense frosting free of refined sugar.
Common Mistakes to Avoid
Mistake 1: Not Letting Ingredients Reach Room Temperature
Using cold eggs and milk straight from the fridge can cause your batter to curdle or not emulsify properly. This can lead to a dense, heavy cake. Take your eggs, milk, and butter for the frosting out about an hour before you start. Room-temperature ingredients blend together smoothly, creating a better texture and helping your cake rise beautifully.
Mistake 2: Stirring the Caramel Sugar
Once the sugar and water have dissolved, you must stop stirring. Stirring encourages sugar crystals to form along the sides of the pan. These crystals can cause the whole batch to seize up and become grainy. Instead, gently swirl the pan if you see uneven coloring. Let the heat do its work. Just watch the color closely.
Mistake 3: Frosting a Warm Cake
I know you’re excited to put it all together! But spreading fluffy frosting on a cake that’s even slightly warm is a recipe for disaster. The frosting will melt, slide off, and become a gloppy mess. It will also soak into the cake. Be patient. Let your cake layers cool on a wire rack until they are completely cool to the touch. This can take a full hour.
Mistake 4: Over-measuring Flour
Scooping your flour directly from the bag with the measuring cup packs it down. This leads to using too much flour. A dry, tough cake is often the result. The right way is to spoon the flour lightly into the measuring cup, then level it off with a knife. For the best results, consider weighing your flour. 1 3/4 cups is about 220 grams.
Your Salted Caramel Chocolate Cake FAQs
Can I make this cake ahead of time?
Absolutely! You can bake the cake layers up to 2 days in advance. Wrap them tightly in plastic wrap once cool and store at room temperature. The caramel sauce can be made a week ahead and kept in the fridge. Let it come to room temperature or warm it slightly before using. You can even frost the whole cake the day before and keep it covered at cool room temperature.
My caramel turned out grainy. What went wrong?
Grainy caramel usually means sugar crystals formed. This often happens if sugar crystals splash onto the side of the pan and fall back in, or if you stirred it while it was boiling. Next time, use a clean brush dipped in water to wash down any sugar crystals on the sides of the pan during the initial heating phase. And remember, no stirring after the sugar dissolves!
Can I use store-bought caramel sauce?
You can, in a pinch. For the frosting, use a thick, high-quality jarred caramel sauce. For drizzling, you might want to warm it slightly. However, the flavor of homemade caramel is far superior and less cloyingly sweet. It’s worth the effort for this special cake!
Why did my cake layers dome in the middle?
This is common! It’s often due to the oven being too hot, causing the edges to set before the center has finished rising. To fix it, try lowering your oven temperature by 25°F. You can also use cake strips—wet fabric strips you wrap around the pan—to insulate it and promote even baking. If a dome forms, you can simply slice it off with a serrated knife to create a flat surface for stacking.
How can I tell if the caramel is at the right “amber” color?
Use a light-colored saucepan so you can see the change. The syrup will go from clear to pale yellow, then to a light gold. Wait until it’s the color of a shiny penny or dark honey. It should smell rich and nutty, not burnt. If you have a candy thermometer, aim for 350°F. If you don’t have one, the visual cue is your best friend.
My frosting seems too thin. How can I fix it?
If your frosting is runny, it’s likely because the butter was too soft or the caramel sauce was still warm. Pop the whole bowl of frosting into the refrigerator for 20-30 minutes to firm up the butter, then re-whip it. You can also add a little more sifted powdered sugar, a tablespoon at a time, until it reaches the desired consistency.
Can I freeze this chocolate caramel cake?
Yes, you can! Freeze the unfrosted, cooled cake layers individually wrapped in plastic wrap and then foil for up to 3 months. Thaw overnight in the refrigerator. The frosted cake can also be frozen, though the texture of the frosting may change slightly. Freeze the whole cake uncovered until the frosting is solid, then wrap it well.
What’s the best cocoa powder to use?
For a deep, intense chocolate flavor, use a natural unsweetened cocoa powder, not Dutch-processed, for this particular recipe. The baking soda in the cake needs the acidity in natural cocoa to react properly and help the cake rise. My go-to brands are Hershey’s Special Dark or Ghirardelli.
Is there a substitute for the boiling water in the cake?
The boiling water is important for texture and to bloom the cocoa. If you must, you can use hot, strongly brewed coffee. It won’t make the cake taste like coffee; it will actually make the chocolate flavor taste even richer and more complex! It’s a fantastic secret ingredient.
The cake stuck to the pan! Help!
Don’t panic. First, let the pan cool completely. Then, place the pan on a warm, damp dish towel for a minute. The steam can help release it. You can also gently run a thin, flexible knife or offset spatula around the very edge. Next time, be sure to grease and flour the pan thoroughly, or use a parchment paper circle on the bottom for guaranteed release.
Ready, Set, Bake!
So there you have it—your guide to creating a truly unforgettable dessert. This salted caramel chocolate cake is more than just following a recipe. It’s an experience. It’s about the smell of caramelizing sugar, the joy of licking the frosting spoon, and the proud moment you present your creation. It might look fancy, but every step is simple and fun. I promise, the look on your family’s or friends’ faces will make it all worth it. Now, go preheat that oven and get ready for your own “wow” moment. Happy baking!
Ferrero Oreo Delight
Ingredients
Equipment
Method
- Preheat your oven to 350°F (175°C) and prepare two 9-inch round cake pans by greasing and flouring them.
- In a large mixing bowl, whisk together the flour, cocoa powder, baking powder, baking soda, and salt.
- In another bowl, mix together the sugar, eggs, milk, oil, and vanilla until smooth.
- Combine the wet ingredients with the dry mixture and gently stir until just combined; then carefully stir in the boiling water.
- Divide the batter evenly between the prepared pans and bake for about 30 to 35 minutes, checking for doneness with a toothpick.
- Let the cakes cool in the pans for 10 minutes before transferring them to a wire rack to cool completely.
- To make the salted caramel sauce, combine sugar and water in a saucepan over medium heat until dissolved, then let it caramelize until deep amber; remove from heat and whisk in butter, cream, and sea salt.
- Prepare the chocolate frosting by beating the butter until creamy, then gradually add powdered sugar and cocoa powder, followed by cream, vanilla, and cooled caramel; beat until fluffy.
- Assemble the cake by placing one layer on a stand, frosting, adding a drizzle of caramel, then layering the second cake on top and frosting the whole cake.
- Finish with a drizzle of caramel and a sprinkle of flaky sea salt.
Nutrition
Notes
Feel free to make the caramel sauce ahead of time as it needs to cool before use.
Ensure cake layers are completely cool before frosting to prevent melting.
Leftover cake can be stored at room temperature for up to 3 days or refrigerated for up to 5 days. Bring to room temperature before serving for the best texture.