Unbelievably Good Caramel Crunch Cake: Your New Signature Dessert
You know that feeling when you take a bite of something so good, you just have to close your eyes and sigh? That’s this cake. I first made this Decadent Caramel Crunch Layer Cake for my sister’s birthday, and let me tell you, it stole the show. Everyone, and I mean everyone, asked for the recipe. It’s that magical combination of impossibly moist cake, rich homemade caramel, and a salty-sweet crunch that makes you go back for “just one more sliver” three times. Consider this your invitation to make your kitchen smell like a dream factory.
A Sweet Story: From Old-Fashioned Treats to Modern Masterpiece
Caramel has been a beloved sweetener for centuries, but putting it front and center in a layer cake feels like a modern celebration. Think of it as the grown-up, sophisticated cousin of your favorite childhood candy bar. While there isn’t one specific origin story, this cake taps into a universal love for buttery, toasted sugar and a satisfying crunch. My version mixes the classic comfort of a homemade yellow cake with the gourmet flair of a from-scratch caramel sauce. It’s my nod to tradition, with a big, crunchy, happy twist on top.
Here’s Why You Will Absolutely Adore This Recipe
This isn’t just any cake; it’s a total experience. First, the texture is a party in your mouth: soft, fluffy layers meet velvety frosting, then you get that fantastic crackle from the toffee and nuts. Second, making your own caramel sauce is easier than you think and fills your home with the most amazing smell. Finally, it looks spectacular with very little fuss. It’s the kind of dessert that makes people think you spent all day in a fancy bakery, but we’ll keep our little secrets between us.
The Perfect Moments for This Showstopper Cake
This cake isn’t meant for a quiet Tuesday (unless you’re treating yourself, which I highly support!). It’s meant for moments worth remembering. It’s perfect for:
- Birthday celebrations (it beats a store-bought sheet cake every single time).
- Holiday gatherings like Thanksgiving or Christmas, where rich desserts reign supreme.
- Potlucks or dinner parties where you want to be the person everyone talks about.
- Simply as a grandmotherly “just because I love you” gift for a neighbor or friend.
Gathering Your Ingredients
Let’s get everything out on the counter. Using quality ingredients really shines here, especially the butter and vanilla.
For the Cake:
- 2 cups all-purpose flour
- 2 tsp baking powder
- 1/2 tsp baking soda
- 1/2 tsp salt
- 1 cup unsalted butter, softened
- 1 1/2 cups granulated sugar
- 4 large eggs
- 2 tsp vanilla extract
- 1 cup buttermilk
For the Caramel Sauce:
- 1 cup granulated sugar
- 6 tbsp butter
- 1/2 cup heavy cream
For the Crunch Topping:
- 1 cup caramelized nuts (pecans or almonds)
- 1/2 cup crushed toffee bits
For the Caramel Frosting:
- 1 cup unsalted butter, softened
- 4 cups powdered sugar
- 1/2 cup caramel sauce (from the homemade sauce above)
No-Problem Ingredient Swaps
Don’t have something? No panic! Here are some easy fixes:
- Buttermilk: Make your own! Add 1 tbsp lemon juice or white vinegar to a cup of milk. Let it sit for 5 minutes until it curdles slightly.
- Caramelized Nuts: Plain toasted nuts work fine. Or, use pretzel pieces for a different salty crunch.
- Toffee Bits: Crushed up peanut brittle or even chopped up chocolate-covered toffee bars are delicious.
- Heavy Cream: For the caramel sauce, full-fat coconut milk can work in a pinch for a slight twist.
Let’s Bake This Beauty: Step-by-Step
Step 1: Bake the Cake Layers
Start by preheating your oven to 350°F (175°C). Grease three 8-inch round pans and dust them with flour, tapping out the excess. This little step is your insurance policy for perfect release. In a medium bowl, whisk together your flour, baking powder, baking soda, and salt. In your large mixing bowl, cream the softened butter and sugar together for a good 3-4 minutes until it’s pale, fluffy, and dreamy. Add your eggs, one at a time, letting each one get cozy with the butter mixture before adding the next. Stir in that lovely vanilla. Now, with your mixer on low, add about a third of the dry ingredients, then half the buttermilk, repeating until everything is just combined. The batter will be thick and smooth. Divide it evenly among your pans and bake for 25-30 minutes. You’ll know it’s done when the tops are golden and a toothpick comes out clean.
Pro tip: For super even layers, weigh your batter with a kitchen scale. About 500 grams per pan is perfect.
Step 2: Create the Dreamy Homemade Caramel Sauce
This is the fun part! In a medium, light-colored saucepan (so you can see the color change), heat the sugar over medium heat. Don’t stir right away. Let it melt around the edges first, then gently swirl the pan. You’ll watch it turn from white, to amber, to a gorgeous deep golden brown. This is where the magic flavor happens! Carefully add the butter—it will bubble up—and whisk until it’s completely melted. Then, slowly drizzle in the heavy cream while whisking constantly. Let it simmer for a minute or two until it thickens slightly. You now have liquid gold. Pour it into a heat-proof bowl and let it cool completely. It will thicken more as it sits.
Chef’s tip: Have all your caramel ingredients measured and ready by the stove before you start. Caramel waits for no one!
Step 3: Whip Up the Caramel Frosting
While your cakes and caramel cool, make the frosting. In a large bowl, beat the softened butter until it’s creamy and smooth. Gradually beat in the powdered sugar. It will get thick. Now, pour in that 1/2 cup of your cooled caramel sauce. Beat on medium-high for another 2-3 minutes. Watch as it transforms into a light, creamy, caramel-colored cloud. Taste it. Go ahead, I won’t tell. It’s unbelievable.
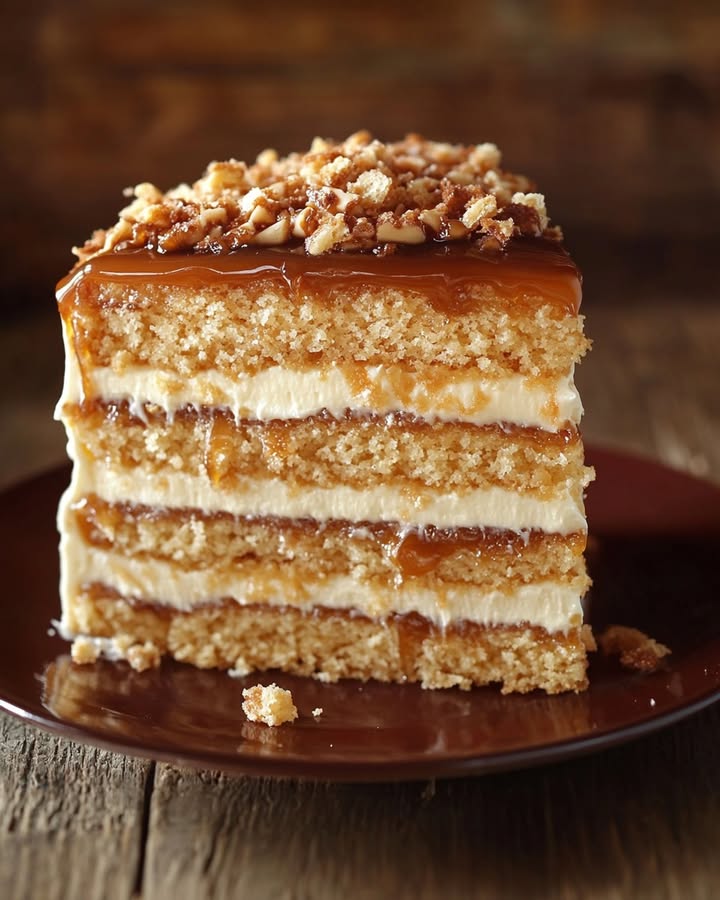
Step 4: Assemble Your Masterpiece
Place your first cake layer on a plate or stand. Spread a generous, even layer of caramel frosting on top. Gently place the next layer on and repeat. Once your cake is stacked, apply a thin “crumb coat” of frosting over the entire outside. Pop it in the fridge for 15 minutes to set. This locks in any crumbs. Then, frost the cake fully with the remaining frosting. Use a spoon or spatula to make pretty swirls. Now, take your remaining caramel sauce and drizzle it artfully over the top, letting some drip down the sides.
Step 5: Add the Signature Crunch
This is the final flourish! Take your caramelized nuts and crushed toffee bits. Gently press them onto the top of the cake, letting some fall where they may. You want a beautiful, tempting, crunchy crown. Step back and admire your work. You did it!
Timing Your Baking Success
Here’s a quick glance at how your time will be spent:
- Prep Time: 40 minutes
- Cook Time: 30 minutes (for cakes) + 10 minutes (for caramel)
- Cooling/Assembly Time: 1 hour
- Total Time: About 2 hours, 20 minutes
The #1 Chef’s Secret
For the absolute moistest cake, don’t overmix the batter once you add the flour. Mix just until the last streaks of flour disappear. Overmixing develops gluten, which can make your cake tough instead of tender and soft.
A Crunchy Bit of Extra Info
That crunchy toffee topping? It’s often called “heath bar crunch” in bakeries. The combination of butter, sugar, and almonds was famously popularized by the Heath bar in the 1930s. Adding it to a cake is a brilliant way to bring a nostalgic candy flavor into a whole new dessert form.
Your Kitchen Toolbox
You don’t need anything too fancy, just the basics:
- Three 8-inch round cake pans
- Mixing bowls (medium and large)
- Electric hand mixer or stand mixer
- Light-colored medium saucepan
- Whisk and spatulas
- Cooling rack
- Offset spatula for frosting (makes life easier!)
How to Store Your Caramel Creation
Because of the homemade caramel and frosting, this cake is best stored in the refrigerator. Place it in a cake carrier or loosely cover it with plastic wrap. It will keep beautifully for up to 4-5 days.
The cold will firm up the frosting and caramel, giving the cake a lovely, almost cheesecake-like texture. Let individual slices sit at room temperature for about 15 minutes before serving to take the chill off.
You can also freeze the unfrosted cake layers tightly wrapped for up to 2 months. Thaw overnight in the fridge and frost fresh the day you want to serve it for the best texture.
My Best Tips & Advice for You
- Room temp is key: Ensure your butter, eggs, and buttermilk are all at room temperature. This helps the batter emulsify better for a uniform, tender crumb.
- Cool cakes completely: I know it’s hard to wait! But frosting a warm cake is a recipe for a melty, sliding disaster. Patience pays off.
- Toast your nuts: Even if using “caramelized” nuts, giving them a quick toast in a dry pan intensifies their flavor.
Presentation Ideas to Make it Shine
- Serve on a beautiful cake stand with a glass dome.
- Garnish each plate with a tiny extra drizzle of caramel and a single pecan half.
- For a dinner party, pre-slice the cake and plate it ahead of time for easy serving.
- Pair with a cup of strong coffee or a glass of cold milk for the perfect bite.
Healthier Twists on the Caramel Crunch Cake
Love the idea but want some variations? Here are six spins to try:
- Gluten-Free Version: Use a 1:1 gluten-free flour blend for the cake. Ensure your toffee bits are certified GF.
- Dairy-Free Delight: Use plant-based butter and milk (for the buttermilk swap) and full-fat coconut milk in the caramel.
- Lighter Cake: Substitute half the all-purpose flour with whole wheat pastry flour and reduce the sugar in the cake by 1/4 cup.
- Chocolate Caramel Fusion: Add 3/4 cup cocoa powder to the dry ingredients for a chocolate cake base.
- Apple Spice Version: Add 2 tsp cinnamon and 1/2 tsp nutmeg to the cake batter. Fold in 1 cup finely chopped apples.
- Salty Pretzel Crunch: Swap the nuts and toffee for crushed salty pretzels for an amazing sweet-and-salty profile.
Common Mistakes to Avoid
Mistake 1: Rushing the Caramel
This is the biggest pitfall. Turning the heat too high to melt the sugar faster almost guarantees burnt, bitter caramel. Sugar needs patient, even heat to caramelize properly. Keep it at a steady medium and watch it like a hawk. Swirl the pan instead of stirring aggressively to prevent crystallization. If you see any dark specks, it’s starting to burn. It’s better to have a lighter caramel than a burnt one.
Mistake 2: Frosting a Warm Cake
We’ve all been tempted to put the cake together the second it comes out of the pan. Resist! A warm cake will melt the frosting, causing the layers to slide and creating a crumbly, messy exterior. Let the cakes cool in the pans for 10 minutes, then turn them out onto a wire rack to cool completely. This can take an hour. Use this time to make your caramel and frosting.
Mistake 3: Overmeasuring the Flour
Scooping flour directly from the bag with your measuring cup packs it in, leading to too much dry ingredient. This creates a dense, dry cake. The right way is to spoon the flour lightly into your measuring cup, then level it off with a knife. For the best results, weigh your flour. 2 cups should be about 240 grams.
Mistake 4: Skipping the Crumb Coat
That thin first layer of frosting might seem like an extra, unnecessary step. It is not! It traps all the loose crumbs so they don’t muddy up your beautiful final layer of frosting. A quick 15-minute chill after the crumb coat sets it, making the final frosting smooth and crumb-free. It’s the secret to a professional-looking finish.
Your Caramel Cake Questions, Answered
Can I make this cake ahead of time?
Absolutely! You can bake the cake layers up to two days in advance. Let them cool completely, then wrap them tightly in plastic wrap and store at room temperature. You can also make the caramel sauce 3-4 days ahead and keep it refrigerated. Gently warm it to a drizzle-able consistency before using. Assemble and frost the cake the day you plan to serve it for the freshest taste and texture.
My caramel sauce turned out grainy. What went wrong?
Grainy caramel usually means the sugar crystallized. This happens if sugar crystals stick to the side of the pan and fall back in, or if you stir it too aggressively while it’s melting. To prevent this, you can brush down the sides of the pan with a wet pastry brush as the sugar melts to dissolve any crystals. Also, be patient and let it melt on its own before gently swirling. If it happens, you can often save it by adding a tablespoon or two of hot water and whisking vigorously until it dissolves.
I don’t have three 8-inch pans. Can I still make it?
Yes, you have options! You can bake the batter in two 9-inch pans. The layers will be slightly thicker, so increase the baking time by 5-10 minutes and keep an eye on them. You can also bake it in a 9×13 inch pan for a sheet cake. Adjust the frosting and topping amounts slightly, as you won’t have layers to fill. The bake time for a sheet cake will be closer to 30-35 minutes.
What’s the best way to crush the toffee?
The easiest method is to place the toffee bits or a toffee bar in a sealed plastic bag. Use a rolling pin or the bottom of a heavy saucepan to smash it into small, uneven pieces. You want a mix of fine bits and some larger chunks for varied texture. Don’t pulverize it into dust—the crunch is what we’re after!
Can I use store-bought caramel sauce?
You can, in a pinch. The flavor of homemade is far superior, but a good-quality store-bought jar will work. For the frosting, use 1/2 cup from the jar. You may need to adjust the powdered sugar slightly if the store-bought sauce is thinner. Taste as you go. For drizzling, you might want to gently warm the sauce so it flows nicely.
How do I get my cake layers to be perfectly flat?
Cakes often dome slightly in the center. To get flat layers for easy stacking, you can use cake strips. These are fabric strips you soak in water and wrap around the outside of the pan, which slows the edge baking and promotes even rising. No strips? A DIY trick is to cut old towels into strips, wet them, and secure them with safety pins. It works!
My frosting is too thick/too thin. How can I fix it?
If it’s too thick, add a teaspoon of milk or cream and beat again. Add more very slowly until you get the right consistency. If it’s too thin and runny, you likely need more powdered sugar. Add it 1/4 cup at a time until it firms up. Remember, the caramel sauce itself adds liquid, so you may need a bit more sugar than usual buttercream recipes.
Is there a nut-free alternative for the crunch?
Of course! To keep the crunch nut-free, use extra crushed toffee bits. You could also use crushed pretzels, crushed butter cookies (like shortbread), or even crispy rice cereal tossed with a little melted butter and brown sugar and baked for a few minutes to crisp up.
How long can the finished cake sit out?
Because the frosting is butter-based and contains caramel, it’s best not to leave the cake out at room temperature for more than 2-3 hours, especially on a warm day. For longer displays, keep it cool. The fridge is its happy place, so pop it back in when not being served.
Can I freeze the fully assembled cake?
I don’t recommend freezing the fully frosted and decorated cake. The texture of the frosting and the crunch topping can change. It’s much better to freeze the unfrosted, cooled cake layers wrapped tightly. Thaw, then make fresh caramel and frosting for assembling. This guarantees the best taste and texture experience.
The Final, Sweet Slice
So there you have it, my friend. Every secret, tip, and trick I’ve learned to make this Decadent Caramel Crunch Layer Cake a guaranteed hit. It’s a labor of love, but each bite makes it worth every second. This cake is more than just dessert; it’s a memory maker, a celebration in itself. So preheat that oven, grab your whisk, and get ready to create something truly special. I can’t wait for you to experience the joy of that first perfect bite. Happy baking!
Festive Coffee Log
Ingredients
Equipment
Method
- Preheat oven to 350°F (175°C) and grease three 8-inch round pans, dusting with flour.
- In a medium bowl, whisk together flour, baking powder, baking soda, and salt.
- In a large mixing bowl, cream softened butter and sugar for 3-4 minutes until fluffy.
- Add eggs one at a time, mixing well after each, then stir in vanilla.
- With mixer on low, alternate adding dry ingredients and buttermilk until just combined.
- Divide batter evenly among pans and bake for 25-30 minutes, or until a toothpick comes out clean.
- In a medium saucepan over medium heat, melt sugar for the caramel sauce without stirring until it turns golden.
- Carefully add butter, whisking until melted, then drizzle in heavy cream while whisking continuously.
- Let caramel sauce simmer for a couple of minutes, then cool completely.
- In a large bowl, beat softened butter for frosting until creamy, then gradually add powdered sugar.
- Mix in cooled caramel sauce and beat until fluffy.
- Layer the first cake on a plate, spread frosting evenly, then repeat with remaining layers.
- Apply a thin crumb coat of frosting around the entire cake and chill for 15 minutes.
- Frost the entire cake with remaining frosting, creating swirls as desired.
- Press caramelized nuts and crushed toffee onto the top of the cake.
Nutrition
Notes
If you don’t have buttermilk, make your own by adding 1 tbsp of lemon juice or vinegar to regular milk and letting it sit.
This cake can be prepared in advance; store it in the refrigerator for up to 5 days or freeze the un-frosted layers for up to 2 months.
Let cake slices rest at room temperature for 15 minutes before serving for the best texture.