A Slice of Sunshine: My Heavenly Strawberry Cream Pie
Have you ever tasted a cloud? I think I got pretty close the first time I made this Strawberry Cream Pie. It was for my niece’s spring birthday, and let me tell you, the moment that creamy, pink filling hit my tongue, I knew I had a keeper. This isn’t just a dessert; it’s a little slice of happiness on a plate. With its buttery graham cracker crunch and a filling that’s both light and luxuriously creamy, this pie has become my go-to for making any day feel special.
The Story Behind the Berry Bliss
While cream pies are a classic American diner staple, my version has a bit of a personal twist. I remember my grandma making something similar, but hers was always a bit… wobbly. I wanted that same nostalgic flavor but with a firmer, dreamier texture. After a summer of testing (a delicious struggle, I assure you), I landed on the magic of a little gelatin. It sets the filling perfectly without making it taste like jelly. It’s the bridge between old-fashioned comfort and a foolproof modern treat that holds its shape beautifully when sliced.
Why You’ll Adore This Strawberry Cream Pie
You’ll love this recipe because it’s deceptively simple but tastes like you spent all day in the kitchen. The contrast between the sweet, crunchy crust and the airy, fruity filling is pure magic. It’s also incredibly versatile—you can make it a day ahead, which is a lifesaver for parties. Most importantly, it’s a crowd-pleaser. From kids to grandparents, everyone goes back for a second slice of this heavenly delight.
Perfect Occasions for Your Pie Masterpiece
This pie is your secret weapon for so many events! It’s a star at spring brunches and Easter celebrations. Bring it to a summer potluck or a Fourth of July BBQ for a patriotic red-and-white treat. It’s elegant enough for a Mother’s Day lunch or a bridal shower, but also casual enough for a simple weekend family dinner. Honestly, a sunny Tuesday is a perfect occasion for this strawberry delight.
Gathering Your Ingredients for Success
Here’s what you’ll need to create this strawberry dream. I recommend using room temperature cream cheese for the smoothest filling.
For the Crust:
- 1 ½ cups graham cracker crumbs
- ⅓ cup granulated sugar
- 6 tbsp melted butter
For the Filling:
- 1 cup fresh strawberries, mashed
- 200g (1 package) cream cheese, softened
- ¾ cup powdered sugar
- 1 cup heavy whipping cream
- ½ tsp vanilla extract
- 1 packet (7g) unflavored gelatin
- 2 tbsp water
For Garnish:
- Fresh strawberries, halved
Easy Ingredient Swaps (No Panic Allowed!)
Don’t have every item? No worries! Cooking is about creativity.
- Graham Crackers: Use digestive biscuits or even vanilla wafer cookies for a different crust flavor.
- Fresh Strawberries: In a pinch, you can use thawed frozen strawberries. Just be sure to drain the excess liquid well.
- Heavy Cream: For a lighter version, you can use cold full-fat coconut milk (the thick part from the can) and whip it.
- Gelatin: For a vegetarian option, look for agar-agar powder, but follow the package instructions for substitution amounts as it sets differently.
Crafting Your Heavenly Strawberry Cream Pie
Ready to make some magic? Follow these simple steps for a perfect pie every time.
Step 1: Building the Buttery Base
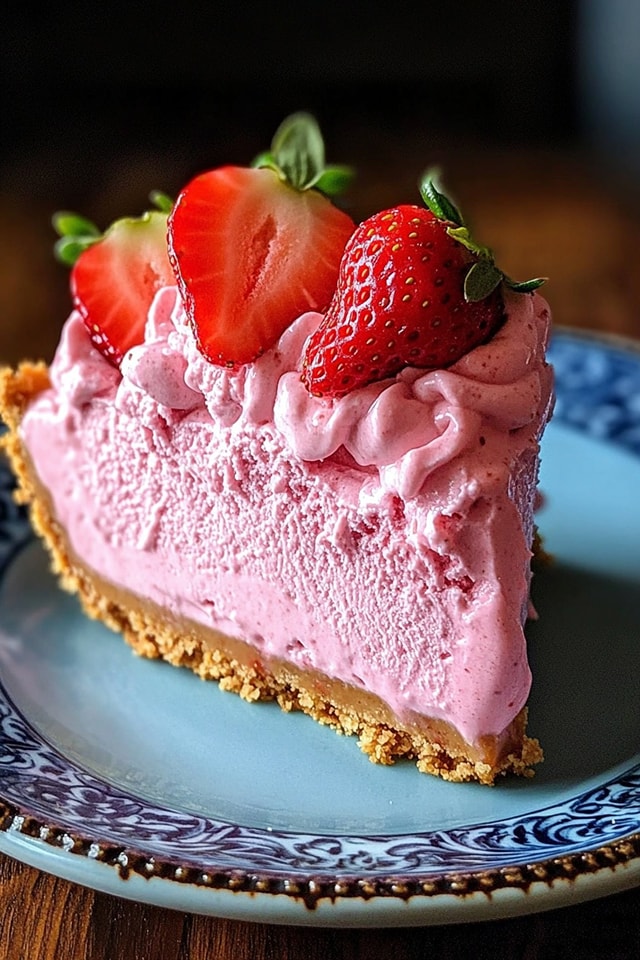
First, preheat your oven to 175°C (350°F). In a medium bowl, combine the graham cracker crumbs, sugar, and melted butter. Mix it with a fork until it looks like wet sand and holds together when you pinch it. Pour this mixture into a 9-inch pie pan. Use the bottom of a flat glass or measuring cup to press it firmly and evenly across the bottom and up the sides. Bake this for 8-10 minutes until it’s fragrant and slightly darkened. Let it cool completely on a wire rack. Pro tip: A completely cool crust is key so your creamy filling doesn’t melt on contact!
Step 2: Waking Up the Gelatin
While the crust cools, grab a very small bowl or ramekin. Sprinkle the packet of unflavored gelatin over the 2 tablespoons of water. Give it a quick stir with a fork and then let it sit for about 5 minutes. It will become a firm, spongy blob—this is called “blooming.” Blooming the gelatin helps it dissolve smoothly later and prevents any weird lumps in your beautiful filling.
Step 3: Creating the Dreamy Strawberry Filling
Now for the fun part! In a large mixing bowl, beat the softened cream cheese and powdered sugar together until they are completely smooth and creamy. Add in your mashed strawberries and vanilla extract, and mix until you have a lovely, uniform pink color. In a separate, clean bowl, whip the heavy cream until stiff peaks form—this means when you lift the beaters, the cream stands straight up. Take your bloomed gelatin and microwave it for a mere 10 seconds until it turns into a clear liquid. Quickly stir this liquid gelatin into the strawberry-cheese mixture. Finally, gently fold in the whipped cream. Use a spatula and turn the mixture over itself slowly until no white streaks remain. Chef’s tip: Be gentle when folding! You want to keep all that air in the whipped cream to make the filling light and fluffy.
Step 4: The Grand Assembly & Chill Time
Pour your magnificent pink filling into the waiting, cooled crust. Spread it out evenly with your spatula, making little swirls if you like. Now, the hardest part: patience. Carefully place the pie in the refrigerator. You need to let it chill for at least 4 hours, but overnight is even better. This gives the gelatin time to work its setting magic so you get clean, perfect slices.
Step 5: The Finishing Flourish
Just before serving, artfully arrange the halved fresh strawberries on top of the pie. You can do a circle around the edge, pile them in the center, or get creative! Slice with a sharp knife dipped in hot water for the cleanest cuts. Serve it up and get ready for the compliments. This strawberry delight is ready to shine!
Your Pie Timeline
Good things take a little time, but most of it is hands-off!
- Prep Time: 25 minutes
- Cook Time: 10 minutes
- Chill Time: 4 hours (minimum)
- Total Time: 4 hours 35 minutes
My Secret for the Best Flavor
For an incredible flavor boost, hull and slice your fresh strawberries for the garnish, then toss them in a tiny sprinkle of sugar about 30 minutes before assembling. This draws out their natural juices and makes them extra sweet and glossy on top of the pie.
A Fun Berry Fact
Did you know the average strawberry has about 200 tiny seeds on its outside? Those little specks are the actual fruits! Each one is called an achene. So next time you’re mashing strawberries for this pie, you’re mashing hundreds of little fruits into one spectacular filling.
Helpful Tools You’ll Need
- 9-inch pie pan
- Mixing bowls (a few different sizes)
- Electric hand mixer or stand mixer
- Measuring cups and spoons
- Fork and spatula
- Small microwave-safe bowl (for gelatin)
How to Keep Your Pie Delicious
This Strawberry Cream Pie is best stored covered in the refrigerator. You can loosely place plastic wrap over the top, or use a pie carrier with a dome lid. Because of the fresh dairy and fruit, it should not be left out at room temperature for more than two hours.
Your pie will stay fresh and delicious for about 3 to 4 days in the fridge. The crust may start to soften slightly after a day or two, but the flavor will still be wonderful. I find it’s always eaten long before then!
I do not recommend freezing this pie. The whipped cream filling can separate and become grainy when thawed, and the fresh strawberry texture will be compromised. It’s truly a make-and-enjoy-within-a-few-days kind of treat.
Tips for Pie Perfection
- For a super smooth filling, you can puree the mashed strawberries and then strain them to remove the seeds.
- Make sure your heavy cream and mixing bowl are very cold before whipping. This helps it whip up faster and hold its shape better.
- If you’re in a hurry, you can skip baking the crust. Just press the crumb mixture into the pan and chill it for an hour before adding the filling.
Presentation Ideas to Impress
- Drizzle each slice with a little melted white chocolate or a strawberry sauce.
- Add a dollop of extra whipped cream and a single mint leaf on each serving plate.
- Serve with a side of fresh berries or a scoop of vanilla ice cream.
- For a festive touch, sprinkle a little edible glitter or gold leaf over the top.
6 Tasty Variations to Try
Love this recipe? Mix it up with these fun twists!
- Mixed Berry Bliss: Use a combination of mashed raspberries, blackberries, and blueberries for a triple berry delight.
- Lemon Strawberry: Add the zest of one lemon to the cream cheese mixture for a bright, zingy flavor that pairs amazingly with the strawberry.
- Chocolate Graham Crust: Swap regular graham crumbs for chocolate graham crackers for a chocolate-strawberry combo.
- No-Bake Cheesecake Style: Double the filling and pour it into a springform pan over the crust for a stunning no-bake cheesecake.
- Coconut Strawberry Dream: Toast ½ cup of shredded coconut and mix it into the graham cracker crust. Use coconut extract instead of vanilla in the filling.
- Individual Mini Pies: Press the crust mixture into muffin tins to make personal-sized pies. Perfect for parties!
Common Mistakes to Avoid
Mistake 1: Using Cold Cream Cheese
This is the biggest culprit for a lumpy filling. Cold cream cheese will never blend smoothly with the sugar or strawberries. You’ll end up with little white chunks throughout your beautiful pink cream. Always take the cream cheese out of the fridge at least an hour before you start. To quickly soften it, you can microwave the unwrapped block on low power for 15-second intervals.
Mistake 2: Not Letting the Crust Cool
Pouring the cold filling onto a warm or even slightly warm crust is a recipe for disaster. The heat will begin to melt the filling, causing it to separate and become soupy. It can also make the bottom of the crust soggy. Be patient! Let the baked crust cool completely on a wire rack. This might take 30-45 minutes.
Mistake 3: Overheating the Gelatin
When you melt the bloomed gelatin, you just want to liquefy it, not cook it. Ten seconds in the microwave is usually perfect. If you overheat it, the gelatin can lose its setting power. If you see it boiling, you’ve gone too far. It should just be a clear, warm liquid. Stir it into the strawberry mixture immediately so it incorporates evenly before it starts to set again.
Mistake 4: Not Chilling Long Enough
Four hours is the minimum chill time. If you cut into the pie too early, the filling will be soft and won’t hold its shape on the slice. It will look more like a pudding than a pie. For the best, cleanest slices, I always make mine the day before I need it. Overnight chilling is the ultimate secret for perfect texture.
Your Strawberry Cream Pie Questions, Answered
Can I use frozen strawberries for the filling?
Yes, you can, but there’s an important step. Thaw the frozen strawberries completely first. Then, drain them very well in a fine-mesh strainer, pressing gently to remove as much excess liquid as possible. You might even want to pat them dry with a paper towel. Extra liquid will make your filling runny and prevent it from setting firmly. Using the thawed berries will give you a beautiful, deep pink color.
My filling is runny. What did I do wrong?
A runny filling usually points to one of three issues. First, the gelatin may not have been measured correctly, bloomed properly, or incorporated while still liquid. Second, the whipped cream may have been under-whipped (it needs stiff peaks). Third, the pie may simply need more chill time. Pop it back in the fridge for a few more hours. If it’s still soupy after a long chill, the gelatin may have been compromised.
Can I make this pie without gelatin?
You can, but the texture will be much softer, more like a mousse. It will not slice as neatly and needs to be eaten with a spoon. For a no-gelatin version, you could try whipping the cream with a stabilizer like instant pudding mix, but this will change the flavor. The gelatin is there to give structure for that perfect, clean slice.
How far in advance can I make this pie?
This pie is an excellent make-ahead dessert! You can prepare it fully 1 to 2 days before you need to serve it. Just keep it tightly covered in the refrigerator. I recommend adding the fresh strawberry garnish on top the day you are serving it so they look their freshest and don’t get soggy.
What’s the best way to cut a clean slice?
For picture-perfect slices, use a sharp, thin-bladed knife. Run the knife under very hot water for a few seconds, wipe it dry with a clean towel, and then make your cut. The heat helps the knife glide through the creamy filling smoothly. Wipe and reheat the knife between each slice for the cleanest results.
Can I use a different type of crust?
Absolutely! A traditional baked pie crust (shortcrust pastry) works wonderfully if you prefer a flaky texture. A crushed vanilla wafer or shortbread cookie crust is also delicious. For a nutty flavor, try a crust made from ground pecans or almonds mixed with butter and a bit of sugar. Just press and bake or chill as directed for that specific crust type.
Is there a way to make this recipe lower in sugar?
You can make some adjustments, but they will alter the final texture. You can reduce the sugar in the crust by half. In the filling, try using a sugar substitute that measures like powdered sugar, meant for baking. Be aware that the strawberries provide natural sweetness, so you might be able to reduce the powdered sugar slightly. Taste the filling as you go!
My cream cheese filling has lumps. Can I fix it?
If you discover lumps after mixing, all is not lost. You can press the entire filling mixture through a fine-mesh sieve using a spatula. This will remove any lumps from the cream cheese and also any large bits of strawberry, giving you an ultra-smooth, velvety texture. It’s an extra step, but it works like a charm for a perfectly smooth strawberry delight.
Can I double this recipe?
Yes, you can double it to make a larger pie in a 9×13-inch pan, which is great for feeding a big crowd. Simply double all the ingredients. You may need to bake the crust a few minutes longer. The chill time will remain about the same. Alternatively, you could make two separate 9-inch pies.
What can I do with leftover egg yolks/whites from a different recipe?
This recipe doesn’t use eggs, so no worries here! But if you landed here looking for a no-egg dessert, you’re in the right place. This Strawberry Cream Pie is completely egg-free, making it a great option for those with allergies or for times you just don’t want to deal with separating eggs.
The Sweet Finale
There you have it—my beloved recipe for a truly Heavenly Strawberry Cream Pie. It’s more than just a list of ingredients and steps; it’s a promise of a creamy, fruity, and utterly delightful dessert that brings people together. I’ve shared this pie with neighbors, brought it to countless gatherings, and it never fails to bring smiles. So grab those strawberries, whip that cream, and get ready to make some sweet memories. Happy baking!
Heavenly Pineapple Delight
Ingredients
Equipment
Method
- Preheat your oven to 175°C (350°F).
- In a medium bowl, combine graham cracker crumbs, sugar, and melted butter; mix until it looks like wet sand.
- Pour the mixture into a 9-inch pie pan and press firmly across the bottom and up the sides.
- Bake for 8-10 minutes until fragrant and slightly darkened; let cool completely on a wire rack.
- While the crust cools, bloom the gelatin by sprinkling it over 2 tablespoons of water in a small bowl; let sit for 5 minutes.
- In a large mixing bowl, beat cream cheese and powdered sugar until smooth; add mashed strawberries and vanilla extract; mix well.
- In a separate bowl, whip the heavy cream until stiff peaks form.
- Microwave the bloomed gelatin for 10 seconds until clear; quickly stir into the strawberry-cream cheese mixture.
- Gently fold in the whipped cream until no white streaks remain.
- Pour the filling into the cooled crust, spread evenly and refrigerate for at least 4 hours (or overnight).
- Before serving, garnish with halved fresh strawberries.