Cheesecake Symphony: A Dessert Masterpiece That Sings
You know that feeling when a dessert is so perfect, it feels like a standing ovation for your taste buds? That’s this Cheesecake Symphony. It’s the showstopper I bring to every family gathering, and without fail, someone always asks, “Can I have the recipe?” It’s not just a cheesecake. It’s a creamy, rich, and flawlessly textured experience that makes you want to close your eyes and savor every single bite. It’s my go-to when I want to spread a little joy, and trust me, it never disappoints.
From Ancient Greece to Your Kitchen Table
The story of cheesecake is a delicious journey! Did you know its roots go all the way back to ancient Greece? Athletes were served a simple version for energy during the first Olympic games. Fast forward to America, and cream cheese changed the game entirely, giving us the dense, velvety New York-style treat we adore. This Cheesecake Symphony recipe is a love letter to that classic version. It builds on tradition with a touch of extra creaminess from sour cream and heavy whipping cream. It’s the modern, foolproof version of a timeless dessert that has been making people happy for centuries.
Why This Cheesecake Recipe Wins Hearts Every Time
You’ll fall head over heels for this recipe, and here’s why. First, the texture is pure magic – it’s incredibly smooth and melts on your tongue. Second, it’s surprisingly straightforward. No fancy techniques are needed, just good old-fashioned mixing and baking. The flavor is a perfect balance: rich from the cream cheese, slightly tangy from the sour cream, and sweet with a hint of vanilla. It’s the kind of dessert that feels fancy but is totally approachable for a casual weekend bake. It’s the culinary equivalent of a warm hug.
Perfect Occasions for Your Cheesecake Symphony
This cheesecake isn’t just for holidays! It’s perfect for so many moments. Imagine slicing it at a birthday party instead of a regular cake. Picture it as the grand finale to a summer barbecue, topped with fresh berries. It’s my secret weapon for potlucks because it travels well and always disappears. I love making it for a “just because” weekend treat. A simple slice with a cup of coffee turns an ordinary afternoon into something special. Any day is better with cheesecake!
Gathering Your Ingredients
Let’s gather the cast of characters for our symphony. Using full-fat, quality ingredients here really makes a difference in the final taste and texture.
- For the Crust:
- 1 ½ cups graham cracker crumbs
- ⅓ cup granulated sugar
- ½ cup melted butter
- For the Filling:
- 3 (8 oz) packages cream cheese, softened
- 1 cup granulated sugar
- 1 teaspoon vanilla extract
- 3 large eggs
- 1 cup sour cream
- ½ cup heavy cream
Simple Substitutions for Your Pantry
Out of something? No panic! Here are some easy swaps:
- Graham Cracker Crumbs: Try digestive biscuits, vanilla wafers, or even crushed pretzels for a salty-sweet twist.
- Sour Cream: Plain full-fat Greek yogurt is a great stand-in.
- Heavy Cream: You can use an extra ½ cup of sour cream for a tangier result.
- Sugar: For a deeper flavor, use half white and half light brown sugar in the filling.
Conducting Your Cheesecake Symphony: Step-by-Step
Step 1: Preheat & Craft the Crust
Start by preheating your oven to 325°F (160°C). This stable, moderate heat is key for gentle, even baking. In a medium bowl, combine the graham cracker crumbs and sugar. Pour in that melted, golden butter – you’ll love the nutty aroma. Mix it until it looks like wet sand. Press this mixture firmly and evenly into the bottom of your springform pan. I use the bottom of a flat measuring cup to get it nice and compact. A solid crust foundation prevents any filling leaks! Pro tip: For a thicker crust, use 2 cups of crumbs and a bit more butter.
Step 2: Create the Creamy Filling Base
In a large bowl, beat the softened cream cheese with the sugar. It’s crucial that the cream cheese is truly soft to avoid lumps. Beat them on medium speed until the mixture is utterly smooth and pale. This takes a few minutes, but don’t rush it! Then, mix in the vanilla extract, which fills your kitchen with its warm, comforting scent. Now, add the eggs one at a time. Beat on low speed after each egg until it’s just blended. Over-beating the eggs adds too much air, which can lead to cracks later.
Step 3: Blend in the Creams for Luxury
This is where the magic happens! With the mixer on low, gently blend in the cool sour cream and the heavy cream. The batter will transform into something gloriously silky and pourable. The heavy cream lightens the density just enough, while the sour cream adds a beautiful tang. Stop mixing as soon as everything is combined and smooth. Your batter should be lump-free and have a beautiful, creamy ivory color.
Step 4: Assemble and Bake to Perfection
Place your springform pan on a baking sheet for easy handling. Pour that luscious filling over the waiting crust. Give the pan a gentle tap on the counter to release any air bubbles. Slide it into the center of your preheated oven. Bake for 60-70 minutes. You’re looking for the edges to be completely set and puffed, while the center (about a 3-inch circle) still has a slight, delicate jiggle when you nudge the pan. It will firm up as it cools.
Step 5: The Crucial Gradual Cool Down
This is the secret to a crack-free top! When the baking time is up, turn off the oven. Crack the oven door open with a wooden spoon. Let the cheesecake sit in this warm, fading oven for a full hour. This slow cooling prevents the dramatic temperature change that causes the surface to contract and split. Be patient here – it makes all the difference for a picture-perfect finish.
Step 6: Chill, Then Celebrate with a Slice
After its oven rest, carefully run a thin knife around the inside edge of the pan to loosen the cheesecake. This also helps prevent sticking as it chills. Let it cool completely on the counter, then cover and refrigerate for at least 4 hours, but overnight is best. This long chill allows the flavors to marry and the texture to become perfectly firm and sliceable. When ready, unclasp the pan, slice with a warm knife for clean cuts, and add your favorite toppings! Chef’s tip: For ultra-clean slices, wipe your knife clean with a damp cloth between each cut.
Your Cheesecake Timeline
Here’s a quick look at the schedule for your baking day:
- Prep Time: 20 minutes
- Bake Time: 1 hour 10 minutes
- Cooling & Chilling Time: At least 5 hours (1 hour in oven, 4+ in fridge)
- Total Time: About 6 hours 30 minutes
- Servings: 8-10 happy people
The Ultimate Cheesecake Secret
My number one trick? A water bath. It sounds fancy, but it’s simple. Wrap the bottom of your springform pan tightly in heavy-duty foil. Place it in a large roasting pan. Pour the cheesecake batter in, then pour hot water into the roasting pan until it comes halfway up the side of the springform pan. The steam creates a gentle, even heat that cooks the cheesecake without curdling it, guaranteeing the creamiest, dreamiest texture imaginable.
A Little Extra Slice of Knowledge
Ever wonder about the “New York” style? It famously uses extra egg yolks for richness. Our recipe gets its incredible silkiness from the combination of whole eggs, sour cream, and heavy cream. It’s a fantastic hybrid that delivers that iconic dense-yet-creamy feel without being overly heavy. It’s the best of all cheesecake worlds!
Gear You’ll Need
You likely have most of this in your kitchen!
- 9-inch springform pan
- Stand mixer or hand mixer
- Large mixing bowls
- Measuring cups and spoons
- Rubber spatula
- Baking sheet (for easy transport)
- Roasting pan (if using a water bath)
- Heavy-duty aluminum foil
Storing Your Cheesecake Masterpiece
Once sliced, your cheesecake needs to stay chilled. Cover any leftovers tightly with plastic wrap or transfer slices to an airtight container. It will keep beautifully in the refrigerator for up to 5 days. The flavors often deepen and get even better on the second day!
For longer storage, cheesecake freezes exceptionally well. Wrap the whole cheesecake or individual slices tightly in plastic wrap, then a layer of foil. Place it in a freezer bag. It can be frozen for up to 2 months. Thaw it overnight in the refrigerator before serving.
Remember, always use a clean knife to cut serving slices to prevent introducing bacteria that could shorten its fridge life. If you’ve topped it with fresh fruit, store that separately and add it just before serving to keep everything fresh and crisp.
Tips for Cheesecake Success
- Room Temp is Key: Make sure your cream cheese, eggs, and sour cream are at room temperature. This ensures a smooth, lump-free batter.
- Don’t Over-mix: Mix the batter until just combined after adding the eggs. Too much air causes rising and falling, which leads to cracks.
- Test for Doneness: The jiggle test is your best friend. The center should jiggle like Jell-O, not look liquidy.
- Chill Patiently: Rushing the chilling step means a messy, soft slice. Let it set fully for the best experience.
Presenting Your Dessert Like a Pro
Make it beautiful!
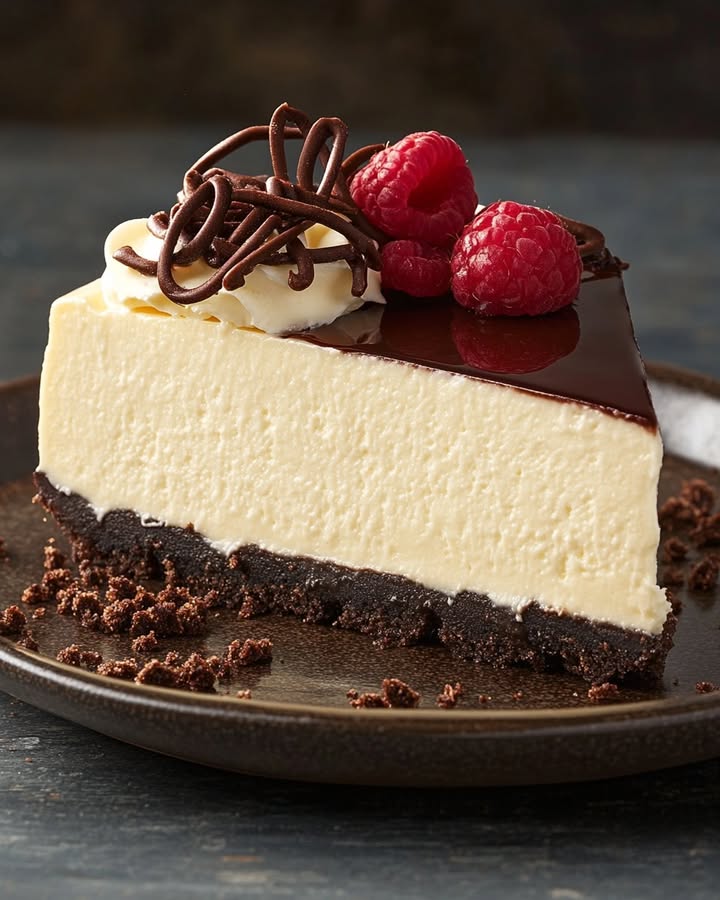
- Top with a glossy layer of homemade strawberry or raspberry sauce.
- Arrange a mosaic of fresh berries (blueberries, raspberries, blackberries) on top.
- Drizzle with salted caramel or bittersweet chocolate ganache.
- A simple dollop of freshly whipped cream and a mint leaf is classic and elegant.
- Dust the whole top with a light snowfall of powdered sugar just before serving.
Healthier & Fun Variations to Try
Love the classic but want to mix it up? Here are six fantastic spins on the symphony:
- Lemon Coconut Bars Twist: For a tropical vibe, add 1 tablespoon of lemon zest and 1 teaspoon of lemon extract to the filling. Mix 1 cup of toasted coconut into the graham cracker crust. It’s like a sunny vacation in every bite!
- Chocolate Swirl: Melt ½ cup of chocolate chips with a splash of heavy cream. Dollop over the filled pan and swirl with a knife for a marbled effect.
- Pumpkin Spice: Blend 1 cup of pumpkin puree and 2 tsp of pumpkin pie spice into the filling for a perfect fall treat.
- Berry Bliss: Before adding the filling, spread a thin layer of seedless raspberry jam over the crust for a fruity surprise layer.
- No-Bake Version: Use gelatin in the filling and set it in the fridge. Perfect for hot summer days with no oven required.
- Mini Cheesecakes: Use a muffin tin with liners. Press crust into the bottom, fill ¾ full, and bake for only 18-22 minutes. Great for parties!
Common Mistakes to Avoid
Mistake 1: Using Cold Ingredients
Pulling cream cheese and eggs straight from the fridge is a top cause of a lumpy batter. Cold cream cheese will never blend smoothly, leaving you with tiny chunks in your finished cake. Always plan ahead. Let your dairy ingredients sit on the counter for at least an hour before you start baking. They should feel soft and pliable to the touch. This simple step guarantees that silky, professional texture we all love.
Mistake 2: Over-Beating the Batter
It’s tempting to let that mixer run on high, but too much air is the enemy of a dense, creamy cheesecake. When you over-beat, especially after adding the eggs, you incorporate lots of air bubbles. These bubbles expand in the oven, then collapse as the cake cools, causing it to fall and crack. Mix on medium speed only until ingredients are just combined. A few strokes by hand with a spatula at the end can help pop any large air bubbles.
Mistake 3: Skipping the Gradual Cool Down
Yanking a hot cheesecake out of the oven and plopping it on the counter is a surefire way to see cracks form. The sudden temperature shock makes the surface shrink faster than the center. That’s why the “turn off the oven and crack the door” step is non-negotiable. It allows the delicate cake to adjust slowly and gently. Think of it as a cozy, gradual transition from the warm oven to room temperature. It takes time, but it saves the beautiful surface of your dessert.
Mistake 4: Not Using a Springform Pan
Trying to bake a cheesecake in a regular cake pan is a recipe for disaster. You’ll have an incredibly hard time getting the slices out in one piece. A springform pan, with its removable sides, is designed for this exact purpose. The latch opens to free the cake, leaving the bottom as a perfect serving plate. If you don’t have one, they are a very worthwhile investment for any cheesecake lover. They make the whole process so much easier and less stressful.
Your Cheesecake Symphony Questions, Answered
Why did my cheesecake crack on top?
Cracks usually happen from a too-fast temperature change or from over-baking. The most common fix is to use the slow cooling method described in Step 5. Letting the cheesecake cool gradually in the turned-off oven helps it settle without stress. Also, avoid over-beating the batter and make sure you’re not baking it longer than needed—the center should still jiggle slightly when done. Remember, a cracked cheesecake still tastes amazing! You can always cover it with a tasty topping like whipped cream or fruit.
Can I make this cheesecake ahead of time?
Absolutely! In fact, I highly recommend it. Cheesecake needs that long chill time to set properly, and the flavor actually improves after a day in the fridge. You can easily bake it one or even two days before you plan to serve it. Just keep it covered in the refrigerator. Add any fresh fruit or whipped cream toppings right before you’re ready to bring it to the table. Making it ahead takes the pressure off and lets you enjoy the party.
Do I have to use a water bath?
You don’t have to, but it is the best way to guarantee a perfectly creamy texture without any cracks. The water bath creates a steamy environment that bakes the cheesecake gently and evenly. If you’re worried about water leaking into the pan, just wrap the outside of your springform pan very tightly with two layers of heavy-duty foil. The extra few minutes of setup are worth it for that flawless, professional result. If you skip it, just be extra careful not to over-bake.
How do I know when the cheesecake is done baking?
Use the “jiggle test.” About 10 minutes before the recipe time is up, give the oven rack a gentle nudge. Look at the center of the cheesecake. It should have a slight, soft jiggle—like Jell-O—while the outer edges (about 2-3 inches in) look set and may be slightly puffed. The center will firm up as it cools. If the entire surface seems firm and doesn’t move at all, it might be over-baked. An instant-read thermometer can also help; the center should read about 150°F (65°C).
My springform pan leaked! What did I do wrong?
Most springform pans are not completely watertight, which is why wrapping them in foil is so important for a water bath. Before adding the batter, place your empty pan on a large piece of heavy-duty foil. Bring the foil up the sides and wrap it tightly. Some people use a second piece going the other way for extra security. Also, avoid pressing the crust too far up the sides of the pan, as this can create a path for the butter to melt and leak during baking. Using a baking sheet underneath is always a good safety measure.
Can I use low-fat cream cheese and sour cream?
You can, but be prepared for a different result. Full-fat dairy products give the cheesecake its signature rich, creamy, and stable texture. Low-fat or Neufchâtel cheese has more water and less fat. This can lead to a softer, sometimes grainier texture, and the cake may not set as firmly. It might also be more prone to cracking. For the best, most reliable outcome, I always stick with the full-fat versions. Save the low-fat for another day!
How do I get a really clean slice?
A messy slice can ruin a beautiful presentation. The trick is a warm, clean knife. Run a long, sharp knife under very hot water for a few seconds. Dry it quickly with a towel, then make your cut in one smooth motion. The heat helps the knife glide through the creamy filling without sticking or dragging. Wipe and reheat the knife between every single slice. It takes a moment longer, but you’ll be left with pristine, picture-perfect pieces of cheesecake.
What are the best toppings for cheesecake?
The possibilities are endless! Fresh fruit is always a winner: try strawberries, blueberries, raspberries, or a mix. A simple fruit compote or coulis adds beautiful color and flavor. For chocolate lovers, a drizzle of ganache or hot fudge is divine. Salted caramel is a fantastic sweet-and-salty option. For a classic touch, a dollop of freshly whipped cream is perfect. You can also keep it simple with just a light dusting of powdered sugar. Let your mood or the season guide you!
Can I freeze cheesecake?
Yes, cheesecake freezes beautifully! To freeze the whole cake or individual slices, first chill it completely. Then wrap it very tightly in plastic wrap, followed by a layer of aluminum foil. Place it in a freezer bag if you can. It will keep for up to 2 months. To serve, thaw it overnight in the refrigerator. Don’t thaw it at room temperature, as that can make the texture watery. Freezing is a great way to have a decadent dessert ready for unexpected guests or future cravings.
Is it normal for the top to be a little brown?
Yes, a light golden brown top is completely normal and even desirable for many bakers! It indicates that the Maillard reaction has occurred, adding a subtle, caramelized flavor. If you prefer a very pale top, you can tent the cheesecake with foil during the last 15-20 minutes of baking. Just lay a sheet of foil loosely over the top of the pan. Be careful not to let it touch the surface. Whether golden or pale, your cheesecake will be delicious.
The Final, Sweet Note
There you have it – the recipe for a dessert that truly feels like a celebration. This Cheesecake Symphony is more than just a list of ingredients and steps. It’s a project of love, a bit of patience, and a whole lot of delicious reward. Whether it’s for a special occasion or a simple Tuesday night treat, baking this cheesecake is a joyful experience. I hope it brings as much happiness to your table as it has to mine. Now, go preheat that oven and get ready for a standing ovation from everyone who gets a taste. Happy baking!
Lemon Coconut Bars
Ingredients
Equipment
Method
- Preheat your oven to 325°F (160°C).
- In a medium bowl, combine graham cracker crumbs and sugar, then stir in melted butter until mixed resembles wet sand.
- Press the mixture firmly and evenly into the bottom of a springform pan.
- In a large bowl, beat softened cream cheese and sugar until smooth and pale.
- Mix in vanilla extract, then add eggs one at a time, beating on low speed until just blended.
- Gently blend in sour cream and heavy cream until the batter is smooth.
- Pour the filling over the crust in the springform pan and tap lightly to release air bubbles.
- Bake for 60-70 minutes, until edges are puffed and center has a slight jiggle.
- Turn off the oven, crack the door, and let the cheesecake cool in the oven for an hour.
- Run a thin knife around the edge to loosen, then let it cool completely and refrigerate for at least 4 hours, preferably overnight.