
Last Tuesday, I stared at my freezer wondering what on earth I was going to make for dinner. My kids were getting hangry, and I needed something fast. That’s when I spotted those tilapia fillets I bought on sale last week. Twenty minutes later, we were all gathered around the table, devouring the most delicious Lemon Garlic Tilapia that had my picky eater asking for seconds. Sometimes the best recipes come from those desperate weeknight moments, right?
The Story Behind This Simple Lemon Garlic Tilapia
Tilapia has been feeding families for thousands of years. Ancient Egyptians raised it in the Nile River, and it’s even mentioned in the Bible. Pretty impressive for a humble fish! These days, tilapia is one of the most popular fish in America because it’s affordable, mild-tasting, and cooks faster than you can help your kid with their math homework.
The lemon garlic combination is a classic Mediterranean pairing that makes everything taste better. When I was learning to cook, my aunt Rosa told me that lemon and garlic could save any fish dish from being boring. She was absolutely right. This simple flavor combo has been passed down through generations, and now I’m passing it to you.
Modern versions of this recipe have taken it in so many directions. Some folks add capers or white wine. Others throw in fresh herbs like parsley or basil. But honestly, the basic version is still my favorite. It lets the bright lemon and punchy garlic shine without competing flavors getting in the way.
Why This Lemon Garlic Tilapia Recipe Will Become Your Go-To
This recipe takes less time than ordering takeout. I’m talking 20 minutes from start to finish. When you’re juggling work, kids, and life in general, that’s a game changer. Plus, it’s one of those tilapia recipes easy enough for beginners but fancy enough to serve to guests.
The flavors are bright and fresh without being overwhelming. My daughter, who claims she doesn’t like fish, actually cleans her plate when I make this. The lemon cuts through any fishiness, and the garlic adds that savory depth we all crave. It’s light but satisfying, which is exactly what you want for dinner.
This is also one of the tilapia recipes healthy that doesn’t taste like diet food. Tilapia is naturally low in calories and high in protein. Add some heart-healthy olive oil and vitamin C from the lemon, and you’ve got a nutritious meal that tastes indulgent. Your family won’t even realize they’re eating something good for them.
The best part? It’s forgiving. Seriously. Even if you’re not confident in the kitchen, this recipe has your back. The cooking method is straightforward, and it’s hard to mess up. I’ve made it on my best days and my most chaotic days, and it always turns out delicious.
Perfect Times to Make This Delicious Tilapia Dish
This Lemon Garlic Tilapia shines brightest on busy weeknights when you need something quick. I make it every other week when soccer practice runs late and everyone’s starving. It’s become our Tuesday night staple because it’s fast, filling, and no one complains about it.
It’s also perfect for casual dinner parties. Seriously! I served it to friends last month with some roasted asparagus and garlic bread. They thought I’d spent hours in the kitchen. Little did they know I was actually watching Netflix while it cooked. It looks elegant on the plate but requires minimal effort.
This recipe works wonderfully for meal prep too. Make a double batch on Sunday, and you’ve got protein ready for salads and grain bowls all week. I love flaking the leftovers into tacos with some cabbage slaw. It transforms beautifully into different meals.
Special occasions like Easter or Mother’s Day brunch also call for this dish. The bright, fresh flavors feel celebratory without being heavy. It’s lighter than traditional holiday fare, which is nice when you’re already planning a big dessert. Your guests will appreciate something that doesn’t weigh them down.
Everything You Need for Perfect Lemon Garlic Tilapia
- 4 tilapia fillets (fresh or thawed if using frozen, about 6 ounces each)
- 3 tablespoons olive oil
- 4 garlic cloves, minced
- 2 lemons (one for juice, one for slices)
- 1 teaspoon salt
- 1/2 teaspoon black pepper
- 1/2 teaspoon paprika
- 2 tablespoons fresh parsley, chopped
- 2 tablespoons butter
- 1/4 teaspoon red pepper flakes (optional)
Smart Substitutions for Your Lemon Tilapia Pan Recipe
Don’t have tilapia? Use cod, haddock, or flounder instead. These mild white fish work beautifully with lemon and garlic. I’ve even used catfish in a pinch, and it was delicious. Just keep the cooking time similar since they’re all thin fillets.
Out of fresh lemons? Bottled lemon juice works in a pinch, though fresh is always better. Use about 3 tablespoons of bottled juice to replace one lemon. You can also try lime for a slightly different citrus twist. My neighbor does this and swears by it.
If you’re avoiding butter, use more olive oil or try ghee for a rich flavor. Coconut oil also works if you don’t mind a subtle tropical hint. I’ve used avocado oil when I ran out of olive oil, and nobody noticed the difference.
No fresh parsley? Dried parsley, cilantro, or basil all work great. You could even use dill if you want a more sophisticated flavor. I keep dried herbs on hand for those moments when my fresh herbs have turned to mush in the fridge drawer.
For a dairy-free version, skip the butter entirely and increase the olive oil to 4 tablespoons. The dish will be slightly less rich but still absolutely delicious. My lactose-intolerant sister makes it this way every time, and it’s fantastic.
How to Make the Best Tilapia Recipes Come to Life
Step 1: Prep Your Fish and Ingredients
Start by patting your tilapia fillets completely dry with paper towels. This is super important because wet fish won’t brown properly and can steam instead of getting that nice golden color. If you’re using frozen tilapia recipes, make sure they’re fully thawed and any ice crystals are gone. I usually thaw mine overnight in the fridge, but if I forget, I run them under cold water for about 15 minutes.
While your fish is drying, mince your garlic cloves nice and fine. I like using a garlic press to save time, but chopping works just as well. Juice one lemon into a small bowl and slice the other lemon into thin rounds. Chop your parsley and measure out all your spices. Having everything ready before you start cooking makes the whole process so much smoother.
Season both sides of each fillet with salt, pepper, and paprika. The paprika adds a gorgeous color and a subtle sweetness that balances the lemon beautifully. Don’t be shy with the seasoning. Fish needs a good amount of salt to really shine. I learned this the hard way after making bland fish for months when I first started cooking.
Pro tip: Let the seasoned fish sit at room temperature for about 10 minutes before cooking. This helps it cook more evenly and prevents that cold-center, overcooked-outside situation we’ve all experienced.
Step 2: Heat Your Pan to the Perfect Temperature
Place a large skillet over medium-high heat and add 2 tablespoons of olive oil. Let it heat up for about a minute until it shimmers but doesn’t smoke. You want the pan hot enough to sear the fish but not so hot that the garlic burns immediately. I usually test it by dropping a tiny piece of garlic into the oil. If it sizzles gently, you’re good to go.
This lemon tilapia pan method is my favorite because you get that beautiful golden crust while keeping the inside tender and flaky. The hot pan creates a barrier that locks in moisture. I’ve tried baking and it’s great, but pan-searing gives you that restaurant-quality finish that makes everyone think you’re a professional chef.
Make sure your pan is big enough to hold all the fillets without crowding. If they’re touching, they’ll steam instead of sear. I usually cook two fillets at a time in my 12-inch skillet. If you only have a smaller pan, work in batches. It’s worth the extra few minutes for properly cooked fish.
Step 3: Sear the Tilapia to Golden Perfection
Carefully place the seasoned fillets in the hot pan. They should sizzle immediately when they hit the oil. This sound is music to my ears because I know a beautiful crust is forming. Don’t touch them! I know it’s tempting to peek underneath, but leave them alone for 3 to 4 minutes. This lets that golden-brown crust develop properly.
Watch the edges of the fillets. When you see them turning white and opaque about halfway up the sides, it’s time to flip. Use a thin spatula and flip gently but confidently. The second side only needs about 2 to 3 minutes since it’s thinner and cooks faster. The fish is done when it flakes easily with a fork and reaches an internal temperature of 145°F.
The color transformation is beautiful. The fish goes from translucent pink to opaque white, and that golden crust develops these gorgeous brown spots. Once cooked through, transfer the fillets to a plate and tent them loosely with foil to keep warm. Don’t skip this step, or your fish will get cold while you make the sauce.
Pro tip: If your fillets are particularly thick, you can finish them in a 400°F oven for 2 to 3 minutes after searing. This ensures they cook through without burning the outside.
Step 4: Create the Magical Lemon Garlic Sauce
In the same pan with all those lovely brown bits, reduce the heat to medium and add the remaining tablespoon of olive oil. Toss in your minced garlic and red pepper flakes if using. Stir constantly for about 30 seconds until the garlic becomes fragrant and just starts to turn golden. The smell will make everyone come running to the kitchen asking when dinner will be ready.
Now add the butter and let it melt into the garlicky oil, creating this luxurious golden sauce. Swirl the pan to help it emulsify. Those brown bits stuck to the bottom of the pan (called fond) are pure flavor gold. Use a wooden spoon to scrape them up as the butter melts. This is where all the magic happens.
Pour in the fresh lemon juice and watch it bubble and sizzle. The acidity brightens everything up and creates this beautiful, tangy sauce that coats the back of a spoon. Let it simmer for just a minute to meld the flavors together. Taste it and adjust the seasoning if needed. Sometimes I add a pinch more salt or an extra squeeze of lemon.
Stir in most of the chopped parsley, saving a little for garnish. The green flecks make the sauce look fresh and vibrant. At this point, your kitchen smells absolutely amazing. My husband always says this is when he knows dinner is going to be good.
Step 5: Bring It All Together
Return the tilapia fillets to the pan, nestling them into that gorgeous lemon garlic sauce. Spoon some sauce over the top of each fillet so every bite is coated in flavor. Let them hang out in the sauce for just a minute to warm through and absorb all those delicious flavors. This is also when I add those lemon slices on top for presentation.
The fillets should be glistening with the butter and lemon sauce, looking absolutely restaurant-worthy. If the sauce seems too thick, add a tablespoon of water or white wine to loosen it up. If it’s too thin, let it simmer for another 30 seconds to reduce slightly. You want it pourable but not watery.
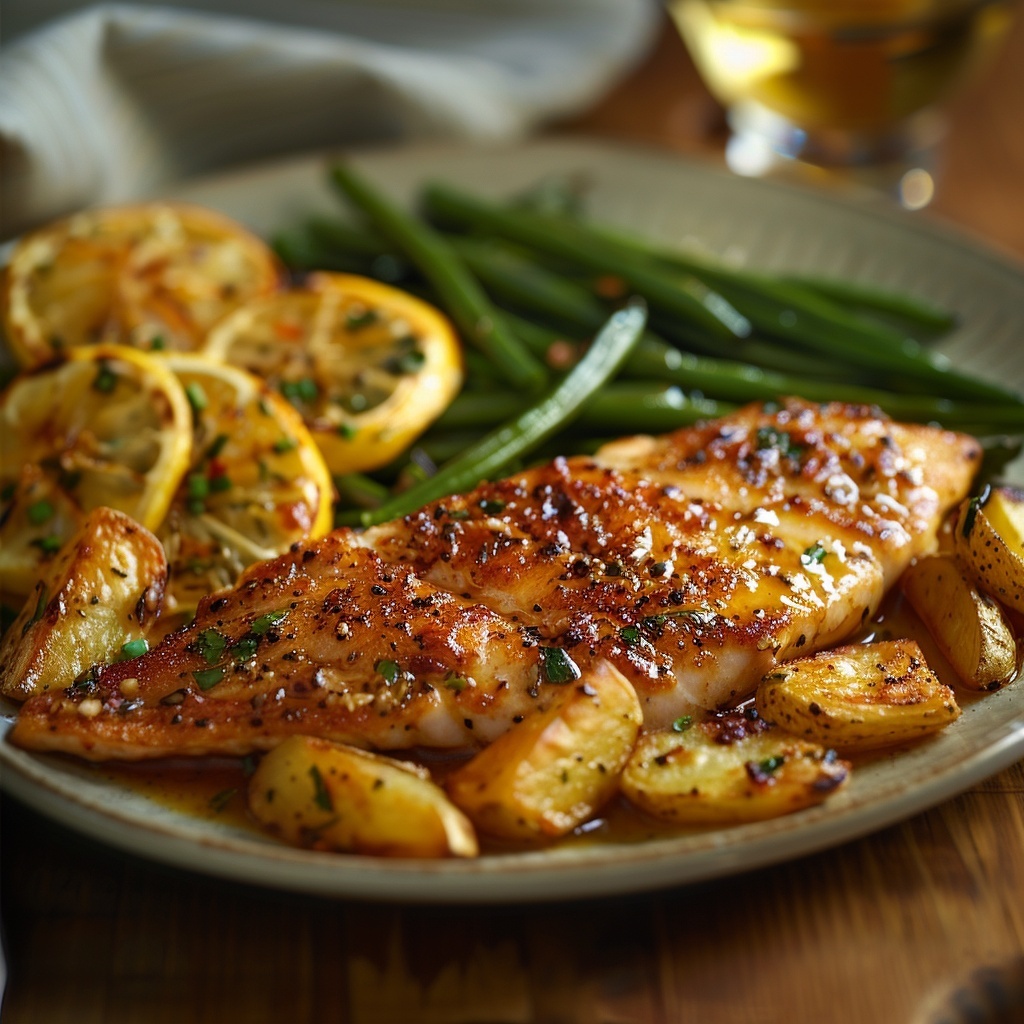
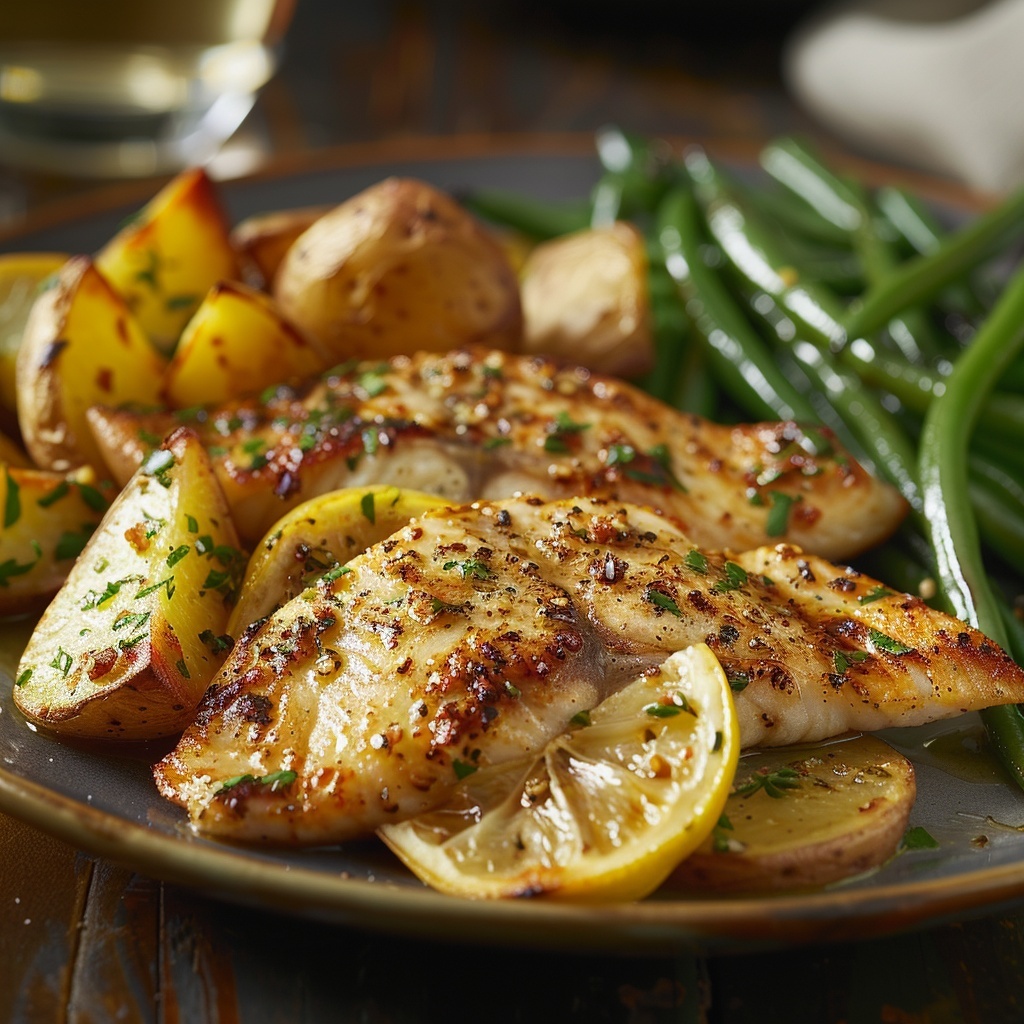
Transfer everything to a serving platter or individual plates. Make sure each fillet gets a generous drizzle of that incredible sauce. Garnish with the remaining fresh parsley and those beautiful lemon slices. The presentation is so simple yet elegant that it looks like you put in way more effort than you actually did.
Chef’s tip: For an extra layer of flavor, add a splash of white wine to the sauce before the lemon juice. It adds depth and sophistication that takes this dish from weeknight dinner to special occasion worthy.
Time Breakdown for This Quick Tilapia Recipe
Prep Time: 10 minutes. This includes thawing the fish if you’re using frozen, mincing garlic, juicing lemons, and measuring spices. If you’re organized and have everything laid out, you might even do it faster.
Cook Time: 10 minutes. The fish cooks in about 6 to 7 minutes total, and the sauce takes another 2 to 3 minutes. This is one of those recipes where the actual cooking happens in a flash.
Total Time: 20 minutes from start to finish. This includes all prep and cooking. By the time your rice or pasta is done, the fish is ready. It’s perfectly timed for busy weeknights when you need food on the table fast.
Resting Time: None required! Unlike meat, fish doesn’t need to rest before serving. You can plate it immediately and dig in. This is one of the things I love most about cooking fish. Instant gratification!
My Secret Weapon for Restaurant-Quality Fish
Here’s something I learned from a chef friend that changed everything: add a tiny pinch of sugar to your seasoning mix. I know it sounds weird, but trust me. Just a quarter teaspoon of sugar enhances the natural sweetness of the fish and helps create that beautiful caramelized crust. It doesn’t make the fish taste sweet at all. It just makes everything taste more balanced and professional.
The sugar also helps the fish brown more evenly and quickly. This means you can cook it at a slightly lower temperature and reduce the risk of overcooking. I started doing this about a year ago, and my fish has never been better. My mother-in-law even asked what I was doing differently because it tasted so good.
Another secret? Use clarified butter or ghee instead of regular butter in the sauce if you want to cook at higher heat without burning. Regular butter contains milk solids that can burn and turn bitter. Clarified butter has a higher smoke point and gives you that rich, buttery flavor without the risk of burning. You can buy it at most grocery stores, or make your own by melting butter and skimming off the foam.
Fun Facts About Your Lemon Garlic Tilapia
Did you know that tilapia is one of the oldest farmed fish in the world? Ancient Egyptians farmed it over 4,000 years ago. There are even hieroglyphics showing tilapia farming techniques. It’s pretty cool to think we’re continuing a tradition that’s thousands of years old every time we make dinner.
Lemons weren’t always the kitchen staple they are today. They were actually considered a luxury item in Europe until the 19th century. People would pay big money for a single lemon. Now we can grab a bag for a few bucks at any grocery store. We’re basically living like royalty and don’t even realize it!
Garlic has been used for both culinary and medicinal purposes for over 5,000 years. Ancient Greek athletes ate garlic before competitions, believing it enhanced performance. Ancient Roman soldiers ate it for strength and courage. Your dinner is basically power food with a long and impressive history. How cool is that?
Kitchen Tools You’ll Need for Perfect Results
A good quality large skillet is essential. I use a 12-inch stainless steel or non-stick pan. Cast iron works too, but it can sometimes give fish a metallic taste if it’s not well-seasoned. Non-stick is great for beginners because the fish releases easily and cleanup is a breeze.
You’ll need a thin, flexible spatula for flipping the delicate fillets. I love my fish spatula with the slotted design. It slides under the fish easily and lets any excess oil drip away. If you don’t have one, a regular spatula works, but be extra gentle when flipping.
A sharp knife for mincing garlic and slicing lemons makes prep so much faster. Dull knives are dangerous and frustrating. I sharpen mine every few months, and it makes such a difference. A cutting board is obvious but worth mentioning. I prefer plastic for raw fish because it’s easier to sanitize.
A meat thermometer takes the guesswork out of knowing when fish is done. Fish should reach 145°F internally. Once I started using a thermometer, I stopped overcooking fish. It’s a small investment that makes a huge difference in your cooking confidence.
Basic measuring spoons and cups ensure your seasonings are balanced. A garlic press saves time if you cook with garlic often. I also love my citrus juicer for getting every drop of juice from my lemons. Paper towels for drying the fish are a must-have too.
Keeping Your Tilapia Fresh and Delicious
Store leftover Lemon Garlic Tilapia in an airtight container in the refrigerator for up to 3 days. Let it cool to room temperature first, but don’t leave it out for more than 2 hours to avoid bacterial growth. I usually transfer mine to containers within 30 minutes of cooking. The lemon garlic sauce keeps the fish moist even as leftovers, which is a bonus.
When reheating, be gentle to avoid drying out the fish. I prefer reheating it in a covered skillet over low heat with a splash of water or broth. This creates steam that keeps everything moist. Microwave works in a pinch, but use 50% power and heat in 30-second intervals. Cover the dish with a damp paper towel to keep moisture in. The fish is done when it’s heated through, which usually takes about 2 minutes.
For longer storage, you can freeze cooked tilapia for up to 2 months. Wrap each fillet individually in plastic wrap, then place them all in a freezer-safe bag with as much air removed as possible. Label it with the date so you remember when you made it. Thaw overnight in the fridge before reheating. The texture won’t be quite as good as fresh, but it’s still tasty and way better than letting it go to waste. I usually use frozen leftovers in fish tacos or salads where the texture change is less noticeable.
Pro Tips for the Best Oven Baked Tilapia Recipes
If you prefer oven baked tilapia recipes, preheat your oven to 400°F and bake the seasoned fillets for 12 to 15 minutes. For crispier fish, broil for the last 2 minutes. The oven method is more hands-off and perfect when you’re cooking multiple fillets at once. I do this when I have company over and need to feed a crowd.
Always use fresh lemon juice when possible. The bottled stuff is convenient, but fresh lemons have a brightness and complexity that makes a real difference. Plus, you can use the zest for extra lemon flavor. I zest my lemons before juicing them and sprinkle the zest over the finished dish for an extra pop of citrus.
Don’t overcrowd your pan. Give each fillet some space so the heat can circulate properly. Crowded fish steams instead of sears, and you’ll miss out on that gorgeous golden crust. If you need to cook in batches, keep the first batch warm in a 200°F oven while you finish the rest.
Let your fish come to room temperature before cooking. Cold fish straight from the fridge can shock the hot pan and cook unevenly. I take mine out about 15 minutes before I plan to cook. This small step makes a big difference in texture and cooking time.
Taste your sauce before serving and adjust as needed. Sometimes you need more salt, sometimes more lemon, sometimes a pinch of sugar. Trust your taste buds. Cooking is about making food you love, not following recipes blindly. I adjust mine every single time based on the size of my lemons and my mood that day.
Making Your Tilapia Look Instagram-Worthy
Serve your Lemon Garlic Tilapia on a white platter to make the colors pop. The golden fish with bright yellow lemon slices and green parsley looks absolutely stunning against a clean white background. I learned this trick from food blogs, and it really does make a difference in presentation.
Add some fresh herbs around the platter. A few sprigs of parsley, dill, or even rosemary make the dish look more sophisticated. You can also add lemon wedges around the edges for people to squeeze over their fish. It looks pretty and serves a purpose.
Serve the fish over a bed of rice, quinoa, or couscous. The grains soak up that delicious lemon garlic sauce and make the plate look fuller and more complete. I love using wild rice or a rice pilaf for extra color and texture. The contrast between the white fish and darker grains is beautiful.
Pair it with colorful vegetables like roasted cherry tomatoes, sautéed green beans, or steamed broccoli. The bright colors make the whole plate more appealing and appetizing. I always try to have at least three colors on the plate: the golden fish, green vegetables, and something else like red tomatoes or orange carrots.
For individual servings, place each fillet on a plate and arrange vegetables artfully around it. Drizzle the sauce over the fish in a zigzag pattern. Add a lemon wheel on top and a sprinkle of fresh parsley. It looks like something from a restaurant menu but took you almost no extra effort.
Healthier Takes on This Classic Tilapia Recipe
Spicy Lemon Garlic Tilapia with a Kick
For those who love heat, this spicy lemon garlic tilapia variation adds cayenne pepper, red pepper flakes, and a dash of hot sauce to the basic recipe. I increase the red pepper flakes to a full teaspoon and add a quarter teaspoon of cayenne to the seasoning mix. The spice level is noticeable but not overwhelming. The lemon juice actually helps balance the heat beautifully.
When making the sauce, I stir in a teaspoon of sriracha or your favorite hot sauce. This gives the sauce a beautiful orange color and a complex heat that builds with each bite. My husband prefers this version and requests it at least once a month. It’s especially good when served with cooling sides like cucumber salad or a yogurt-based sauce.
The spicy version also works wonderfully in tacos. I flake the cooked fish into warm tortillas with shredded cabbage, avocado, and a drizzle of chipotle mayo. It’s become our favorite taco Tuesday meal. The contrast between the spicy fish and cool toppings is absolutely perfect.
Herb-Crusted Lemon Garlic Tilapia
This version adds a crispy herb crust for extra texture and flavor. Mix together a quarter cup of panko breadcrumbs with a tablespoon each of chopped parsley, basil, and dill. Add a tablespoon of melted butter to help it stick. After seasoning your fish, press the herb mixture onto the top of each fillet.
Bake this version at 400°F for about 12 minutes until the crust is golden and crispy. The herbs get toasted and fragrant, and the breadcrumbs add a satisfying crunch. Drizzle the lemon garlic sauce over the fish after baking so the crust doesn’t get soggy. This method combines the best of both worlds: the flavor of pan-seared fish and the ease of oven baking.
I make this version when I want to impress guests or when I’m just in the mood for something a little fancier. The green herbs in the golden crust look beautiful and taste even better. It’s one of those dishes that photographs beautifully, so keep your phone handy if you’re into food pics.
Mediterranean Lemon Garlic Tilapia
Add Mediterranean flavors by incorporating kalamata olives, capers, and cherry tomatoes to the basic recipe. After making your lemon garlic sauce, toss in a quarter cup of halved cherry tomatoes, two tablespoons of sliced olives, and a tablespoon of capers. Let them warm through for a minute before returning the fish to the pan.
The briny olives and capers add salty pops of flavor that complement the lemon beautifully. The tomatoes add sweetness and color. This version feels like a trip to the Greek islands without leaving your kitchen. I serve it with orzo or couscous and a Greek salad for a complete Mediterranean feast.
You can also add a splash of white wine and some crumbled feta cheese on top. The feta melts slightly from the heat of the fish and adds creaminess to each bite. My sister-in-law, who visited Greece last year, says this version tastes authentic. I’ll take that as a win even though I’ve never been!
Asian-Inspired Ginger Lemon Tilapia
For an Asian twist, replace half the garlic with freshly grated ginger and add a tablespoon of soy sauce to the lemon juice. The ginger adds warmth and a slight spiciness that’s different from chili peppers. It’s earthy and aromatic in the best way. I also add a teaspoon of sesame oil to the sauce for that nutty, toasted flavor.
Garnish with sliced green onions and sesame seeds instead of parsley. The flavor profile is completely different but equally delicious. It pairs wonderfully with jasmine rice and stir-fried vegetables. My kids actually prefer this version because the ginger-soy combination is milder than straight garlic.
You can also add a drizzle of honey to the sauce for a sweet and savory combination. Just a teaspoon balances the salty soy sauce and tart lemon juice. This creates a glaze that coats the fish beautifully and caramelizes slightly. It’s become my go-to when I want to shake things up but still keep dinner easy.
Coconut Lime Tilapia with Tropical Flair
Swap the lemon for lime juice and add coconut milk for a tropical variation. Use a third cup of coconut milk in place of the butter for a dairy-free, island-inspired dish. The coconut milk creates a creamy sauce that’s rich but not heavy. Add a teaspoon of curry powder for extra warmth and color.
This version transports you straight to a beach vacation. The lime is slightly sweeter and more aromatic than lemon, and the coconut adds richness without overwhelming the fish. I serve it over coconut rice and with grilled pineapple for a full tropical experience. It’s my go-to recipe when I need a mental vacation but can’t actually leave town.
For extra flair, toast some shredded coconut and sprinkle it over the finished dish. The toasted coconut adds crunch and intensifies the tropical flavor. Fresh cilantro works better than parsley in this version. The whole dish feels exotic and special but uses mostly pantry staples you probably already have.
Tilapia Casserole with Lemon Garlic
Turn this into a comforting tilapia casserole by layering the fish with vegetables and rice. Cook rice according to package directions and spread it in a greased 9×13 baking dish. Layer the seasoned tilapia fillets on top. Add sautéed vegetables like zucchini, bell peppers, and onions around and over the fish.
Pour the lemon garlic sauce over everything, making sure it seeps into all the layers. Cover with foil and bake at 375°F for 25 minutes. Remove the foil and bake another 5 minutes to let the top brown slightly. The casserole method is perfect for feeding a crowd or meal prepping for the week.
You can even add a layer of cheese on top if you want it extra comforting. Parmesan or mozzarella both work great. The cheese gets bubbly and golden, and everyone thinks you’ve made something much more complicated than you actually did. This is my potluck go-to because it travels well and people always ask for the recipe.
Common Mistakes to Avoid When Making Tilapia
Mistake 1: Not Drying the Fish Properly
One of the biggest mistakes people make is throwing wet fish into the pan. When fish is wet, it steams instead of searing, and you miss out on that beautiful golden crust. The moisture creates a barrier between the fish and the hot pan, preventing proper browning. I made this mistake for years before someone pointed it out to me.
Take the extra 30 seconds to pat your fillets completely dry with paper towels. Press down gently but firmly on both sides until no moisture remains. If you’re using frozen tilapia recipes, this step is even more critical because thawed fish releases extra water. Sometimes I’ll even let the fillets sit on a paper towel for a few minutes to absorb any lingering moisture.
Dry fish also means better seasoning adherence. The salt and spices stick to the surface instead of sliding off with the moisture. This creates better flavor in every bite. Trust me, this simple step transforms your fish from mediocre to restaurant-quality.
Pro tip: If your fish is particularly wet, use a salad spinner lined with paper towels to remove excess moisture quickly and efficiently.
Mistake 2: Cooking at the Wrong Temperature
Too many people cook fish at either too high or too low a temperature. Too high and the outside burns before the inside cooks. Too low and the fish becomes rubbery and never develops that nice crust. Medium-high heat is the sweet spot for pan-searing tilapia. The pan should be hot enough that the fish sizzles when it hits the surface but not so hot that the garlic burns immediately.
For oven baked tilapia recipes, temperature matters just as much. Baking at 400°F to 425°F ensures the fish cooks through in 12 to 15 minutes without drying out. If you’re wondering how long to bake tilapia at 425, the answer is about 10 to 12 minutes for standard fillets. Lower temperatures mean longer cooking times and potentially dry fish.
Invest in an oven thermometer if you don’t have one. Many ovens run hotter or cooler than the dial indicates. My oven runs about 25 degrees cool, so I adjust accordingly. Once I figured this out, my baking results improved dramatically. Temperature consistency is key to cooking fish properly.
Mistake 3: Overcooking the Fish
Overcooked fish is dry, tough, and just plain sad. Tilapia is a delicate fish that cooks quickly, usually in 6 to 8 minutes total for pan-searing. People often cook it too long because they’re nervous about undercooked fish. But fish continues cooking even after you remove it from heat, so pulling it slightly early is actually smart.
Fish is done when it flakes easily with a fork and reaches an internal temperature of 145°F. The flesh should be opaque and no longer translucent. If you can pull it apart easily with a fork, it’s ready. Any more cooking just dries it out. I set a timer on my phone so I don’t lose track of time while multitasking.
Remember that residual heat will continue cooking the fish for another minute or two after you remove it from the pan. So if it’s just barely done when you take it off the heat, it’ll be perfect by the time you serve it. This is especially important when making oven baked tilapia recipes where the fillets stay in the hot dish even after leaving the oven.
Mistake 4: Using Too Much Lemon
Lemon is wonderful, but too much turns the fish acidic and actually starts “cooking” it like ceviche. This makes the texture mushy and the flavor overwhelmingly sour. I learned this the hard way when I got excited and used three lemons worth of juice for four fillets. The fish tasted like I was eating a lemon with a side of fish.
One lemon’s worth of juice for four fillets is plenty. You can always serve extra lemon wedges on the side for people who want more. The lemon should enhance the fish, not overpower it. The garlic should shine through equally in this Lemon Garlic Tilapia recipe.
If you accidentally add too much lemon juice, balance it by adding a pinch of sugar or a little extra butter to the sauce. This helps neutralize some of the acidity. I’ve saved many sauces this way when my hand slipped while squeezing lemons. Don’t panic, just adjust and taste as you go.
Mistake 5: Burning the Garlic
Garlic burns quickly and turns bitter when burned. This ruins the whole dish with an acrid, unpleasant flavor that no amount of lemon can fix. Many people add the garlic too early or cook it at too high a temperature. Burned garlic is one of the most common reasons homemade fish dishes taste “off” or bitter.
Always add garlic after you’ve cooked the fish and reduced the heat to medium. Cook it for only 30 seconds to a minute until fragrant and just starting to turn golden. It should smell amazing, not harsh. If it starts turning brown quickly, immediately add the butter or liquid to stop the cooking process.
Using minced garlic instead of large chunks also helps because it cooks more evenly and quickly. If you’re nervous about burning it, you can add the garlic to the cold pan with the butter and heat them together slowly. This gives you more control and prevents that bitter burned taste that ruins so many dishes.
Your Tilapia Questions Answered
What makes Lemon Garlic Tilapia different from other fish recipes?
The combination of bright lemon and savory garlic creates a perfect balance that enhances rather than overpowers the mild tilapia. Unlike heavier fish preparations with cream sauces or strong spices, this recipe keeps things light and fresh while still delivering tons of flavor. The quick cooking method preserves the delicate texture of the fish, making it tender and flaky instead of rubbery. This is one of the best tilapia recipes because it’s simple enough for weeknights but impressive enough for company, which is a rare combination in cooking.
Can I use frozen tilapia fillets for this recipe?
Absolutely! Frozen tilapia recipes work perfectly as long as you thaw the fish properly first. Never cook fish straight from frozen for this recipe because it releases too much water and won’t sear properly. Thaw your fillets overnight in the refrigerator or place them in a sealed bag under cold running water for about 20 minutes. Once thawed, pat them completely dry with paper towels to remove excess moisture. Frozen tilapia is often more affordable and just as nutritious as fresh, making it a smart choice for budget-conscious cooks who still want healthy, delicious meals.
How long does it take to bake tilapia at 425 degrees?
When baking tilapia at 425°F, plan for about 10 to 12 minutes for standard-sized fillets that are about half an inch thick. Thicker fillets may need an extra 2 to 3 minutes, while thinner pieces might be done in 8 to 9 minutes. The fish is ready when it flakes easily with a fork and reaches an internal temperature of 145°F. Baking at this higher temperature gives you a slightly golden top while keeping the inside moist and tender. If you want extra browning, you can broil for the last minute or two, but watch it carefully to prevent burning.
What are some easy side dishes to serve with Lemon Garlic Tilapia?
This versatile fish pairs wonderfully with simple sides that don’t compete with its bright flavors. Rice pilaf, quinoa, or couscous all soak up the delicious lemon garlic sauce beautifully. Roasted vegetables like asparagus, green beans, or Brussels sprouts add color and nutrition. A simple green salad with a light vinaigrette keeps things fresh and balanced. Garlic bread is always a hit because it’s perfect for soaking up any remaining sauce on your plate. For a low-carb option, try cauliflower rice or zucchini noodles, which let the fish be the star while keeping your meal light and healthy.
Is tilapia a healthy fish choice?
Yes, tilapia is an excellent source of lean protein with about 26 grams per 4-ounce serving and only around 110 calories. It’s low in fat and contains important nutrients like vitamin B12, selenium, and phosphorus. Tilapia recipes healthy options like this one add minimal fat through olive oil and butter, keeping the dish nutritious without sacrificing flavor. Tilapia is also lower in mercury compared to many other fish, making it a safer choice for frequent consumption. The omega-3 content is lower than fatty fish like salmon, but the overall nutritional profile makes it a smart addition to a balanced diet.
Can I make this recipe spicy?
Definitely! Adding heat to create spicy lemon garlic tilapia is easy and delicious. Increase the red pepper flakes to a full teaspoon or add cayenne pepper to your seasoning mix. You can also stir hot sauce or sriracha into the lemon garlic sauce for a spicy kick. Fresh jalapeños or serrano peppers minced into the garlic add fresh heat that builds gradually. The lemon juice actually helps balance the spiciness, so don’t worry about it being overwhelmingly hot. Start with less heat than you think you need and add more at the end if desired, since you can always add more but can’t take it away once it’s mixed in.
What’s the best way to tell when tilapia is fully cooked?
Properly cooked tilapia will be opaque throughout with no translucent or raw-looking areas in the center. The flesh should flake easily when you gently press a fork into it. An instant-read thermometer should register 145°F when inserted into the thickest part of the fillet. The fish will also feel firm to the touch rather than squishy or jiggly. Visual cues include the color changing from pinkish-translucent to solid white throughout. If you’re still unsure, make a small cut in the thickest part to check that it’s opaque all the way through. With practice, you’ll develop an instinct for when fish is perfectly done.
Can I make this recipe ahead of time?
While this dish is best served fresh, you can prep components ahead to save time. Season the fish and refrigerate it covered for up to 4 hours before cooking. Mince the garlic and juice the lemons, storing them separately in the fridge. You can even make the sauce ahead and reheat it gently while you cook fresh fish. Fully cooked fish can be stored in the refrigerator for up to 3 days and reheated carefully, though the texture won’t be quite as perfect as fresh. For meal prep, I recommend cooking the fish, letting it cool, and storing it separately from any sides. Reheat gently in a covered skillet with a splash of water or broth to prevent drying out.
What can I substitute for tilapia in this recipe?
Any mild, white fish fillets work beautifully with this lemon garlic preparation. Cod, haddock, sole, flounder, or catfish are all excellent substitutes. These fish have similar cooking times and mild flavors that pair well with lemon and garlic. If you want something a bit more substantial, halibut or sea bass work wonderfully, though they’re pricier. Even salmon works if you prefer a richer, fattier fish, though the flavor profile will be quite different. Just keep the cooking times similar since you want fillets that are roughly the same thickness as tilapia. The beauty of this recipe is its versatility, so feel free to experiment with whatever fresh fish looks best at your market.
Why is my tilapia rubbery or tough?
Rubbery tilapia is almost always the result of overcooking. Fish proteins contract and squeeze out moisture when cooked too long or at too high a temperature, resulting in that unpleasant rubbery texture. Tilapia cooks quickly because it’s thin and delicate, usually needing only 6 to 8 minutes total when pan-searing. Another cause can be cooking fish straight from the refrigerator, which causes uneven cooking with the outside overdone before the inside warms through. Let your fish sit at room temperature for 10 to 15 minutes before cooking and use a timer to avoid overcooking. Remember that fish continues cooking from residual heat even after you remove it from the pan, so pull it slightly before you think it’s done.
Why This Recipe Deserves a Spot in Your Weekly Rotation
This Lemon Garlic Tilapia has everything you need in a weeknight dinner. It’s quick enough for busy Tuesday nights, healthy enough to feel good about serving your family, and delicious enough that everyone actually wants to eat it. I’ve been making this recipe for years, and it never gets old.
The best part is how flexible it is. You can dress it up for guests or keep it casual for a quiet night at home. Serve it with fancy sides or just some rice and frozen vegetables. It works either way. The flavors are universally appealing without being boring, which is exactly what we need from our go-to recipes.
Whether you’re new to cooking fish or you’ve been doing it for years, this recipe will become one of your favorites. It’s forgiving, fast, and full of flavor. Give it a try this week and see why it’s earned a permanent spot in my meal rotation. Your family will thank you, and your taste buds definitely will too.

Lemon Garlic Tilapia
Ingredients
Equipment
Method
- Pat the tilapia fillets completely dry with paper towels.
- Mince the garlic cloves, juice one lemon, and slice the other lemon into thin rounds.
- Season both sides of each fillet with salt, pepper, and paprika.
- Heat a large skillet over medium-high heat and add 2 tablespoons of olive oil.
- Place the seasoned fillets in the hot pan and sear for 3-4 minutes without touching them.
- Flip the fillets gently and cook for an additional 2-3 minutes until they flake easily.
- Remove the cooked fillets and tent them loosely with foil to keep warm.
- In the same pan, reduce heat to medium and add the remaining tablespoon of olive oil and the minced garlic.
- Stir for about 30 seconds until the garlic is fragrant, then add the butter and let it melt.
- Pour in fresh lemon juice and let it simmer for a minute, stirring in most of the chopped parsley.
- Return the tilapia fillets to the pan and nestle them into the sauce, spooning sauce over the top.
- Serve on a platter, garnished with the remaining parsley and lemon slices.