How Delicious Those Milk and Chocolate Bread Rolls Look! A Homemade Treat
Have you ever walked past a bakery window and just stopped? That’s exactly what happened to me with these milk and chocolate bread rolls. They were sitting there, all plump and golden, little chips of chocolate peeking out like edible treasure. I knew right then I had to make them at home. After a few (very delicious) trials, I landed on this simple recipe. Now, the heavenly smell of them baking is my family’s favorite weekend alarm clock!
A Little Story on Sweet Breads
Sweet, enriched doughs like this one are a love letter in food form. Cultures across the globe have their own version, from Mexican conchas to Chinese pineapple buns. Our milk and chocolate rolls are a wonderfully simple take on that tradition. They combine the comforting softness of milk bread with the universal joy of melted chocolate. It’s a modern homemade classic that feels both special and wonderfully familiar.
Why You’ll Fall in Love With This Recipe
First, they are incredibly soft and fluffy. The warm milk and butter make the dough a dream to work with. Second, it’s a fantastic project for bakers of all levels. The steps are clear, and the reward is huge! Finally, nothing beats the pride of pulling a tray of these gorgeous, glossy rolls from your own oven. The look on your kids’ (or friends’) faces is pure magic.
Perfect Occasions for These Chocolate Rolls
These rolls are your secret weapon for making any moment better. They are perfect for a leisurely weekend breakfast with a big pot of coffee. Pack them in lunchboxes for a sweet surprise. They’re also a huge hit at brunch parties or as a comforting afternoon snack with a glass of cold milk. Honestly, “Tuesday” is a pretty good occasion, too!
Gathering Your Ingredients
Here’s everything you’ll need to create this bit of bakery magic at home. I promise it’s all simple stuff!
For the Dough:
- 500 g (about 4 cups) of wheat flour
- 7 g (1 packet) dry yeast or 20 g fresh yeast
- 250 ml (1 cup) of warm milk
- 50 g (1/4 cup) granulated sugar
- 1 egg
- 60 g (1/4 cup) of melted butter
- 1/2 teaspoon salt
For the Filling and Decoration:
- 1/2 cup chocolate chips (semisweet or milk)
- 1 egg, beaten for the egg wash
Handy Substitution Options
No worries if you’re missing something! Here are easy swaps:
Milk: Any milk works—whole, 2%, or even a plain, unsweetened non-dairy milk.
Butter: A neutral oil like canola or vegetable oil can be used in a pinch.
Chocolate Chips: Chopped chocolate bar, Nutella for a swirl, or even dried fruit like raisins or cranberries.
Egg Wash: For a dairy-free shine, brush with a little milk or cream instead.
Creating Your Magical Milk and Chocolate Rolls
Let’s get our hands a little dusty with flour! Follow these steps for perfect, puffy rolls every time.
Step 1: Wake Up the Yeast
This is where the magic begins! In a small bowl, mix your yeast with 2 tablespoons of the warm milk and a teaspoon of the sugar. Let it sit for about 10 minutes. You’ll know it’s ready when it looks creamy, bubbly, and smells wonderfully yeasty. If it doesn’t foam, your yeast might be old and your milk was likely too hot or too cold. Pro tip: The milk should feel warm to your wrist, like a nice bath, not hot.
Step 2: Bring the Dough Together
In a large mixing bowl, whisk together the flour, the rest of the sugar, and the salt. Make a well in the center. Pour in the foamy yeast mixture, the remaining warm milk, the whole egg, and the melted butter. Stir with a wooden spoon until a shaggy dough forms. Then, turn it out onto a lightly floured surface.
Step 3: The Kneading Dance
Now, knead the dough for about 10 minutes. Push it away with the heel of your hand, fold it back, give it a quarter turn, and repeat. You’ll feel it transform from sticky and messy to smooth, elastic, and soft as a baby’s cheek. If using a stand mixer, use the dough hook on medium speed for 5-6 minutes. The dough should spring back slowly when poked.
Step 4: The First Cozy Rest
Form the dough into a neat ball. Place it in a lightly greased bowl and turn it over so the top gets greased too. Cover the bowl with a clean kitchen towel or plastic wrap. Let it rest in a warm, draft-free spot until it doubles in size. This usually takes 1 to 2 hours, depending on how warm your kitchen is. I love tucking mine in the oven with just the light on for a cozy spot.
Step 5: Shape and Fill the Buns
Gently punch down the puffy dough to release the air. Turn it out and divide it into about 50-gram portions—you should get 12-14 lovely rolls. Take each piece, flatten it slightly in your palm, and place a small handful of chocolate chips in the center. Pinch the edges together tightly to seal the chocolate inside, then roll into a smooth ball. Place them seam-side down on a baking sheet lined with parchment paper.
Step 6: The Second Rise (Almost There!)
Cover your tray of shaped rolls with that clean towel again. Let them rest for another 30-40 minutes. They won’t double this time, but they will get noticeably puffy and feel light. This second rest is crucial for that final soft, airy texture.
Step 7: Bake to Golden Perfection
While the rolls are resting, preheat your oven to 180°C (350°F). Just before baking, gently brush the top of each roll with the beaten egg. This gives them that gorgeous, professional-looking golden shine. Bake for 15-20 minutes. They’re done when they sound hollow if tapped on the bottom and are a beautiful, deep golden brown. Your kitchen will smell unbelievable.
Step 8: The Best Part – Enjoy!
Let the rolls cool on the tray for just a few minutes. I always sneak one while it’s still warm—the chocolate inside is gloriously melty. You can sprinkle a few extra chocolate chips on top while they’re warm for extra decadence. Serve with a tall glass of milk or your favorite cup of coffee. Chef’s tip: For an extra treat, brush the warm rolls with a little melted butter and roll them in cinnamon sugar!
Your Baking Timetable
Here’s a quick look at the time investment for these heavenly rolls:
- Prep Time: 30 minutes
- Rising Time: 1.5 – 2.5 hours
- Cook Time: 20 minutes
- Total Time: About 2.5 – 3.5 hours
Most of this is hands-off waiting while the dough works its magic!
My Chef’s Secret for Ultimate Fluffiness
For rolls that stay softer for days, try a tangzhong starter. Before you start the main recipe, whisk 3 tablespoons of the recipe’s flour with 1/2 cup of the recipe’s milk in a small pot. Cook over medium heat, stirring constantly, until it thickens into a paste. Let it cool completely, then add it to your dough with the other wet ingredients. This simple trick locks in moisture like a dream!
A Sweet Fact About Chocolate in Bread
Adding chocolate to bread isn’t just a modern indulgence! In the 17th century, chocolate was often taken as a beverage. Bakers in European monasteries are said to have been some of the first to experiment with adding cocoa and sugar to bread doughs, creating early ancestors to our beloved chocolate pastries. So you’re part of a delicious, centuries-old tradition!
Necessary Kitchen Equipment
You don’t need fancy gear! Here’s the basics:
- Large mixing bowl
- Measuring cups and spoons or a kitchen scale
- Wooden spoon or spatula
- Clean kitchen towels
- Baking sheet
- Parchment paper
- Pastry brush (for the egg wash)
A stand mixer with a dough hook is helpful but not required.
Storing Your Homemade Rolls
Let the rolls cool completely first. The most important thing is to keep them in an airtight container. A zip-top bag or a container with a tight-fitting lid works perfectly. This stops them from drying out and losing that wonderful soft texture.
You can keep them at room temperature for 2-3 days. If you want to keep them longer, these rolls freeze beautifully. Wrap each cooled roll individually in plastic wrap, then place them all in a freezer bag. They’ll keep for up to 2 months.
When you’re ready to eat a frozen roll, just let it thaw at room temperature. For that fresh-baked warmth and softness, pop a thawed roll in the microwave for 10-15 seconds or warm it in a 300°F oven for 5-7 minutes.
My Best Tips and Advice
- Flour Power: Flour amounts can vary based on humidity. Add the last cup gradually until the dough is soft and slightly tacky, but not overly sticky.
- Patience is a Virtue: Don’t rush the rising times! Letting the dough double in size ensures light and airy rolls.
- Seal Tight: Make sure you pinch the dough around the chocolate chips really well. A tight seal prevents the chocolate from leaking out all over your baking tray.
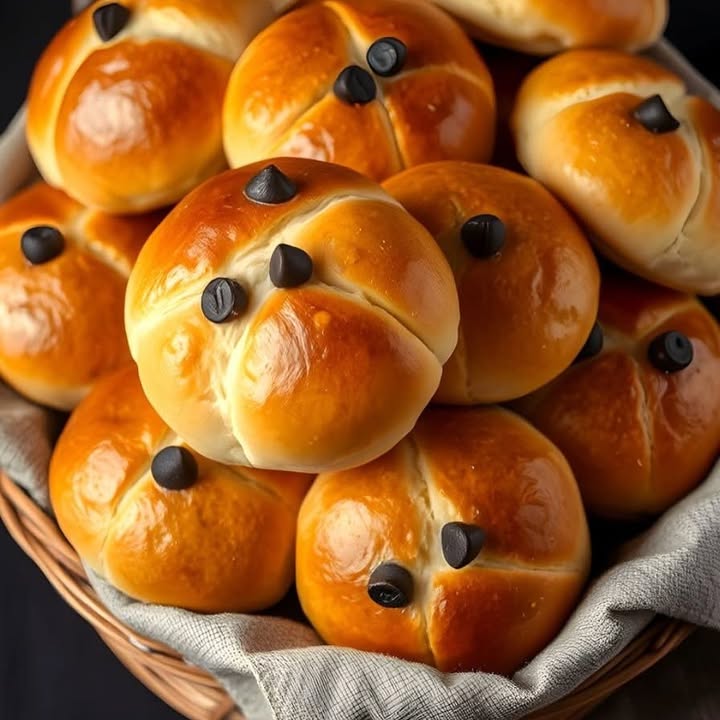
Fun Ways to Present Your Rolls
Make them look as good as they taste!
- Arrange them in a round basket lined with a cute napkin.
- Dust them lightly with powdered sugar for a snowy, elegant look.
- Serve with small bowls of melted chocolate, caramel sauce, or fruit jam for dipping.
- For a party, tie a ribbon around each roll and present them on a tiered cake stand.
Healthier and Fun Recipe Variations
Want to mix it up? Here are six delicious twists on the classic milk and chocolate rolls.
1. Whole Wheat Honey Rolls: Swap half the white flour for whole wheat and use honey instead of sugar. The flavor is deep and nutty.
2. Cinnamon Sugar Swirl Buns: Roll the dough into a rectangle, brush with butter, and sprinkle with cinnamon sugar. Roll up, slice, and bake.
3. Orange Zest and Dark Chocolate: Add the zest of one orange to the dough. Use dark chocolate chips for a sophisticated, bittersweet combo.
4. Cream Cheese Stuffed Rolls: Mix cream cheese with a little sugar and vanilla. Use a spoonful instead of chocolate chips for a creamy surprise.
5. Savory Herb and Cheese Rolls: Omit the sugar and chocolate. Add grated cheddar cheese and dried herbs like rosemary to the dough.
6. Vegan “Buttery” Rolls: Use plant-based milk, a flax egg, and vegan butter. Dairy-free chocolate chips make this totally plant-based.
Common Mistakes to Avoid
Avoid these simple pitfalls for perfect rolls every single time.
Mistake 1: Using Hot or Cold Milk for the Yeast
Yeast is a living thing! If your milk is too hot, it will kill the yeast and your dough won’t rise. If it’s too cold, the yeast stays asleep. The perfect temperature is warm to the touch, around 105-110°F. A good test is to drip a little on your wrist—it should feel comfortably warm, not hot.
Mistake 2: Skipping the Second Rise
You might be tempted to bake the rolls right after shaping them. Don’t do it! The second rise (or proof) lets the shaped dough relax and puff up again. This gives you the final light and tender texture. Skipping it leads to dense, heavy rolls. Just be patient for that last 30 minutes.
Mistake 3: Not Sealing the Filling Tightly
If you just push chocolate chips into a ball of dough, they will almost certainly leak out during baking. The heat melts the chocolate, and it will find any escape route. Take the time to flatten the dough piece, place the chips in the center, and pinch the edges together firmly. Roll it into a smooth, sealed ball for a perfect pocket of melted chocolate.
Mistake 4: Over-Baking the Rolls
We want golden brown, not dark brown! Over-baking dries out the rolls. Start checking at the 15-minute mark. They are done when the tops are a rich golden color and the bottoms sound hollow when tapped. They will continue to cook a little on the hot tray after you take them out.
Frequently Asked Questions
Can I make the dough the night before?
Absolutely! This is a great time-saver. After the first rise (when the dough has doubled), punch it down. Place it in a greased bowl, cover tightly, and put it in the refrigerator overnight. The next morning, let it sit on the counter for 30 minutes to take the chill off. Then, proceed with shaping, the second rise, and baking. The cold ferment can actually develop more flavor!
My dough didn’t rise. What went wrong?
This usually points to the yeast. Either the yeast was old and inactive, or the liquid used to activate it was too hot or too cold. Always check the expiration date on your yeast. Test it in warm liquid with a pinch of sugar to make sure it gets foamy before adding it to the flour. Also, make sure your rising spot is warm and draft-free—like an oven with the light on.
Can I use instant yeast instead of active dry yeast?
Yes, you can! Instant yeast doesn’t need to be activated in liquid first. You can mix it directly in with your dry ingredients. Just make sure your other liquids are still warm to help it get started. Use the same amount (7 grams or 2 1/4 teaspoons) as the recipe calls for with active dry yeast.
Why do I need to brush the rolls with egg before baking?
The egg wash is your secret to a beautiful, glossy, and golden-brown crust. The protein and fat in the egg create a lovely sheen and color as it bakes. It also helps any toppings (like coarse sugar) stick to the rolls. For a lighter shine, you can use just the egg yolk mixed with a teaspoon of milk. For a dairy-free version, brush with just milk or cream.
How can I tell if the rolls are fully baked inside?
The golden color is a good sign, but the best test is the internal temperature. Use an instant-read thermometer; the rolls are done when they reach 190°F in the center. If you don’t have a thermometer, gently lift one roll and tap the bottom. It should sound hollow. You can also insert a toothpick into the side of a roll—it should come out clean (melted chocolate doesn’t count!).
Can I use something other than chocolate chips for the filling?
Of course! Get creative. Try a smear of Nutella, a dollop of peanut butter, or a mix of cinnamon and sugar. Chopped nuts, dried fruit like cherries or apricots, or even a small chunk of cream cheese are all delicious. Just make sure whatever you use isn’t too wet, as it can make the dough soggy.
My chocolate leaked out everywhere. How do I prevent this?
Leaky chocolate usually means the dough wasn’t sealed tightly enough. Make sure you pinch the dough closed firmly over the filling. Also, try using chocolate chunks or bar chocolate chopped into small pieces instead of very small chips. They melt a bit slower and might stay put better. Don’t overfill—a tablespoon or less per roll is plenty.
Can I make these rolls without a stand mixer?
You definitely can! In fact, I often make them by hand. Kneading dough is therapeutic! It will take about 10 minutes of kneading on a lightly floured surface. The dough is ready when it’s smooth, elastic, and springs back slowly when you poke it. Just put on some music and enjoy the process.
How do I get my rolls to be perfectly round and uniform?
After dividing the dough, use a cupping motion with your hand on an un-floured part of your counter. Place a dough portion in your cupped hand and make small, fast circular motions. The friction from the counter will help tuck the dough underneath itself, creating a tight, smooth ball. A kitchen scale to weigh each portion (aim for 50g) also helps ensure they are all the same size.
Are these the same as Hawaiian Sweet Rolls?
They are similar but not exactly the same. Hawaiian rolls often include pineapple juice and have a distinct, sweeter flavor. Our milk and chocolate rolls are more of a classic enriched European-style dough, focused on the softness from milk and butter, with a chocolate surprise inside. Think of them as chocolate-filled cousins to the Hawaiian roll!
Go Bake Some Joy!
There you have it! My tried-and-true recipe for the most delicious milk and chocolate bread rolls. They look impressive, but the process is simple and so rewarding. Whether you’re baking for a special brunch or just a quiet Tuesday afternoon, these rolls bring a little bit of bakery magic right into your kitchen. So, preheat that oven, get your chocolate chips ready, and prepare for the compliments. Happy baking!
Magical Butterbeer Pancakes
Ingredients
Equipment
Method
- In a small bowl, mix yeast with 2 tablespoons of warm milk and 1 teaspoon of sugar, and let sit for about 10 minutes until foamy.
- In a large mixing bowl, whisk together flour, remaining sugar, and salt, then make a well in the center.
- Pour the foamy yeast mixture, remaining warm milk, whole egg, and melted butter into the well, stirring until a shaggy dough forms.
- Turn the dough onto a lightly floured surface and knead for about 10 minutes, or use a stand mixer with a dough hook for 5-6 minutes.
- Form the dough into a ball, place in a greased bowl, cover, and let it rise in a warm place until doubled in size (1-2 hours).
- Punch down the dough, divide into 12-14 portions, shape each portion with chocolate chips inside, and place seam-side down on a baking sheet.
- Cover the rolls and let them rest for another 30-40 minutes.
- Preheat the oven to 180°C (350°F), brush rolls with beaten egg, and bake for 15-20 minutes until golden brown and hollow-sounding when tapped.
- Let cool slightly before serving, optionally sprinkle extra chocolate chips on top.