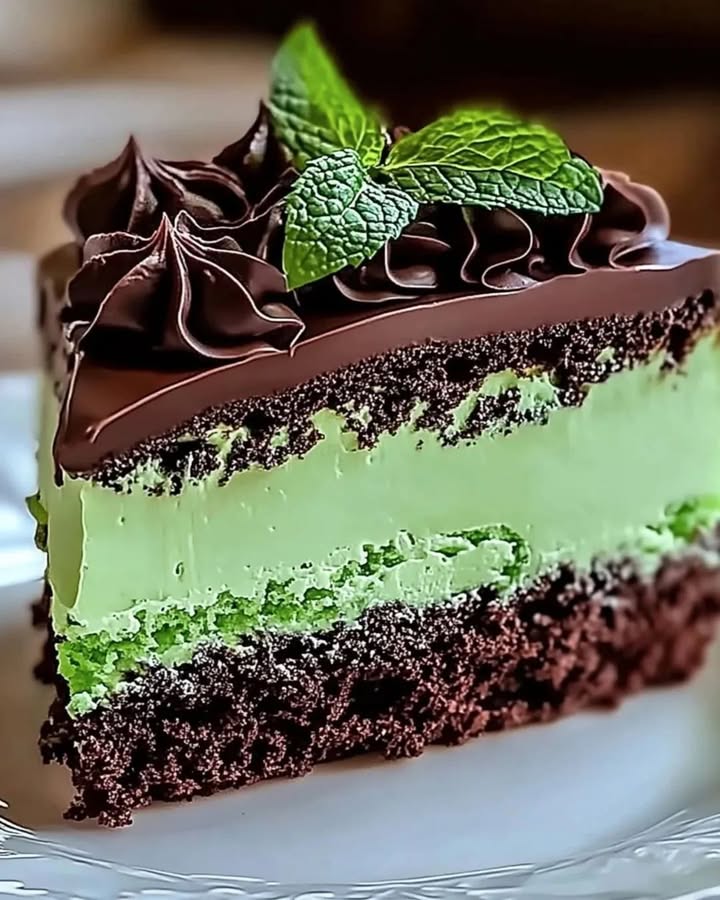
Mint Chocolate Brownie Bliss Cheesecake: Your New Favorite Indulgence
You know that feeling when you can’t decide between a rich chocolate brownie, a creamy cheesecake, and a cool minty dessert? I was hosting a summer book club and facing this exact dilemma. So, I decided to throw the rulebook out the window and combine all three! The result was this stunning Mint Chocolate Brownie Bliss Cheesecake. It was such a hit that I now make it for every special gathering. It’s like a party in your mouth—cool, creamy, and deeply chocolatey all at once.
A Happy Kitchen Accident
This recipe doesn’t have a long, storied history. Its origin is my own messy kitchen and a desire to use up some leftover mint extract from the holidays! I’ve always loved the classic combo of mint and chocolate, but I wanted something more substantial than a thin after-dinner mint. The idea of a no-bake mint cream layer on a fudgy brownie base just clicked. It’s a modern twist that takes the best parts of a brownie sundae and an icebox cake, then turns them into an elegant, sliceable dessert perfect for today’s home baker.
Why You’ll Fall in Love With This Cheesecake
First, it’s incredibly simple. Using a boxed brownie mix for the base saves so much time and stress. Second, the flavor contrast is magical. The dense, dark chocolate brownie perfectly balances the airy, peppermint-kissed cream. Third, it’s a showstopper. With its glossy chocolate drizzle and fresh mint garnish, it looks like it came from a fancy bakery. But the best part? You get to take all the credit!
Perfect Occasions for This Cool & Creamy Masterpiece
This cheesecake is versatile! It’s ideal for summer potlucks because it’s chilled and refreshing. Think Fourth of July parties, birthday celebrations, or holiday dinners (the green mint hue is perfect for Christmas!). It’s also a fantastic “wow” factor dessert for dinner parties. I love bringing it to gatherings because it always disappears quickly, and everyone asks for the recipe.
What You’ll Need: The Ingredients List
Gathering your ingredients is the first step to bliss. Here’s your shopping list:
For the Brownie Base:
- 1 box of brownie mix (or your favorite homemade recipe)
- The ingredients listed on the box (typically eggs, oil, and water)
For the Mint Cream Filling:
- 1 ½ cups heavy cream
- 1 cup powdered sugar
- 1 tsp peppermint extract
- 8 oz cream cheese, softened
- ½ cup sour cream
- 2 cups whipped cream (or whip an additional 1 cup heavy cream to stiff peaks)
For the Chocolate Topping & Garnish:
- 4 oz semi-sweet chocolate, chopped
- 1 tbsp butter
- Fresh mint leaves
- Shaved chocolate or chocolate curls
Easy Swaps: Ingredient Substitutions
Don’t worry if you’re missing an item! Cooking should be flexible.
- Brownie Mix: Use any brand you like, or your from-scratch recipe baked in the same pan.
- Peppermint Extract: Start with 1 tsp, but add more to taste. You can use 1-2 drops of food coloring for a more vibrant green layer.
- Sour Cream: Plain, full-fat Greek yogurt is a great tangy substitute.
- Semi-Sweet Chocolate: Milk chocolate or dark chocolate work beautifully for the topping.
- For a Lighter Version: Use Neufchâtel cheese instead of cream cheese, and consider a sugar-free brownie mix.
Let’s Make Mint Chocolate Brownie Bliss Cheesecake!
Follow these steps for a foolproof, delicious dessert. I promise it’s easier than it looks!
Step 1: Bake Your Fudgy Foundation
First, preheat your oven to 350°F (175°C). The warm aroma of chocolate will start filling your kitchen—heaven! Prepare your brownie batter according to the package directions. I like to use a 9-inch springform pan lined with parchment paper for easy removal. Pour in the thick, glossy batter and smooth the top. Bake for 20-25 minutes. You’ll know it’s done when a toothpick poked in the center comes out with just a few moist crumbs. Let this chocolatey base cool completely on a wire rack. This patience is key for a perfect slice later.
Pro tip: Rushing this step will cause your mint cream filling to melt! Let the brownie cool for at least an hour.
Step 2: Craft the Dreamy Mint Filling
Now, for the star of the show! In a large bowl, beat the softened cream cheese and sour cream together until perfectly smooth and lump-free. In another chilled bowl, take your heavy cream and powdered sugar. Whip them together until you see beautiful, stiff peaks form. This creates the cloud-like texture. Now, gently fold the whipped cream and the refreshing peppermint extract into the cream cheese mixture. Use a big spatula and fold slowly to keep all that lovely air in the mixture. You’ll end up with a fluffy, pale green filling that smells amazing.
Step 3: Assemble Your Masterpiece
Time to bring it all together! Take your completely cooled brownie base. Spoon the mint cream filling on top, spreading it gently all the way to the edges. Use an offset spatula or the back of a spoon to create a beautifully smooth, level top. Now, the hard part—waiting! Carefully place the whole pan in the refrigerator. Let it chill and set for at least 4 hours, though overnight is truly best. This rest allows the flavors to mingle and the filling to firm up perfectly.
Step 4: Create the Shiny Chocolate Topping
Just before serving, make your simple chocolate ganache. Place the chopped chocolate and butter in a microwave-safe bowl. Heat in 20-second bursts, stirring well after each, until the mixture is melted and silky smooth. Let it cool for just a couple of minutes so it thickens slightly. Then, take a spoon and drizzle the glossy chocolate artistically over the chilled cheesecake top. You can make elegant swirls or a simple criss-cross pattern. This step adds that final layer of rich, decadent flavor.
Step 5: Garnish, Slice, and Enjoy!
The fun finale! Scatter a few fresh, bright green mint leaves over the chocolate drizzle. Then, add some delicate chocolate shavings or curls for extra texture and wow-factor. To slice, run a thin, sharp knife under hot water, wipe it dry, and make clean cuts. Serve each gorgeous slice on a plate. Watch your friends and family take that first bite of cool mint, creamy filling, and fudgy brownie. Their smiles are the best reward!
Chef’s tip: For ultra-clean slices, clean your knife with hot water between each cut.
Your Cheesecake Timeline
Good things take a little time, but active work is minimal!
- Prep Time: 20 minutes
- Bake Time: 25 minutes
- Cooling & Chilling Time: At least 5 hours (1 hour cool, 4+ hours chill)
- Total Time: About 5 hours 45 minutes (mostly hands-off chilling)
A Secret From My Kitchen
My secret trick is all in the peppermint extract. I always use pure peppermint extract, not mint extract. Peppermint gives that classic, clean “candy cane” flavor, while mint can sometimes taste more like spearmint gum. It makes all the difference for that nostalgic, festive taste!
A Fun Fact About Mint & Chocolate
Did you know the mint-chocolate combo is older than you think? In the 19th century, candymakers discovered that mint oil helped mask the bitter flavors in early, low-quality chocolate. What started as a practical fix became one of the world’s most beloved flavor pairings! We’re just carrying on a delicious tradition.
Necessary Kitchen Tools
You likely have most of these already!
- 9-inch springform pan
- Mixing bowls (2-3)
- Electric mixer or whisk
- Spatula (rubber or silicone)
- Wire cooling rack
- Microwave-safe bowl
- Measuring cups and spoons
Storing Your Mint Chocolate Bliss Cheesecake
This cheesecake needs to stay chilled. Keep it covered in the springform pan or on a cake stand with a lid in the refrigerator. It will stay fresh and perfect for up to 4 days. The brownie base may get a little denser from the fridge’s moisture, but it will still taste fantastic.
For longer storage, you can freeze the whole cheesecake or individual slices. Wrap it tightly in plastic wrap, then aluminum foil to prevent freezer burn. It can last in the freezer for up to 2 months. When you’re ready to enjoy, thaw it overnight in the refrigerator.
Always serve it cold! If it sits out at room temperature for more than an hour, the creamy filling can start to soften too much. For the best texture and flavor, take it out of the fridge just before slicing and serving.
Helpful Tips for Cheesecake Success
- Soften Completely: Ensure your cream cheese is very soft. This prevents lumps in your smooth filling.
- Chill Your Bowl: For the best whipped cream, chill your mixing bowl and beaters in the freezer for 10 minutes before starting.
- Fold Gently: When combining the whipped cream with the cream cheese, fold slowly and gently to keep the filling light and airy.
- Patience Pays: Do not skip the full chilling time. It’s essential for a clean slice.
Presentation Ideas to Impress Your Guests
Make your dessert table shine!
- Place each slice on a drizzle of chocolate sauce or a pool of mint creme anglaise.
- Add a small scoop of vanilla ice cream or chocolate gelato on the side.
- For a holiday look, use crushed candy canes alongside the chocolate curls for garnish.
- Serve on simple white plates to let the beautiful green and brown layers pop.
Healthier Twists on the Recipe
Love the idea but want a lighter version? Try these easy swaps:
- Gluten-Free Brownie Bliss: Use a certified gluten-free brownie mix for the base. All other ingredients are naturally gluten-free.
- Vegan Mint Chocolate Dream: Use a vegan brownie mix, vegan cream cheese, coconut cream instead of heavy cream, and dairy-free chocolate.
- Low-Sugar Option: Choose a sugar-free brownie mix and use a sugar substitute suitable for baking in the filling. Opt for a very dark, low-sugar chocolate for the topping.
- Protein-Packed Version: Look for a high-protein brownie mix. Blend a scoop of chocolate or vanilla protein powder into the cream cheese mixture for an extra boost.
- Different Flavor Infusions: Swap the peppermint for orange extract and add some zest for a “Chocolate Orange” version, or use almond extract for a nostalgic flavor.
- Crust Variations: Instead of a brownie base, use a pre-made chocolate cookie crust or a mint-chocolate chip cookie base for a different texture.
Common Mistakes to Avoid
Steer clear of these pitfalls for a perfect cheesecake every time.
Mistake 1: Using a Warm Brownie Base
This is the biggest error! Adding the cool, creamy filling onto a warm or even slightly warm brownie will cause a meltdown—literally. The heat will melt the whipped cream, making the filling soupy and preventing it from setting. It can also make the layers separate. Always, always let your brownie base cool to room temperature. I even pop mine in the fridge for 30 minutes after it’s cooled on the counter to be extra sure.
Mistake 2: Overbeating or Underbeating the Cream
The texture of your filling depends on perfectly whipped cream. Underbeaten cream is too soft and won’t hold the structure, leading to a runny cheesecake. Overbeaten cream becomes grainy and can turn into butter, making your filling lumpy and greasy. You want stiff peaks that hold their shape when you lift the beaters. A pro tip is to whip on medium-high speed and stop to check often once it starts thickening.
Mistake 3: Skipping the Long Chill Time
Impatience is your enemy here. Four hours is the minimum. The filling needs this time to set firm enough to slice cleanly. If you cut into it too early, it will ooze and the layers will smear. For the absolute best texture and cleanest slices, let it chill overnight. The wait is worth it, I promise! Plan your baking schedule with this in mind.
Mistake 4: Using the Wrong Pan
A springform pan is non-negotiable for this recipe. The removable sides are what allow you to cleanly release the tall, layered cheesecake without destroying it. Trying to use a regular cake pan will end in frustration when you try to get the first piece out. If you don’t own one, they are a great investment for cheesecakes and tarts.
Frequently Asked Questions
Can I make this cheesecake ahead of time?
Absolutely! This dessert is perfect for making ahead. In fact, I highly recommend it. You can bake the brownie base one day, let it cool, cover it, and leave it at room temperature overnight. The next day, make the filling, assemble, and chill. Or, you can assemble the entire cheesecake up to two days before your event. Just keep it covered in the refrigerator. The flavors even improve with a little extra time to meld together.
What can I use if I don’t have peppermint extract?
If you’re out of peppermint extract, you have a couple of options. You could use mint extract, but remember the flavor will be different—more like spearmint gum. Crushing peppermint candies or candy canes won’t give you a strong enough flavor for the filling, but they make a great garnish. For a different twist, you could substitute the peppermint with vanilla extract for a classic chocolate-vanilla cheesecake, or use almond extract for a chocolate-almond delight.
My filling seems too runny. What did I do wrong?
A runny filling usually points to one of two issues. First, your brownie base might have been too warm when you added the filling. Second, your heavy cream might not have been whipped to stiff enough peaks. If you catch this before chilling, you can try to salvage it by whipping a little more cream separately and folding it in. If it’s already chilling, just give it more time—often, a full overnight chill will fix a slightly soft filling.
Can I freeze Mint Chocolate Brownie Bliss Cheesecake?
You sure can! Freeze it whole or in individual slices. Wrap it tightly in plastic wrap, then in foil to prevent freezer burn. It will keep for 1-2 months. Thaw it overnight in the refrigerator before serving. The texture of the creamy filling may change slightly, but it will still taste delicious. I recommend adding the chocolate drizzle and fresh garnish after thawing for the best look.
Why did my brownie base get soggy?
This happens if the filling is put on a warm brownie, as the steam gets trapped. Also, if the cheesecake is stored for many days, moisture from the filling can slowly seep into the brownie. To prevent this, ensure the brownie is completely cool. For long storage, you can also brush a thin layer of melted chocolate onto the cooled brownie before adding the filling. This creates a moisture barrier.
Is it okay to use a homemade brownie recipe?
Of course! Using your favorite homemade brownie recipe is a wonderful idea. Just bake it in the same 9-inch springform pan. Make sure the recipe yields a fairly dense, fudgy brownie rather than a cakey one, as it needs to support the heavy filling. Adjust the bake time as needed until a toothpick comes out with moist crumbs.
How do I get clean, professional-looking slices?
The secret is a hot, clean knife. Fill a tall glass with very hot water. For each slice, dip a sharp, thin-bladed knife into the water, wipe it dry with a towel, and then make a smooth, confident cut. Repeat this process for every slice. The heat helps the knife glide through the creamy filling and fudgy base without sticking or dragging.
Can I add chocolate chips to the mint layer?
Yes, but with a small trick! Toss ½ cup of mini chocolate chips in a teaspoon of flour or cocoa powder. This helps prevent them from sinking to the bottom of the filling. Gently fold them in at the very end, just before you spread the filling over the brownie base. Mini chips work better than regular-sized ones for a more even distribution.
My chocolate topping is too thick/hard. How can I fix it?
If your chocolate and butter mixture cools too much before drizzling, it can become thick and clumpy. Simply reheat it for 5-10 seconds in the microwave and stir vigorously. If it’s too thick, you can also add a tiny dab (½ teaspoon) of vegetable oil or more butter to make it more fluid. For a thinner, more pourable topping, you can add a tablespoon of warm heavy cream to the melted chocolate and butter.
How long can the finished cheesecake sit out at a party?
Because of the dairy-heavy filling, it’s best not to leave it out for more than 1 hour, especially in a warm room. To keep it safe and at the perfect cool, creamy texture, serve it directly from the fridge. You can place the whole cheesecake or individual slices on a chilled platter or nestle the serving dish in a larger bowl filled with ice.
Your Turn to Create Bliss
This Mint Chocolate Brownie Bliss Cheesecake is more than just a recipe. It’s a conversation starter, a celebration centerpiece, and a surefire way to make someone’s day sweeter. It combines the joyful ease of a box mix with the impressive flair of a gourmet dessert. So, gather your ingredients, put on some fun music, and treat yourself (and your loved ones) to this cool, creamy, and utterly indulgent creation. I can’t wait for you to experience the bliss. Happy baking!
Mini Banana Cream Pies
Ingredients
Equipment
Method
- Preheat your oven to 350°F (175°C).
- Prepare brownie batter according to the package directions.
- Pour the brownie batter into a 9-inch springform pan lined with parchment paper and smooth the top.
- Bake for 20-25 minutes until a toothpick comes out with a few moist crumbs.
- Let the brownie base cool completely on a wire rack for at least an hour.
- In a large bowl, beat softened cream cheese and sour cream until smooth.
- In another chilled bowl, whip heavy cream and powdered sugar together until stiff peaks form.
- Gently fold the whipped cream and peppermint extract into the cream cheese mixture.
- Spoon the mint cream filling over the cooled brownie base and smooth the top with a spatula.
- Cover and refrigerate for at least 4 hours (overnight is best).
- To make the chocolate topping, melt chopped chocolate and butter in a microwave-safe bowl in 20-second bursts, stirring until silky smooth.
- Let the chocolate ganache cool slightly and then drizzle over the cheesecake.
- Garnish with fresh mint leaves and chocolate shavings or curls before serving.
- Slice with a knife dipped in hot water for clean cuts and serve chilled.