You know that magical moment when the first bite of fried chicken hits your taste buds? The crunch, the savory juice, the absolute comfort? Now, imagine that moment, but a thousand times more flavorful. That’s what happened in my kitchen last Sunday. I was craving something crispy, but I also had a tub of yellow miso paste staring at me from the fridge. A little experiment later, and my family declared this Miso Fried Chicken the winner of all our fried chicken adventures. It’s not just fried chicken; it’s an umami explosion wrapped in a golden, shatteringly crisp crust.
The Story Behind Miso Fried Chicken
While fried chicken has roots all over the world, from the American South to Korean yangnyeom chicken, this recipe is a beautiful fusion. It takes the soul-warming crunch we all love and marries it with the deep, fermented savoriness of Japanese miso. I first had a version of this at a tiny Izakaya bar, and I was hooked. The miso doesn’t shout; it hums in the background, adding a complex, savory layer that makes you go, “What *is* that amazing flavor?” My version brings that restaurant magic home, using easy-to-find ingredients. It’s a testament to how a simple pantry staple can transform a classic dish into something spectacularly new and exciting.
Why This Miso Chicken Recipe Will Be Your New Favorite
You will adore this recipe for three big reasons. First, the flavor is insane—salty, sweet, tangy, and utterly addictive. Second, the miso marinade acts like a flavor tenderizer, keeping the chicken incredibly juicy even after frying. And third, it’s surprisingly fun to make! Coating the sticky, marinated pieces in the dry mix feels like a little kitchen craft project. It’s the perfect dish to impress guests or treat your family to a “fakeaway” night that’s far better than any takeout.
When to Whip Up This Crispy Delight
This chicken is a crowd-pleaser for any event. It’s fantastic for casual weekend dinners, game day spreads where you want to be the MVP, or even a fun Friday night with movies. I love setting up a DIY bar with the miso mayonnaise, pickled ginger, and extra herbs, letting everyone build their perfect bite. It turns a simple meal into an interactive, memorable experience.
Gathering Your Ingredients
Here’s everything you’ll need to create this umami masterpiece. I promise, the list looks longer than it is!
- For the Chicken: 1 cup (110g) yellow miso paste, 1 tbsp finely grated ginger, 2 garlic cloves (crushed), ¼ cup (60ml) mirin, 2 tbsp rice vinegar, 800g skinless chicken thighs (cut into 2cm strips), Vegetable oil (for frying), 1 cup (150g) cornflour (cornstarch), 1 cup (110g) self-raising flour, ½ tsp cayenne pepper (for sprinkling), Baby mint or micro herbs (optional, for garnish), Pickled ginger (to serve).
- For the Miso Mayo: ⅔ cup (150g) Japanese mayonnaise, 1 tsp hot English mustard, 2 tsp yellow miso paste, 1 tsp rice vinegar.
No Mirin? No Problem! Handy Substitutions
- Mirin: Combine 1 tbsp sake or dry white wine with 1 tsp sugar for every 1 tbsp of mirin. It won’t be identical, but it adds that sweet tang.
- Yellow Miso Paste: White miso is milder and sweeter, while red miso is saltier and stronger. Both work! Start with a little less if using red miso.
- Self-Raising Flour: Make your own by adding 1 ½ tsp baking powder to 1 cup of all-purpose flour.
- Chicken Thighs: Boneless, skinless chicken breast works, but be extra careful not to overcook it, as thighs are more forgiving and juicy.
- Japanese Mayo: Regular mayo mixed with a tiny squeeze of lemon juice or rice vinegar works in a pinch.
Crafting Your Miso Fried Chicken: A Step-by-Step Journey
Step 1: The Flavor Soak (Marinating)
Get a large mixing bowl. In goes the glorious yellow miso paste, the fragrant grated ginger, the crushed garlic, the sweet mirin, and the tangy rice vinegar. Whisk it all together until it’s a smooth, thick, caramel-colored sauce. Now, add your chicken strips and use your hands (gloves are handy here!) to massage every piece, ensuring it’s fully coated in that savory mud. Cover the bowl with plastic wrap and let it sit in the fridge for 30 minutes. This chill time lets the flavors sink in. Then, take it out and let it sit on the counter for another 30 minutes. This brings the chicken closer to room temperature for even cooking. Pro tip: The marinade will be thick and sticky—that’s perfect! It’s packed with flavor.
Step 2: Heating the Oil for Perfect Frying
While the chicken rests, pour your vegetable oil into a large, heavy-bottomed pot or Dutch oven. You want it filled about two-thirds of the way up. Heat it over a medium flame. This part is crucial for the perfect crisp. Use a deep-fry or candy thermometer and wait for it to hit 180°C (350°F). If you don’t have a thermometer, test with a small cube of bread; it should turn golden brown in about 15 seconds.
Step 3: Creating the Crispy Magic Coat
In another bowl, it’s time to make the dredge. Simply combine the self-raising flour and the cornflour. The cornflour is the secret to an extra light and crispy texture. Working with a few pieces at a time, take the marinated chicken (it will be very sticky) and toss it firmly in the flour mixture. Press the flour onto the chicken to create lots of craggy bits—those craggies become the best, crunchiest parts after frying.
Step 4: The Big Fry
Your oil is hot and ready! Gently lower your first batch of coated chicken into the oil. Don’t overcrowd the pot; fry in batches to keep the oil temperature steady. You’ll hear that glorious sizzle. Fry for 2 to 3 minutes, until each piece is a deep, golden brown and cooked through. Use a slotted spoon or tongs to transfer them to a wire rack set over a baking sheet, or onto paper towels. Let the oil come back to temperature between batches. The smell in your kitchen will be absolutely heavenly.
Step 5: Whipping Up the Miso Mayo Dip
While the chicken is frying or resting, make the dip. In a small bowl, stir together the Japanese mayonnaise, the hot English mustard, the extra miso paste, and the rice vinegar. Keep stirring until it’s completely smooth and a lovely pale tan color. Taste it and do a happy dance. It’s creamy, tangy, and packed with umami.
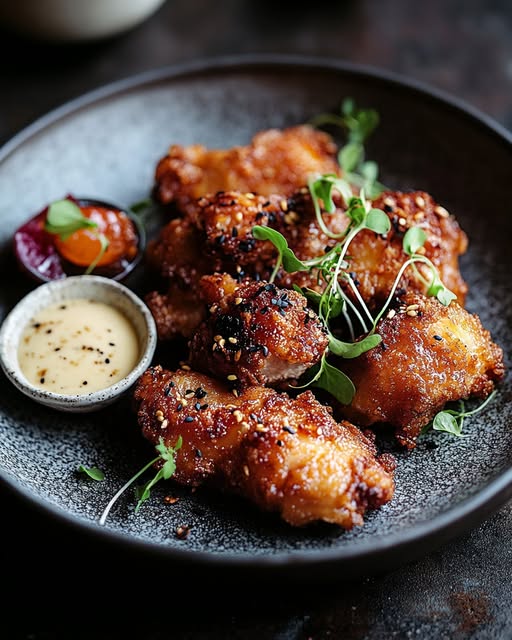
Step 6: The Grand Finale (Serving)
Place all your gorgeous, golden miso fried chicken pieces on a large platter. Give them a light, final sprinkle of cayenne pepper for just a hint of warmth and a pop of color. Serve immediately with bowls of the miso mayonnaise, little piles of pink pickled ginger, and a scattering of fresh mint leaves if you have them. The cool, pickled ginger is the perfect palate cleanser between each delicious, crunchy bite. Chef’s tip: For an extra show-stopping touch, serve the chicken in a basket lined with parchment paper, with the dip in a small ceramic bowl on the side.
Timing is Everything
Let’s break down the clock so you can plan your cooking adventure smoothly:
- Prep Time: 20 minutes (plus 1 hour marinating/resting)
- Cook Time: 10-15 minutes (in batches)
- Total Time: About 1 hour 30 minutes.
Remember, the marinating time is mostly hands-off, so you can do other things!
Chef’s Secret for Ultimate Crispiness
The real secret is in the double-starch dredge. Using a 50/50 mix of self-raising flour and cornflour is a game-changer. The self-raising flour gives a little lift and airiness, while the cornflour creates that incredibly fine, shattering crisp we all dream about. Don’t skip it!
A Little Extra Miso Knowledge
Miso is a fermented paste usually made from soybeans, salt, and koji (a type of mold). The longer it ferments, the darker and stronger it becomes. Yellow miso, or shinshu miso, is fermented for a shorter time, giving it a mild, slightly sweet flavor that’s perfect for marinades and dressings without overwhelming the dish.
Tools You’ll Need in Your Kitchen Arsenal
- A large, heavy-bottomed pot or Dutch oven (for safe frying)
- A deep-fry/candy thermometer (highly recommended)
- A wire rack and baking sheet (for draining)
- Several mixing bowls
- Whisk and slotted spoon/tongs
-

Miso Fried Chicken
Miso Fried Chicken recipe with an umami-packed marinade and shatteringly crisp crust. Easy steps for juicy, golden chicken with a creamy miso mayo dip. Your new favorite fried chicken.Ingredients
Equipment
Method
- In a mixing bowl, whisk together yellow miso paste, grated ginger, crushed garlic, mirin, and rice vinegar until smooth.
- Add chicken strips and massage them into the marinade. Cover and refrigerate for 30 minutes, then let sit at room temperature for another 30 minutes.
- Heat vegetable oil in a pot or Dutch oven until it reaches 180°C (350°F).
- In another bowl, combine self-raising flour and cornflour for the dredge.
- Toss marinated chicken pieces in the flour mixture, pressing flour onto the chicken to create craggy bits.
- Fry chicken in batches for 2 to 3 minutes until golden brown and cooked through. Drain on a wire rack or paper towels.
- In a small bowl, stir together Japanese mayonnaise, English mustard, yellow miso paste, and rice vinegar until smooth.
- Serve fried chicken on a platter, sprinkled with cayenne pepper, and accompany with miso mayonnaise and pickled ginger.
Nutrition
Calories: 380kcalCarbohydrates: 30gProtein: 25gFat: 18gSaturated Fat: 3gPolyunsaturated Fat: 2gMonounsaturated Fat: 12gCholesterol: 90mgSodium: 980mgPotassium: 550mgFiber: 1gSugar: 2gVitamin A: 5IUVitamin C: 2mgCalcium: 4mgIron: 10mgNotes
The miso marinade adds incredible flavor and helps keep the chicken juicy. Feel free to experiment with the types of miso you use! If you don't have mirin, you can substitute it with a mix of sake or dry white wine with sugar. For an extra crispy texture, don’t skip on the double-starch dredge! This dish is perfect for gatherings, and setting up a DIY bar with dipping sauces and garnishes makes it interactive and fun! Leftover fried chicken can be stored in the fridge for up to 2 days and reheated in an oven to maintain crispiness.Tried this recipe?Let us know how it was!Contents hide