Last winter, my daughter came home from a friend’s house raving about this amazing dessert she’d tried. She kept saying, “Mom, it was like chocolate cake, but when you cut into it, melted peanut butter just poured out!” I knew right then I had to recreate that magic in my own kitchen. After a few tries and some happy taste-testers, I perfected my version of the Peanut Butter Chocolate Lava Cake. Now it’s become our go-to dessert for birthdays, date nights, and those moments when we just need something special.
This dessert brings together two of the best flavors on earth: rich, dark chocolate and smooth, creamy peanut butter. The outside bakes up like a soft, tender cake while the inside stays molten and gooey. When you break into it with your spoon, warm peanut butter filling flows out like liquid gold. It’s pure comfort in a ramekin.
Why Peanut Butter Chocolate Lava Cake is a Must-Try Dessert
I love traditional chocolate lava cakes, but adding peanut butter takes them from great to unforgettable. The chocolate peanut butter lava cake gives you that amazing contrast of temperatures and textures. You get the warm, slightly crispy edges of the cake meeting the hot, flowing center. It’s like getting a hug from the inside out.
This dessert works perfectly for special occasions. I’ve made it for Valentine’s Day dinners, anniversary celebrations, and even served it at a small dinner party where it completely stole the show. My guests couldn’t stop talking about it. One friend even texted me the next day asking for the recipe.
But here’s what I really love: you don’t need a special reason to make this dessert. Sometimes a regular Saturday night deserves something extraordinary. The peanut butter chocolate lava cake recipe comes together faster than you’d think. From start to finish, you’re looking at about 30 minutes, including baking time. That’s less time than it takes to watch your favorite show.
The beauty of this chocolate cake with peanut butter filling is how impressive it looks and tastes, yet it’s actually quite simple to make. People will think you spent hours in the kitchen. I like to keep that secret to myself and just accept the compliments.
The Popularity of Chocolate Peanut Butter Lava Cake
This dessert has been making waves everywhere. If you’ve watched the Great British Bake Off, you might have seen contestants tackle their own versions of molten cakes. The chocolate peanut butter lava cake Great British Bake Off inspired many home bakers to try their hand at this showstopper dessert. Seeing it on such a popular baking show really brought it into the spotlight.
The Pioneer Woman chocolate peanut butter lava cake version also gained tons of fans. Ree Drummond has a way of making recipes feel approachable and doable. Her take on this dessert helped prove that you don’t need to be a professional pastry chef to create something this special.
I’ve noticed more restaurants adding lava cakes with peanut butter to their menus. Food blogs are filled with different variations. Some people make a vegan peanut butter lava cake using plant-based ingredients. Others create peanut butter lava cookies for a portable version. There’s even a peanut butter lava cake HelloFresh meal kit option for those who like having ingredients delivered right to their door.
What I find interesting is how this dessert appeals to so many different people. Kids love it because, well, it’s chocolate and peanut butter. Adults appreciate the sophisticated presentation and rich flavors. My husband, who’s not usually a dessert person, asks me to make this regularly.
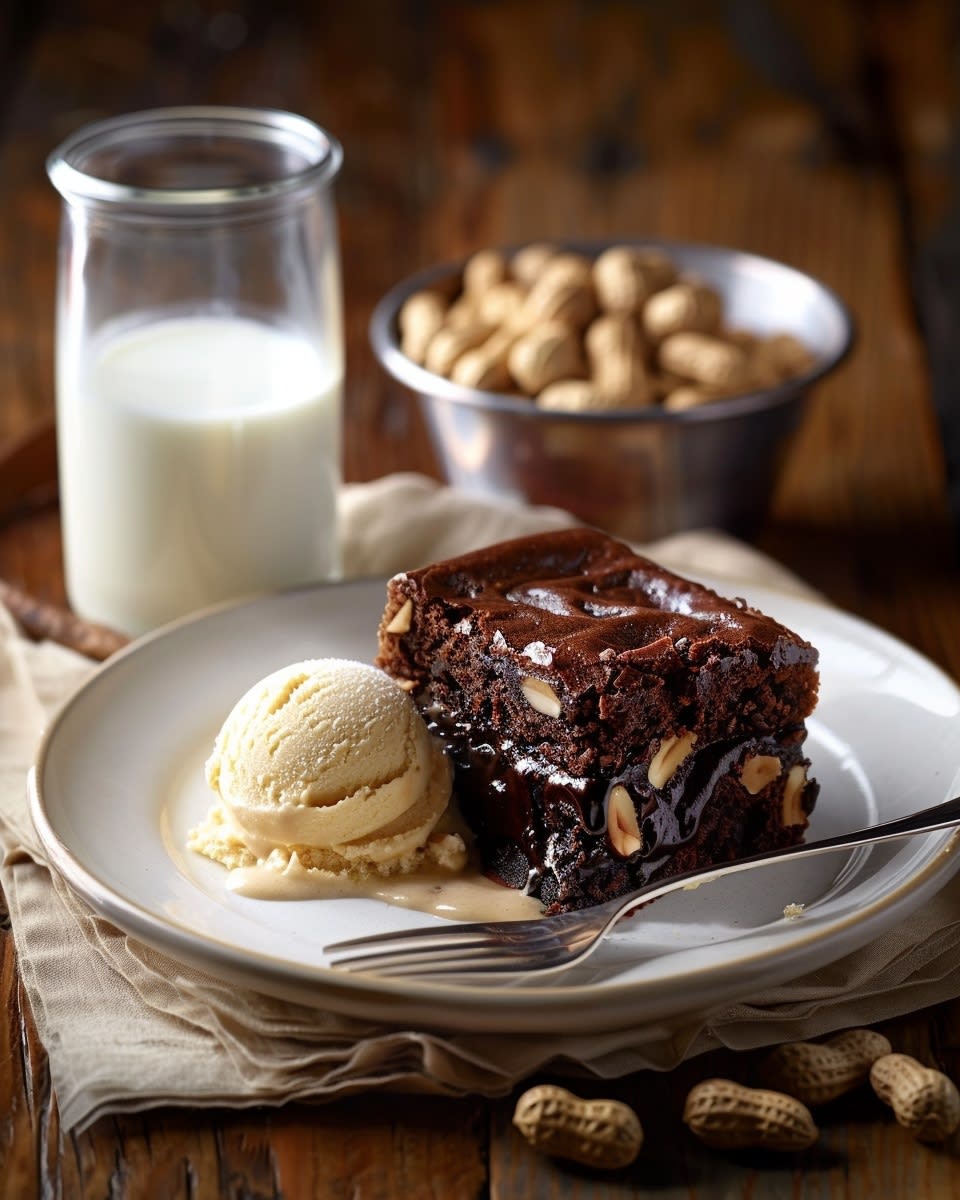
If you’re cooking for just two people, you can easily scale this down. A chocolate peanut butter lava cake for 2 makes for an incredibly romantic dessert. I’ve made it for my husband and me on quiet Friday nights when the kids are at sleepovers. We eat them fresh from the oven with a scoop of vanilla ice cream on top.
Ingredients and Tools You’ll Need
Let me walk you through what you’ll need to create this peanut butter chocolate cake masterpiece. The ingredient list is shorter than you might expect. That’s one reason I love this recipe so much.
For the chocolate cake base, you’ll need:
- Dark chocolate chips or chopped chocolate (about 6 ounces)
- Butter (half a stick works perfectly)
- Two eggs plus two egg yolks
- Granulated sugar (a quarter cup)
- All-purpose flour (just two tablespoons)
- A pinch of salt
- Vanilla extract for flavor depth
For the peanut butter filling, you’ll need:
- Creamy peanut butter (I prefer the regular kind, not natural)
- Powdered sugar
- A tiny splash of milk or cream
I always use good quality chocolate for this recipe. It makes a real difference in the final taste. You don’t need to buy the most expensive brand, but skip the cheap stuff. Something in the middle range works great.
For peanut butter, I stick with conventional creamy peanut butter like Jif or Skippy. Natural peanut butter can be too oily and might not set up properly in the center. Save the fancy natural stuff for your morning toast.
Essential tools you’ll need:
- Four ramekins (6-ounce size works best)
- A microwave-safe bowl or double boiler for melting chocolate
- Mixing bowls (one medium, one small)
- A whisk or electric mixer
- Cooking spray or butter for greasing
- A baking sheet to hold the ramekins
Ramekins are key here. They’re those small, round ceramic dishes you see in restaurants. I picked up a set of four at a kitchen store for about fifteen dollars. They’ve lasted me years and I use them for other desserts too, like creme brulee or individual cobblers.
If you don’t have ramekins, you can use large muffin tins in a pinch. The baking time will be slightly shorter, so watch them carefully. I’ve done this when making a bigger batch for a party.
Having everything measured and ready before you start makes the process so much smoother. I like to prep my peanut butter filling first and pop it in the fridge while I work on the chocolate batter. This helps it firm up a bit, making it easier to work with when you’re assembling the cakes.
One tool I almost forgot to mention: an ice cream scoop. It’s perfect for portioning the peanut butter filling into equal amounts. This way, each cake gets the same amount of that gooey center. Nobody fights over who got more peanut butter that way.


Step-by-Step Guide to Making Peanut Butter Chocolate Lava Cake
Now that you’ve got all your ingredients lined up and your tools ready, let’s get into the actual making of this incredible dessert. I promise you, the process is way easier than it looks.
Start by preheating your oven to 425 degrees Fahrenheit. I know that seems hot, but trust me on this. The high heat creates that perfect contrast between the set outer cake and the molten center. While the oven heats up, generously butter your ramekins. Don’t skip this step or skimp on the butter. I learned this the hard way when one of my cakes stuck to the ramekin and fell apart. My husband still ate it with a spoon directly from the dish, but presentation matters when you’re trying to impress.
After buttering, dust each ramekin with a little cocoa powder or granulated sugar. This creates an extra non-stick layer and adds a nice touch to the edges. Place your prepared ramekins on a baking sheet. This makes them easier to move in and out of the oven without burning yourself.
Here’s where the magic starts. Combine your chocolate and butter in a microwave-safe bowl. I microwave them in 30-second bursts, stirring between each one, until everything’s smooth and glossy. The whole process takes maybe two minutes. If you’re more traditional and prefer a double boiler, that works too. I’m just usually in a hurry and the microwave method has never failed me.
While that chocolate mixture cools slightly, make your peanut butter filling. Mix together about half a cup of creamy peanut butter with two tablespoons of powdered sugar and a tiny splash of milk. You want it smooth but thick enough to hold its shape. I use a fork to mash it all together until it’s well combined. Then scoop out four equal portions and roll them into balls. Pop these in the freezer for about ten minutes. This step is crucial for getting that perfect molten center because the cold peanut butter filling takes longer to heat through than the surrounding cake batter.
By the way, if you’re someone who loves trying different flavor combinations, you might also enjoy experimenting with triple chocolate brownies that use similar melting techniques.
Back to the chocolate batter. In a mixing bowl, whisk together your eggs, egg yolks, and sugar until the mixture becomes pale and slightly thick. This takes about two minutes with an electric mixer or three to four minutes by hand. I won’t lie, my arm gets tired doing it manually, but sometimes I do it anyway for the extra workout. Add your slightly cooled chocolate mixture to the eggs and whisk until combined. The batter should look smooth and silky.
Sift in your flour and salt. I know sifting feels like an extra step, but it prevents lumps and makes the final cake texture incredible. Fold everything together gently with a spatula. Don’t overmix here. You want to combine the ingredients just until you don’t see any more flour streaks.
Here comes the fun assembly part. Spoon about two tablespoons of batter into the bottom of each prepared ramekin. Take your chilled peanut butter balls and place one in the center of each ramekin. Don’t push them down. Just set them on top of that first layer of batter. Then cover each peanut butter ball completely with the remaining chocolate batter. Make sure the peanut butter is fully enclosed or it might leak out during baking.
The peanut butter chocolate lava cake recipe timing is critical. Bake for exactly 12 to 14 minutes. Your kitchen will smell absolutely amazing during this time. The edges should look set and slightly pulling away from the sides of the ramekins, but the centers should still jiggle just a tiny bit when you gently shake the pan. That little jiggle tells you the center is still molten. If you overbake them even by a minute or two, you’ll end up with regular chocolate cakes instead of lava cakes. Still delicious, but not what we’re going for.
Let them cool for exactly one minute after removing from the oven. Not two minutes, not thirty seconds. One minute. I set a timer because I’ve gotten distracted before and waited too long. During this minute, the cakes set up just enough to unmold without falling apart, but the centers stay gloriously gooey.
To serve, run a thin knife around the edge of each ramekin. Place a dessert plate upside down on top of the ramekin, then quickly flip the whole thing over. Give the ramekin a gentle tap and lift it off. The cake should slide right out. The first time I did this successfully, I felt like a professional pastry chef. My kids even clapped.
Serve immediately. This dessert waits for no one. I like to dust mine with powdered sugar and add a scoop of vanilla ice cream on the side. The cold ice cream melting into the warm cake is perfection. Fresh berries work great too if you want something a little lighter alongside all that richness. Sometimes I’ll make a batch of strawberry shortcake dessert cups earlier in the day so guests have options.
Variations and Adaptations
The beautiful thing about this dessert is how adaptable it is. I’ve played around with different versions depending on who I’m cooking for and what’s happening in my life.
Hello Fresh Peanut Butter Lava Cake
Funny enough, my sister introduced me to the peanut butter lava cake HelloFresh option when she was going through a particularly busy season at work. She didn’t have time to grocery shop but still wanted to make something special for her husband’s birthday. The meal kit version comes with pre-measured ingredients and simplified instructions. Everything arrives at your door in the right portions.
I tried it myself one month when I was juggling too many things and honestly, it turned out great. The recipe they provide is slightly different from mine, but the concept is the same. If you’re new to making lava cakes or just want the convenience of not having to measure anything, the HelloFresh version is a solid choice. It takes away any guesswork.
Peanut Butter Lava Cake for Two
Making a chocolate peanut butter lava cake for 2 is actually my most frequent version. My husband and I are empty nesters these days, and making four cakes when it’s just us feels like too much. Well, maybe not too much because we’d probably eat them all, but you know what I mean.
Simply cut the entire recipe in half. Use one whole egg and one egg yolk. Everything else gets halved too. The baking time stays the same, maybe even a minute less depending on your oven. I’ve made this version for anniversary dinners, Valentine’s Day, or just because it’s Tuesday and we deserve something nice.
This smaller batch works perfectly when you want something decadent without leftovers tempting you from the fridge. Though honestly, these cakes don’t really work as leftovers anyway. They’re truly best served fresh from the oven.
Vegan Peanut Butter Lava Cake
My daughter went vegan last year, which sent me on a mission to adapt some of our favorite recipes. Creating a vegan peanut butter lava cake took some trial and error, but I finally cracked it.
Replace the butter with vegan butter or coconut oil. Use dairy-free chocolate chips. Instead of eggs, I use a combination of aquafaba (the liquid from a can of chickpeas) and a little cornstarch. Two tablespoons of aquafaba plus one tablespoon of cornstarch replaces each egg. For the two egg yolks, I add an extra tablespoon of aquafaba with half a tablespoon of cornstarch.
The texture is slightly different from the traditional version, a bit more delicate, but the molten center still works beautifully. Make sure your peanut butter is vegan friendly too. Most regular brands are, but some contain honey or other animal products.
The vegan version bakes at the same temperature but might need an extra minute in the oven. Keep an eye on that jiggle test I mentioned earlier.
Creative Twists and Complementary Treats
Peanut Butter Lava Cookies
Here’s something fun I discovered by accident. Peanut butter lava cookies happened when I had leftover batter one time and no more ramekins. I dropped spoonfuls of the chocolate batter onto a cookie sheet with frozen peanut butter pieces in the center and baked them for about 8 minutes at 350 degrees.
They came out as these incredible cookies with gooey centers. Not quite as dramatic as the cake version, but way more portable. I made them for my son’s bake sale at school and they sold out in fifteen minutes. Parents were asking for the recipe.
The cookie version is more forgiving than the cake too. If you slightly overbake them, they’re still good. Just a little less molten. My kids love taking these in their lunch boxes, though I warn them to eat carefully because the center can still be pretty gooey.
Pairing with Other Desserts
When I’m hosting a dinner party, I like offering dessert options. Not everyone loves chocolate, though I don’t understand those people. Setting up a dessert spread makes everything feel more special and gives guests choices.
I’ll make my lava cakes alongside something lighter and fruitier. Banana pudding icebox cake is a favorite pairing because it’s cool and creamy while the lava cakes are warm and rich. The contrast works really well.
For a more elegant spread, I’ve served these with classic New York cheesecake bars cut into small pieces. The tangy cheesecake balances the sweet richness of the chocolate peanut butter combination.
Coffee is essential when serving lava cakes. The slight bitterness cuts through all that chocolate and peanut butter. I usually brew a fresh pot right before dessert time. Some guests prefer a glass of cold milk, which is perfectly acceptable too. My father-in-law insists on milk with any chocolate dessert and I respect that dedication.
One thing I’ve learned over the years is that presentation matters almost as much as taste. I serve these on white plates so the dark chocolate really stands out. A small mint leaf on top adds a pop of color. Edible flowers work too if you’re feeling fancy. My neighbor grows them and gives me some whenever I’m hosting something special.


FAQs About Peanut Butter Chocolate Lava Cake
Over the years of making this dessert, I’ve gotten so many questions from friends, family, and readers who’ve tried the recipe. Let me answer the ones that come up most often. These are things I wish someone had told me when I first started making lava cakes.
Q: Can I make this cake ahead of time?
Here’s the thing about lava cakes—they’re really best fresh from the oven. That warm, flowing center is what makes them special. However, I totally understand that timing can be tricky when you’re hosting a dinner party. What I do is prepare the batter and fill the ramekins completely, then cover them with plastic wrap and refrigerate for up to 24 hours before baking. When your guests are finishing their main course, pop the cold ramekins straight into a preheated oven. They’ll need an extra two to three minutes of baking time since they’re starting cold. I’ve done this dozens of times and it works perfectly. The assembled unbaked cakes can also be frozen for up to a month, which is honestly a lifesaver. Just add about five extra minutes to the baking time if you’re going from freezer to oven.
Q: What if I don’t have ramekins?
Don’t let a lack of ramekins stop you from making this peanut butter chocolate lava cake. I’ve successfully used muffin tins, small oven-safe coffee cups, and even those little mason jars made for baking. The key is using something that holds about six ounces of liquid. Custard cups work great too. If you’re using muffin tins, butter and flour them really well. The baking time will be shorter, usually around 8 to 10 minutes, so watch them closely. My neighbor made these in her jumbo muffin tin once and they turned out beautifully. Whatever container you choose, just make sure it’s oven-safe up to 425 degrees. I learned this lesson when I almost used a mug that had metallic trim on it.
Q: Is there a way to make this cake gluten-free?
Absolutely, and it’s easier than you might think. Since this recipe only calls for two tablespoons of flour, substituting is pretty straightforward. I use a gluten-free all-purpose flour blend that has xanthan gum already in it. Bob’s Red Mill makes a good one. You can also use almond flour, though that changes the texture slightly and makes the cake a bit denser. My cousin has celiac disease, so I’ve made the gluten-free version many times for family gatherings. She says it’s just as good as the regular version. One tip: make absolutely sure your chocolate chips and peanut butter are certified gluten-free. Some brands process their products in facilities that also handle wheat. Reading labels is important when cooking for someone with dietary restrictions.
Q: How do I know when the cakes are done?
This is probably the most common question I get, and I totally understand the anxiety around it. The edges should look set and firm, maybe even slightly pulling away from the sides of the ramekin. The center should still look a tiny bit wet and should jiggle just slightly when you gently shake the baking sheet. It’s that little jiggle that tells you the center is still molten. I’ve overbaked these cakes before when I second-guessed myself and left them in “just one more minute.” Trust the jiggle test. If you’re really nervous your first time making them, you can sacrifice one cake to check. Carefully invert it onto a plate and cut into it to see if the center is still flowing. Then you’ll know exactly what to look for with the remaining cakes. After making these a few times, you’ll develop a feel for it.
Q: Can I use natural peanut butter instead of regular?
I’ve tried this multiple times because I really wanted it to work, but natural peanut butter just doesn’t perform as well in this recipe. The oil separation in natural peanut butter causes problems with the texture of the filling. It tends to seep out during baking and makes the filling less stable. The conventional stuff like Jif or Skippy has stabilizers that help it hold together better at high heat. If you’re really committed to using natural peanut butter for health or taste reasons, try stirring it really well and maybe adding an extra tablespoon of powdered sugar to help bind it together. You can also try refrigerating the peanut butter balls for longer, maybe 20 minutes instead of 10. I’ve had mixed results with this approach, but some people swear by it. For the most reliable outcome, stick with regular creamy peanut butter.
Q: Can I substitute other nut butters or fillings?
Oh, I’m so glad you asked this because I’ve experimented quite a bit here. Almond butter works wonderfully and gives you a slightly different flavor profile. Cashew butter is milder and also delicious. I even tried Nutella as a filling once when my kids requested it, and while it was different from the chocolate peanut butter lava cake concept, it was still amazing. Cookie butter is another filling I’ve tested that turned out incredible. Just make sure whatever filling you choose is thick enough to roll into a ball and hold its shape. If it’s too runny, it’ll mix into the batter instead of staying as a distinct molten center. My mother-in-law is allergic to peanuts, so I make almond butter versions specifically for her whenever she visits.
Q: What’s the best way to store leftovers?
Honestly, leftovers are rare in my house because these are always devoured immediately. But if you do end up with extras, you can refrigerate them in an airtight container for up to two days. Reheating is tricky though because you won’t get that same molten center effect. I microwave them for about 20 seconds just to take the chill off. They’re still tasty, more like a dense chocolate cake at that point. Some people actually prefer them cold the next day, eating them straight from the fridge like a chocolate truffle. My son does this all the time. He says he likes the fudgy texture when they’re cold. By the way, food safety is important when storing any dessert with eggs and dairy, so make sure you’re following proper kitchen hygiene practices to keep everything fresh and safe to eat.
Q: Can I double the recipe for a crowd?
Definitely, and I’ve done this many times for larger gatherings. The recipe scales up perfectly. Just multiply all your ingredients by however many servings you need. The only challenge is oven space. Most home ovens can fit about eight ramekins at once if you arrange them carefully on two baking sheets. If you need more than that, you’ll have to bake in batches. The unbaked assembled cakes can wait at room temperature for about 30 minutes while the first batch bakes, or you can keep them in the fridge if you need more time. I made these for my daughter’s graduation party, serving sixteen people. I baked eight at a time and it worked out great. Just stay organized and keep track of timing for each batch.
Q: Why did my lava cakes sink in the middle?
This happened to me early on and it’s usually because the eggs weren’t beaten enough before adding them to the chocolate mixture. You need to whip the eggs and sugar together until they’re pale and slightly thick. This incorporates air that helps the cakes rise and hold their shape. Another possible reason is opening the oven door too early or too often during baking. The temperature drop causes the cakes to collapse. I know it’s tempting to peek, but try to resist until at least the 10-minute mark. Also, make sure your oven temperature is accurate. If it’s running too hot or too cool, that affects how the cakes bake. I finally bought an oven thermometer after too many baking disasters and discovered my oven runs 15 degrees cooler than the dial says. Game changer.
Q: What’s the best chocolate to use for this recipe?
I’ve tested this recipe with different chocolates more times than I can count. Semi-sweet or dark chocolate with around 60 to 70 percent cacao works best. Anything darker than 70 percent can be too bitter and might not melt as smoothly. Milk chocolate makes the dessert way too sweet in my opinion, though my kids would probably disagree. I like Ghirardelli chocolate chips because they melt beautifully and have great flavor. Trader Joe’s pound plus bars are another excellent option and super affordable. If you’re feeling fancy, high-quality chocolate like Valrhona or Callebaut takes this dessert to another level, but it’s definitely not necessary. The peanut butter chocolate lava cake recipe works well with whatever decent quality chocolate you can find at your regular grocery store.
When you’re ready to explore more delicious options beyond this incredible dessert, you’ll find plenty of inspiration in our collection of desserts that range from simple weeknight treats to showstopping centerpieces for your next celebration.
Making this Peanut Butter Chocolate Lava Cake has become one of my absolute favorite kitchen adventures. It never fails to impress, whether I’m making it for two on a quiet evening or for a houseful of guests. The combination of rich chocolate and creamy peanut butter, that dramatic moment when the molten center flows out—it’s pure magic every single time. Don’t be intimidated by how fancy it looks. Once you make it that first time and see how straightforward it actually is, you’ll wonder why you waited so long. Give it a try this weekend. Play around with different fillings if you’re feeling adventurous. Make it your own. And when your family or guests ask how you created something so incredible, just smile and enjoy the moment. You’ve earned those compliments.
Ingredients
Equipment
Method
- Préchauffer le four à 425°F (220°C).
- Beurrer quatre ramequins de 6 onces et saupoudrer de cacao en poudre ou de sucre cristallisé.
- Placer les ramequins sur une plaque de cuisson.
- Dans un bol adapté au micro-ondes, mélanger le chocolat et le beurre, en faisant chauffer par intervalles de 30 secondes jusqu'à ce que le mélange soit lisse.
- Dans un bol séparé, fouetter les œufs, les jaunes d'œufs et le sucre jusqu'à obtenir un mélange pâle et épais.
- Ajouter le mélange de chocolat refroidi au mélange d'œufs et mélanger.
- Tamiser la farine et le sel dans le mélange, en pliant doucement jusqu'à ce qu'il n'y ait plus de stries de farine.
- Préparer la garniture au beurre de cacahuète en mélangeant le beurre de cacahuète crémeux, le sucre glace et un éclat de lait jusqu'à obtenir un mélange lisse. Rouler en quatre boules et congeler pendant 10 minutes.
- Verser deux cuillères à soupe de pâte au fond de chaque ramequin, placer une boule de beurre de cacahuète refroidie au centre, puis couvrir avec le reste de pâte.
- Cuire au four pendant 12 à 14 minutes jusqu'à ce que les bords soient pris et que le centre tremble légèrement.
- Laisser refroidir pendant 1 minute, puis passer un couteau autour des bords et inverser sur des assiettes à dessert pour servir.