Creamy Vanilla Custard Squares: A Little Slice of Heaven
You know that moment when you take a bite of something so smooth and comforting, the whole world just seems to slow down for a second? That’s what these Vanilla Custard Cream Squares are all about. I started making them years ago for my husband’s office potlucks, and now, if I show up without them, I get a chorus of disappointed sighs. They’re the dessert equivalent of a cozy blanket—simple, classic, and guaranteed to make people smile.
A Recipe Steeped in Sweet Tradition
While you might see similar treats called “cream squares” or “sliced vanilla desserts,” this recipe feels like it came straight from a well-loved community cookbook. It’s a modern, no-bake twist on classic baked custards and puddings our grandmothers made. Instead of fussing with a water bath in the oven, we use a bit of cornstarch to get that perfect, velvety set on the stovetop. It’s a brilliant shortcut that keeps all the old-fashioned flavor but makes it accessible for any busy week. My version uses a graham cracker crust, which adds a lovely, buttery crunch against the silky filling.
Why You’ll Fall in Love with These Custard Squares
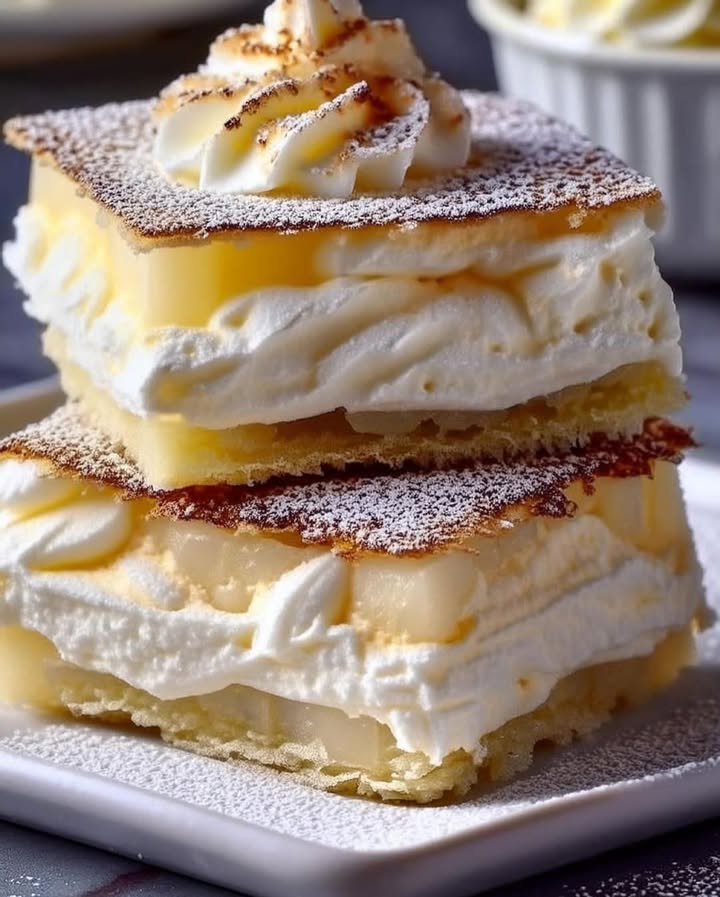
First, the texture is pure magic. The contrast between the crumbly base, the lush custard layer, and the cloud of whipped cream on top is simply divine. Second, they’re a make-ahead dream! You can prepare them the day before a party, which is my secret for looking like a relaxed host. Finally, they’re a blank canvas. While the vanilla bean-speckled custard is perfect on its own, you can top these squares with fresh berries, a drizzle of chocolate, or even a sprinkle of cinnamon for endless variety.
Perfect Occasions for Your Custard Cream Squares
This is my go-to dessert for so many events! They are elegant enough for a bridal or baby shower, cut into neat little squares. They’re a guaranteed hit at family reunions and picnics because they travel so well in the pan. And honestly, I often make a batch just for us at home. It’s a sweet little treat to have in the fridge for an after-dinner indulgence with a cup of tea. It turns an ordinary Tuesday into something a bit more special.
Gathering Your Ingredients for Custard Cream Squares
Let’s gather everything you need. Using simple, good-quality ingredients makes all the difference here.
For the Crust:
- 1 ½ cups graham cracker crumbs
- ⅓ cup melted butter
- ¼ cup sugar
For the Vanilla Custard Filling:
- 2 cups of whole milk
- 1 cup of heavy cream
- ¾ cup sugar
- 5 large egg yolks
- 2 tsp pure vanilla extract (or the seeds from 1 vanilla bean)
- 3 tbsp cornstarch
For the Whipped Cream Topping:
- 1 ½ cups of heavy cream, cold
- ¼ cup powdered sugar
- 1 tsp vanilla extract
Ingredient Substitutions You Can Try
Don’t have everything on hand? No problem! Here are some easy swaps:
- Graham Cracker Crumbs: Digestive biscuits or vanilla wafers make a great crust too.
- Whole Milk & Cream: You can use 3 cups of half-and-half for a slightly lighter, but still rich, custard.
- Cornstarch: An equal amount of all-purpose flour can be used as a thickener, though the custard may be slightly less clear.
- Egg Yolks: Save those egg whites for a healthy omelet or meringue cookies!
Creating Your Dreamy Vanilla Custard Squares
Follow these steps for foolproof, creamy squares every single time.
Step 1: Prep and Preheat
Start by preheating your oven to 350°F (175°C). This gives it time to get perfectly hot for your crust. Take a 9×9-inch baking pan and line it with parchment paper, letting the edges hang over the sides. This “sling” is your best friend—it lets you lift the whole dessert out later for clean, beautiful cuts. Give the paper a light spritz of cooking spray so it lays flat.
Step 2: Make the Buttery Crust
In a medium bowl, combine the graham cracker crumbs, melted butter, and sugar. Stir it with a fork until it looks like wet sand and every crumb is coated in that golden butter. The smell is already amazing! Dump the mixture into your prepared pan and press it down firmly and evenly with the bottom of a cup or your fingers. You want a solid, compact base. Bake this for 10 minutes, then let it cool completely on a wire rack. Pro tip: Pressing the crust up the sides just a tiny bit helps contain the custard.
Step 3: Cook the Luxurious Custard
This is the heart of the recipe. In a medium saucepan, heat the milk and 1 cup of heavy cream over medium heat until it’s just steaming—small bubbles will form around the edges. Don’t let it boil. In a separate bowl, whisk together the sugar, egg yolks, vanilla, and cornstarch until it’s smooth and pale yellow. Now, the key part: slowly pour about a cup of the hot milk mixture into the yolk mixture while whisking constantly. This “tempers” the eggs and prevents them from scrambling. Then, pour everything back into the saucepan.
Cook over medium-low heat, whisking non-stop. In about 5-7 minutes, you’ll see it transform from a thin liquid to a thick, pudding-like consistency. It should coat the back of a spoon. Once big bubbles start to pop on the surface, cook for one more minute, then immediately remove from the heat.
Step 4: Assemble and Chill
Pour the hot custard directly over your cooled crust. Use a spatula to spread it into a perfectly smooth, even layer. To prevent a skin from forming, you can press a piece of plastic wrap directly onto the surface of the custard. Now, the hardest part: patience! Refrigerate the pan for at least 2 hours, but 4 is even better. The custard needs this time to set firmly so you can slice it.
Step 5: Top and Slice into Squares
When you’re ready to serve, make the whipped cream. In a chilled bowl, beat the cold heavy cream, powdered sugar, and vanilla together. Start on low speed, then increase to high. Beat until you see firm peaks—when you lift the beaters, the cream should hold its shape proudly. Spread this fluffy cloud over the set custard layer. Chef’s tip: Use the parchment paper sling to gently lift the whole dessert onto a cutting board. With a sharp knife dipped in hot water and wiped dry, cut into squares for the cleanest edges.
Step 6: Serve and Savor
Serve these custard cream squares cold! They are beautiful as is, but a fresh berry, a mint leaf, or a light dusting of cocoa powder on top makes them extra special. Enjoy the chorus of “mmmm”s that’s sure to follow.
Your Custard Squares Timeline
- Prep Time: 20 minutes
- Cooking Time: 10 minutes (crust) + 7 minutes (custard)
- Chilling Time: At least 2 hours (essential!)
- Total Time: About 3 hours (mostly hands-off chilling)
My Secret for the Smoothest Custard
My absolute can’t-skip secret? Strain your custard! After you finish cooking it on the stove, pour the hot custard through a fine-mesh sieve directly onto the crust. This catches any tiny, accidental bits of cooked egg or cornstarch lumps, guaranteeing a texture as smooth as silk. It adds one more bowl to wash, but the perfect result is worth it.
A Fun Slice of Food History
Did you know cornstarch is a relatively modern hero in the kitchen? Before it became widely available in the mid-1800s, cooks thickened custards and puddings with eggs alone, flour, or even grated bread. Cornstarch, or “corn flour” as it’s known in some places, was a game-changer because it creates a clearer, glossier, and more stable thickening than flour. So every time you make this custard, you’re using a little piece of culinary innovation!
Helpful Equipment for Your Kitchen
You don’t need fancy tools! Here’s what will help:
- 9×9-inch baking pan
- Parchment paper
- Medium saucepan
- Mixing bowls (various sizes)
- Whisk
- Fine-mesh sieve (highly recommended for my secret trick!)
- Electric hand mixer or stand mixer (for the whipped cream)
- Rubber spatula
Storing Your Custard Cream Squares
These squares must be stored in the refrigerator. Once topped with whipped cream, cover the pan tightly with plastic wrap or transfer squares to an airtight container. They will keep beautifully for 3-4 days. The crust may soften slightly over time, but the flavor will still be wonderful.
For longer storage, you can freeze the squares before adding the whipped cream topping. Freeze the custard-and-crust block until solid, then wrap it well in plastic and foil. Thaw overnight in the fridge before topping with fresh whipped cream and serving. I don’t recommend freezing the whipped cream layer as it can become grainy.
Always use clean utensils to remove squares from the pan. This helps prevent any spoilage from bacteria and keeps your dessert fresh for everyone to enjoy a second day.
Tips for Custard Square Success
- Use real vanilla extract. The flavor is the star here, so skip the imitation stuff.
- Make sure your egg yolk mixture is smoothly whisked before adding the hot milk. No cornstarch lumps allowed!
- Chill your bowl and beaters before whipping the cream. Cold tools make whipping faster and prevent the cream from turning to butter.
- For neat cuts, clean your knife with hot water between each slice.
Presentation Ideas to Impress Your Guests
- Berry Bliss: Top each square with a single perfect raspberry or a few blueberries.
- Chocolate Drizzle: Melt a little chocolate and zig-zag it over the whipped cream with a fork.
- Citrus Zest: A little grated lemon or orange zest adds a bright, beautiful pop of color and flavor.
- Dessert Shooters: For a party, layer crumbled crust, custard, and cream in small glasses.
Six Delicious Variations to Try
Once you master the classic, the fun begins! Here are six tasty twists:
- Chocolate Custard Squares: Add ½ cup of cocoa powder or melted dark chocolate to the custard along with the cornstarch.
- Lemon Bar Twist: Add the zest of two lemons to the custard and use a shortbread cookie crust for a tangy surprise.
- Coconut Dream Squares: Use coconut milk instead of regular milk and toast some shredded coconut to sprinkle on top.
- Berry Swirl Cream Squares: Before chilling, dollop a few spoonfuls of seedless raspberry jam on the custard and swirl gently with a knife.
- Mocha Custard Squares: Dissolve 1-2 tablespoons of instant espresso powder into the hot milk mixture for a coffee-chocolate vibe.
- Peanut Butter Crunch Bars: This is a fun, completely different direction! Use a mix of graham cracker crumbs and crushed pretzels for the crust. Swirl ½ cup of melted peanut butter into the custard, and top with chopped peanuts instead of plain whipped cream.
Common Mistakes to Avoid with Custard Squares
Mistake 1: Rushing the Tempering Step
Dumping the hot milk into the egg yolks all at once is a sure way to make sweet scrambled eggs. The shock of the heat cooks the yolks into little curds. Always whisk the yolks first, then add the hot liquid in a slow, steady stream while whisking constantly. This gently raises their temperature. It’s the most important 60 seconds in the recipe!
Mistake 2: Not Cooking the Custard Long Enough
If you take the custard off the stove when it’s merely “thickened,” it might not set firmly in the fridge. You need to bring it to a full, bubbling boil for about one minute. The cornstarch needs that high heat to reach its full thickening power. Don’t worry, the constant whisking and the egg yolk mixture will keep it smooth. A thoroughly cooked custard sets like a dream.
Mistake 3: Skipping the Full Chill Time
I know, waiting is hard! But if you try to cut the squares after only an hour, you’ll have a delicious but messy pudding soup. The custard needs a minimum of two hours in the fridge to become firm and sliceable. For the absolute cleanest cuts, four hours or even overnight is ideal. Plan ahead so your dessert has time to become its best self.
Mistake 4: Over-whipping the Cream Topping
Whipped cream goes from fluffy peaks to grainy, over-whipped butter in a matter of seconds. Watch it closely once it starts to thicken. Stop beating when the peaks hold their shape but are still soft and smooth. If you go too far, you can salvage it by gently folding in another tablespoon or two of cold cream to soften it back up.
Your Vanilla Custard Squares Questions, Answered
Can I use a different size pan?
Yes, but it will change the thickness of your layers. A 9×13-inch pan will make thinner squares and you might want to reduce the bake time for the crust by a minute or two. An 8×8-inch pan will make thicker, more decadent squares, and you may need to chill them a bit longer to set. Just keep an eye on the crust while baking—it should be lightly fragrant and golden.
My custard is lumpy! Can I fix it?
Do not panic! This happens to everyone. Immediately remove the custard from the heat. Grab your fine-mesh sieve and a rubber spatula. Pour the custard through the sieve into a bowl, pressing the lumps through with the spatula. This will catch any cooked egg bits. If the lumps are from uncooked cornstarch, you can also use an immersion blender to smooth it out quickly. Then pour it over your crust as planned.
Can I make this recipe ahead of time?
Absolutely, and I highly recommend it! These custard cream squares are the perfect make-ahead dessert. You can prepare the crust and custard layers up to two days in advance. Keep it covered in the fridge. Add the fresh whipped cream topping the day you plan to serve it, within a few hours of your event. This keeps the whipped cream looking and tasting its freshest.
What can I do with the leftover egg whites?
Don’t throw them away! You have so many great options. You can make light and airy meringue cookies, add them to scrambled eggs for a protein boost, or freeze them for later. To freeze, place each white in a section of an ice cube tray, then transfer the frozen cubes to a bag. Label it with the date—they’ll be good for months. Thaw in the fridge when you’re ready to bake.
Why did my crust get soggy?
A slightly softer crust after a day is normal, but sogginess usually means the crust wasn’t completely cool before you added the hot custard, or the custard wasn’t thick enough when poured. Always let the baked crust cool on a wire rack. Also, make sure your cooked custard is truly thick—it should hold a line on the back of a spoon—before pouring. This creates a barrier.
Can I use vanilla bean paste?
Yes, and it’s a fantastic choice! Vanilla bean paste will give you those lovely little black specks and a rich, deep vanilla flavor. Use it as a one-to-one substitute for the vanilla extract. It’s more expensive, but a little goes a long way and it makes the custard look professionally made. It’s my secret for special occasions.
Is it okay to use low-fat milk?
You can, but the custard won’t be as rich, creamy, or luxurious. The fat in whole milk and heavy cream adds to the smooth mouthfeel and helps carry the vanilla flavor. If you must substitute, using 2% milk will work in a pinch, but I would not recommend skim milk. For the best texture and taste, stick with the whole milk and cream as written.
How do I get perfectly clean cuts?
The trick is all in the knife! Use a long, sharp chef’s knife. Fill a tall glass with very hot water. Before your first cut, dip the entire blade in the hot water, then quickly dry it with a clean towel. Make your cut in one smooth, decisive motion. Wipe the blade clean, dip it in the hot water again, dry, and repeat for each cut. The heat helps the knife glide through the cream and custard neatly.
Can I turn this into a pie instead?
You sure can! This recipe works wonderfully as a custard pie. Simply press your graham cracker crust into a 9-inch pie dish (you may need a bit more crust mixture). Pre-bake it as directed, let it cool, then pour in the custard. Chill until set, then top with the whipped cream. It’s an elegant and easy alternative that serves a crowd.
My family doesn’t like whipped cream. What else can I use on top?
No problem at all. The squares are delicious plain! You could also dust them with a little powdered sugar or unsweetened cocoa powder. A thin layer of sweetened, stabilized cream cheese frosting would be delicious, or simply serve them with a side of fresh fruit compote or berries for a lighter touch. Let your family’s taste guide you.
The Joy of a Simple, Sweet Treat
In a world full of complicated desserts, I find so much joy in recipes like these Vanilla Custard Cream Squares. They remind us that sometimes, the simplest flavors—rich vanilla, creamy custard, buttery crunch—are the ones we love the most. They don’t need fancy decorations or hard-to-find ingredients to make people feel cared for. Whether you’re bringing them to a potluck or enjoying a quiet square with afternoon coffee, I hope this recipe brings a little slice of creamy, dreamy happiness to your table. Now, who’s ready for a bite?
Peanut Butter Crunch Bars
Ingredients
Equipment
Method
- Preheat your oven to 350°F (175°C) and line a 9x9-inch baking pan with parchment paper.
- Combine graham cracker crumbs, melted butter, and sugar in a medium bowl and mix until the mixture resembles wet sand.
- Press the crumb mixture firmly into the bottom of the prepared pan and bake for 10 minutes, then let cool completely.
- In a saucepan, heat milk and 1 cup of heavy cream over medium heat until steaming (but not boiling).
- In a bowl, whisk together sugar, egg yolks, vanilla, and cornstarch until smooth and pale.
- Slowly pour about a cup of the hot milk mixture into the egg mixture while whisking constantly, then return it to the saucepan.
- Cook the custard over medium-low heat, whisking constantly, until thickened (about 5-7 minutes) and bubbling.
- Pour the hot custard over the cooled crust, smoothing it into an even layer.
- Refrigerate the pan for at least 2 hours to allow the custard to set.
- Make the whipped cream by beating cold heavy cream, powdered sugar, and vanilla in a chilled bowl until firm peaks form.
- Spread the whipped cream over the set custard layer and cut into squares.