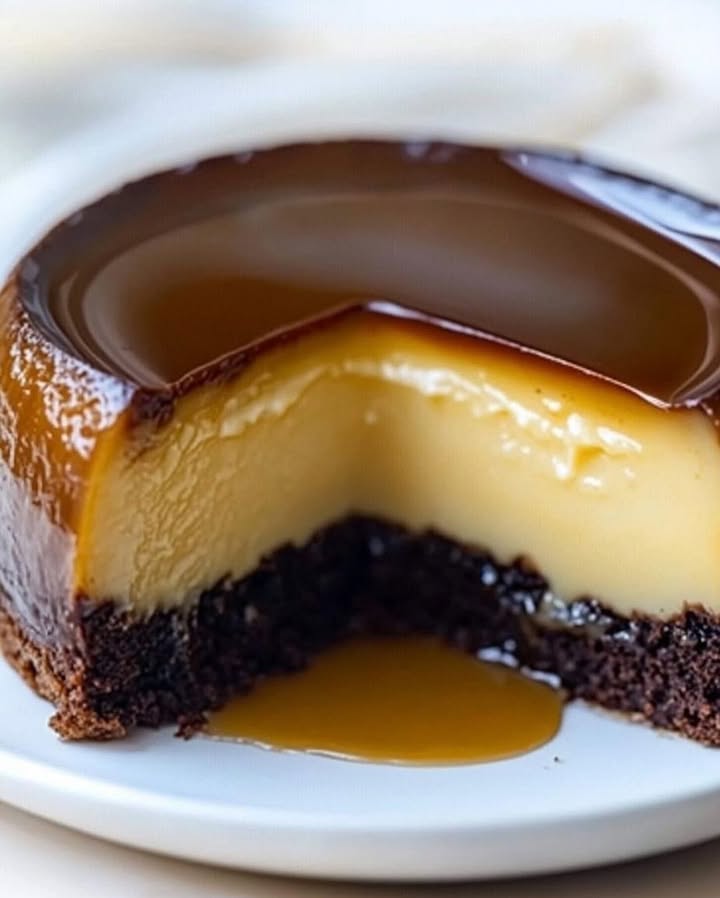
Chocoflan: The “Impossible” Cake That Will Amaze You
Have you ever seen a dessert that performs a magic trick right in your oven? I’m talking about the Chocoflan, lovingly known as “The Impossible Cake.” You layer chocolate cake batter and creamy flan in one pan, bake it, and somehow they swap places. It’s pure kitchen wizardry! The first time I made it for a potluck, my friends were absolutely convinced I’d baked two separate desserts and stacked them. Nope—just one simple, show-stopping pan of deliciousness.
The Magic Behind “El Pastel Imposible”
This dessert has roots in Latin American kitchens, especially popular in Mexico and the Philippines. The name “Impossible Cake” comes from its baffling flip—it looks impossible to have a moist cake on the bottom and a custard on top before baking, but end up with a flan crowned by a rich chocolate base after. Traditionally, it’s a celebratory treat, often made for birthdays and holidays. Today, it’s a fantastic way to give guests a two-in-one dessert experience that’s both familiar and wonderfully surprising. My family now requests it for every special dinner, and I love telling the story of its magical transformation each time.
Why You’ll Totally Fall for This Chocoflan Recipe
You’ll love this because it’s a guaranteed crowd-pleaser with minimal fuss. It combines two beloved desserts into one unforgettable bite. The process is almost easier than making the two components separately! You get to enjoy the deep, fudgy goodness of chocolate cake married with the silky, vanilla-kissed smoothness of flan, all draped in a golden caramel sauce. It’s the ultimate dessert union.
Perfect Occasions for Your Impossible Cake
This cake is made for moments where you want to shine. Bring it to your next dinner party and watch everyone’s jaws drop when you unmold it. It’s perfect for birthdays, holidays like Christmas or Easter, and even as a spectacular finale to a weekend family meal. I’ve even served it at summer barbecues—its cool, creamy texture is a refreshing contrast to savory grilled foods.
What You’ll Need for Your Chocoflan
Gather these simple ingredients. I promise you probably have most of them already!
For the Chocolate Cake:
- 1 cup all-purpose flour
- 3/4 cup granulated sugar
- 1/2 cup unsweetened cocoa powder
- 1 teaspoon baking powder
- 1/2 teaspoon baking soda
- 1/4 teaspoon salt
- 1/2 cup milk (whole or 2%)
- 1/3 cup vegetable oil
- 1 large egg
- 1 teaspoon vanilla extract
- 1/2 cup hot water
For the Flan:
- 1 (12 oz) can evaporated milk
- 1 (14 oz) can sweetened condensed milk
- 4 large eggs
- 1 teaspoon vanilla extract
For the Caramel:
- 1 cup granulated sugar (for homemade) OR 1/2 cup store-bought caramel or cajeta
Smart Swaps: Ingredient Substitutions
Don’t stress if you’re missing something! Here are easy swaps:
Milk: Any milk you have works—almond, oat, or even buttermilk for a tangier cake.
Oil: Melted butter or even applesauce (for a denser texture) can replace vegetable oil.
Cocoa: Use Dutch-processed or natural cocoa; both work fine here.
Caramel: Store-bought dolce de leche or cajeta is a fantastic time-saver. No one will know!
Dairy-Free: Use coconut condensed milk and evaporated milk for a dairy-free version.
Let’s Make Some Magic: Chocoflan Instructions
Ready to be a kitchen magician? Follow these steps. It’s easier than you think!
Step 1: The Caramel Base
If making homemade caramel, add the sugar to a clean, light-colored saucepan over medium heat. Let it melt slowly without stirring—just swirl the pan occasionally. It will go from clear to a deep amber liquid. This process fills your kitchen with a sweet, almost nutty aroma. Carefully pour the hot caramel into your well-greased Bundt pan or deep cake pan, swirling to coat the bottom. Pro tip: Work quickly as caramel hardens fast! Let it cool and harden for a few minutes while you make the batters.
Step 2: Mix the Chocolate Cake Batter
In a large bowl, whisk together the flour, sugar, cocoa, baking powder, baking soda, and salt. In another bowl, beat the milk, oil, egg, and vanilla until smooth. Gradually add the wet ingredients to the dry, stirring until just combined. The batter will be thick. Finally, pour in the hot water and mix. The batter will become thin and glossy—this is perfect! Gently pour this chocolatey river over the hardened caramel in your pan.
Step 3: Blend the Flan Mixture
Now, for the creamy layer. In a blender, combine the evaporated milk, sweetened condensed milk, eggs, and vanilla. Blend on high for about 30 seconds until the mixture is completely smooth and frothy on top. It will look like a rich, pale golden milkshake. Here’s the cool part: slowly pour this flan mixture over the back of a spoon held just above the chocolate batter. This gentle technique helps the flan layer float on top without mixing in.
Step 4: The Bain-Marie Bake
This is the secret to a smooth, crack-free flan. Place your filled cake pan inside a larger roasting pan. Place this setup in the preheated oven, THEN carefully pour hot water into the roasting pan until it comes about halfway up the sides of your cake pan. Bake at 350°F (175°C) for about 1 hour. The steam from the water bath creates an even, gentle heat. You’ll know it’s done when a toothpick inserted in the chocolate cake part comes out clean and the flan is set but still jiggles slightly in the center.
Step 5: Cool, Chill, and Reveal
Let the cake cool completely in the pan on a wire rack. Then, cover it and refrigerate for at least 4 hours, preferably overnight. This chilling is non-negotiable—it firms everything up for a clean flip. To unmold, run a thin knife around the edges of the pan. Place your serving plate upside-down on top of the pan, and with confidence (and maybe a deep breath!), flip everything over. Gently lift the pan. Behold the magic! The caramel drips down over a perfect dome of creamy flan sitting atop the fudgy chocolate cake. Chef’s tip: If it sticks, place the bottom of the pan in warm water for a minute to loosen the caramel.
Your Chocoflan Timeline
- Prep Time: 25 minutes
- Cook Time: 1 hour
- Chill Time: 4 hours (minimum)
- Total Time: About 5 hours 25 minutes (mostly hands-off chilling)
- Yield: 10-12 generous slices
My Secret for the Perfect Flip
The absolute best trick is to grease your pan extremely well before adding the caramel. I use butter or non-stick spray on every single nook and cranny of my Bundt pan. Then, the caramel layer creates a non-stick barrier. This double protection ensures your beautiful cake slides out in one glorious piece, every single time.
A Sweet Piece of Trivia
While modern Chocoflan is a star in many homes, its “impossible” nature has inspired similar desserts worldwide. In some places, it’s called “Magic Cake” or “Flan Cake.” The science is simple: the flan mixture is denser, so it sinks during baking, while the cake batter rises. They essentially trade places! It’s a delicious lesson in kitchen chemistry.
Equipment You’ll Need
- 12-cup Bundt pan or a deep 9-inch round cake pan
- Blender or food processor
- Large mixing bowls
- Whisk and spatula
- Large roasting pan for the water bath
- Kettle or pot for hot water
Storing Your Impossible Cake Masterpiece
Once you’ve unveiled your Chocoflan, you can store any leftovers right on the serving plate. Simply cover it loosely with plastic wrap or a dome lid. It needs to stay refrigerated because of the custard. It will keep beautifully for up to 4 days in the fridge. The flavors actually meld and improve after a day!
I do not recommend freezing the whole assembled cake. The flan’s texture can become grainy and separate after thawing. However, if you have extra, you can freeze individual slices wrapped tightly in plastic and then foil. Thaw overnight in the fridge for best results.
If you need to make it ahead, this dessert is your best friend. Bake and cool it completely, then keep it covered in its pan in the refrigerator for up to 2 days before unmolding. This makes it a perfect stress-free dessert for entertaining—just flip and serve when your guests arrive!
Tips and Advice for Chocoflan Success
- Room Temp is Key: Let your eggs and milk sit out for 20-30 minutes before blending the flan. This helps everything combine smoothly and bake evenly.
- Don’t Skip the Water: The hot water for the cake batter helps “bloom” the cocoa, making the chocolate flavor richer.
- Water Bath Level: Ensure your water bath is hot, not boiling, when you add it to the oven. And don’t let it splash into your cake pan!
- The Jiggle Test: The center of the flan should jiggle like Jell-O when gently shaken, not look liquidy. The cake layer will pull away from the pan’s sides slightly.
Presentation Ideas to Wow Your Guests
- Drizzle extra caramel or chocolate sauce on the plate before placing a slice.
- Add a dollop of freshly whipped cream and a few berries on the side.
- Sprinkle with a light dusting of cocoa powder or chopped toasted nuts for texture.
- Serve each slice with a small spoon and fork—it’s a luxurious two-texture experience!
Healthier & Fun Chocoflan Variations
- Decaf Coffee Chocoflan: Add 1 tablespoon of instant espresso powder to the chocolate cake batter. It intensifies the chocolate flavor in a wonderful way without being overly coffee-tasting.
- Orange Dream: Add the zest of one orange to the flan mixture and a teaspoon of orange extract to the cake batter for a bright, citrusy twist.
- Coconut Chocoflan: Use coconut milk instead of evaporated milk in the flan and sprinkle shredded coconut into the caramel layer before adding the batters.
- Mexican Chocolate Version: Spike the cake batter with a pinch of cinnamon and a tiny dash of cayenne pepper for a warm, traditional flavor.
- Nutella Swirl: Drop spoonfuls of Nutella onto the chocolate batter before adding the flan, and give it a quick swirl with a knife.
- Pumpkin Spice Flan: Replace the vanilla in the flan with 1/2 cup of pumpkin puree and a teaspoon of pumpkin pie spice for a festive fall treat.
Common Mistakes to Avoid with Chocoflan
Mistake 1: Mixing the Two Batters
This is the number one worry! If you just dump the flan mixture in, it can sink and mix with the cake batter, creating a muddy, layered mess instead of a sharp swap. The trick is to pour the flan very slowly over the back of a spoon. The spoon disperses the force, allowing the flan to float gently on top. It seems fussy, but it takes just an extra second and makes all the difference.
Mistake 2: Using a Cold Water Bath
Pouring room-temperature or cold water into the roasting pan lowers the oven temperature too much at the start. This can lead to uneven cooking and a soggy cake bottom. Always use hot tap water or water you’ve just heated in a kettle. The goal is to create instant steam for a gentle, moist baking environment from the very first minute.
Mistake 3: Not Letting It Chill Long Enough
Impatience is the enemy of a beautiful unmolding. If you try to flip a warm Chocoflan, the flan is too soft and can break or slump. The cake is also too crumbly. Chilling for at least 4 hours firms up the custard and cake, making them sturdy enough to hold their shape during the grand flip. Overnight chilling is even better.
Mistake 4: Underbaking Because of the Jiggle
It’s tricky! The flan should jiggle when you take it out, which can make you think it’s underdone. But if it looks liquidy or sloshes, it needs more time. The proper jiggle is a unified, gentle wobble in the center—like firm Jell-O. Check the cake part with a toothpick. If it comes out clean, even if the center jiggles, it’s done. The residual heat will finish setting the flan as it cools.
Your Chocoflan Questions, Answered
Can I make Chocoflan in a regular 9×13 pan?
Yes, you can! A 9×13-inch rectangular pan will work. Your layers will be thinner, so the baking time may be slightly less, around 45-50 minutes. The flip will be less dramatic-looking than a Bundt cake, but it will still taste incredible. Just be sure to grease the pan very well and use the water bath method as directed.
Why did my flan mix into the cake batter?
This usually happens if the flan mixture is poured in too forcefully or if the chocolate cake batter is too thick. Next time, make sure your cake batter is nice and liquidy after adding the hot water. And always, always use the spoon method for pouring the flan. It acts as a gentle buffer to prevent the two layers from combining before the bake.
My caramel hardened into a rock. What did I do wrong?
You likely cooked the sugar a bit too long. It goes from perfect amber to burnt and rock-hard very quickly. Use a light-colored pot so you can see the color change clearly. Aim for a deep golden hue, not a dark brown. If it does harden too much, don’t panic. The baking process will create a delicious syrup that softens it, though it might be a thicker, chewier layer—which some people love!
Can I use a boxed cake mix for the chocolate layer?
Absolutely! This is a fantastic shortcut. Prepare a standard 15.25 oz box of chocolate cake mix according to the package directions (typically needing oil, water, and eggs). Pour it into your caramel-coated pan, then proceed with the homemade flan recipe as written. Adjust baking time as needed, as box mixes can vary.
Is it safe to bake with a pan of water in the oven?
It is perfectly safe if done carefully. Place the empty roasting pan with the cake pan inside onto the oven rack first. Then, using a pitcher or kettle, pour the hot water into the roasting pan. Do not try to carry a pan full of water to the oven—that’s a spill waiting to happen. The steam from the water bath is what gives the flan its smooth, silky texture.
The top of my flan cracked. How can I prevent this?
Cracking usually happens from too high or dry heat, which is why the water bath is so crucial. Also, avoid over-baking. Check the cake at the 55-minute mark. Another tip is to let the cake cool slowly in the oven with the door slightly ajar for 15-20 minutes after turning off the heat, which prevents sudden temperature changes that can cause cracks.
How far in advance can I make Chocoflan?
It’s an excellent make-ahead dessert. You can bake it up to 2 days before serving. Keep it covered in the refrigerator right in the pan. In fact, the flavors improve, and the texture sets perfectly. Just unmold it onto your serving plate a couple of hours before your event to let it come to a cool, but not cold, serving temperature.
What’s the best way to slice Chocoflan cleanly?
Use a thin, sharp knife dipped in hot water and wiped dry between each slice. The warm knife glides through the creamy flan and fudgy cake without dragging or smearing the beautiful layers. This gives you picture-perfect slices every time.
Can I make individual Chocoflans?
Yes, and they are adorable! Use oven-safe ramekins or small jars. Place a spoonful of caramel in each, then layer the batters. Place the ramekins in a deep baking dish for the water bath. Baking time will be shorter, around 30-40 minutes. It’s a fantastic way to serve personalized desserts at a dinner party.
My cake is stuck to the pan after chilling. What now?
Don’t force it! Place the bottom of the pan in a shallow dish of warm (not hot) water for about 60 seconds. This will slightly melt the caramel layer just enough to release it. You can also run a thin, flexible knife or silicone spatula around the edges and center tube again. Then, try the flip with confidence.
Go Ahead, Make the Impossible Happen!
Chocoflan is more than a dessert; it’s an experience. It combines the joy of baking with the thrill of a magic trick. Whether you’re a seasoned baker or a nervous newbie, this recipe is forgiving and fantastically rewarding. So gather your ingredients, trust the process, and get ready for the sweetest “ta-da!” moment your kitchen has ever seen. Your friends and family will talk about your Impossible Cake for years to come. Happy baking!
Peanut Butter Pie
Ingredients
Equipment
Method
- Melt sugar in a light-colored saucepan over medium heat without stirring; swirl occasionally until it turns amber, then pour into a greased Bundt pan.
- In a large bowl, whisk together the dry chocolate cake ingredients.
- In another bowl, beat the wet ingredients until smooth and combine with the dry ingredients, gradually adding hot water until the batter is thin and glossy.
- Blend the flan ingredients in a blender until smooth, then carefully pour over the chocolate batter using a spoon to avoid mixing.
- Set the cake pan in a larger roasting pan; add hot water to the roasting pan until it reaches halfway up the sides of the cake pan. Bake at 350°F (175°C) for 1 hour.
- Let the cake cool completely, refrigerate for at least 4 hours, then unmold onto a serving plate.