Why This Pistachio No-Bake Tiramisu Will Steal Your Heart
Let me tell you a little story. Last summer, I was hosting a dinner party for my closest friends. Everyone was full from the main course, but when I brought out this creamy, dreamy Pistachio No-Bake Tiramisu, plates magically cleared. It’s rich, nutty, and oh-so-creamy, yet light enough to leave you wanting just one more bite. The best part? You don’t even need to turn on your oven. If you’re a pistachio lover (and honestly, who isn’t?), this dessert is about to become your new obsession.
A Little Background on Tiramisu and Its Pistachio Twist
Tiramisu has Italian roots, meaning “pick me up,” thanks to its coffee-infused layers. But let’s be honest—sometimes we want something a little different. That’s where this Pistachio No-Bake Tiramisu comes in. Instead of coffee, we’re using the earthy, nutty flavor of pistachios to create a dessert that feels both modern and timeless. I first tried making it after spotting a jar of pistachio paste at the store. One bite, and I knew I had stumbled onto something magical.
Why You’ll Fall Head Over Heels for This Recipe
This Pistachio No-Bake Tiramisu is all about simplicity and flavor. The mascarpone cream is silky smooth, the pistachio adds a luxurious crunch, and the whole thing comes together in no time. Plus, it’s no-bake, which means less time in the kitchen and more time enjoying life. Whether you’re a seasoned baker or a total newbie, this recipe is foolproof and sure to impress.
Perfect Occasions for This Pistachio Delight
Picture this: a cozy family brunch, a romantic date night, or even a holiday gathering. This Pistachio No-Bake Tiramisu fits every occasion. It’s elegant enough for special events but easy enough for a casual weekend treat. Pro tip: Make it ahead of time and let it chill in the fridge while you focus on other things.
Ingredients for Your Pistachio Dream
- 250 g of mascarpone
- 3 eggs
- 80 g of powdered sugar
- 2 tablespoons of pistachio paste
- 1 pack of ladyfingers (savoiardi)
- 1 cup of heavy cream
- Pistachio kernels for garnish
Substitution Options
- Mascarpone: If you can’t find mascarpone, mix cream cheese with a bit of heavy cream for a similar texture.
- Pistachio paste: Almond paste works as a substitute if pistachio isn’t available.
- Ladyfingers: Sponge cake slices can replace them in a pinch.
Step 1: Prepare the Cream Base
Start by separating the eggs. Whip the egg whites until they form stiff peaks—it’s like watching clouds form in a bowl! In another bowl, whisk the yolks with the powdered sugar until pale and fluffy. Gently fold in the mascarpone and pistachio paste. The vibrant green hue will make your heart skip a beat. Pro tip: Use an electric mixer to save time and energy.
Step 2: Whip the Cream
In a chilled bowl, whip the heavy cream until soft peaks form. Fold it into the mascarpone mixture. Be gentle here; you want to keep that airy texture. Imagine folding clouds into a sea of pistachio goodness. Once combined, set the mixture aside while you prepare the ladyfingers.
Step 3: Assemble the Layers
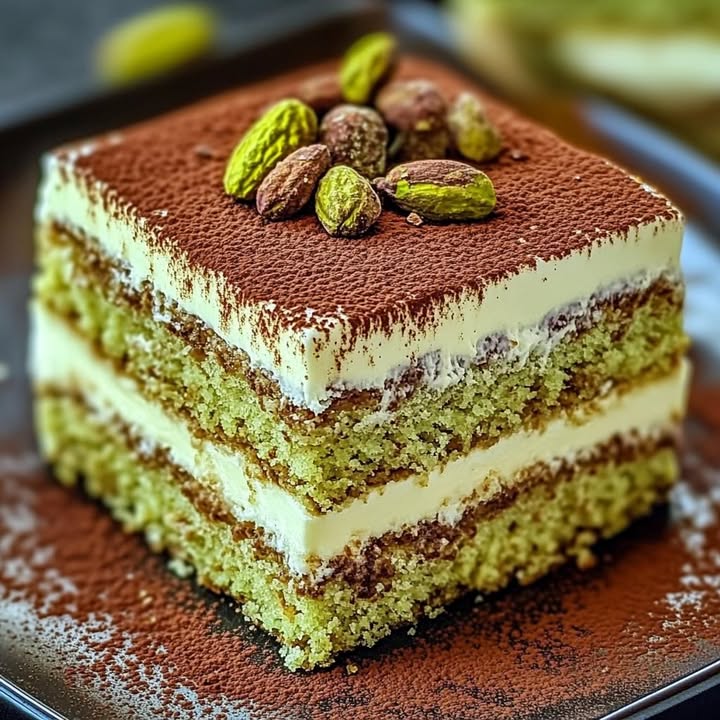
Dip each ladyfinger briefly into milk or water (your choice!) and arrange them in a dish. Spread half of the cream mixture over the layer of ladyfingers. Repeat with another layer of dipped ladyfingers and the remaining cream. Finish with a sprinkle of crushed pistachio kernels for a touch of elegance. It’s like building a little pistachio skyscraper!
Step 4: Chill and Set
Cover your masterpiece with plastic wrap and let it chill in the fridge for at least 4 hours—or overnight if you can wait that long. This resting time allows the flavors to meld and the texture to set perfectly. Trust me, patience pays off here.
Chef’s Tip for Extra Wow Factor
For an extra burst of flavor, drizzle a bit of honey or sprinkle some sea salt over the top before serving. The sweetness and saltiness pair beautifully with the nutty pistachio. It’s a small touch, but it makes a big difference.
Timing Breakdown
- Prep Time: 20 minutes
- Cooking Time: None (no-bake magic!)
- Resting Time: 4–6 hours
- Total Time: About 5 hours
Chef’s Secret
Always use fresh, high-quality ingredients. The better your pistachio paste, the more vibrant and flavorful your Pistachio No-Bake Tiramisu will be. Don’t skimp on quality—it’s worth every penny.
An Interesting Fact About Pistachios
Pistachios are often called the “smiling nut” because their shells crack open slightly during growth, resembling a smile. How cute is that? They’re also packed with healthy fats and antioxidants, making them a guilt-free indulgence.
Necessary Equipment
- Mixing bowls
- Electric mixer or whisk
- Spatula
- Rectangular dish (for layering)
- Plastic wrap
Storage Tips
This Pistachio No-Bake Tiramisu keeps well in the fridge for up to 3 days. Cover it tightly with plastic wrap to prevent it from drying out. If you’re making it ahead, store it in the coldest part of your fridge to maintain its creamy texture.
If you need to freeze it, place it in an airtight container. It can last up to a month, though I doubt it’ll stay untouched that long. Thaw it in the fridge overnight before serving.
Avoid leaving it out at room temperature for more than 2 hours, as dairy-based desserts spoil quickly. Keep it cool and enjoy it fresh for the best experience.
Tips and Advice
- Use room-temperature eggs for easier whipping.
- Dip the ladyfingers quickly to avoid them becoming soggy.
- Toast your pistachio garnish for added crunch and aroma.
Presentation Ideas
- Serve in individual glasses for a fancy touch.
- Add edible flowers for a pop of color.
- Drizzle chocolate sauce around the plate for contrast.
Healthier Alternatives
Here are six ways to tweak this recipe for a healthier twist:
- Low-Fat Version: Swap mascarpone for Greek yogurt.
- Vegan Option: Use coconut cream and plant-based ladyfingers.
- Sugar-Free: Replace powdered sugar with a sugar substitute.
- Gluten-Free: Use gluten-free ladyfingers.
- Protein-Packed: Add a scoop of vanilla protein powder to the cream.
- Less Sweet: Reduce the sugar by half and rely on natural sweetness from pistachios.
Mistake 1: Overdipping the Ladyfingers
One common mistake is soaking the ladyfingers too long. They absorb liquid quickly, and overdipping turns them mushy. To avoid this, dip each ladyfinger for just 1–2 seconds per side. This ensures they stay firm and hold their shape.
Mistake 2: Skipping the Resting Time
Patience is key! Rushing the chilling process results in a runny texture. Let the tiramisu rest for at least 4 hours to allow the flavors to develop and the layers to set properly. Pro tip: Prep it the night before for stress-free serving.
Mistake 3: Using Low-Quality Ingredients
Don’t skimp on the pistachio paste or mascarpone. These star ingredients define the flavor. Opt for premium brands to elevate your dessert from good to unforgettable.
FAQs
Can I make this recipe ahead of time?
Absolutely! This Pistachio No-Bake Tiramisu actually tastes better after resting. Make it a day in advance and store it in the fridge until ready to serve.
Is this recipe kid-friendly?
Yes, it’s perfect for kids! There’s no alcohol involved, and the creamy texture is a hit with little ones. Just ensure no one has nut allergies.
Can I use almond paste instead of pistachio?
Definitely. While the flavor will differ slightly, almond paste works wonderfully as a substitute.
How do I know when the cream is ready?
The cream should be thick and hold its shape when you lift the whisk. It should resemble softly whipped cream—not too stiff, not too runny.
What if I don’t have an electric mixer?
No problem! A hand whisk works fine, though it might take a bit more effort. Enlist a friend to help—it’s always more fun together.
Can I add coffee to this recipe?
Of course! For a pistachio-coffee combo, brush the ladyfingers with a bit of espresso for a unique twist.
Why is my tiramisu runny?
This usually happens if the cream isn’t whipped enough or if the resting time was skipped. Ensure you whip the cream until soft peaks form and chill the dessert adequately.
How do I toast pistachios?
Spread the pistachios on a baking sheet and toast them in a preheated oven at 350°F for 5–7 minutes. Watch closely to avoid burning.
Can I double the recipe?
Yes, simply double all the ingredients and use a larger dish. Adjust chilling time slightly if needed.
What’s the best way to serve this dessert?
Slice it neatly with a sharp knife dipped in hot water for clean cuts. Garnish with extra pistachios or a dusting of cocoa powder for flair.
Wrap-Up
This Pistachio No-Bake Tiramisu is a showstopper. With its creamy layers, nutty goodness, and no-fuss preparation, it’s a dessert that brings joy to any table. Whether you’re celebrating a special occasion or just treating yourself, this recipe is sure to become a favorite. So grab those pistachios, roll up your sleeves, and get ready to wow everyone with your culinary skills. Happy baking!
Pistachio No-Bake Tiramisu
Ingredients
Equipment
Method
- Separate the eggs and whip the egg whites until stiff peaks form.
- In another bowl, whisk the yolks with the powdered sugar until pale and fluffy.
- Gently fold in the mascarpone and pistachio paste.
- In a chilled bowl, whip the heavy cream until soft peaks form and fold it into the mascarpone mixture.
- Dip each ladyfinger briefly into milk or water and arrange them in a dish.
- Spread half of the cream mixture over the layer of ladyfingers.
- Repeat with another layer of dipped ladyfingers and the remaining cream.
- Sprinkle crushed pistachio kernels on top.
- Cover with plastic wrap and chill in the fridge for at least 4 hours or overnight.