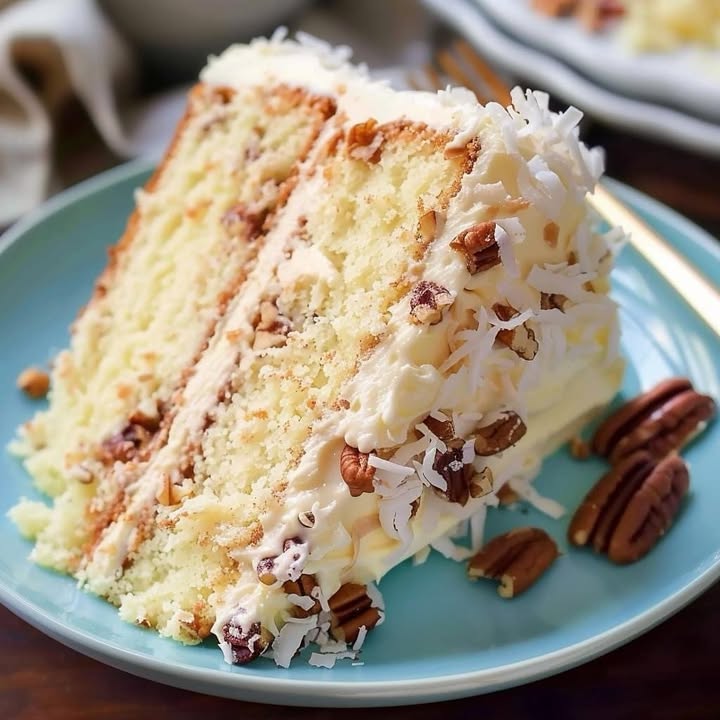
The Ultimate Coconut Cake with Cream Cheese Pecans: A Slice of Heaven
Is there anything more comforting than the smell of a cake baking? I think not. Especially when it’s a cake that whispers of tropical breezes and cozy family gatherings. This Coconut Cake with Cream Cheese Pecans is my absolute favorite. It’s the cake I make for birthdays, holidays, or just when I need a little sunshine in my kitchen. It’s fluffy, moist, and topped with a frosting so rich and tangy it makes you close your eyes and sigh with delight. Let me share this treasure with you.
Where This Sweet Dream Came From
This cake feels like a taste of the South to me. While its exact origins are a bit fuzzy, coconut cakes have long been a staple in American baking, especially in Southern states where pecans are plentiful. My version is a happy marriage of a classic buttermilk layer cake and my grandmother’s love for cream cheese frosting. I added the pecans for a little crunch and because my husband insists “everything is better with nuts!” It’s a modern take on a traditional favorite, perfect for today’s home baker.
Why You Will Adore This Coconut Cake Recipe
You’ll love this recipe because it works! It’s detailed but straightforward. The result is a stunning, triple-layer cake that looks like it came from a bakery. The taste is incredible. The cake itself is tender and sweet with hints of vanilla and coconut. The frosting is smooth, slightly tart, and wonderfully creamy. Then, you get the bonus of crunchy pecans and extra coconut flakes. It’s a textural party in every bite. Plus, it makes you feel like a superstar when you present it.
Perfect Occasions for This Show-Stopping Cake
This cake is a celebration in itself. It’s ideal for:
- Birthdays: Especially for someone who loves tropical flavors.
- Holiday Gatherings: Christmas, Easter, or Thanksgiving dessert table.
- Potlucks and Parties: It always gets compliments and requests for the recipe.
- Just Because: Sometimes, a Tuesday needs a three-layer cake.
Gathering Your Ingredients
For the Cake:
- 2 cups all-purpose flour
- 1/2 cup butter, softened
- 1 teaspoon baking soda
- 1/2 cup shortening
- 1 cup buttermilk
- 2 cups granulated sugar
- 1 cup shredded sweetened coconut
- 5 large eggs, separated
- 1 cup chopped pecans (the recipe says walnuts, but we’re using pecans!)
- 1 tablespoon vanilla extract
For the Frosting & Garnish:
- 8 ounces cream cheese, softened
- 1 teaspoon vanilla extract
- 4 cups powdered sugar (confectioners’ sugar)
- 1/2 cup butter, melted
- Extra chopped pecans and coconut flakes for garnish
Smart Ingredient Substitution Options
Don’t stress if you’re missing something! Here are easy swaps:
- Buttermilk: Make your own! Mix 1 cup milk with 1 tablespoon lemon juice or white vinegar. Let it sit for 5 minutes.
- Shortening: You can use an additional 1/2 cup of softened butter instead.
- Pecans: Walnuts work perfectly, as the original recipe states. Almonds would also be lovely.
- Coconut: Unsweetened coconut can be used if you prefer less sweetness.
Creating Your Coconut Cake Masterpiece
Step 1: Preheat and Prep
First, get your oven ready. Turn it on to 350°F (175°C). This ensures a consistent baking temperature. While it heats, generously grease three 9-inch round cake pans. I like to use butter and a light dusting of flour. This little prep work guarantees your beautiful cakes will slide out easily after baking.
Step 2: Build the Cake Base
In a large mixing bowl, combine the softened butter, shortening, and sugar. Beat them together until the mixture is light, fluffy, and pale in color. This takes about 3-4 minutes. Next, add the egg yolks one at a time, mixing well after each. The yolks will make the batter rich and golden. Finally, stir in that wonderful tablespoon of vanilla. Your kitchen will start smelling amazing already.
Step 3: Incorporate Dry Ingredients
Now, add your buttermilk to the mixture. The buttermilk adds moisture and a slight tang. Then, gently beat in the flour and baking soda until just combined. You want a smooth, thick batter. Be careful not to overmix here. Overmixing can lead to a dense cake. Pro tip: Sift your flour first for an even lighter texture.
Step 4: Add Coconut and Pecans
Fold in the cup of shredded coconut and the chopped pecans. Use a spatula and a gentle hand. You want to distribute these goodies evenly without deflating your batter. The batter will become speckled with white coconut and brown pecans. It’s a beautiful sight!
Step 5: Whip the Egg Whites
In a completely clean, dry bowl, beat your egg whites. Start on low, then increase to high speed. Beat until stiff peaks form. This means when you lift the beaters, the white peaks stand straight up and don’t curl over. These whites are the secret to a super light and airy cake structure.
Step 6: Fold in the Whites
Gently fold the whipped egg whites into your main batter. Again, use a folding motion with a spatula. This incorporates air into the batter. It will become lighter and slightly increased in volume. This step is what makes the cake layers so wonderfully tall and soft.
Step 7: Divide and Bake
Divide the batter evenly among your three prepared pans. Tap the pans lightly on the counter to settle the batter. Place them in your preheated oven. Bake for 25 to 30 minutes. The cakes are done when they are golden, pull away from the pan edges slightly, and a toothpick inserted in the center comes out clean.
Step 8: Cool the Layers
Let the cakes rest in their pans for 10 minutes after baking. This allows them to set. Then, carefully turn them out onto wire racks to cool completely. Chef’s tip: They must be completely cool before frosting. Warm cake will melt your lovely cream cheese frosting.
Step 9: Make the Dreamy Frosting
For the frosting, beat the softened cream cheese and melted butter together until smooth. Add the vanilla. Gradually beat in the powdered sugar. Start with 3 cups, then add more until you reach your preferred consistency. You want it thick enough to spread but soft and creamy.
Step 10: Frost and Garnish
Place one cooled cake layer on your serving plate. Spread a generous amount of frosting on top. Place the second layer on top and repeat. Add the third layer. Now, frost the top and sides of the entire cake. Finally, garnish the top with extra chopped pecans and a generous sprinkling of coconut flakes. It’s now a masterpiece!
Time You’ll Need for This Coconut Cake
Here’s a quick timeline to plan your baking:
- Preparation Time: 20 minutes (measuring, mixing, pan prep)
- Cooking Time: 30 minutes (for baking the layers)
- Cooling Time: At least 1 hour (very important!)
- Frosting & Decorating Time: 15 minutes
- Total Project Time: About 1 hour 50 minutes
My Chef’s Secret for the Best Cake
My secret is in the egg whites. Whipping them correctly is crucial. Ensure your bowl and beaters are spotlessly clean. Any trace of grease or yolk will prevent the whites from reaching stiff peaks. Also, fold them in with a light, patient hand. This preserves the air bubbles, giving you that cloud-like texture.
A Little Extra Coconut Cake Info
Did you know coconut is not actually a nut? It’s a drupe, a type of fruit! The shredded coconut in baking comes from the white meat inside. Using both butter and shortening in the cake is an old baker’s trick. Butter gives flavor, while shortening often gives a more tender texture. It’s a perfect balance.
Necessary Equipment Checklist
You’ll need these tools to make the process smooth:
- Three 9-inch round cake pans
- Electric mixer (stand or hand mixer)
- Large mixing bowls (at least two)
- Measuring cups and spoons
- Spatula for folding
- Wire cooling racks
- Cake server or large plate for assembly
How to Store Your Coconut Cake
Because of the cream cheese frosting, this cake needs refrigeration. After serving, cover any leftover cake with plastic wrap or place it in a cake carrier. Store it in the refrigerator. It will stay fresh and delicious for up to 4-5 days.
If you need to store it longer, you can freeze it. Freeze the unfrosted cake layers individually, wrapped tightly in plastic wrap and then aluminum foil. Thaw them overnight in the fridge before frosting. The frosting itself does not freeze well, so make it fresh when you’re ready to serve.
For short-term storage before a party, you can keep the frosted cake at room temperature for about 2 hours. This makes it easier to slice and serve. After that, please refrigerate it.
My Best Tips and Advice
- Always use room temperature ingredients (butter, eggs, cream cheese). They blend much more evenly.
- When folding, use a figure-eight motion with your spatula to combine without beating.
- If your frosting seems too soft, add a little more powdered sugar. If it’s too thick, add a tiny splash of milk.
- Toast your garnishing coconut flakes lightly for extra flavor and a beautiful golden color.
Presentation Tips to Impress Your Guests
Make your cake look extra special with these ideas:
- Place the cake on a beautiful cake stand or a simple white plate for contrast.
- Create a pattern with the pecans and coconut on top, like a ring around the edge.
- Serve with a dollop of extra whipped cream or a scoop of vanilla ice cream on the side.
- For a party, add a small “Happy Birthday” or decorative flag on top.
Healthier Alternative Recipe Variations
If you want to tweak the recipe for different needs, here are six great ideas:
- Gluten-Free Coconut Cake: Substitute the all-purpose flour with a gluten-free flour blend designed for baking. Ensure it contains a binder like xanthan gum.
- Lower-Sugar Version: Reduce the sugar in the cake by 1/4 cup. Use a sugar substitute in the frosting, or simply use less powdered sugar.
- Dairy-Free Adaptation: Use plant-based butter and milk (with lemon juice for buttermilk). Use a dairy-free cream cheese alternative for the frosting.
- Nut-Free Cake: Simply omit the pecans. The cake will still be delicious with the coconut. You could add raisins for a different texture.
- Single Layer Cake: Bake the entire batter in a 9×13 inch pan. This makes a simpler sheet cake. Adjust baking time to 35-40 minutes.
- Cupcake Version: Pour the batter into cupcake liners. Bake for 18-22 minutes. Top each with a swirl of frosting and a pinch of coconut and pecans.
Common Mistakes to Avoid
Mistake 1: Not Cooling the Cakes Completely
This is a big one! Frosting a warm cake is a recipe for disaster. The cream cheese frosting will become runny and slide off. It might even make the cake layers soggy. Always let your cakes cool on a rack until no warmth remains. This can take a full hour. Patience is key here.
Mistake 2: Overmixing the Batter
After adding the flour, mix only until the ingredients are combined. Overmixing activates the gluten in the flour too much. This can make your cake tough and chewy instead of soft and tender. Once you see a smooth batter with no dry flour pockets, stop mixing.
Mistake 3: Incorrect Egg White Technique
If your egg whites don’t reach stiff peaks, your cake will be denser. Ensure there is no yolk in your whites. Use a clean metal or glass bowl, not plastic. Plastic can retain grease. Beat on high speed until the whites are stiff and glossy. They should not look watery or soft.
Mistake 4: Using Cold Ingredients
Cold butter and cream cheese won’t blend smoothly. They can create a lumpy batter or frosting. Take your butter, eggs, and cream cheese out of the fridge about an hour before you start. Softened ingredients create a silky, homogeneous mix for a perfect texture.
Mistake 5: Underbaking or Overbaking
Check your cake at the 25-minute mark. Use the toothpick test. If it comes out with wet batter, it needs more time. If it comes out completely dry and the cake is dark brown, it might be overbaked. Aim for a golden color and a toothpick with just a few moist crumbs attached.
Frequently Asked Questions
Can I make this cake in advance?
Yes, you can! You can bake the cake layers up to two days ahead. Wrap them tightly in plastic wrap once cooled and store at room temperature. Make the frosting the day you plan to serve. Frost the cake a few hours before your event. The flavors actually meld together beautifully when assembled a bit ahead.
Why do I need to separate the eggs?
Separating the eggs serves a special purpose. The yolks go into the main batter to add richness, fat, and flavor. The whites are whipped separately and folded in. This adds a tremendous amount of air to the batter. This air lightens the cake’s texture, making it rise high and become wonderfully fluffy and soft.
What if I don’t have three cake pans?
No problem! You can bake the batter in batches. Grease and prepare one pan. Pour in about one-third of the batter and bake it. While it bakes and cools, wash and re-prepare the same pan for the next layer. It takes a little more time, but the result is the same beautiful triple-layer cake.
Can I use pre-made frosting?
I really recommend making the frosting from scratch. The cream cheese frosting in this recipe is a key flavor component. It’s tangy, creamy, and balances the sweet cake. Store-bought frostings are often much sweeter and have a different texture. They won’t give you the same magic as this homemade version.
How do I prevent my cake from sticking to the pan?
Grease your pans very well. I use softened butter and a pastry brush to coat every inch. Then, I sprinkle a light layer of flour over the butter and tap it around. You can also use a non-stick baking spray that has flour in it. This creates a barrier that helps the cake release cleanly.
Is shortening necessary?
Shortening helps create a very tender cake crumb. If you prefer not to use it, you can replace the 1/2 cup shortening with an additional 1/2 cup of softened butter. The cake will be slightly richer in flavor but may be a bit less tender. Both versions are delicious.
My frosting is too runny. How can I fix it?
If your frosting is runny, it’s likely because the cream cheese or butter was too soft or warm. Pop the whole bowl of frosting into the refrigerator for 20-30 minutes to firm up. Then, beat it again. You can also add a little more powdered sugar, a half cup at a time, to thicken it up.
Can I use frozen coconut?
You should use thawed, dried shredded coconut. Frozen coconut often contains more moisture. If you use it without thawing and draining, it could add extra liquid to your batter. This might affect the final texture of the cake. It’s best to use the packaged shredded coconut from the baking aisle.
How do I know when the egg whites are at “stiff peaks”?
After beating on high speed, stop the mixer and lift the beaters straight up out of the whites. The peak of egg white that forms on the beater should stand up straight and not droop or curl over at the tip. The entire mass of whites should look glossy, firm, and hold its shape when you tilt the bowl.
What’s the best way to chop pecans?
For this cake, you want small pieces but not dust. Use a sharp knife on a cutting board. You can also place pecans in a zip-top bag and gently crush them with a rolling pin. Avoid using a food processor if you can, as it can quickly turn them into a paste. Uniform, small pieces mix into the batter best.
Your Moment of Sweet Victory
And there you have it! Your own stunning, homemade Coconut Cake with Cream Cheese Pecans. I promise, the effort is worth it. Seeing the smiles when you bring this cake to the table is the best reward. It’s more than a dessert; it’s a memory maker. So, tie on your apron, preheat that oven, and get ready to bake something truly spectacular. Happy baking!
Pizza Savory Muffins
Ingredients
Equipment
Method
- Preheat the oven to 350°F (175°C) and grease three 9-inch round cake pans.
- In a large mixing bowl, beat together softened butter, shortening, and sugar until light and fluffy.
- Add egg yolks one at a time, mixing well after each addition, then stir in vanilla.
- Add buttermilk to the mixture, then gently beat in flour and baking soda until just combined.
- Fold in shredded coconut and chopped pecans.
- In a clean bowl, beat egg whites until stiff peaks form.
- Gently fold the whipped egg whites into the batter.
- Divide the batter evenly among the prepared pans and bake for 25 to 30 minutes or until golden and a toothpick comes out clean.
- Let cakes cool in pans for 10 minutes before transferring to wire racks to cool completely.
- For the frosting, beat cream cheese and melted butter until smooth, then gradually add powdered sugar.
- Frost the layers of the cooled cake and garnish with chopped pecans and coconut flakes.