The Irresistible Charm of Red Velvet Cake
There’s just something about a red velvet cake that makes everyone stop and stare. I remember the first time I brought one to a family potluck. My uncle, who usually skips dessert, asked for a second slice! That rich red color, so bold and cheerful, paired with that snowy-white, tangy frosting is pure magic. It’s not just a cake; it’s a celebration on a plate. Today, I’m sharing my tried-and-true recipe for the most luscious red velvet cake with creamy frosting. This is the one that always gets the “wow” and the recipe requests.
A Slice of History: Where Did Red Velvet Come From?
The story of red velvet cake is as rich as its flavor. Many believe it started in the elegant tearooms of the Victorian era. The original red tint wasn’t from food coloring! It came from a cool chemical reaction. Natural, non-Dutched cocoa powder mixed with acidic ingredients like buttermilk and vinegar would turn a subtle reddish-brown. Today, we use a bit of food coloring for that famous vibrant hue. This cake became a Southern classic and a symbol of luxury. My version honors that tradition with a perfect, modern balance of moisture and flavor.
Why You’ll Fall in Love With This Red Velvet Recipe
You will adore this recipe because it works. Every. Single. Time. The crumb is incredibly soft and moist, not dry or crumbly. The flavor is a subtle chocolate whisper, not overpowering. It’s the perfect partner for the luscious, creamy frosting. Plus, it’s straightforward! No fancy techniques are needed. I’ve tested this for years at birthdays, bake sales, and just-because-Tuesdays. It’s my go-to for creating sweet, happy memories. This cake promises to be the star of your table, too.
Perfect Occasions for Your Beautiful Cake
This cake turns any event into something special. It’s a natural for Valentine’s Day with its romantic red color. Imagine it as the centerpiece for a birthday party or a holiday dessert table. It’s also a superstar at potlucks and picnics—everyone wants to try a piece. I love baking it for a “just because” treat to surprise my neighbors. Anytime you want to add a touch of love and joy, this red velvet cake is your answer.
Gathering Your Ingredients
Here’s what you’ll need for this baking adventure. Having everything measured and ready makes the process so smooth.
- 2 1/2 cups all-purpose flour
- 1 1/2 cups granulated sugar
- 1 teaspoon baking soda
- 1 teaspoon salt
- 1 teaspoon cocoa powder
- 1 1/2 cups vegetable oil
- 1 cup buttermilk, room temperature
- 2 large eggs, room temperature
- 2 tablespoons red food coloring
- 1 teaspoon vanilla extract
- 1 teaspoon white vinegar
For the Cream Cheese Frosting:
- 16 oz cream cheese, softened
- 1/2 cup unsalted butter, softened
- 4 cups powdered sugar
- 1 teaspoon vanilla extract
Handy Substitution Options
No buttermilk? No panic! Make your own by mixing 1 cup of milk with 1 tablespoon of lemon juice or white vinegar. Let it sit for 5 minutes. For a slightly different flavor, you can use sour cream or plain Greek yogurt. If you want a natural red color, try beet juice powder instead of liquid food coloring. For the frosting, mascarpone cheese can stand in for cream cheese for a richer, Italian twist.
Creating Your Masterpiece: Step-by-Step Instructions
Step 1: Preheat and Prepare
First, get your oven ready for action. Preheat it to 350°F (175°C). This ensures a consistent temperature for baking. Now, grab your two 9-inch round cake pans. Grease them generously with butter or baking spray. Then, dust them with a little flour, tapping out the excess. This simple step is your cake’s insurance policy. It guarantees your beautiful red cakes will slide out perfectly after baking, without any sticking.
Step 2: Whisk the Dry Goods
In a large mixing bowl, let’s combine the dry ingredients. Sift together the flour, sugar, baking soda, salt, and cocoa powder. Sifting is not just for fussy bakers! It aerates the flour and breaks up any lumps. This means your cake batter will be super smooth. You’ll see the cocoa powder creating little brown swirls in the white flour. It smells faintly of chocolate already. This is the foundation of your cake’s tender structure.
Step 3: Combine the Wet Ingredients
Now for the fun, colorful part! In another bowl, whisk together the vegetable oil, room-temperature buttermilk, eggs, red food coloring, vanilla, and vinegar. Watch as the crimson color blooms and coats everything. The mixture will become a vibrant, glossy red liquid. Pro tip: Using room-temperature buttermilk and eggs is key. They blend together much more easily, creating a uniform batter that bakes evenly. The vinegar might seem odd, but it’s a secret weapon for a soft crumb.
Step 4: Bring It All Together
Time to marry the wet and dry teams. Slowly pour the gorgeous red wet mixture into the bowl of dry ingredients. Gently stir with a spatula until the flour just disappears. Stop as soon as you see a smooth, velvety, red batter. Do not overmix! Overmixing develops gluten in the flour, which can make your cake tough. We want light and tender. The batter will be pourable and beautifully deep red.
Step 5: Bake to Perfection
Carefully divide the batter evenly between your two prepared pans. Smooth the tops with your spatula. Slide them into your preheated oven. Now, your kitchen will fill with a warm, sweet aroma. Bake for 30-35 minutes. The cakes are done when they spring back lightly to the touch, and a toothpick poked into the center comes out clean with just a few moist crumbs. Chef’s tip: Rotate the pans halfway through baking for even color and rise.
Step 6: The Patient Cool Down
When the cakes are done, take them out and let them rest in the pans for 10 minutes. This allows them to firm up a bit so they don’t fall apart. Then, run a knife around the edges to loosen them. Place a wire rack on top of each pan and flip it over. Gently lift the pan away to reveal your perfect, red layers. Let them cool completely on the rack. Rushing this step is a frosting disaster waiting to happen—warm cake melts frosting!
Step 7: Whip Up the Dreamy Frosting
While the cakes cool, make the creamy frosting. In a large bowl, beat the softened cream cheese and butter together. Use an electric mixer on medium speed. Beat until it’s completely smooth, creamy, and lump-free. This might take a minute or two. Gradually add the powdered sugar, about one cup at a time, mixing on low speed first to avoid a sugar cloud! Once incorporated, beat on high for 2-3 minutes until fluffy. Mix in the vanilla. You’ll have a bowl of heaven—sweet, tangy, and spreadable.
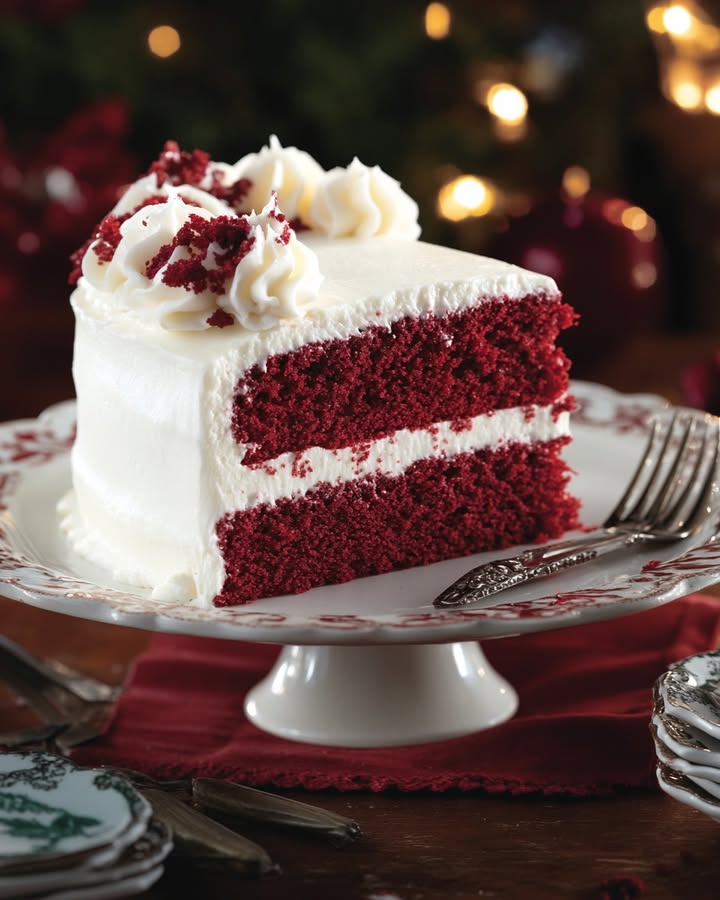
Step 8: Assemble Your Showstopper
This is the best part! Place one completely cool cake layer on your serving plate. Spread a thick, even layer of frosting over the top. Gently place the second layer on top. Now, frost the top and sides with the remaining creamy frosting. Use a spatula to create swoops and swirls. Don’t worry about it being perfectly smooth—rustic looks charming! You’ve just built a beautiful, delicious red velvet cake.
Timing is Everything
Let’s break down the clock so you can plan your baking bliss.
- Prep Time: 20 minutes
- Cook Time: 35 minutes
- Cooling Time: 1 hour (very important!)
- Total Time: About 1 hour 55 minutes
- Servings: 12 happy people
- Calories: Approximately 450 kcal per serving
Chef’s Secret for the Best Red Velvet Cake
My absolute secret trick is the white vinegar. Don’t leave it out! That teaspoon reacts with the baking soda to give an incredible lift. It makes the cake extra tender and soft. It also brightens the flavor just a touch, balancing the sweetness. People will ask, “What’s that amazing texture?” That’s your little secret.
A Fun Fact About That Red Color
Here’s a neat bit of trivia. The original “red velvet” color was more of a mahogany red, from the cocoa. During World War II, bakers started using beet juice to enhance the color and add moisture when foods were rationed. The bright red cake we know today became popular thanks to a famous food coloring company! So, whether you use classic food coloring or beets, you’re part of a long, tasty history.
Necessary Equipment Checklist
You don’t need fancy tools. Here’s what I use:
- Two 9-inch round cake pans
- Mixing bowls (one large, one medium)
- Whisk and spatula
- Electric hand mixer or stand mixer (for frosting)
- Measuring cups and spoons
- Wire cooling rack
- Toothpick or cake tester
How to Store Your Red Velvet Creation
Because of the cream cheese frosting, this cake needs to be refrigerated. Cover it loosely with plastic wrap or place it in a cake carrier. It will stay fresh and delicious for up to 5 days in the fridge. The cold makes the cake even more moist!
If you need to store it longer, you can freeze it. Wrap the unfrosted cake layers tightly in plastic wrap and then aluminum foil. They can freeze for up to 3 months. Thaw them overnight in the fridge before frosting.
For the frosted cake, you can also freeze it whole. First, freeze it uncovered for an hour to let the frosting set hard. Then, wrap it well in several layers of plastic wrap. It will keep for about 1 month. Thaw it in the refrigerator.
My Best Tips and Advice
- Room temperature is best: Let your buttermilk, eggs, cream cheese, and butter sit out for 30-60 minutes before starting. This makes mixing easier and gives a smoother batter and frosting.
- Measure flour correctly: Spoon the flour into your measuring cup and level it off. Don’t scoop directly from the bag—you’ll pack in too much flour and get a dry cake.
- Cool cakes completely: I can’t say it enough. Frosting a warm cake is a messy, runny tragedy. Be patient!
- For deep red color: Use a good quality gel food coloring. Liquid coloring can sometimes fade during baking.
Presentation Ideas to Impress Your Guests
Make your cake look as good as it tastes! Here are some simple ideas:
- Press crushed pecans or walnuts onto the sides of the frosted cake.
- Use a piping bag to create pretty rosettes or swirls on top.
- Garnish with fresh red berries like raspberries or strawberries.
- Dust the top with a little sifted cocoa powder or extra red velvet cake crumbs.
- For a festive touch, sprinkle with edible gold dust or pearl sprinkles.
Healthier Alternative Red Velvet Recipes
Love red velvet but want a lighter twist? Try these variations!
1. Beet-Powered Red Velvet: Replace the food coloring with 1 cup of pureed cooked beets. It adds natural color, moisture, and a nutrient boost.
2. Whole Wheat Wonder: Swap half the all-purpose flour for whole wheat pastry flour. It adds fiber while keeping the cake tender.
3. Sugar-Conscious Version: Reduce the granulated sugar in the cake by 1/4 cup. In the frosting, use a sugar substitute designed for baking or reduce powdered sugar by 1 cup.
4. Gluten-Free Goodness: Use a trusted 1:1 gluten-free all-purpose flour blend. Ensure your baking soda and cocoa are gluten-free certified.
5. Vegan Red Velvet: Use flax eggs, plant-based milk + vinegar for buttermilk, and vegan butter and cream cheese. The result is stunningly similar!
6. Yogurt Frosting: For a lighter frosting, mix Greek yogurt with a little honey and vanilla. It’s tangy and less sweet, but still delicious.
Common Mistakes to Avoid
Mistake 1: Using Cold Ingredients
This is the number one reason for lumpy frosting and dense cake. Cold butter and cream cheese won’t whip up fluffy. Cold buttermilk and eggs can cause the batter to separate. Always plan ahead. Take your dairy and eggs out of the fridge about an hour before you bake. Your ingredients should feel cool to the touch, not cold. This simple step makes mixing a dream and ensures a light texture.
Mistake 2: Overmixing the Batter
Once you add the wet ingredients to the dry, you might feel the urge to keep stirring. Resist it! Overmixing develops the gluten in the flour. This makes your cake tough and chewy, like a bread. You want to mix just until the last streak of flour disappears into the red batter. A few small lumps are okay. They will bake out. Gentle folding is the key to a soft, velvety crumb.
Mistake 3: Overbaking the Layers
It’s easy to leave the cake in the oven “just to be sure.” But overbaking is the fast track to a dry cake. Set your timer for the minimum time (30 minutes). Start checking then. The cakes are done when the edges pull away from the pan slightly and a toothpick comes out clean or with a few moist crumbs. Remember, the cakes will continue to cook a little from residual heat as they cool in the pan.
Mistake 4: Frosting a Warm Cake
Impatience here can ruin your beautiful frosting. If the cake layers are even slightly warm, the cream cheese frosting will melt, slide off, and become a soupy mess. It’s heartbreaking! Let the layers cool in the pan for 10 minutes, then on a wire rack until completely cool to the touch. This can take a full hour. Use this time to clean up and make your frosting. Your patience will be rewarded with a picture-perfect cake.
Mistake 5: Skipping the Sifting Step
It seems like an extra dish to wash, but sifting your dry ingredients is important. It aerates the flour and cocoa powder. It also breaks up any lumps in the baking soda or cocoa. This ensures everything gets evenly distributed in your batter. You’ll avoid pockets of bitter baking soda or dry flour in your finished cake. A quick sift means a consistent, smooth texture in every bite.
Frequently Asked Questions
Can I make this red velvet cake ahead of time?
Absolutely! You can bake the cake layers up to two days in advance. Let them cool completely, then wrap each layer tightly in plastic wrap. Store them at room temperature in a cool, dry place. You can also make the frosting a day ahead. Keep it covered in the refrigerator. Let it sit at room temperature for 30 minutes before you beat it again to make it spreadable. Assembling the cake the day you serve it is best for freshness, but you can frost it a day ahead and refrigerate it.
Why did my red velvet cake turn out brown instead of red?
This usually happens for two reasons. First, the type of cocoa powder matters. Natural cocoa powder is more acidic and helps the red color. Dutch-processed cocoa is darker and can lead to a browner cake. Stick with natural cocoa for this recipe. Second, your food coloring might not be strong enough. Gel food coloring is more concentrated than liquid. It gives a vibrant, bake-proof red color. If you use liquid, you might need to add more, but this can thin your batter. I recommend a good quality red gel food coloring for the best results.
How can I tell if my cake is done baking without a toothpick?
No toothpick? No problem. Gently press the center of the cake with your finger. If it springs back and leaves no indent, it’s done. Also, look at the edges. They will start to pull away slightly from the sides of the pan. The cake should also have a nice, set look on top. Another trick is to listen. A cake that is still wet in the middle will make a slight sizzling sound. A done cake will be quiet. Using these methods together will give you confidence.
Can I freeze a fully frosted red velvet cake?
Yes, you can! It requires a little care. First, place the fully frosted cake in the freezer, unwrapped, for about one hour. This lets the frosting harden completely. Then, wrap the entire cake tightly in several layers of plastic wrap. Be gentle to not mess up the frosting. Finally, wrap it in aluminum foil or place it in a large freezer bag. It will keep for about a month. To serve, thaw it overnight in the refrigerator. This method works great for planning ahead for big events.
What’s the best way to get smooth frosting on the cake?
For super smooth frosting, try a “crumb coat.” First, apply a very thin layer of frosting all over the chilled cake. This traps any loose crumbs. Pop the cake back in the fridge for 15 minutes to let this coat set. Then, apply your final, thick layer of frosting. The crumbs won’t show through. Use a bench scraper or a long, flat spatula held against the side of the cake as you turn the plate. Dip your spatula in hot water and dry it for an extra-smooth finish.
Is there a way to make this recipe into cupcakes?
This recipe makes fantastic red velvet cupcakes! Line a muffin tin with paper liners. Fill each liner about 2/3 full with the batter. Bake at the same temperature, 350°F, but for only 18-22 minutes. Do the toothpick test to check for doneness. This should make about 24 cupcakes. Let them cool completely before frosting. You can pipe the cream cheese frosting on top for a beautiful look. Cupcakes are perfect for parties where you want individual servings.
My frosting is too runny. How can I fix it?
Runny frosting usually means your cream cheese or butter was too soft or the kitchen was very warm. Don’t worry! Pop the entire bowl of frosting into the refrigerator for 20-30 minutes. This will firm up the fats. Then, beat it again with your mixer. If it’s still too soft, you can add a little more powdered sugar, about 1/4 cup at a time, until it reaches a spreadable consistency. Be sure not to overbeat after adding the sugar, as that can sometimes make it runny again.
Can I use a different type of pan, like a 9×13?
You can bake this as a sheet cake. Grease and flour a 9×13 inch baking pan. Pour all the batter into the prepared pan. The baking time will be a bit longer, likely 35-40 minutes. Keep a close eye on it and test for doneness with a toothpick. This is a great, easy option for a crowd. You can frost it right in the pan. It’s less formal but just as delicious. It’s my go-to for large family gatherings and potlucks.
Why is buttermilk important in red velvet cake?
Buttermilk does three wonderful things. First, its acidity reacts with the baking soda to create lift, making the cake light and tender. Second, it adds a subtle tangy flavor that balances the sweetness. This is a classic part of the red velvet taste profile. Third, it adds moisture and richness. Using regular milk just isn’t the same. The cake won’t be as soft or have that signature flavor. If you don’t have it, the homemade substitute works in a pinch.
How do I prevent my cake layers from doming in the middle?
A slight dome is normal, but for perfectly flat layers, try these tricks. Make sure your oven temperature is accurate with an oven thermometer. An oven that runs hot can cause doming. You can also use cake strips. These are fabric strips you soak in water and wrap around the outside of the cake pan. They insulate the edges, so the cake bakes evenly from edge to center. If you get a dome, you can always slice it off with a serrated knife before stacking for a level cake.
Your New Favorite Cake Awaits
There you have it—everything you need to bake a stunning, luscious red velvet cake. This recipe is a labor of love that always pays off with smiles and empty plates. Remember, baking is about joy, not perfection. So put on your apron, play some music, and have fun creating this classic dessert. I can’t wait for you to experience the pride of slicing into your own beautiful, homemade red velvet cake. Happy baking!
Savory Dijon Turkey
Ingredients
Equipment
Method
- Preheat the oven to 350°F (175°C) and prepare two 9-inch round cake pans.
- Sift together flour, sugar, baking soda, salt, and cocoa powder in a large mixing bowl.
- In another bowl, whisk together vegetable oil, buttermilk, eggs, red food coloring, vanilla, and vinegar.
- Gradually pour the wet mixture into the dry ingredients and stir gently until just combined.
- Divide the batter between the prepared pans and smooth the tops.
- Bake for 30-35 minutes until a toothpick comes out clean.
- Let the cakes rest in the pans for 10 minutes, then cool completely on a wire rack.
- For frosting, beat cream cheese and butter until smooth, add powdered sugar gradually, then mix in vanilla.
- Assemble the cake by spreading frosting between layers and over the top and sides of the cake.