Who needs a candy aisle when you have your kitchen? I was on a mission to conquer my sweet tooth without the guilt. After a few hilarious kitchen experiments (let’s not talk about the “granola bar” that tasted like cardboard), I finally nailed it. This Healthy Kit Kat recipe is my proudest creation yet. It’s crispy, chocolatey, and feels like a total treat. Your family won’t believe it’s made with wholesome ingredients!
A Bite of Happier History
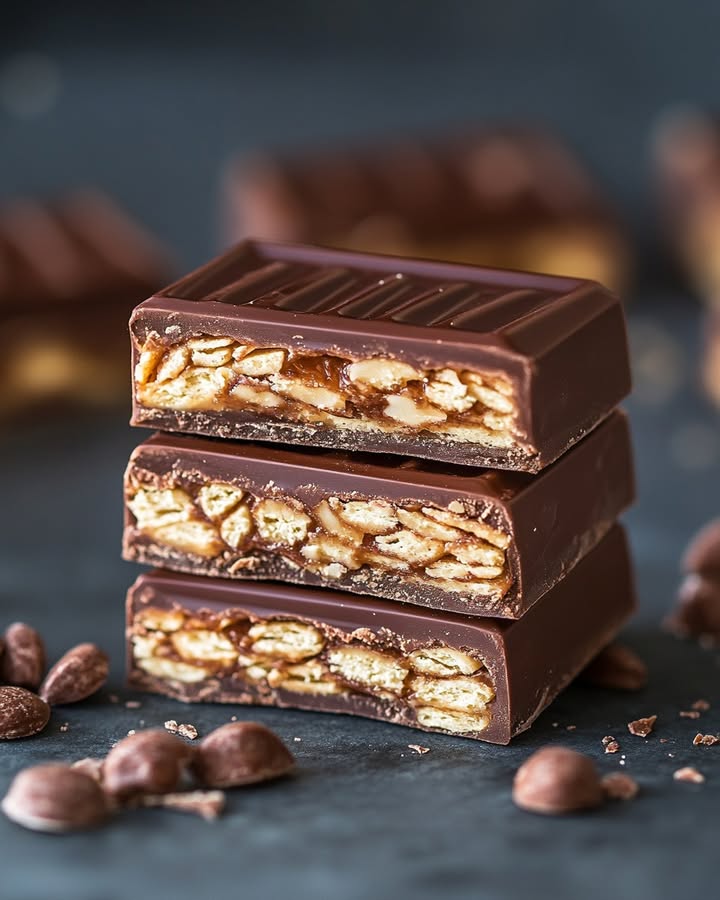
The real Kit Kat is a global superstar, known for its crispy wafer and smooth chocolate. My version pays homage but takes a delicious detour. We swap refined flours for almond or tiger nut flour. We use coconut sugar and dark chocolate for richer flavor. This isn’t just a copycat recipe. It’s an upgrade. It’s for anyone who wants to enjoy a classic treat with a happy, healthy twist.
Why You’ll Love This Healthier Kit Kat
First, they are incredibly delicious. The cookie layer bakes into a perfect, crisp crunch. The fudge filling is rich and creamy. The dark chocolate coating ties it all together. Second, they are secretly good for you. With protein from nut butter and fiber from flax, they actually satisfy you. No more sugar crashes! They’re also gluten-free and can easily be made nut-free.
Perfect Occasions for Homemade Kit Kats
These bars are perfect for so many moments. Pack them in lunchboxes for a special surprise. Serve them as a fancy dessert at your next dinner party. They are a hit at picnics and potlucks. I love making a batch for movie nights at home. They also make wonderful homemade gifts. Just tie them with a ribbon!
Ingredients for Your Healthy Kit Kat Recipe
Gathering simple, quality ingredients is the first step to success.
- Cookies: 1 cup blanched almond flour (or tigernut flour for nut-free), 3 Tbsp coconut sugar, 1 Tbsp ground flax, 1/4 tsp salt, 3 Tbsp melted coconut oil, 1 Tbsp water, 1 tsp vanilla extract.
- Fudge Filling: 2 Tbsp dark chocolate, 3 Tbsp peanut butter (or Sunbutter for nut-free).
- Chocolate Coating: 1 cup dark chocolate (5oz), 1 Tbsp coconut oil.
Smart Substitution Options
Don’t have an ingredient? No problem! Here are easy swaps.
- Almond Flour: Tigernut flour works perfectly for a nut-free version. Sunflower seed flour is another great option.
- Peanut Butter: Use any nut or seed butter you love. Almond butter, cashew butter, or sunflower seed butter all work.
- Coconut Sugar: You can use maple syrup or honey. If you do, slightly reduce the water in the cookie dough by half a teaspoon.
- Dark Chocolate: Use your favorite chocolate chips or baking bar. A dairy-free brand keeps it vegan.
Creating Your Healthy Kit Kat Bars
Follow these steps for perfect, crispy, chocolatey bars every time.
Step 1: Make the Cookie Base
Preheat your oven to 350°F (175°C). In a medium bowl, mix the almond flour, coconut sugar, ground flax, and salt. The mixture will look like fine sand. Pour in the melted coconut oil, water, and vanilla extract. Stir with a spatula first, then use your hands to knead it into a soft, pliable dough. The warmth from your hands helps the coconut oil bind everything beautifully. Pro tip: If the dough feels too dry, add another teaspoon of water. It should hold together when pressed.
Step 2: Roll, Cut, and Bake
Place the dough between two sheets of parchment paper. Roll it out until it’s about 1/4 inch thick. Peel back the top layer of paper. Use a sharp knife or a pastry cutter to cut the dough into rectangles, about 3.5″ long and 0.75″ wide—classic Kit Kat size! Slide the parchment paper with all the cut cookies directly onto a baking sheet. Bake for 8-10 minutes. You’ll know they’re done when the edges turn a light golden brown. Let them cool completely on the pan. They’ll crisp up as they cool.
Step 3: Whip Up the Fudge Filling
While the cookies cool, make the magical fudge. Gently melt the 2 tablespoons of dark chocolate. You can use a double boiler or microwave in short bursts. Stir in the peanut butter until the mixture is completely smooth and glossy. Let it cool for about 10 minutes. It will thicken slightly, making it easier to spread. This fudge is so good you might want to eat it with a spoon—I won’t tell!
Step 4: Assemble the Layers
Now for the fun part: building your bars! Take three cooled cookie rectangles. Spread a thin layer of the fudge filling on one cookie. Place a second cookie on top and press gently. Add another layer of fudge on that second cookie, then top with the third. You’ve made a cookie sandwich with two layers of fudge. Repeat until all your cookies are used up. Chef’s tip: For super neat bars, chill the assembled sandwiches for 15 minutes before dipping. This helps them stay together.
Step 5: The Final Chocolate Coat
Melt the remaining 1 cup of dark chocolate with the tablespoon of coconut oil. The oil makes the chocolate thinner for dipping and gives it a lovely sheen. Holding a cookie sandwich with a fork, dip it completely into the melted chocolate. Let the excess drip off. Place it on a parchment-lined tray. Repeat with all bars. For a professional finish, use a spoon to drizzle any leftover chocolate over the top. Let the chocolate set completely at room temperature or in the fridge.
Your Recipe Timing Breakdown
Here’s a quick look at how your time will be spent:
- Prep Time: 25 minutes
- Cook Time: 10 minutes
- Cooling/Setting Time: 45 minutes
- Total Time: About 1 hour 20 minutes
- Yields: 11-12 delicious Kit Kat bars
The Chef’s Secret for the Perfect Snap
The key to that iconic crispy texture is letting the baked cookies cool completely before you assemble. If they are even slightly warm, the fudge will melt and make the cookies soggy. Patience is your secret ingredient here! A fully cooled cookie ensures every bite has that satisfying snap.
A Little Extra Info: The Power of Dark Chocolate
Using high-quality dark chocolate isn’t just for taste. Dark chocolate is rich in antioxidants. Choosing a bar with a higher cocoa percentage (70% or more) means less added sugar. It gives these treats a deep, sophisticated flavor that milk chocolate just can’t match. It’s a simple swap that makes a big difference in your food responsibility journey, focusing on quality ingredients.
Necessary Kitchen Equipment
You don’t need any fancy tools for this recipe.
- Medium mixing bowl
- Baking sheet
- Parchment paper
- Sharp knife or pastry cutter
- Small bowls for melting chocolate
- Fork for dipping
- Wire cooling rack (helpful but not essential)
How to Store Your Healthy Homemade Kit Kats
Store these bars in an airtight container in the refrigerator. They will stay fresh and crisp for up to two weeks. The cool temperature keeps the chocolate firm and the layers intact.
For longer storage, you can freeze them. Place them in a single layer on a parchment-lined tray until solid. Then transfer them to a freezer-safe bag or container. They will keep for up to two months.
One of my favorite ways to eat them is straight from the freezer. The chocolate is extra crisp, and the fudge becomes wonderfully chewy. It’s like a whole new dessert experience!
My Best Tips and Advice
- Measure your flour correctly: Spoon the almond flour into your measuring cup and level it off. Don’t scoop directly from the bag, as this can pack it down and lead to dry dough.
- Chill your dough if it’s sticky: If the cookie dough is too soft after mixing, pop it in the fridge for 15 minutes. This makes it much easier to roll and cut.
- Use a ruler for fun: For perfectly uniform bars, use a ruler to measure your cuts. It makes them look store-bought (but better!).
Presentation Tips to Impress
Make these treats look as good as they taste.
- Wrap individual bars in colorful cellophane and tie with twine for a cute gift.
- Arrange them standing up in a tall glass for a fun centerpiece.
- Serve them on a white plate with a light dusting of cocoa powder or crushed freeze-dried raspberries.
- Package them in a small cardboard box lined with parchment paper, just like the real thing!
Six Delicious Healthy Kit Kat Variations
Once you master the basic recipe, try these fun twists.
- Mint Chocolate: Add 1/4 teaspoon of peppermint extract to the fudge filling. It’s refreshing and decadent.
- Orange Zest: Mix the zest of one orange into the cookie dough. The citrus pairs wonderfully with dark chocolate.
- Salted Caramel: Add a pinch of flaky sea salt to the top of the chocolate coating right after dipping.
- Cookie Dough Center: Replace the fudge layer with a ball of edible chickpea cookie dough for a surprise inside.
- Double Berry: Mix freeze-dried strawberry or raspberry powder into the cookie dough for a pink hue and fruity flavor.
- Espresso Crunch: Add 1 teaspoon of instant espresso powder to the melted chocolate coating for a coffee kick.
If you love creating balanced, wholesome treats like this, you’ll find so much inspiration in our full collection of healthy recipes designed for everyday joy.
Common Mistakes to Avoid
Mistake 1: Rolling the Dough Too Thin
It’s tempting to roll the dough super thin for an extra-crispy cookie. But if it’s thinner than 1/4 inch, the cookies can burn easily. They also become too fragile to handle when dipping. Aim for a consistent 1/4-inch thickness. Using two wooden dowels or chopsticks as guides on either side of your dough can help you roll it evenly.
Mistake 2: Spreading Warm Fudge on Warm Cookies
This is the biggest culprit for soggy Kit Kats. If your cookies or fudge filling are even slightly warm, the heat will soften the cookie layer. The result is a bar that lacks the signature crunch. Always let both components cool completely at room temperature. Rushing this step changes the entire texture of the treat.
Mistake 3: Using Chocolate That’s Too Hot for Dipping
Melting chocolate is a delicate process. If it gets too hot, it can “seize” and become grainy. Even if it doesn’t seize, overly hot chocolate will melt the fudge layer when you dip. Always melt chocolate gently over low heat or in short microwave bursts, stirring frequently. The chocolate should be just smooth and liquid, not piping hot. Test it by dipping the tip of a knife in it first.
Mistake 4: Skipping the Coconut Oil in the Coating
That tablespoon of coconut oil in the coating chocolate is not optional. It thins the chocolate to the perfect dipping consistency. Without it, the coating will be too thick and clumpy. It also helps the chocolate set with a beautiful, crisp shell and a lovely shine. Don’t leave it out!
Frequently Asked Questions
Can I make these completely nut-free?
Absolutely! It’s very easy. Use tigernut flour or sunflower seed flour instead of almond flour for the cookie base. For the fudge filling, swap the peanut butter for sunflower seed butter (Sunbutter). Just make sure your dark chocolate is processed in a nut-free facility if you have a severe allergy. You’ll get the same delicious texture and richness without any nuts.
Why did my cookie dough crumble when I tried to cut it?
This usually means the dough is a bit too dry. Almond flour brands can vary in absorbency. Next time, try adding an extra half tablespoon of water or melted coconut oil to the dough. If it’s already rolled and cracking, don’t worry. Simply press the cracks together with your fingers. You can also gather the scraps, re-roll them, and cut out more cookies. The dough is very forgiving.
How can I get a super smooth chocolate coating?
The secret is in the temperature and the tool. Make sure your melted chocolate and oil mixture is smooth and fluid, but not hot. Use a fork to dip the bar, then gently tap the fork on the side of the bowl to let excess chocolate drip off. As you place it on the parchment, use a second fork or a small knife to help slide it off cleanly. A final drizzle with a spoon hides any minor imperfections.
Are these Healthy Kit Kats vegan?
They can be! The basic recipe is already egg-free and dairy-free if you use dairy-free dark chocolate. To make it fully vegan, just ensure your dark chocolate doesn’t contain any milk solids and that your sugar is certified vegan (some sugar is processed with bone char). Coconut sugar is typically vegan. Always check your specific ingredient labels to be sure.
Can I use maple syrup instead of coconut sugar?
Yes, but it requires a small adjustment. Liquid sweeteners change the dough’s texture. Use 2 tablespoons of maple syrup instead of 3 tablespoons of coconut sugar. Then, reduce the water in the cookie dough by 1 teaspoon. The dough might be slightly sticker, so chilling it before rolling will be very helpful. The flavor will be wonderful!
What’s the best way to melt chocolate for this recipe?
I recommend the double boiler method for the most control. Place a heatproof bowl over a pot of barely simmering water. Make sure the bottom of the bowl doesn’t touch the water. Stir the chocolate and oil until just melted. If using a microwave, do it in 20-second bursts at 50% power, stirring well between each burst. Never walk away from chocolate in the microwave—it burns in an instant!
How long do they take to set after dipping?
It depends on the temperature of your kitchen. At cool room temperature (around 70°F), they will set in about 45 minutes to an hour. If you’re in a hurry, you can place the tray in the refrigerator for 15-20 minutes. Chilling speeds up the process and gives the chocolate a very firm, crisp snap.
Can I use a different nut butter for the filling?
Of course! Almond butter, cashew butter, or even tahini (sesame seed butter) work great. Each one will give a slightly different flavor profile. Almond butter is milder. Cashew butter is extra creamy. Tahini adds a unique, slightly bitter note that pairs amazingly with dark chocolate. Feel free to experiment with what you have on hand.
My chocolate coating cracked after setting. Why?
This often happens if the chilled, assembled bars are too cold when dipped into the warm chocolate. The temperature shock causes the set chocolate shell to contract and crack. To avoid this, let your assembled cookie sandwiches sit at room temperature for 5-10 minutes after taking them out of the fridge, right before dipping. The small temperature adjustment makes a big difference.
Can I make these into fun shapes for a party?
Definitely! Instead of cutting rectangles, use small cookie cutters. Hearts for Valentine’s Day, stars for the 4th of July, or circles for a simpler look. Just remember that intricate shapes can be more delicate to dip. For easier handling, you can also just drizzle the melted chocolate over the top of the cut-out shapes instead of fully dipping them. They’ll be just as festive and delicious.
Your Healthier Treat Adventure Awaits
Making these Healthy Kit Kat bars is more than just following a recipe. It’s about creating joyful moments in your kitchen. The smell of baking cookies, the fun of dipping them in chocolate, the pride of sharing something homemade—it’s all part of the magic. This recipe proves that you don’t have to give up the treats you love. You can make them better. So grab your apron, turn on some music, and get ready for your new favorite snack. Happy cooking!
Southern Cornbread Delight
Ingredients
Equipment
Method
- Preheat your oven to 350°F (175°C).
- In a medium bowl, mix almond flour, coconut sugar, ground flax, and salt.
- Pour in melted coconut oil, water, and vanilla extract, then stir until combined.
- Knead the mixture into a soft dough, adding more water if needed.
- Place the dough between parchment paper and roll it out to 1/4 inch thick.
- Cut the dough into rectangles, about 3.5" long and 0.75" wide.
- Bake the cookies for 8-10 minutes until edges turn golden brown, then let cool completely.
- Melt the 2 tablespoons of dark chocolate and mix in the peanut butter until smooth.
- Spread fudge filling on one cookie, stack another on top, add more fudge, then top with a third cookie to create a sandwich.
- Melt the remaining dark chocolate with coconut oil for coating.
- Dip each cookie sandwich into the chocolate and let excess drip off.
- Place on a parchment-lined tray and allow chocolate to set completely.