Bacon and Corn Griddle Cakes: Your New Favorite Brunch Star
Let me tell you about the morning I became a brunch legend among my friends. I was hosting a lazy weekend get-together, and I wanted something different from the usual pancakes or eggs. I looked at the bacon sizzling in my pan, the sweet summer corn on my counter, and I had a “what if” moment. The result? These savory, golden Bacon and Corn Griddle Cakes. The moment I served them, drizzled with warm maple syrup, the table went quiet except for the happy sounds of people eating. I knew right then this recipe was a keeper.
From Plain Pancakes to a Savory Sensation
Griddle cakes, johnnycakes, corn cakes—they have a long and delicious history across America, often made with simple cornmeal. My version is a fun, modern mash-up. It takes the comforting, fluffy texture of a classic pancake and packs it with the smoky, savory goodness of bacon and the sweet pop of corn. It’s like your favorite breakfast items decided to join forces in one perfect, crispy-on-the-outside, tender-on-the-inside bite. Forget boring breakfast; this is a flavor party on a plate.
Why You’ll Fall Head Over Heels for This Recipe
You will love this recipe because it is shockingly simple but tastes like you spent all morning in the kitchen. It’s a fantastic way to use up leftover corn. The combination of salty bacon, sweet onion, creamy cheese, and that hint of cayenne is absolutely magical. Plus, it’s a one-bowl wonder for the batter—minimal cleanup is a huge win in my book! These griddle cakes are deeply satisfying and feel like a special treat, perfect for turning an ordinary morning into something memorable.
When to Whip Up These Griddle Cakes
This recipe is your secret weapon for so many occasions! It’s a guaranteed hit for:
- Weekend Brunches: Impress your family or guests without stress.
- Holiday Mornings: Christmas or Thanksgiving breakfast deserves something special.
- Camping or Cabin Trips: Cook them on a griddle over the fire for an unforgettable outdoor meal.
- “Breakfast for Dinner” Night: The ultimate comfort food any time of day.
What You’ll Need: The Cast of Characters
Here’s your shopping list for these savory griddle cake delights. Gather these ingredients, and you’re halfway there!
- 8 slices bacon, cut into 1/2-inch pieces
- 1/2 cup finely chopped sweet onion
- 1 cup all-purpose flour
- 2 tablespoons chopped fresh chives
- 1 teaspoon baking powder
- 1/2 teaspoon salt
- 1/4 teaspoon cayenne pepper
- 3/4 cup milk
- 1 large egg, beaten
- 1 tablespoon canola or vegetable oil
- 1 cup frozen, canned (drained), or fresh corn kernels
- 1/2 cup shredded Monterey Jack cheese
- Warm maple syrup, for serving
No Worries! Handy Substitution Ideas
Don’t have every ingredient? No problem! Cooking is about making it work for you.
- Cheese: Swap Monterey Jack for cheddar, pepper jack, or even gouda.
- Flour: Use a 1-to-1 gluten-free flour blend for a gluten-free version.
- Milk: Any milk you have works—whole, 2%, or even a plain unsweetened almond milk.
- Bacon: For a lighter twist, use turkey bacon or even chopped ham.
- Fresh Herbs: No chives? Use thinly sliced green onions or a teaspoon of dried chives.
Let’s Get Cooking: Your Step-by-Step Guide
Ready to make magic? Follow these simple steps. I promise, it’s easier than it looks!
Step 1: Crisp Up the Bacon and Onion
Grab your favorite skillet—I love using my trusty cast iron for this. Toss in those little bacon pieces and get them sizzling over medium heat. The aroma of cooking bacon is the best kitchen perfume! Once the bacon starts to brown and get a little crispy, add the finely chopped sweet onion. The onion will soften and soak up all that delicious bacon flavor. This is where the magic base is built. Pro tip: Remember to scoop out a heaping tablespoon of this mixture and set it aside for your fancy topping later. Cook everything until the bacon is crisp and the onions are translucent and sweet.
Step 2: Mix the Savory Batter
In a medium-sized mixing bowl, let’s combine our dry ingredients. Whisk together the flour, fresh green chives, baking powder, salt, and that sneaky little bit of cayenne pepper. The cayenne doesn’t make it spicy, just gives a wonderful warm background note. Next, pour in the milk, crack in the beaten egg, and add the tablespoon of oil. Now, here’s the key: stir it just until everything is moistened. A few lumps are perfectly fine! Overmixing makes tough pancakes. Finally, gently fold in that glorious bacon-onion mix, the sweet corn kernels, and the shredded cheese. The batter will be thick and hearty.
Step 3: Cook to Golden Perfection
Heat your griddle or a large non-stick skillet over medium heat. Give it a light greasing—a little butter or a swipe of oil works great. Once it’s nice and hot, drop the batter by heaping quarter-cupfuls onto the surface. You’ll hear a lovely sizzle. Let them cook for a good 3 to 4 minutes. You’ll know it’s time to flip when the edges look set and little bubbles form on the surface and pop. Carefully slide your spatula underneath and flip. The other side will cook a bit faster, another 2-3 minutes, until both sides are a beautiful, golden brown. The smell in your kitchen will be unbelievable.
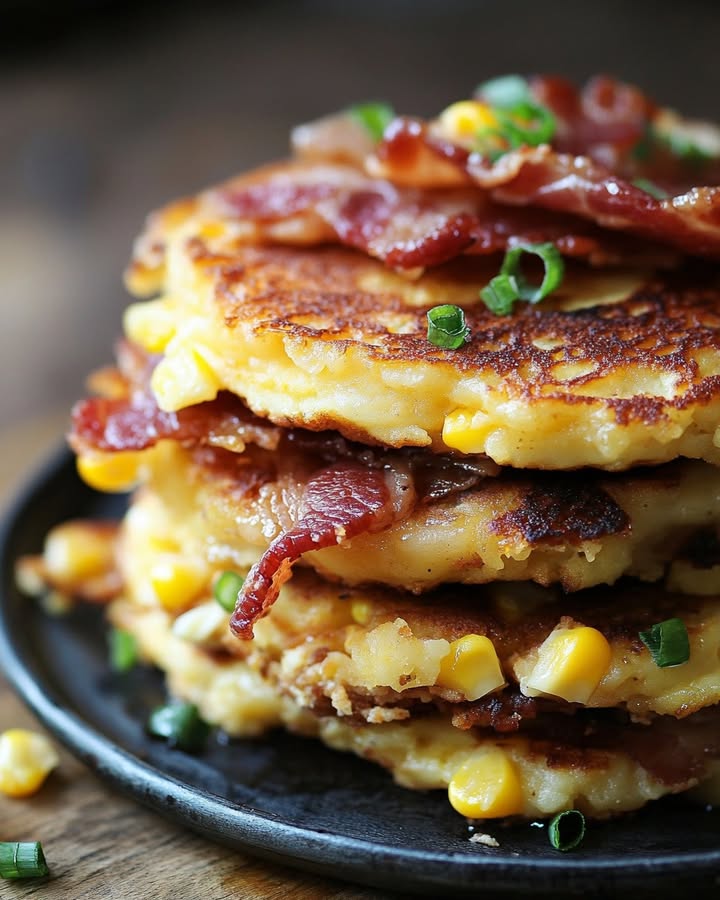
Step 4: Stack, Top, and Devour!
This is the best part. Stack those warm, savory cakes high on a plate. Remember that bacon and onion you saved? Sprinkle it right over the top. Now, for the grand finale: take your warm maple syrup and drizzle it all over everything. The sweet maple syrup with the salty, smoky bacon is a flavor combination sent from the heavens. Serve them immediately while they’re hot and crispy.
Timing is Everything
Here’s a quick look at your time commitment for this fabulous brunch:
- Prep Time: 15 minutes
- Cooking Time: 20 minutes
- Total Time: About 35 minutes
My Chef’s Secret: The Resting Trick
Here’s my little secret for the fluffiest texture: after you mix the batter, let it sit for about 5 minutes before you start cooking. This allows the baking powder to activate and the flour to fully hydrate. You’ll see the batter puff up slightly, and it will give you cakes with a lighter, more tender crumb. It’s a tiny wait for a huge payoff!
A Little Extra Food for Thought
Did you know that combining sweet and savory flavors, like maple and bacon, is a classic culinary pairing called “agrodolce” (sour-sweet) in Italian cooking? Our taste buds are wired to love the contrast. This recipe plays into that perfect balance, making it so irresistibly delicious. It’s science that tastes amazing!
Tools You’ll Need
You don’t need any fancy gadgets for this one. Just gather:
- A medium skillet (cast iron is ideal)
- A mixing bowl and whisk/spoon
- A griddle or large non-stick frying pan
- Measuring cups and spoons
- A sturdy spatula for flipping
Storing Your Savory Leftovers (If You Have Any!)
Let the cooked griddle cakes cool completely on a wire rack. This prevents them from getting soggy on the bottom. Once cool, you can layer them between sheets of parchment paper in an airtight container.
They will keep well in the refrigerator for up to 3 days. To reheat, pop them in a toaster or a warm oven (350°F) for a few minutes until they’re crisp and heated through. This method works much better than the microwave, which can make them soft.
For longer storage, you can freeze them! After cooling, place them in a single layer on a baking sheet to freeze solid, then transfer to a freezer bag. They’ll keep for about 2 months. Reheat straight from the freezer in a toaster or oven.
My Best Tips for Success
- Bacon Fat is Gold: After cooking the bacon and onion, you can drain most of it, but leaving a tiny bit in the batter adds incredible flavor.
- Test Your Griddle: Sprinkle a few drops of water on the hot surface. If they dance and sizzle away, it’s ready. If they just sit and boil, it’s too cold.
- Don’t Press Them Down: Resist the urge to press on the cakes with your spatula while cooking. This squeezes out the air and makes them dense.
- Keep Them Warm: If cooking in batches, keep finished cakes warm on a baking sheet in a 200°F oven.
Make It Look as Good as It Tastes
Presentation is the final touch of love!
- Stack them high and drizzle the syrup in a zigzag pattern.
- Add a fresh sprinkle of chopped chives or green onion on top for a pop of color.
- Serve with a small side of fresh fruit or a simple green salad to balance the meal.
- For a fun twist, serve the warm maple syrup in a little pitcher on the side so everyone can pour their own.
Mix It Up! Healthier and Fun Variations
Love the base recipe? Try these delicious twists!
- Southwestern Style: Add a diced jalapeño (seeds removed) to the bacon mix, use pepper jack cheese, and top with a dollop of cool sour cream or avocado.
- Green Goddess: Fold in a handful of fresh spinach, chopped, and use feta cheese instead of Monterey Jack.
- Sweet Potato Boost: Replace 1/4 cup of the flour with sweet potato puree for extra moisture and vitamins.
- Gluten-Free & Dairy-Free: Use your favorite gluten-free flour blend and swap the milk for unsweetened almond milk and the cheese for a dairy-free shred.
- Mini Slider Bites: Use a tablespoon of batter to make silver dollar-sized cakes. Perfect for party appetizers or kids!
- Herb Garden Delight: Mix in other fresh herbs like parsley, dill, or thyme for a brighter, garden-fresh flavor.
Common Mistakes to Avoid
Let’s sidestep a few common pitfalls to ensure your griddle cakes are perfect every time.
Mistake 1: Overmixing the Batter
This is the number one reason pancakes get tough and chewy. When you stir the wet and dry ingredients together, you only need to mix until they are just combined. It’s okay if there are a few small lumps of flour left. Over-stirring develops the gluten in the flour, which leads to a dense texture instead of a light and fluffy one. Stir gently and stop as soon as you see no more dry patches.
Mistake 2: Cooking at the Wrong Temperature
If your griddle is too hot, the outside of the cakes will burn before the inside is cooked. If it’s too cold, they’ll absorb too much grease and become soggy. The perfect temperature is medium heat. Do the water droplet test: a few drops should sizzle and bounce. Your first cake is often a “test” cake—use it to adjust your heat up or down for the rest of the batch.
Mistake 3: Flipping Too Often
Patience is key! Let the cakes cook undisturbed for the full 3-4 minutes on the first side. You’ll see the edges look dry and bubbles form and pop on the surface. That’s your signal to flip. Flipping them more than once can break them apart and prevent that lovely, even golden crust from forming. Trust the process and flip only once.
Mistake 4: Using Cold Ingredients
Using eggs and milk straight from the fridge can sometimes hinder the rise of your batter, leading to flatter cakes. For the best results, try to let your egg and milk sit out for 15-20 minutes to take the chill off before mixing. This helps the ingredients incorporate more smoothly and can contribute to a better texture.
Your Questions, Answered
Can I make the batter ahead of time?
I don’t recommend mixing the batter and letting it sit for hours. The baking powder will start to lose its oomph, and you might end up with flat cakes. However, you can do the prep work ahead! Cook the bacon and onion, let it cool, and store it in the fridge. You can also measure out your dry ingredients. In the morning, just combine everything quickly and cook. It’s a great way to get a head start on brunch.
Can I use a different type of pan if I don’t have a griddle?
Absolutely! A large non-stick skillet or a well-seasoned cast iron frying pan works perfectly. Just make sure it’s large enough to fit 2-3 cakes at a time without crowding. You may need to cook in more batches, but the results will be just as delicious. Keep the cooked cakes warm in a low oven while you finish the rest.
My cakes are browning too fast but are raw inside. What happened?
This usually means your heat is too high. The outside is cooking quickly, but the heat isn’t penetrating to the center. Lower your burner to medium-low. Also, make sure you’re not making the cakes too thick. A heaping quarter-cup is the ideal amount to ensure they cook through evenly. If they are very thick, you can gently press them down a tiny bit with the spatula after flipping to help.
Can I make these without the cheese?
You sure can! The cheese adds richness and helps bind the batter, but the recipe will still work without it. The cakes might be a tad less moist and a bit more crumbly. If you omit the cheese, you might want to add an extra tablespoon of milk to the batter to compensate for the missing moisture.
Is fresh corn better than frozen or canned?
Fresh corn in season is fantastic and adds a wonderful crunch. But frozen corn (thawed and patted dry) is a brilliant, year-round option and is often just as nutritious. Canned corn works in a pinch—just be sure to drain and rinse it very well to remove the canned flavor. All three options will give you a great result, so use what you have!
What else can I serve on top besides maple syrup?
Get creative with your toppings! Try a spoonful of salsa and sour cream for a savory kick. A fried or poached egg on top is delicious. A drizzle of sriracha honey (mix honey with a little sriracha) is amazing. Or, keep it simple with just a pat of good salted butter melting over the hot cakes.
Can I bake these instead of frying them?
While the stovetop method gives you that perfect golden crust, you can bake them for a hands-off approach. Drop the batter onto a parchment-lined, greased baking sheet to form cakes. Bake in a preheated 375°F oven for about 12-15 minutes, flipping halfway through. They won’t be quite as crispy but will still be tasty!
How do I know when the cakes are fully cooked inside?
The best test is to look for visual cues and then do a quick peek. The edges should be set, and the surface bubbles should have popped. After flipping, press the center gently with your finger. It should spring back slightly. If you’re unsure, you can carefully insert a toothpick into the center of one cake. It should come out clean, with no wet batter clinging to it.
My batter seems way too thick. Is that normal?
Yes, this is a thick batter by design! It’s packed with chunky ingredients like bacon and corn. A thick batter helps hold everything together and gives you a hearty, substantial cake. If it seems unmanageably thick—like you can’t scoop it—add milk one tablespoon at a time until it’s a scoopable consistency. But err on the side of thicker rather than thinner.
Are these kid-friendly?
Oh, absolutely! Kids love the familiar “pancake” shape with fun bits of bacon and sweet corn inside. You can even reduce or omit the cayenne pepper if your little ones are sensitive to spice. Let them help by sprinkling the reserved bacon on top or drizzling the syrup. It’s a fun, interactive meal they’ll ask for again and again.
Go Forth and Griddle!
There you have it—my tried-and-true recipe for the most delicious Bacon and Corn Griddle Cakes. They are the perfect blend of sweet, salty, smoky, and satisfying. I hope this recipe brings as much joy to your table as it has to mine. Don’t be afraid to make it your own. Now, go preheat that griddle, call your favorite people, and get ready for the compliments to roll in. Happy cooking!
Creamy Garlic Tortellini
Ingredients
Equipment
Method
- In a skillet, cook bacon pieces over medium heat until brown and crispy, then add chopped onion and cook until translucent.
- Remove a tablespoon of the bacon mixture for topping and set aside, then continue cooking the rest until crispy.
- In a mixing bowl, whisk together flour, chives, baking powder, salt, and cayenne pepper.
- Stir in milk, beaten egg, and oil until just combined, then fold in the bacon-onion mixture, corn, and cheese.
- Heat a griddle or non-stick skillet over medium heat and grease lightly.
- Drop heaping quarter-cups of batter onto the surface and cook for 3-4 minutes until edges set and bubbles form.
- Flip the cakes and cook for another 2-3 minutes until golden brown.
- Serve stacked with reserved bacon-onion topping and drizzled with warm maple syrup.