Introduction
I still remember the first time I made baked chicken parmesan on a busy Tuesday night. My kids were hungry, I was tired, and I needed something that felt special without the stress. When I pulled that bubbling, golden dish from the oven, the smell alone made everyone forget about their homework and video games. They actually ran to the dinner table. That’s when I knew this recipe was a keeper.
Baked chicken parmesan has become my go-to family-friendly dish for good reason. It’s comforting, satisfying, and surprisingly simple to make. Unlike the traditional fried version you might get at an Italian restaurant, this baked approach doesn’t leave you standing over a hot stove splattered with oil. You get all the crispy, cheesy goodness with half the effort.
What I love most about this recipe is how flexible it is. Need a gluten free baked chicken parmesan for a friend with dietary restrictions? Just swap the breadcrumbs. Want an easy baked chicken parmesan no breading option for a low-carb meal? Skip the coating entirely and let the cheese do the work. You can turn it into a baked chicken parmesan casserole for meal prep or mix it with pasta for a heartier dinner. The same basic technique works for countless variations.
This dish saves me time and stress while still making my family feel like I’ve made something really special. And honestly, that’s exactly what weeknight cooking should be about.
Why Choose Baked Chicken Parmesan?
Health Benefits of Baking vs. Frying
Let me be real with you. Fried chicken parmesan tastes amazing, but it comes with a hefty price tag for your health. When I used to fry chicken cutlets, I’d watch them soak up oil like a sponge. Each piece could absorb several tablespoons of oil before it even hit the plate. That’s a lot of unnecessary fat and calories.
Baking changes the game completely. You brush on a light coating of oil or use a cooking spray, and that’s it. The chicken still gets crispy and golden in the oven without swimming in grease. This simple switch can cut the fat content by more than half. For someone like me who wants to enjoy comfort food without the guilt, healthy baked chicken parmesan is the perfect solution.
The health benefits go beyond just reducing fat. Baking keeps more of the nutrients intact in your chicken. High-heat frying can damage some of the protein structures and create compounds you don’t really want in your body. With baking, you get tender, juicy chicken that’s better for you in every way.
My family honestly can’t tell much difference between the baked and fried versions. The cheese gets melty and golden, the sauce bubbles around the edges, and the coating still has that satisfying crunch. But I can tell the difference when I’m not feeling sluggish after dinner or when my jeans still fit comfortably.
What Are Common Mistakes When Making Chicken Parm?
I’ve made plenty of mistakes with this dish over the years. Let me save you some frustration by sharing what I’ve learned the hard way.
The biggest mistake is overcooking the chicken. Chicken breasts dry out fast, especially the thin cutlets we use for parmesan. I used to leave mine in the oven way too long, thinking they needed more time to get crispy. The result was tough, rubbery chicken that nobody wanted to eat. Now I use a meat thermometer and pull them out at 165 degrees. Game changer.
Another common error is using too much oil, even when baking. Some recipes tell you to drizzle oil generously over everything. Don’t do it. A light mist or thin brush of oil is plenty. Too much oil makes your coating soggy instead of crispy. It also defeats the purpose of choosing the healthier baked version in the first place.
Not properly preparing your chicken is another mistake I see often. You need to pound those breasts to an even thickness. If one end is thick and the other is thin, you’ll get uneven cooking. The thin part dries out while the thick part is still raw in the middle. I use a meat mallet and a plastic bag to pound mine to about half an inch thick all over.
Finally, many people skip the resting step. When your baked chicken parmesan comes out of the oven, let it sit for five minutes before serving. This lets the juices redistribute through the meat. Cut into it immediately and all those juices run out onto the plate, leaving you with dry chicken.
Versatility of Baked Chicken Parmesan
One reason this recipe never gets boring at my house is because it transforms so easily. The basic technique stays the same, but you can adjust it to fit what your family needs that night.
Take baked chicken parmesan casserole, for example. Instead of making individual portions, I cut the cooked chicken into chunks and layer it with pasta, sauce, and extra cheese in a baking dish. It’s perfect for feeding a crowd or doing meal prep for the week. I make it on Sunday and have ready-to-heat dinners for the next few days.
Baked chicken parmesan pasta is another favorite variation. After baking the chicken, I slice it up and toss it with whatever pasta shape I have on hand. Penne works great. Spaghetti is classic. Even rigatoni does the job. The pasta soaks up the marinara sauce and gets coated with little bits of melted cheese. My kids love this version because it feels more like a complete meal on one plate.
For a quicker option, baked chicken parmesan tenders are brilliant. I cut chicken breasts into strips instead of pounding them flat. They cook faster and kids find them easier to eat. Plus, they’re great for dipping in extra marinara sauce.
When I’m watching my carbs or cooking for my friend with celiac disease, I make easy baked chicken parmesan no breading. Just season the chicken well, top it with sauce and cheese, and bake. You lose some of that crispy texture, but you still get all the flavor. It’s surprisingly satisfying. For a gluten free baked chicken parmesan, I use crushed rice cereal or almond flour mixed with Italian seasoning instead of regular breadcrumbs.
Some nights I go fancy with oven baked chicken parmesan panko for extra crunch. Panko breadcrumbs are lighter and crispier than regular breadcrumbs. They create an almost restaurant-quality coating that makes the dish feel extra special. I just toast them lightly with some olive oil before coating the chicken.
The beauty of baked chicken parmesan is that it bends to fit your needs. Low carb? Skip the breading. Need more protein? Make the portions bigger. Want comfort food? Add pasta. Feeding picky eaters? Cut it into tenders. The same basic recipe works for all of it.


How to Prepare Baked Chicken Parmesan
Now that you understand why this dish works so well, let’s get into the actual cooking. I promise it’s way easier than it looks, and once you’ve done it a couple times, you won’t even need to check the recipe.
Step-by-Step Instructions
Here’s the thing about making baked chicken parmesan: the prep work matters more than the actual baking. Get your setup right, and the rest practically handles itself.
First, you need to prep your chicken properly. I grab boneless, skinless chicken breasts and lay them on a cutting board. Cover them with plastic wrap or put them in a large zip-top bag. Then I pound them with my meat mallet until they’re about half an inch thick all the way across. This step is non-negotiable if you want evenly cooked chicken. The thick part of a chicken breast can be double the size of the thin end, which means one part burns while the other stays raw. Not fun.
Once your chicken is pounded flat, set up your breading station. I use three shallow dishes lined up in a row. The first gets flour mixed with a little salt and pepper. The second holds beaten eggs, usually two or three depending on how much chicken I’m making. The third contains your breadcrumb mixture. For regular oven baked chicken parmesan panko, I mix panko breadcrumbs with grated Parmesan cheese, Italian seasoning, garlic powder, and a pinch of salt. The ratio I use is about two cups of panko to half a cup of Parmesan, plus a tablespoon of Italian seasoning and a teaspoon of garlic powder.
By the way, panko makes such a difference here. Regular breadcrumbs work fine, but panko creates this incredibly light, crispy coating that stays crunchy even after you add the sauce and cheese. It’s worth the extra dollar at the grocery store.
Now for the breading process. Take each chicken breast and dredge it in the flour, shaking off any excess. Then dip it in the egg, letting the extra drip back into the bowl. Finally, press it into the panko mixture, making sure both sides get completely coated. I press down firmly so the crumbs really stick. Place each breaded piece on a baking sheet lined with parchment paper or a silicone mat.
Here’s where I give the chicken a light spray with cooking oil. Just a quick mist over the top. This helps the coating turn golden and crispy without deep frying. Some people brush on olive oil with a pastry brush, which works great too. Just don’t pour it on or you’ll end up with soggy, greasy coating.
For baked chicken parmesan tenders, the process is basically identical except you’re working with strips instead of whole breasts. I cut each breast into three or four long strips before pounding them. Kids love these because they’re easier to handle and quicker to cook. They’re done in about 15 minutes instead of 20. I actually make tenders more often than full breasts now because my youngest can eat them with his hands, and somehow that makes dinner go smoother.
If you need a gluten free baked chicken parmesan, substitute the flour with rice flour or cornstarch, and swap the panko for crushed gluten-free cereal or almond flour mixed with Parmesan. I’ve made it for my sister-in-law who has celiac disease, and honestly, she said she couldn’t taste the difference. The texture was slightly different but still really good. Speaking of alternatives, I’ve gotten really fond of preparing traditional Asian wraps with braised meats when I want something completely different but equally satisfying for weeknight meals.
How Do You Bake Chicken Parmesan in the Oven?
Once your chicken is prepped and on the baking sheet, slide it into your preheated oven. I usually bake it plain for the first 15-20 minutes until it’s almost cooked through. You want the internal temperature to hit about 155 degrees at this point.
Then I pull the pan out and work fast. Spoon marinara sauce over each piece of chicken. I use about two to three tablespoons per breast. Don’t drown it; you just want a nice layer. Then top each piece with shredded mozzarella cheese. I’m generous with the cheese because that’s kind of the whole point of this dish, right? A sprinkle of extra Parmesan on top doesn’t hurt either.
Put the pan back in the oven for another 5-8 minutes. You’re watching for the cheese to melt completely and get bubbly around the edges. Some spots might even brown a little, which is perfect. At this point, your chicken should reach 165 degrees internal temperature. That’s the safe zone for chicken according to food safety guidelines.
Let everything rest for about five minutes before serving. I know it’s tempting to dig in immediately, but this resting period lets the juices settle back into the meat. Cut into it too soon and you lose all that moisture onto your plate. Similar to how slow-cooked lamb shanks need resting time before serving to stay tender and juicy.
Choosing the Right Temperature
Funny enough, the temperature question trips people up more than anything else with this recipe. I get asked about it constantly.
For baked chicken parmesan, I stick with 400 degrees Fahrenheit. That’s hot enough to crisp up the coating and cook the chicken through without drying it out. The higher heat creates that golden-brown finish on the panko that makes the dish look and taste restaurant-quality.
Now, how long to bake chicken parmesan at 375 is a slightly different story. If you’re cooking at 375 instead of 400, you’ll need a few extra minutes. At 375, plan on about 25 minutes for the initial baking before adding sauce and cheese, then another 5-8 minutes with the toppings. The lower temperature is gentler, which can be nice if your chicken pieces are on the thicker side or if you’re nervous about burning the coating.
Should You Bake Chicken at 350 or 400?
I vote for 400 degrees every time for this dish. At 350, the chicken cooks too slowly and the coating doesn’t get crispy enough. You end up with pale, soft breading instead of that satisfying crunch. The chicken itself comes out fine, but the texture just isn’t what you want for chicken parmesan.
At 400, everything happens faster and better. The coating crisps up beautifully while the inside stays juicy. The higher heat also helps the cheese on top get that slightly browned, bubbly finish that makes everyone’s mouth water.
The exception would be if you’re making easy baked chicken parmesan no breading. Without the coating to worry about, you can go with 375 degrees and take your time. The naked chicken won’t burn as easily, and the lower temperature gives the sauce and cheese time to meld together nicely. That’s more similar to how I cook creamy fish gratins with cheese, where gentle heat helps everything come together perfectly.
What Temperature Should My Oven Be for Chicken Parm?
To be completely clear: set your oven to 400 degrees Fahrenheit for the best results with traditional breaded baked chicken parmesan. Preheat it fully before your chicken goes in. I turn my oven on while I’m still pounding and breading the chicken so it’s ready when I am.
If your oven runs hot or you’ve noticed things burning in the past, drop it to 375. Every oven is a little different. Mine runs about 10 degrees cooler than the setting, which I figured out with an oven thermometer. Worth checking if you’re not getting consistent results.
Pairing with Pasta
Let’s talk about how to make baked chicken parmesan with pasta because this is where the dish becomes a complete meal instead of just a protein with a side.
The easiest method is to cook your pasta separately while the chicken bakes. I usually make spaghetti or penne. About half a pound of pasta feeds my family of four alongside the chicken. Boil it in salted water according to the package directions, but drain it about a minute before it’s fully al dente. It’ll finish cooking when you toss it with the hot sauce.
While the pasta cooks, I heat up extra marinara sauce in a large skillet or pot. About two cups of sauce for half a pound of pasta works well. When the pasta is drained, I dump it right into the sauce and toss everything together. The pasta soaks up some of that sauce and gets perfectly coated.
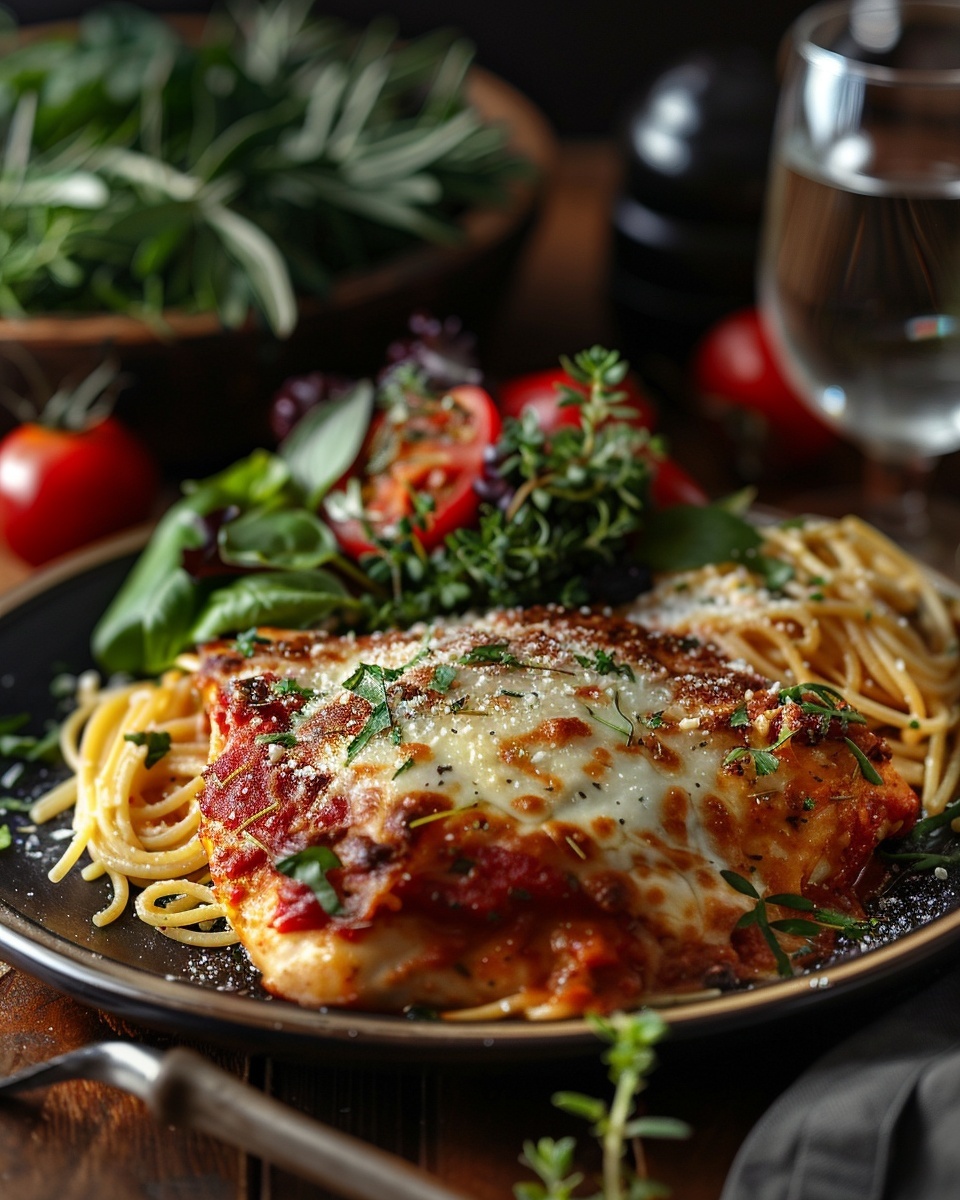
Here’s my favorite serving method: spread the saucy pasta on a big platter or divide it among plates. Then slice the baked chicken parmesan and lay the pieces right on top of the pasta. The cheese melts a little more from the heat of the pasta, and everything just looks gorgeous. Garnish with fresh basil if you have it, or just a sprinkle of Parmesan.
For baked chicken parmesan pasta done casserole-style, I take a different approach. After baking the chicken, I cut it into bite-sized pieces. Then I mix cooked pasta with marinara sauce in a large baking dish, add the chicken pieces throughout, and top everything with more mozzarella and Parmesan. Another 10 minutes in the oven at 375 and you’ve got this amazing, bubbling pasta bake that’s perfect for feeding a crowd.
This casserole version is brilliant for meal prep too. I make it on Sunday, portion it into containers, and have four lunches ready for the week. It reheats beautifully in the microwave. The flavors actually get better after a day in the fridge as everything melds together. Sometimes I prepare a big batch alongside rich French sausage dishes to give myself variety throughout the week.
One trick I learned from my Italian neighbor: add a splash of the pasta cooking water to your sauce before tossing with the pasta. That starchy water helps the sauce cling to the noodles better. Just save about half a cup before you drain the pasta, then add a few tablespoons to your sauce. It makes everything silky and cohesive.


Tips for Success and Serving Suggestions
Avoiding Common Pitfalls
Let me share some practical tips I’ve picked up over the years that’ll save you from the frustrations I went through when I was figuring out this recipe.
The number one issue I see people struggle with is moisture control. Too much moisture ruins everything. When you pound your chicken, make sure it’s completely dry before you start breading. I pat mine down with paper towels, sometimes twice. Any wetness on the surface prevents the flour from sticking properly, which means your whole breading falls off during baking. I learned this after watching half my coating slide off onto the pan one embarrassing evening when I had guests coming. Not my finest moment.
Another thing that helps tremendously is letting your breaded chicken rest for about ten minutes before it goes in the oven. Just leave it on the baking sheet at room temperature. This gives the coating time to adhere better to the meat. The egg mixture kind of sets up a bit, creating a stronger bond. I use this waiting time to clean up my breading station and get my sauce ready.
Temperature consistency matters more than most people realize. Don’t open your oven door constantly to check on things. Every time you do, the temperature drops by 25 degrees or more, and your cooking time gets thrown off. Trust the timer for at least the first 15 minutes. If you really need to peek, turn on the oven light and look through the window instead.
Here’s something I wish someone had told me earlier: invest in an instant-read thermometer. They’re like fifteen bucks and they eliminate all the guesswork. Chicken is safely cooked at 165 degrees internal temperature, but I actually pull mine at 160 and let carryover cooking bring it up while it rests. This keeps it juicier. Overcooking chicken even by a few degrees turns it dry and stringy. A thermometer takes the anxiety out of the whole process.
For baked chicken parmesan tenders, watch them even more carefully because they cook faster than full breasts. I set my timer for 12 minutes on the first round instead of 15. Those smaller pieces go from perfectly done to overcooked really quickly.
One mistake I don’t see mentioned enough is using cold chicken straight from the fridge. Let your chicken sit at room temperature for about 15-20 minutes before cooking. Cold chicken takes longer to cook through, which means the outside gets overdone while you’re waiting for the inside to reach temperature. Room temperature chicken cooks more evenly every single time.
Creative Serving Ideas
The beauty of baked chicken parmesan is how it plays well with so many different sides. You don’t always need pasta, even though that’s the classic pairing.
My go-to quick side is a simple arugula salad with lemon vinaigrette. The peppery greens and bright citrus cut through the richness of the cheese and sauce perfectly. I just toss arugula with olive oil, fresh lemon juice, salt, pepper, and some shaved Parmesan. Takes three minutes and makes the meal feel lighter and more balanced.
Roasted vegetables work beautifully too. I throw whatever I have in the fridge onto a sheet pan—zucchini, bell peppers, cherry tomatoes, red onion—toss them with olive oil and Italian seasoning, and roast them alongside the chicken. Everything finishes at the same time, and I only dirty one oven. Efficient cooking is happy cooking, at least in my kitchen.
Garlic bread is obviously a crowd-pleaser, especially with kids. I make mine by splitting a baguette, spreading it with butter mixed with minced garlic and parsley, and toasting it under the broiler for a few minutes. The crispy bread is perfect for soaking up extra marinara sauce.
For a lower-carb option, try serving your chicken over sautéed spinach or zucchini noodles. I make zoodles with a spiralizer and quickly sauté them with garlic and a splash of chicken broth. Top them with the baked chicken parmesan and you’ve got a meal that’s lighter but still incredibly satisfying. This approach works great if you’re following a low sodium diet, since you can control exactly how much salt goes into each component.
Caesar salad is another winner in my house. The creamy dressing and crunchy romaine complement the chicken perfectly. Sometimes I cut the chicken into strips and toss it right into the salad for a chicken parmesan Caesar hybrid that my teenagers actually request by name.
When I’m feeling ambitious, I make a caprese side—sliced tomatoes, fresh mozzarella, and basil drizzled with balsamic glaze. It echoes the Italian flavors of the main dish but adds freshness and brightness. Plus it looks really pretty on the table, which matters when you’re trying to make a Tuesday feel special.
By the way, baked chicken parmesan casserole opens up even more possibilities. You can serve it straight from the baking dish family-style, which makes it perfect for potlucks or when you have company. I bring this to gatherings all the time and people always ask for the recipe. One friend made it three weeks in a row after I shared the recipe with her.
For anyone needing gluten free baked chicken parmesan, all these serving suggestions still apply. The adaptability doesn’t stop at the main dish. You can do gluten-free garlic bread, use rice noodles instead of regular pasta, or skip the carbs entirely and load up on vegetables. I’ve served the gluten-free version to mixed crowds where some people had dietary restrictions and others didn’t, and everybody enjoyed it equally.
One creative twist I stumbled onto by accident: make baked chicken parmesan sliders. Use the tender-sized pieces on small Hawaiian rolls with extra sauce and cheese. They’re fantastic for game day or casual parties. I made them for my son’s birthday party last year and they disappeared faster than the pizza.
If you’re preparing several dishes for the week, this pairs wonderfully with other main dish recipes that offer variety while using similar ingredients, so you’re not wasting half-opened packages of cheese or sauce.
Final Thoughts
The real magic of baked chicken parmesan isn’t just that it tastes incredible—though it definitely does. It’s that this one recipe can morph to fit whatever your evening throws at you. Rushed weeknight? Make tenders. Feeding guests? Go with the full breasts on a platter. Need meal prep? Casserole version all the way. Dealing with dietary restrictions? The gluten-free and no-breading options have you covered. I genuinely think this is one of those recipes every home cook should have in their back pocket, ready to pull out whenever comfort food calls. Give it a try with whatever variation speaks to you, and don’t be afraid to make it your own.
FAQ Section
How do you bake chicken parmesan in the oven?
Start by pounding chicken breasts to an even thickness, then bread them with flour, egg, and seasoned breadcrumbs or panko. Place the breaded chicken on a baking sheet, spray lightly with oil, and bake at 400 degrees for 15-20 minutes. Pull it out, top with marinara sauce and mozzarella cheese, then return to the oven for another 5-8 minutes until the cheese melts and bubbles. Let it rest for five minutes before serving to keep the juices inside the meat.
Should you bake chicken at 350 or 400?
For baked chicken parmesan, 400 degrees is definitely better. The higher temperature creates a crispy, golden coating on the breading while keeping the inside juicy. At 350, the chicken takes longer to cook and the coating stays pale and soft instead of getting that satisfying crunch. The only time I’d go with 350 is if I’m making a casserole-style version where everything bakes together for a longer period.
What temperature should my oven be for chicken parm?
I recommend 400 degrees Fahrenheit for traditional breaded chicken parmesan. This temperature gives you the best balance of crispy coating and moist chicken. If your oven tends to run hot or you’ve had issues with burning in the past, you can drop it to 375 and add a few extra minutes to the cooking time. Always preheat your oven completely before the chicken goes in for the most consistent results.
What are common mistakes when making chicken parm?
The biggest mistakes are overcooking the chicken until it’s dry, using uneven chicken breasts that cook inconsistently, and applying too much oil which makes the coating soggy. Another common error is skipping the resting period after cooking, which causes all the juices to run out when you cut into it. Finally, many people add the cheese and sauce too early, which can make the coating lose its crispness before the chicken is fully cooked.
Can I make baked chicken parmesan ahead of time?
Absolutely. You can bread the chicken up to a day ahead and keep it covered in the refrigerator until you’re ready to bake. You can also fully cook it, then reheat it in a 350-degree oven for about 10 minutes. For meal prep, the casserole version works even better because it actually tastes better the next day after the flavors meld together. I make it on Sundays and eat it all week long.
How do I keep the breading from falling off?
Make sure your chicken is completely dry before you start breading—pat it down well with paper towels. Press the breadcrumbs firmly onto the chicken so they really adhere. Let the breaded chicken rest for 10 minutes before baking, which helps the coating set up. Also, don’t flip the chicken during baking; just let it cook undisturbed and the coating will stay intact.
What kind of cheese works best for chicken parmesan?
Mozzarella is the traditional choice because it melts beautifully and has that classic stretchy texture everyone loves. I use shredded low-moisture mozzarella for convenience. Fresh mozzarella works too but releases more water, so you might end up with a slightly wetter dish. Adding some grated Parmesan on top with the mozzarella gives you extra flavor and a nice golden finish.
Can I freeze baked chicken parmesan?
Yes, it freezes really well. I freeze it after baking but before adding the sauce and cheese for the best texture. Wrap each piece individually in plastic wrap, then put them all in a freezer bag. When you’re ready to eat, thaw in the fridge overnight, then add sauce and cheese and bake at 375 for about 20 minutes. You can also freeze the fully assembled version, though the coating might be slightly less crispy when reheated.
What’s the best marinara sauce to use?
Honestly, any good-quality marinara works fine. I usually grab whatever’s on sale that has simple ingredients—tomatoes, garlic, olive oil, herbs. Rao’s is my favorite if I’m splurging because it tastes homemade. Sometimes I doctor up a cheaper sauce by simmering it with extra garlic, fresh basil, and a pinch of red pepper flakes. If you have time to make your own sauce, even better, but jarred sauce makes this a realistic weeknight meal.
How do I make this recipe healthier without sacrificing flavor?
The baked version is already much healthier than fried, but you can take it further. Use whole wheat panko for extra fiber. Go lighter on the cheese or use part-skim mozzarella. Choose a low-sugar marinara sauce or make your own to control the sodium. You can even skip the breading entirely for a lower-carb option and just season the chicken well before topping it with sauce and a moderate amount of cheese. It still tastes amazing.
Baked Chicken Parmesan
Ingredients
Equipment
Method
- Preheat the oven to 400°F (200°C).
- Pound chicken breasts to about half an inch thick between plastic wrap or in a zip-top bag.
- Set up a breading station with three shallow dishes (flour mixed with salt and pepper, beaten eggs, and panko mixture with Parmesan, Italian seasoning, and garlic powder).
- Dredge each chicken breast in flour, dip in beaten eggs, and coat with the panko mixture, pressing to adhere.
- Place the breaded chicken on a baking sheet lined with parchment paper.
- Spray or lightly brush the tops of the breaded chicken with cooking oil.
- Bake for 15-20 minutes until the chicken reaches 155°F internally.
- Remove from the oven, spoon marinara sauce over each piece, and top with shredded mozzarella cheese.
- Return to the oven for an additional 5-8 minutes until cheese is melted and bubbly, and chicken reaches 165°F.
- Let it rest for 5 minutes before serving.