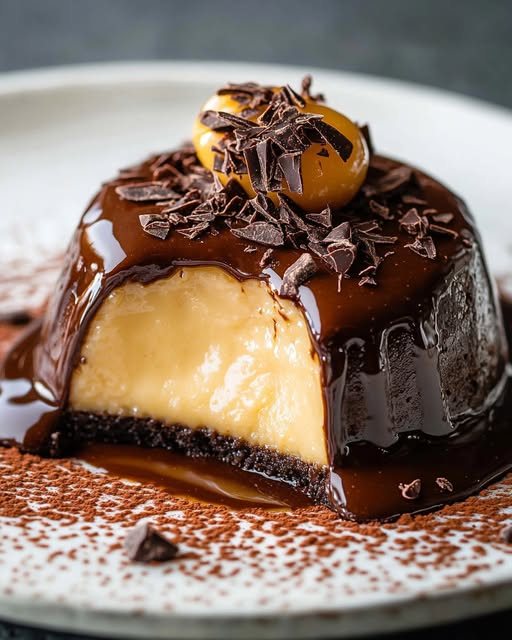
The Magical Chocolate Flan Delight That Bakes Itself Upside Down
Have you ever baked a cake that flips its own layers like a little kitchen acrobat? The first time I made Chocoflan for a family potluck, my aunt was convinced I’d bought it from a fancy bakery. Her face when I told her the chocolate cake and creamy custard swapped places all on their own? Priceless. This isn’t just a dessert; it’s a delicious magic trick on a plate.
A Slice of Sweet History: The “Impossible” Cake
This dessert goes by many magical names: Chocoflan, “Pastel Imposible” (Impossible Cake), or even “Magic Cake.” Its roots are proudly Mexican, a beautiful blend of two beloved worlds. It marries the rich, dark tradition of Mexican chocolate cake with the smooth, caramel-kissed elegance of flan, a custard with Spanish heritage. The real “wow” moment happens in the oven, where the heavier flan batter sinks and the lighter cake batter rises, performing a stunning inversion. It’s a celebration of tradition and culinary surprise, all in one stunning Bundt cake.
Why You’ll Fall in Love With This Chocolate Flan Recipe
If you’re scared of making flan or layer cakes, this recipe is your new best friend. It’s shockingly simple. You simply pour one batter on top of the other. The oven does the sophisticated layering work for you! You get two incredible desserts in one—moist chocolate cake and silky vanilla custard—with a single effort. The contrast of textures and flavors is a guaranteed crowd-pleaser. Every slice is a conversation starter. Trust me, the compliments you’ll receive are worth their weight in golden caramel.
When to Whip Up Your Chocolate Flan Delight
This showstopper is perfect for any event where you want to impress without stress. It’s a birthday hit, a fabulous finish to a holiday meal like Christmas or Easter, and the ultimate centerpiece for a dinner party. I love bringing it to potlucks because it travels well and looks absolutely professional. It’s my secret weapon for “wow” moments with family and friends.
Gathering Your Ingredients for the Magic
Most of these items are pantry staples! Here’s what you’ll need:
- For the Caramel: ¾ cup of cajeta (Mexican goat’s milk caramel) or dulce de leche.
- For the Chocolate Cake:
- 1 cup granulated sugar
- 6 tbsp unsalted butter, softened
- 1 large egg
- 1 cup all-purpose flour
- ¾ cup unsweetened cocoa powder
- 1 tsp baking soda
- ½ tsp salt
- ¾ cup buttermilk
- ½ cup whole milk
- 1 tsp vanilla extract
- 1 tsp distilled white vinegar
- For the Flan:
- 1 can (12 oz) evaporated milk
- 1 can (14 oz) sweetened condensed milk
- 4 oz cream cheese, softened
- 3 large eggs
- 1 tsp vanilla extract
Easy Ingredient Swaps (No Panic Allowed!)
Don’t have something? No worries! Here are my tried-and-true swaps:
- Cajeta/Dulce de Leche: Regular caramel sauce from a jar works perfectly in a pinch.
- Buttermilk: Make your own! Add 1 tbsp of white vinegar or lemon juice to a cup of milk. Let it sit for 5 minutes until it curdles slightly.
- Cream Cheese: This makes the flan extra lush, but you can omit it if needed. The flan will be slightly less firm but still delicious.
Creating Your Own Kitchen Magic: The Steps
Follow these steps closely, and you’ll be a dessert magician in no time.
Step 1: Prep Your Pan and Caramel
First, grab your trusty 12-cup Bundt pan. Generously grease every nook and cranny with butter—this is your non-stick insurance policy! Now, warm your cajeta or dulce de leche for a few seconds in the microwave so it’s pourable. Pour it into the bottom of the pan, creating a golden, gooey lake. Swirl the pan to coat the bottom evenly. This will become the gorgeous, shiny glaze on top of your finished masterpiece.
Step 2: Make the Chocolate Cake Batter
Let’s make the cake layer. In a large bowl, cream together the soft butter and sugar until it’s light and fluffy. Beat in the egg until it’s fully incorporated. In another bowl, whisk together your dry ingredients: flour, cocoa powder, baking soda, and salt. In a measuring cup, mix the buttermilk, milk, vanilla, and that secret weapon—white vinegar. Pro tip: The vinegar reacts with the baking soda for a super tender cake crumb. Alternate adding the dry mix and the milky mix to the butter bowl, starting and ending with the dry ingredients. The batter will be thick and gloriously chocolatey.
Step 3: Blend the Silky Flan Mixture
Now for the creamy star. This could not be easier. Simply place all the flan ingredients—evaporated milk, sweetened condensed milk, softened cream cheese, eggs, and vanilla—into a blender. Put the lid on and blend on high for a full minute. You want it completely smooth, with no specks of cream cheese remaining. The mixture will be pale, liquid, and smell like sweet, vanilla-infused heaven.
Step 4: The “Impossible” Assembly
Here’s where the magic begins. Slowly pour your thick chocolate cake batter over the caramel in the Bundt pan. Smooth it out gently with a spatula. Now, take your blender pitcher and slowly pour the liquid flan mixture directly over the back of a large spoon held just above the cake batter. This gentle technique helps the flan layer float on top instead of mixing in. You’ll see two distinct layers—dark chocolate on bottom, light custard on top.
Step 5: The Gentle Bain-Marie Bake
This step is crucial for perfect flan! Tightly cover your Bundt pan with aluminum foil. Place it inside a larger roasting pan. Carry it to the oven, then carefully pour hot water into the roasting pan until it comes halfway up the sides of the Bundt pan. This water bath (bain-marie) creates a gentle, steamy heat. It cooks the flan evenly and prevents it from cracking or turning rubbery. Bake at 350°F for about 1 hour 15 minutes.
Step 6: The Patience Game (Cooling & Chilling)
Once a knife inserted comes out clean, carefully remove the Bundt pan from the water bath. Let it cool completely on a rack until it’s room temperature. Do not rush this. Then, and this is the real secret, cover it and refrigerate for at least 4 hours, but ideally overnight. This sets the layers firmly and makes unmolding a breeze. The flavors also meld and become incredible.
Step 7: The Grand Reveal & Unmolding
It’s showtime! Run a thin, flexible knife around the inner and outer edges of the pan to loosen the dessert. Place your serving platter upside-down on top of the Bundt pan. Take a deep breath, hold platter and pan together firmly, and flip it over in one confident motion. Give the pan a little jiggle and lift it off. Be prepared for gasps as the golden caramel cascades down the sides of your beautiful, layered Chocolate Flan Delight.
Chef’s Tip: If it feels stuck, place the bottom of the Bundt pan in a dish of warm water for 30 seconds. The warmth will slightly melt the outer caramel, helping it release perfectly.
Your Chocolate Flan Timeline
Plan ahead for best results!
- Prep Time: 30 minutes
- Cook Time: 1 hour 15 minutes
- Cooling & Chilling Time: 4 hours (minimum) to overnight
- Total Time: About 6 hours (mostly hands-off)
A Chef’s Secret for the Smoothest Flan
For an unbelievably silky flan texture, strain your blended flan mixture through a fine-mesh sieve before pouring it over the cake batter. This catches any tiny bits of unmixed egg or cream cheese, ensuring a flawlessly smooth custard layer in every single bite.
Fun Fact: Why Does It Flip?
The science behind the magic is all about density! The flan mixture is initially heavier and more liquid, so during baking, it sinks through the thicker cake batter. As the cake bakes, it solidifies on top. The result? A magical layer swap that never fails to amaze.
Equipment You’ll Need
- 12-cup Bundt pan
- Large roasting pan (for the water bath)
- Blender or food processor
- Mixing bowls
- Hand or stand mixer (optional, for cake batter)
How to Store Your Leftover Masterpiece
Cover the unmolded Chocoflan tightly with plastic wrap or place it in a cake carrier. Store it in the refrigerator. The cold environment helps the layers stay distinct and firm.
Properly stored, your Chocolate Flan Delight will stay fresh and delicious for up to 5 days. The flavors actually continue to improve over the first day or two!
I do not recommend freezing Chocoflan. The custard layer can become watery and grainy when thawed, losing its signature smooth texture.
Pro Tips for Flawless Results Every Time
- Grease well: Don’t skimp on buttering the pan. It’s your best defense against sticking.
- Water bath is non-negotiable: This gentle heat is key for perfect custard. Ensure the water is hot when you add it.
- Test for doneness: The top (which will become the bottom) should be firm to a gentle touch, and a knife inserted should come out with moist crumbs, not wet batter.
- Chill thoroughly: This is the most common rush job. Patience here makes all the difference in slicing cleanly.
Presentation Ideas to Make it Shine
- Garnish with fresh berries like raspberries or strawberries for a pop of color and freshness.
- Add a dollop of freshly whipped cream and a sprinkle of cocoa powder or chocolate shavings.
- Drizzle a little extra caramel or cajeta around the plate for a restaurant-worthy look.
- Serve with a scoop of vanilla bean ice cream for the ultimate indulgence.
Delicious & Creative Recipe Variations
Love the base recipe? Try these fun twists:
- Coconut Chocoflan: Add 1 tsp of coconut extract to the flan mixture and sprinkle shredded coconut on top after unmolding.
- Orange-Zested Delight: Add the zest of one orange to the cake batter for a bright, citrusy chocolate note.
- Mocha Flan: Dissolve 1 tablespoon of instant espresso powder into the milks for the flan to create a delicious mocha custard.
- Spiced Chocolate Version: Add 1 tsp of cinnamon and a pinch of cayenne pepper to the chocolate cake dry ingredients for a Mexican-inspired warm spice kick.
- Nutella Swirl: After pouring the cake batter, dollop spoonfuls of Nutella on top and use a knife to lightly swirl it before adding the flan layer.
- Individual Servings: Bake in a muffin tin lined with parchment liners (and a water bath!). Reduce baking time to about 25-30 minutes for adorable personal desserts.
Common Mistakes to Avoid With Your Chocolate Flan
Mistake 1: Skipping the Water Bath
Baking the Chocoflan without a bain-marie is the biggest error. The direct, dry oven heat will cause the flan to overcook. It can become bubbly, rubbery, and may even crack. The gentle steam from the hot water bath surrounds the pan. It cooks the delicate custard evenly and slowly. Always use the water bath for a silky smooth result.
Mistake 2: Not Letting it Chill Long Enough
Unmolding a warm Chocoflan is a recipe for disaster. The layers are still soft and haven’t set. This can cause the cake to break or the flan to ooze out messily. The chilling time in the fridge is non-negotiable. It allows the custard to firm up and the entire dessert to solidify. This makes slicing clean, beautiful pieces easy. Plan to make it a day ahead for the best outcome.
Mistake 3: Overmixing the Batters Together
When you pour the flan mixture over the cake batter, it’s natural to worry they will mix. But pouring it slowly and gently is key. If you pour too fast or from too high, you’ll blast a hole in the cake layer. This can cause the two layers to blend during baking. Use the “back of the spoon” trick. Pour the flan slowly over the spoon to disperse the weight gently. Trust the process—they will separate during baking.
Mistake 4: Using a Leaky Bundt Pan
If your Bundt pan doesn’t have a tight seal, water from the bath can seep in during baking. This will make the bottom of your cake soggy and ruin the texture. Before you start, test your pan. Fill it with water in the sink and check for leaks. If it leaks, use a different pan or wrap the outside tightly with heavy-duty foil before placing it in the water bath.
Your Chocolate Flan Questions, Answered
Can I make Chocoflan without a Bundt pan?
Yes, you can! A round 9-inch springform pan with high sides works well. Just be sure to wrap the outside bottom and sides tightly with aluminum foil to prevent water from the bath seeping in. The cooking time may be slightly different, so keep an eye on it. The classic ring shape is beautiful, but the taste is the same in any pan.
Why did my flan turn out watery or have holes?
A watery flan usually means it was underbaked or the water bath wasn’t hot enough. Ensure your oven is fully preheated and you use very hot tap water for the bath. Holes or bubbles mean the flan was overmixed or baked at too high a temperature, causing it to curdle. Blend just until smooth, and trust the low, gentle heat of the water bath method.
My caramel hardened at the bottom of the pan. What did I do wrong?
This often happens if you use a caramel intended for hard candies or if you cook your own sugar caramel too long. For this recipe, use a ready-made soft caramel like cajeta, dulce de leche, or a jarred caramel sauce. These stay soft and syrupy even after refrigeration. They create that lovely glaze instead of a hard, sticky layer.
Can I prepare Chocoflan ahead of time?
Absolutely! In fact, I highly recommend it. Chocoflan needs to chill for at least 4 hours, but making it a full day ahead is perfect. This gives the flavors time to develop and meld together beautifully. Store it covered in the refrigerator overnight. Unmold it just before you’re ready to serve for the freshest presentation.
Is it normal for the top (cake layer) to look wet after baking?
Yes, this is completely normal! Remember, the cake bakes underneath the flan layer in the water bath. It steams and bakes in a very moist environment. After you flip it, that moist top becomes the beautiful, fudgy bottom layer of chocolate cake. It should be moist and tender, not soggy. The chilling process will firm it up perfectly.
What’s the difference between cajeta, dulce de leche, and caramel?
All three are delicious, but they have slight differences. Cajeta is a Mexican caramel traditionally made from goat’s milk, giving it a tangy depth. Dulce de leche is made from cow’s milk and is sweeter and creamier. American caramel sauce is typically made from sugar, butter, and cream. For this recipe, any of them will work wonderfully, so use your favorite or what’s available.
How do I know for sure when the Chocoflan is done baking?
The best test is the knife test. Carefully insert a long knife or toothpick into the center. It should come out with a few moist crumbs clinging to it, but not with wet, liquid batter. The top (flan layer) will also look set and will jiggle slightly as a single unit when you gently shake the pan, not like liquid.
My cake layer is dense. How can I make it lighter?
A dense cake often means the batter was overmixed after the flour was added, or the leavener (baking soda) is old. Mix your dry ingredients just until they are incorporated—a few lumps are okay. Also, make sure your baking soda is fresh. The vinegar is there to activate it; that reaction helps create a lighter texture.
Can I use a boxed cake mix for the chocolate layer?
You can, for a super shortcut version! Prepare the cake mix according to the package directions (usually needing oil, water, and eggs). Pour it into the caramel-coated pan. Then pour your homemade flan mixture over it and bake as directed. The textural contrast won’t be *quite* as distinct, but it will still be a delicious and magical dessert.
How do I clean a Bundt pan after making Chocoflan?
Soak it! After unmolding, fill the pan with very hot, soapy water and let it sit for an hour or more. The caramel will dissolve. You can also gently heat the pan on the stovetop with some water to loosen any stubborn sticky bits. Avoid using abrasive scrubbers on non-stick surfaces.
Go Ahead, Be a Kitchen Magician!
There you have it—the secrets to the incredible, magical Chocolate Flan Delight. This recipe proves that the most impressive desserts don’t have to be the most complicated. With a little patience and trust in the process, you can create a stunning dessert that will have everyone asking for your secret. So preheat that oven, grab your Bundt pan, and get ready for the delicious gasp that comes with the big flip. Happy baking!
Chocolate Flan Delight
Ingredients
Equipment
Method
- Preheat your oven to 350°F (175°C) and grease a 12-cup Bundt pan with butter.
- Warm the cajeta or dulce de leche in the microwave until pourable, then pour it into the bottom of the Bundt pan.
- In a large bowl, cream together softened butter and granulated sugar until light and fluffy. Beat in the egg until fully incorporated.
- In another bowl, whisk together the flour, cocoa powder, baking soda, and salt.
- In a measuring cup, combine the buttermilk, milk, vanilla, and vinegar. Alternate adding the dry mix and the milky mix to the butter mixture, starting and ending with the dry ingredients.
- In a blender, combine the evaporated milk, sweetened condensed milk, cream cheese, eggs, and vanilla for the flan. Blend until completely smooth.
- Pour the chocolate cake batter over the caramel layer in the Bundt pan, smoothing it out gently with a spatula.
- Slowly pour the flan mixture over the chocolate batter using the back of a spoon to prevent the layers from mixing.
- Cover the Bundt pan tightly with aluminum foil. Place it inside a larger roasting pan and add hot water to the roasting pan until it reaches halfway up the sides of the Bundt pan.
- Bake for about 1 hour 15 minutes, or until a knife inserted into the flan comes out clean.
- Remove the Bundt pan from the water bath and let it cool completely at room temperature.
- Cover and refrigerate for at least 4 hours or ideally overnight.
- To unmold, run a thin knife around the edges and invert onto a serving platter.