The Dutch Pie: A No-Bake Slice of Heaven for Your Next Gathering
Picture this: you need a show-stopping dessert, but your oven is broken, or you’re just plain tired of baking. That was me last Christmas Eve, in a mild panic. Then I remembered this magical no-bake Dutch Pie recipe a friend from Amsterdam shared. Let me tell you, it saved the day and stole the show. This isn’t just a pie; it’s a creamy, chocolatey, textural dream that comes together with surprising ease. If you love desserts that look like you slaved for hours but secretly know the simple truth, you’re in the right place.
A Slice of Tradition: The Story Behind Dutch Pie
While the exact origins are a sweet mystery, this pie is a beloved treat in Dutch home cooking, especially around the holidays—hence its other name, Dutch Christmas Pie. It’s a fantastic example of “going to the koekjestrommel” (the cookie jar) and creating something spectacular. The traditional version leans on simple, available ingredients: biscuits for the crust, a rich cream, and a glossy chocolate topping. My version, which I’ve tweaked over many tea-filled afternoons, uses a mix of cornstarch biscuits for a tender base and Calipso cookies for that stunning striped edge. It’s a beautiful blend of tradition and a personal touch.
Why You’ll Fall in Love With This Dutch Pie Recipe
First, it’s no-bake. That means no heat in the kitchen and no stress over a soggy bottom! Second, the contrast is everything. You get a crunchy, buttery crust, a cloud-like vanilla cream, and a decadent dark chocolate ganache that cracks perfectly under your spoon. It’s also incredibly versatile. I’ve served it at fancy dinners and casual backyard barbecues, and it always gets the same reaction: wide eyes and requests for the recipe.
Perfect Occasions to Whip Up This Showstopper
This pie is your secret weapon for so many events! It’s perfect for hot summer days when baking is off the table. It shines during the hectic holidays as a make-ahead lifesaver. Bring it to potlucks, baby showers, or birthday parties. Honestly, I’ve even made it just because it was Tuesday. A little midweek luxury never hurt anyone!
What You’ll Need: Dutch Pie Ingredients
Gather these simple ingredients. The beauty is in their combination!
For the Dough:
- 100g melted unsalted butter
- 130 grams of cornstarch biscuits
- 1 package of Calipso cookies (or similar chocolate-covered sandwich cookies)
For the Cream:
- 1 can of condensed milk (395g)
- 200g butter, softened at room temperature
- 500g chilled fresh cream (place in the freezer for 20 minutes before whipping!)
- 2 tablespoons icing sugar
- 1 tablespoon vanilla essence
For the Chocolate Coverage:
- 170g semi-sweet chocolate (1 bar)
- 200g UHT cream (1 small box)
- 30g white chocolate to decorate (optional, but so pretty)
No Stress Substitutions
Don’t have the exact cookie? No problem! This recipe is very forgiving.
- Cornstarch Biscuits: Digestive biscuits or graham crackers work beautifully.
- Calipso Cookies: Any chocolate-coated sandwich cookie will do. Get creative!
- Fresh Cream: Ensure it’s full-fat for whipping. You can use a stabilized whipped cream product if you’re nervous about deflation.
- Semi-sweet Chocolate: Use dark or milk chocolate based on your preference. Just adjust the sweetness elsewhere if needed.
Let’s Make Some Magic: Dutch Pie Preparation
Step 1: Building Your Crust
Start by greasing the sides of a 23 cm springform pan with a little oil. This little trick is a lifesaver for clean removal later. Now, take your cornstarch biscuits and blitz them in a blender until they resemble fine, sandy crumbs. Pour these into a bowl with the melted, golden butter. Mix it with a fork until every crumb is moist and the mixture holds together when you pinch it. Dump this into your pan and press it firmly and evenly into the bottom. You’re creating the foundation of your pie, so make it nice and compact. Stand the Calipso cookies around the edge, chocolate side facing out. They should nestle right into the crumb base. Give the whole pan a gentle shake to settle everything, then pop it in the freezer for 30 minutes. This chills the butter, setting your crust perfectly.
Pro tip: Use the bottom of a flat glass or measuring cup to press the crumbs. It gives you a super even and firm base.
Step 2: Whipping Up the Dreamy Cream
While the crust sets, let’s make the cloud. In a large bowl, beat the softened butter and icing sugar together with a mixer. Keep going until it’s pale, fluffy, and almost like a buttercream. The aroma of sweet butter is divine. Add in the vanilla essence and give it another quick mix. Now, pour in the condensed milk. Beat it all together until you have a smooth, homogeneous, and lusciously thick cream. Set this aside for a moment. In another spotlessly clean bowl, take your well-chilled fresh cream and whip it to soft peaks. The cold is crucial here for volume. Now, gently fold the whipped cream into the butter mixture. Use a big spatula and slow, sweeping motions to keep all that air in. You’ll be left with a gloriously light, beige cream that tastes like heaven.
Chef’s tip: Chill your mixing bowl and beaters for the fresh cream! It whips faster and higher.
Step 3: Assembling and Chilling
Pull your rock-solid crust from the freezer. Spoon all that gorgeous cream filling into the center. Smooth the top with your spatula, getting it nice and level. Now, the hard part: patience. Carefully transfer the pie to the refrigerator. It needs to chill for at least 3 hours, but overnight is even better. This time allows the cream to set firmly, so every slice is neat and perfect.
Step 4: Creating the Chocolate Masterpiece
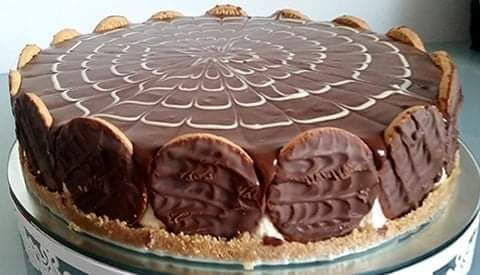
When you’re nearly ready to serve, make the ganache. Chop the semi-sweet chocolate finely and melt it gently with the UHT cream. You can do this in a bowl over simmering water or in short bursts in the microwave. Stir until it’s a silky, glossy, dark pool. Let it cool just for a minute or two. Pour it over the center of your fully set pie. Tilt the pan gently to help it spread evenly to the edges. The contrast of the dark chocolate on the white cream is stunning. For the final flourish, melt the white chocolate, put it in a small plastic bag, snip the tiniest corner, and drizzle circles from the center out. Drag a toothpick through the circles from the edge to the center to create a beautiful web pattern. It looks professional but takes 30 seconds!
Timing is Everything
Prep Time: 40 minutes
Chilling Time: 3 hours 30 minutes (minimum)
Total Time: 4 hours 10 minutes (plus optional overnight setting)
Chef’s Secret for the Perfect Slice
For absolutely pristine slices, take a large knife and run it under very hot water. Wipe it dry, then cut. The heat will glide through the chocolate and cream cleanly. Repeat the hot water wipe between each cut for a picture-perfect pie every time.
A Sweet Bit of Extra Info
Did you know the use of condensed milk in creams like this is a hallmark of many “easy” European desserts? It was a brilliant way to create rich, stable fillings without complex custards, especially before home refrigeration was common. We’re baking (or rather, not baking) with history!
Necessary Equipment
- 23 cm round springform pan
- Blender or food processor
- Two mixing bowls (one chilled)
- Electric mixer or stand mixer
- Spatula
- Small saucepan or microwave-safe bowl for ganache
How to Store Your Dutch Pie Masterpiece
This pie must be stored in the refrigerator. The cream and ganache are perishable. Once set, you can loosely cover the top with plastic wrap or place a dome over the springform pan. It will keep beautifully for 3-4 days.
I do not recommend freezing the fully assembled pie. The cream filling can separate and become watery when thawed. The texture will not be the same. However, you can freeze the crumb base alone in the pan for up to a month. Just wrap it well in plastic.
For serving leftovers, just keep it chilled. The crust may soften slightly after a day or two, but the flavors will still be incredible. It’s a dessert that disappears quickly in my house, so storage is rarely an issue!
Tips and Advice for Dutch Pie Success
- Butter Temperature is Key: For the cream, your butter must be soft but not melted. Leave it out for an hour before you start.
- Chill Everything for the Whipped Cream: Bowl, beaters, and cream. It makes the whipping process fast and foolproof.
- Let the Ganache Cool Slightly: If it’s too hot, it can melt the cream filling when you pour it. A few minutes off the heat makes it the perfect pourable consistency.
Presentation Tips to Impress Your Guests
- Serve on a beautiful cake stand. The height and the cookie sides make it a centerpiece.
- Garnish with fresh berries like raspberries or strawberries just before serving for a pop of color.
- A light dusting of cocoa powder or edible gold flakes over the ganache adds a touch of elegance.
- Pair each slice with a small cup of strong espresso. The bitterness complements the sweet cream perfectly.
Healthier & Fun Variations to Try
- Lemon Zest Dutch Pie: Add the zest of two lemons to the cream mixture for a bright, citrusy twist. It cuts through the richness beautifully.
- Salted Caramel Swirl: Before adding the ganache, drizzle store-bought or homemade salted caramel over the cream. Use a skewer to swirl it gently, then top with the chocolate.
- Mocha Madness: Dissolve a tablespoon of instant espresso powder into the condensed milk mixture for a coffee-flavored cream that chocolate lovers will adore.
- Berry Bliss Layer: After the crust, add a thin layer of high-quality seedless raspberry jam. Then add the cream. This creates a lovely fruit surprise.
- Nutty Crunch: Add 50g of very finely chopped toasted hazelnuts or almonds to your crumb base mixture for extra flavor and texture.
- Dairy-Free Dream: Use vegan butter, coconut cream (chilled and whipped), and dairy-free condensed milk. Choose vegan cookies for the crust. It’s just as indulgent!
Common Mistakes to Avoid With Dutch Pie
Mistake 1: Using Warm or Melted Butter in the Cream
This is the biggest culprit for a runny filling. If your butter is too soft or melted, it won’t aerate properly when whipped with the sugar. The cream will lack structure and may never set firmly. Your filling could be soupy. Always ensure your butter is softened but still cool to the touch. You should be able to make an indent with your finger, but the stick shouldn’t feel greasy or look shiny.
Mistake 2: Not Chilling the Fresh Cream Enough
Whipping cream only works when it’s very cold. If you take it straight from the fridge door, it might not get stiff enough. Putting the cream, bowl, and beaters in the freezer for 15-20 minutes first is a game-changer. Cold cream whips up faster, holds more volume, and is less likely to turn into butter if you over-mix it. This step guarantees a fluffy, stable cloud for your filling.
Mistake 3: Rushing the Chilling Time
I know it’s tempting to cut into this pie after just an hour. Don’t do it! The chilling time is non-negotiable. It’s what allows the butter in the crust and cream to firm up. If you skip it, the pie will slump when you cut it, and the ganache will melt the cream. For the best texture and clean slices, give it the full 3 hours, or better yet, let it set overnight in the fridge. Your patience will be rewarded.
Mistake 4: Pouring Hot Ganache on the Pie
Your beautiful, set cream filling can melt in seconds if the chocolate ganache is too hot. After melting the chocolate and cream together, let the mixture sit for 5-10 minutes. It should still be fluid and pourable, but not steaming hot. Test a tiny drop on your wrist; it should feel warm, not hot. This ensures a gorgeous, smooth layer that sits perfectly on top without ruining your hard work below.
Your Dutch Pie Questions, Answered!
Can I make this pie ahead of time?
Absolutely! This is one of its best features. You can make the entire pie, including the ganache topping, 1-2 days in advance. Just keep it covered in the refrigerator. The flavors actually meld and improve. It’s the ultimate stress-free dessert for a party. I often make it the night before a big gathering.
What can I use instead of Calipso cookies?
No problem at all. Any chocolate-coated cookie or tea biscuit will work. In the US, Oreos (with the filling) are a great stand-in. Just place them with the chocolate side facing out. For a different look, you could also use ladyfingers. The goal is just to create that pretty, edible border for your pie.
My cream filling seems too soft. What did I do wrong?
This usually comes from the butter being too warm or the whipped cream not being stiff enough. First, make sure your filled pie goes right back into the fridge. Often, extra chilling time will fix it. Next time, chill your tools and cream more thoroughly. Also, ensure you’re folding gently to keep all the air in the whipped cream, which provides structure.
Is there a way to make this without a springform pan?
A springform pan is ideal because of the removable sides, but you can use a regular pie dish. The tricky part will be placing the side cookies neatly. You might opt for a version with just the crumb bottom and top with ganache. Serving might be messier, but it will taste just as delicious!
Can I freeze Dutch Pie?
I don’t recommend freezing the finished pie. The cream can separate and become grainy when thawed, and the texture of the filling changes. The best way to get ahead is to make it 1-2 days early and refrigerate it. You can freeze the crumb base separately if needed.
Why did my ganache crack when I cut the pie?
This can happen if the ganache layer is too thick or was chilled until it became very hard. Next time, pour a slightly thinner layer. Also, use the hot knife trick! Run your knife under hot water and dry it before each cut. The heat will gently melt through the chocolate for a clean slice without cracks.
Can I use milk chocolate instead of semi-sweet?
You can, but be mindful of sweetness. Semi-sweet chocolate balances the very sweet cream filling. If you use milk chocolate, the overall dessert will be much sweeter. You could try using a darker milk chocolate or reducing the icing sugar in the cream by a tablespoon.
How long will leftovers keep in the fridge?
Properly stored and covered, your Dutch Pie will stay fresh and delicious for 3 to 4 days in the refrigerator. The crust will gradually soften, but it’s still wonderful. It’s so good, though, that leftovers rarely last that long in my experience!
What’s the purpose of the cornstarch biscuits?
Cornstarch biscuits have a very fine, tender, and melt-in-your-mouth texture. They create a delicate, sandy crust that contrasts beautifully with the creamy filling and crisp side cookies. If you can’t find them, graham crackers or digestive biscuits are the next best thing.
Can I decorate with something other than white chocolate?
Of course! Get creative. You could use a few flaky sea salt flakes sprinkled on the wet ganache. Chopped pistachios or toasted coconut around the edges look lovely. Or, simply leave the ganache smooth and glossy for an elegant, minimalist look. It’s your canvas!
Go Ahead, Be the Pie Hero
This Dutch Pie is more than a recipe. It’s a memory maker. It’s the dessert that makes people ask, “You made this?!” while you smile, knowing how simple it really was. The combination of textures and flavors is pure joy on a plate. So gather your ingredients, put on some music, and treat yourself and your loved ones to this spectacular no-bake wonder. Don’t forget to snap a picture of your beautiful creation before it vanishes! Happy no-baking!
Cajun Garlic Pasta
Ingredients
Equipment
Method
- 1. Grease the sides of a 23 cm springform pan with oil.
- 2. Blitz cornstarch biscuits in a blender until fine.
- 3. Mix biscuit crumbs with melted butter until moist.
- 4. Press crumb mixture into the bottom of the springform pan.
- 5. Arrange Calipso cookies around the edge, chocolate side out.
- 6. Freeze the crust for 30 minutes to set.
- 7. Beat softened butter and icing sugar until pale and fluffy.
- 8. Add vanilla essence and condensed milk, mixing until smooth.
- 9. Whip the chilled fresh cream to soft peaks in a separate bowl.
- 10. Fold whipped cream into the butter mixture gently.
- 11. Spoon the cream filling into the crust and smooth the top.
- 12. Chill the pie in the refrigerator for at least 3 hours, preferably overnight.
- 13. For ganache, melt chopped semi-sweet chocolate with UHT cream until smooth.
- 14. Let the ganache cool slightly, then pour over the chilled pie.
- 15. Optional: Drizzle melted white chocolate over the ganache and create a pattern.
- 16. Serve after chilling further if needed.