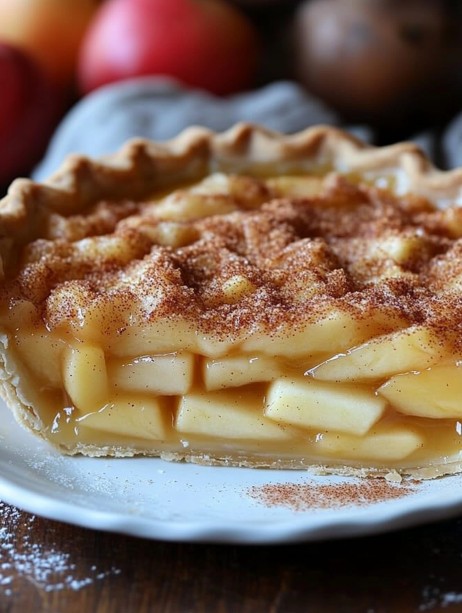
You know that feeling when you bite into something so perfectly balanced, so comforting, that it just feels like a hug from the inside? That’s my Apple Buttermilk Custard Pie. It all started when I wanted to use up a carton of buttermilk and had a bushel of apples from the local orchard. This isn’t your standard pie; it marries the tangy tenderness of a buttermilk custard with warm, spiced apples, all finished with a sweet, crumbly top. It was an instant hit at our family reunion, disappearing faster than the kids could grab plates.
The Story of a Happy Kitchen Accident
While many classic pies have deep family histories, this one is my own little invention, born from a happy accident in my kitchen. I love a traditional buttermilk pie for its creamy simplicity. I also adore a classic apple pie for its cozy spice. One Wednesday, I decided to smash them together, adding a streusel topping for extra texture. The result was magic. My neighbors have dubbed it the “why is there never a second slice?” pie. It’s the perfect blend of old-fashioned comfort and a unique twist that makes everyone ask for the recipe.
Why You’ll Fall in Love With This Apple Buttermilk Pie
This pie checks all the boxes. The flavor is incredible—tart apples, smooth custard, and a crunchy topping. It’s surprisingly simple to make, even if you’re not a pie pro. The filling comes together in minutes. It’s also versatile. I’ve served it warm for dessert and cold for breakfast (don’t judge me!). The contrast between the soft custard, tender apples, and sweet crumbs is just unbeatable. It’s a dessert that feels fancy without the fuss.
The Best Times to Bake This Show-Stopping Pie
This pie is a star at any gathering! I love bringing it to Thanksgiving as an alternative to pumpkin pie. It’s fantastic for a casual fall weekend with friends, paired with coffee. Bake it for a birthday instead of a cake for something different. It’s also my go-to “welcome to the neighborhood” gift. Honestly, any day that ends in “y” is a good day for this pie.
What You’ll Need: Apple Buttermilk Custard Pie Ingredients
Gather these simple ingredients to make pie magic happen.
For the Crust
- Pie Crust: 1 single crust, homemade or a good-quality store-bought.
For the Filling
- Apples: 5 cups (about 2 lbs), peeled and sliced. I recommend Granny Smith for their tartness.
- Granulated Sugar: 1 cup, divided
- Ground Cinnamon: 1 teaspoon
- Ground Nutmeg: ¼ teaspoon
- All-Purpose Flour: 2 tablespoons
- Salt: ¼ teaspoon
- Eggs: 3 large
- Buttermilk: 1 ½ cups
- Vanilla Extract: 1 teaspoon
For the Topping
- All-Purpose Flour: ½ cup
- Brown Sugar: ½ cup
- Cinnamon: ½ teaspoon
- Butter: 3 tablespoons, chilled and cubed
No Buttermilk? No Problem! Handy Substitutions
- For the Buttermilk: Mix 1 ½ tablespoons of white vinegar or lemon juice with enough whole milk to make 1 ½ cups. Let it sit for 5 minutes until it curdles slightly.
- For the Apples: Honeycrisp or Braeburn work well if you want a sweeter, softer apple.
- For a Gluten-Free Version: Use a 1:1 gluten-free flour blend in both the custard and the streusel topping.
- For a Deeper Flavor: Swap the granulated sugar in the filling for 1 cup of light brown sugar.
Let’s Get Baking: Your Step-by-Step Guide
Step 1: Preheat and Prep Your Crust
First, get your oven ready. Preheat it to 325°F (163°C). Now, take your pie dough and roll it out. You want a circle about 14 inches across. Gently lift it and line your 9-inch deep-dish pie pan. Tuck the edges under and crimp them with your fingers. I like a simple fluted edge. Pop the whole pan in the fridge to keep the crust firm. A cold crust helps prevent a soggy bottom!
Step 2: Cooking the Spiced Apples
Grab a large non-stick skillet and give it a light spritz of cooking spray. Toss in your sliced apples, ¼ cup of the sugar, the cinnamon, and nutmeg. The kitchen will start to smell amazing. Cook this over medium heat for about 10 minutes. Stir it now and then. You want the apples tender but not mushy. Once done, spoon this fragrant, spiced apple mixture evenly into your waiting pie crust.
Step 3: Whisking Up the Custard Filling
In a medium bowl, let’s make the custard. Whisk the remaining ¾ cup of sugar with the flour and salt. Crack in the three eggs and whisk until it’s smooth and a bit pale. Now, slowly pour in the buttermilk and vanilla. Keep whisking! You’re aiming for a perfectly smooth, creamy liquid. Pour this gently over the apples in the crust. It will seep into all the little spaces.
Pro tip: Whisk by hand to avoid incorporating too much air, which can create bubbles.
Step 4: The First Bake
Carefully place your pie on the center rack of your preheated oven. Now, be patient. Let it bake for 30 minutes. This initial bake sets the custard base. You’ll see the edges just starting to firm up. This is the perfect time to make our glorious topping.
Step 5: Making the Streusel Topping
While the pie bakes, mix the flour, brown sugar, and cinnamon in a small bowl. Add your cold, cubed butter. Use a pastry blender, a fork, or even your clean fingertips. Work the butter into the dry mix until it looks like coarse, wet sand. You want nice, pea-sized crumbs that will bake up crisp and golden.
Step 6: Adding the Topping and Final Bake
After 30 minutes, pull the pie out (close the oven door!). Reduce the oven heat to 300°F (150°C). Sprinkle your streusel topping evenly over the entire surface. Be generous! Now, return the pie to the oven. Bake for another 40 minutes. The pie is done when the center is set and doesn’t jiggle much, and the topping is a beautiful golden brown.
Step 7: The Hardest Part – Letting it Cool
I know it’s tempting, but you must let this pie cool. Place it on a wire rack for at least 1 hour. This allows the custard to set fully so you get clean slices. The aroma will drive you crazy, but trust me, it’s worth the wait. Slice and serve with a smile!
Chef’s tip: For an extra special touch, sprinkle a little flaky sea salt over the warm streusel topping right when it comes out of the oven.
Time Investment for Your Perfect Pie
Here’s a quick look at how you’ll spend your time:
- Prep Time: 25 minutes
- Cook Time: 1 hour 10 minutes
- Cooling Time: 1 hour (minimum)
- Total Time: About 2 hours 35 minutes
A Little Secret From My Kitchen
Here’s my secret: use cold butter and cold buttermilk. Keeping your dairy ingredients chilled helps the custard bake up creamy and smooth, not curdled. I even stick my mixing bowl in the freezer for 10 minutes before I make the custard. It makes all the difference.
A Fun Fact About Buttermilk
That tangy buttermilk is the star here! Traditional buttermilk was the liquid left after churning butter. Today’s cultured buttermilk is made by adding good bacteria to milk. This acid is what reacts with the baking soda in many recipes. For our pie, it gives the custard its signature, irresistible tang that perfectly balances the sweet apples.
Gather Your Tools
- 9-inch deep-dish pie plate
- Large non-stick skillet
- Mixing bowls (medium and small)
- Whisk
- Pastry blender or fork
- Measuring cups and spoons
- Wire cooling rack
Storing Your Apple Buttermilk Custard Pie
Once fully cooled, you can cover the pie loosely with plastic wrap or foil. It will keep well on the counter for up to two days. The streusel topping will soften a bit, but the flavors will still be wonderful. If your kitchen is very warm, it’s best to store it in the fridge.
For longer storage, pop the pie in the refrigerator. It will stay fresh for up to 4 days. Cover it tightly so it doesn’t absorb any fridge odors. The cold custard is actually delicious! Some people in my family prefer it straight from the fridge with a cup of coffee in the morning.
You can also freeze this pie. Wrap the whole pie or individual slices tightly in plastic wrap, then in foil. Freeze for up to 2 months. Thaw overnight in the refrigerator. You can warm slices gently in a low oven or the microwave to revive the crispy topping.
My Best Tips for Pie Success
- Use a deep-dish pan! The filling is generous, and a regular pie plate might overflow.
- Don’t skip pre-cooking the apples. It removes excess water and concentrates their flavor.
- If the crust edges brown too fast, shield them with strips of foil or a pie crust shield.
- Test for doneness by giving the pie a gentle shake. The center should have a slight jiggle, not a liquid wave.
Making it Pretty: Presentation Ideas
- Serve each slice with a dollop of freshly whipped cream or a scoop of vanilla bean ice cream.
- Drizzle with warm caramel sauce for a truly decadent treat.
- Garnish with a few thin, fan-sliced apple pieces dipped in lemon water.
- For a party, bake them in individual mini pie dishes for personal servings.
Healthier Twists on the Classic Recipe
- Reduced-Sugar Delight: Cut the sugar in the filling to ½ cup total and use a natural sweetener like monk fruit in the streusel.
- Whole Wheat Wonder: Use a whole wheat pie crust and whole wheat flour in the streusel for added fiber.
- Dairy-Free Dream: Swap the buttermilk for a plant-based milk mixed with lemon juice. Use vegan butter in the crust and topping.
- Nutty Crunch: Add ¼ cup of chopped pecans or walnuts to the streusel topping for healthy fats and crunch.
- Oatmeal Streusel: Replace half the flour in the topping with old-fashioned oats for a chewier, heart-healthy topping.
- Spice It Up: Boost the antioxidants by adding ¼ teaspoon of ginger or cardamom to the apple spice mix.
Common Mistakes to Avoid for Apple Buttermilk Pie
Mistake 1: Using a Regular Pie Pan
This filling is abundant. Using a standard 9-inch pie plate is a recipe for overflow and a messy oven. Always use a deep-dish pie pan. It gives the custard and apples the room they need to bake evenly without spilling over the crimped edges. If you only have a regular pan, you may need to reduce the filling slightly.
Mistake 2: Adding the Streusel Too Early
Avoid sprinkling the streusel on before the first bake. If you do, the crumbs will sink into the wet custard and you’ll lose that wonderful crumbly texture. The initial 30-minute bake is crucial. It partially sets the custard, creating a stable surface for your streusel to rest on top and get perfectly crisp.
Mistake 3: Not Letting the Pie Cool Completely
Cutting into a warm custard pie is heartbreaking. The filling will run everywhere and won’t hold its shape. The custard needs time to set as it cools. That hour of waiting feels long, but it’s non-negotiable for picture-perfect slices. Let it cool on a wire rack to allow air to circulate underneath.
Mistake 4: Overcooking the Custard
An overcooked custard becomes rubbery and can weep or separate. Remember, the pie continues to cook from residual heat as it cools. You want to pull it from the oven when the edges are fully set but the center still has a slight jiggle when you gently shake the pan. It will firm up perfectly as it rests.
Your Apple Buttermilk Pie Questions, Answered
Can I make this apple buttermilk pie the day before?
Absolutely, you can and should! This pie is actually an excellent make-ahead dessert. Bake it completely, let it cool to room temperature, and then cover it tightly. Store it in the refrigerator overnight. The flavors have more time to meld, and the custard sets up beautifully. Before serving, you can let it sit out for 30 minutes to take the chill off, or warm slices gently. The streusel will soften a bit in the fridge, but it’s still delicious.
Why do my apples have so much liquid after cooking?
Apples release a lot of water as they cook. If your skillet is too crowded or the heat is too low, they can steam instead of sauté, creating more juice. Make sure you’re using a large skillet over medium heat. Also, let the cooked apple mixture sit for a minute or two in the pan off the heat. You can even use a slotted spoon to transfer the apples, leaving some of the excess syrupy liquid behind. This helps prevent a soggy crust.
My custard looks a bit lumpy. What did I do wrong?
A lumpy custard usually happens if the eggs are added to very hot ingredients or if they are not whisked vigorously enough when combined with the buttermilk. Always whisk your eggs with the sugar and flour first to create a smooth paste. Then, whisk constantly as you slowly stream in the buttermilk. This gradual process, called tempering, helps prevent the eggs from scrambling. If you see small lumps, you can strain the mixture through a fine-mesh sieve before pouring it into the crust.
Can I use frozen apples for this pie?
You can use frozen apples, but you must thaw and drain them very, very well. Frozen apples release a tremendous amount of water. After thawing, place them in a colander and press gently to remove as much liquid as possible. You may even want to pat them dry with paper towels. I still recommend cooking them as directed to caramelize the sugars and further reduce moisture. Using frozen apples without proper draining will likely result in a watery pie filling.
How can I tell for sure that the pie is done baking?
The visual and tactile tests are your best friends. First, the streusel topping should be golden brown. Second, the edges of the custard should be puffed and set. Most importantly, give the pie a gentle side-to-side shake. The very center (about the size of a quarter) should have a slight, creamy jiggle—like set Jell-O—not a sloshy liquid wave. Remember, it will continue to set as it cools on the counter.
What’s the best way to reheat a slice of this pie?
To restore some crispness to the topping, reheating in the oven is best. Preheat your oven or toaster oven to 300°F (150°C). Place the slice on a baking sheet and warm for about 10-15 minutes, until heated through. If you’re in a hurry, the microwave works, but it will soften the topping. Use a low power setting for 20-30 seconds. For the best of both worlds, microwave it briefly to warm the custard, then pop it under the broiler for a minute to re-crisp the top (watch it closely!).
Do I have to use Granny Smith apples?
Granny Smith are my top pick because their tartness balances the sweet custard and streusel beautifully. They also hold their shape well during baking. However, you can use other varieties. Try a mix for complex flavor! Honeycrisp will add sweetness, Braeburn are firm and tart-sweet, and Jonagold offer a great balance. Avoid very soft apples like Red Delicious, as they can turn to mush. The key is using a firm, baking-friendly apple.
My crust got soggy. How do I prevent that next time?
A soggy bottom is a common pie woe. First, make sure your pie crust is well-chilled before adding the filling. You can also create a moisture barrier. Before adding the apples, brush the bottom of the unbaked crust with a thin layer of beaten egg white and let it dry for a few minutes. This creates a seal. Pre-cooking the apples, as the recipe directs, is also a major defense, as it removes a lot of their natural juice before they go in the crust.
Can I use a different type of milk instead of buttermilk?
For the characteristic tangy flavor and chemical reaction that gives the custard its texture, buttermilk is important. However, the substitution I mentioned earlier works perfectly. For each cup of buttermilk, mix 1 tablespoon of lemon juice or white vinegar with enough whole milk to make 1 cup. Let it sit for 5-10 minutes until slightly thickened and curdled. This “soured milk” mimics the properties of real buttermilk. Plain milk alone will result in a much less flavorful and flatter-tasting custard.
How long will leftover pie last in the fridge?
Your leftover apple buttermilk custard pie will keep well in the refrigerator for 3 to 4 days. Make sure it is covered tightly with plastic wrap or stored in an airtight container to prevent it from drying out or absorbing other food odors. The custard and apples hold up nicely to refrigeration. The streusel topping will lose its crispness but will still taste wonderful. I don’t recommend freezing leftovers that have already been sliced and served, as the texture can suffer.
The Final Slice
So there you have it! My tried-and-true recipe for Apple Buttermilk Custard Pie. It’s the dessert that never fails to bring smiles. It might seem like a few steps, but each one is simple and leads to something truly spectacular. From the spiced apples to the last crumble of streusel, this pie is a love letter to simple, comforting baking. I hope it becomes a cherished recipe in your home, just like it is in mine. Now, go preheat that oven and get ready for some serious compliments. Happy baking!
Cheese Bacon Toasties
Ingredients
Equipment
Method
- Preheat the oven to 325°F (163°C) and prepare the pie crust in a 9-inch deep-dish pie pan.
- In a skillet, cook the sliced apples with ¼ cup of sugar, cinnamon, and nutmeg over medium heat for about 10 minutes until tender.
- For the custard, whisk the remaining ¾ cup sugar with flour and salt, then add eggs, buttermilk, and vanilla until smooth.
- Pour the custard mixture over the cooked apples in the crust.
- Bake at 325°F for 30 minutes to set the custard base.
- Prepare the streusel topping by mixing flour, brown sugar, and cinnamon, then incorporating butter until crumbly.
- After the initial bake, sprinkle the streusel over the pie and reduce the oven temperature to 300°F (150°C). Bake for an additional 40 minutes.
- Allow the pie to cool on a wire rack for at least 1 hour before slicing.