The Coffee Tiramisu Cake: Your New Favorite Dessert Obsession
Have you ever had a dessert that made you close your eyes and just sigh? That’s this cake. It’s like your favorite cozy coffee shop met the most indulgent Italian dessert and they decided to have a beautiful, delicious baby. I first made this for my book club, and let’s just say the discussion about the novel was very brief. All anyone could talk about was how to get another slice. This isn’t just a cake; it’s an experience.
A Slice of Sweet History: From Trattoria to Your Table
Tiramisu literally means “pick me up” in Italian. The classic version is a no-bake marvel of ladyfingers, coffee, and mascarpone. I wanted that iconic flavor but in a show-stopping layer cake form for birthdays and celebrations. This recipe is my love letter to that tradition. It takes the soul of a Venetian dessert and bakes it into something you can proudly present with candles on top. It’s the modern, bake-sale-ready version of a timeless treat.
Why You’ll Fall in Love With This Tiramisu Cake
You will love this because it tastes incredibly fancy but is secretly straightforward to make. The soft vanilla cake soaks up that punchy coffee syrup, creating the most amazing texture. Then, the cloud-like mascarpone frosting wraps it all up. It’s not too sweet, deeply flavorful, and looks gorgeous with just a dusting of cocoa. It’s the kind of dessert that makes people think you spent all day in the kitchen, when really, you were just brilliantly efficient.
When to Whip Up This Showstopper
This cake is perfect for any moment that calls for a little “wow.” I’ve made it for:
- Birthdays: It’s a sophisticated alternative to standard birthday cake.
- Dinner Parties: It prepares ahead of time, so you’re not stressed when guests arrive.
- Holidays: It feels special for Christmas, Easter, or Mother’s Day.
- Just Because: Sometimes a Tuesday needs a coffee-and-cake pick-me-up.
Gathering Your Ingredients
For the Cake:
- 1 ½ cups all-purpose flour
- 1 ½ teaspoons baking powder
- ¼ teaspoon salt
- ½ cup unsalted butter, softened
- 1 cup granulated sugar
- 3 large eggs
- 1 teaspoon vanilla extract
- ½ cup whole milk
For the Coffee Syrup:
- 1 cup strong brewed coffee, cooled
- ¼ cup granulated sugar
For the Mascarpone Frosting:
- 1 ½ cups heavy cream, chilled
- 1 (8 oz) cup mascarpone cheese, softened
- ½ cup powdered sugar
- 1 teaspoon vanilla extract
For Assembly:
- Unsweetened cocoa powder, for dusting
- Dark chocolate shavings (optional, but highly recommended!)
No Problem! Handy Ingredient Swaps
Don’t run to the store! You can adapt this.
- Mascarpone: Full-fat cream cheese can work in a pinch. The flavor will be tangier.
- Heavy Cream: Make sure it’s cold for whipping. There’s no great substitute here.
- Strong Coffee: Use instant espresso dissolved in hot water. Or, for an adult version, swap 2 tbsp of the coffee for coffee liqueur like Kahlúa.
- Whole Milk: Any milk you have will do.
Crafting Your Coffee Tiramisu Cake: Step-by-Step
Step 1: Bake the Perfect Cake Layers
Start by heating your oven to 350°F (175°C). Grease and flour two 8-inch round pans. In a bowl, whisk your flour, baking powder, and salt. This aerates the dry ingredients. In a larger bowl, beat the soft butter and sugar until it’s pale and fluffy. This creates a light cake crumb. Add your eggs one at a time, letting each blend in fully. The vanilla goes in next, filling your kitchen with a sweet, warm scent. Now, gently mix in the dry ingredients and milk alternately. You’ll end with a smooth, thick batter. Divide it between your pans and smooth the tops. Bake for 20-25 minutes. You’ll know it’s done when the top is golden and a toothpick comes out clean. Pro tip: Let the cakes cool in the pans for 10 minutes before turning them out. This prevents them from breaking.
Step 2: Create the Flavor-Packed Coffee Syrup
This syrup is the magic soak. Combine your cooled, strong coffee and sugar in a small saucepan. Warm it over medium heat. You just need to stir until the sugar crystals completely disappear into the dark liquid. Don’t let it boil. Once the sugar is dissolved, take it off the heat. Let it cool all the way to room temperature. A warm syrup will make your cake layers soggy instead of perfectly moist. The smell is absolutely divine—like the best part of waking up.
Step 3: Whip Up the Dreamy Mascarpone Frosting
This frosting is what dreams are made of. First, beat your very cold heavy cream in a large bowl until soft peaks form. In another bowl, mix the softened mascarpone, powdered sugar, and vanilla. Stir it until it’s smooth and lump-free. Now, gently fold the whipped cream into the mascarpone mixture. Use a big spatula and a light hand. You want to keep all that lovely air in the cream. The result should be thick, spreadable, and cloud-like. Chef’s tip: If your kitchen is warm, pop the bowl back in the fridge for 10 minutes before frosting to firm it up.
Step 4: Assemble Your Masterpiece
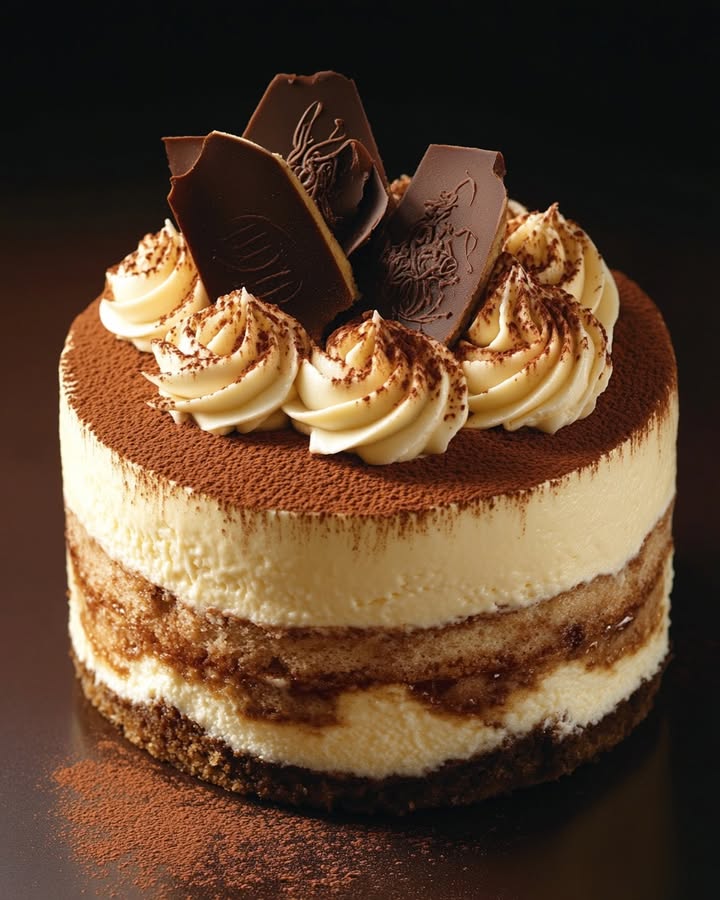
This is the fun part! Place your first cake layer on a plate or cake stand. Take a pastry brush and generously dab the coffee syrup all over the top. You’ll see the cake drink it in eagerly. Now, spread a thick, even layer of your mascarpone frosting over the soaked cake. Place the second layer on top. Repeat the soaking and frosting. Then, use the rest of the frosting to cover the sides of the cake. Finally, dust the top with a snowy layer of unsweetened cocoa powder through a fine sieve. Add dark chocolate shavings for extra glamour. The contrast of creamy white frosting and dark cocoa is stunning.
Your Baking Timeline
Here’s how your time will break down:
- Prep Time: 20 minutes (measuring, mixing)
- Baking Time: 25 minutes
- Cooling Time: 1 hour (crucial for the cake and syrup)
- Assembly & Frosting: 15 minutes
- Chilling Time: At least 2 hours (be patient!)
- Total Time: About 4 hours from start to slice
- Servings: 12 happy people
The Secret to the Ultimate Soak
My chef’s secret is in the syrup application. Don’t just pour it. Use a pastry brush and pat the syrup onto the cake. This gives you total control. You can see exactly how much moisture is being absorbed. It ensures every single bite has that signature tiramisu coffee flavor without any dry spots. This little trick makes all the difference between a good cake and a great one.
A Fun Fact About Mascarpone
That creamy mascarpone cheese isn’t actually a cheese in the traditional, aged sense. It’s more of a cultured cream product, made from just cream and citric or tartaric acid. That’s why it’s so luxuriously smooth and mild. It originated in the Lombardy region of Italy. Using it is what makes your frosting authentically Italian and irresistibly rich.
Tools You’ll Need
You likely have most of this already!
- Two 8-inch round cake pans
- Mixing bowls (various sizes)
- Electric hand mixer or stand mixer
- Whisk and spatulas
- Small saucepan
- Pastry brush (a clean paintbrush from the kitchen drawer works!)
- Wire cooling rack
- Fine-mesh sieve for the cocoa dusting
Storing Your Creation
Because of the dairy-based frosting, this cake must be stored in the refrigerator. Cover it loosely with a cake dome or some plastic wrap tented on toothpicks so you don’t mess up the beautiful cocoa topping. It will keep beautifully for up to 3 days. The flavors actually get better as they mingle overnight.
You can also freeze this cake for longer storage. Place the fully assembled and frosted cake, uncovered, in the freezer for about an hour until the frosting is solid. Then wrap it tightly in several layers of plastic wrap and foil. It can be frozen for up to 1 month.
To serve a frozen cake, transfer it to the refrigerator and let it thaw slowly overnight. This keeps the texture perfect. Do not thaw it at room temperature, as the frosting can become too soft and weep.
My Best Tips for Success
- Cold is Key: Your heavy cream and mascarpone should be cold for the best frosting texture.
- Cool Completely: Never try to frost a warm cake or use warm syrup. Patience pays off.
- Taste Your Coffee: Since the coffee flavor is central, make sure you brew a cup you’d enjoy drinking.
- Level Your Layers: If your cakes dome a bit, use a serrated knife to slice off the top to make them flat for easy stacking.
Presentation Ideas to Impress
Make it look bakery-perfect!
- Use the back of a spoon to create pretty swirls in the frosting on the sides.
- Before dusting with cocoa, place a paper doily on top of the cake. Dust over it, then lift it off for a gorgeous stenciled design.
- Garnish with whole coffee beans or chocolate-covered espresso beans around the base.
- Serve each slice with a little dollop of extra whipped cream and a fresh raspberry on the side.
Love This? Try These Twists!
Want to mix it up? Here are six delicious variations:
- Chocolate Tiramisu Cake: Add ½ cup of cocoa powder to the dry cake ingredients for a double-chocolate experience.
- Strawberry Tiramisu Cake: Replace the coffee syrup with a syrup made from pureed sweetened strawberries. Layer sliced fresh strawberries with the frosting.
- Lemon Tiramisu Cake: Use a lemon simple syrup for soaking and add lemon zest to the frosting for a bright, citrusy zing.
- Nutella Tiramisu Cake: Swirl ½ cup of Nutella into half of the mascarpone frosting for a hazelnut-chocolate ribbon inside.
- Pumpkin Spice Tiramisu Cake: Add pumpkin pie spice to the cake batter and use a chai tea syrup for a perfect fall dessert.
- Individual Jar Cakes: Bake the cake in a sheet pan. Cut out circles and layer them in glasses with syrup and frosting for personal desserts.
Common Mistakes to Avoid
Mistake 1: Using Warm Components
This is the biggest error. Frosting a warm cake or brushing on warm coffee syrup is a disaster. The frosting will melt into a runny mess. The cake will become mushy and could even fall apart. Always, always let your cake layers and coffee syrup cool completely to room temperature. I set a timer for at least an hour to resist the temptation.
Mistake 2: Over-mixing the Cake Batter
Once you add the flour, you must mix gently and only until the ingredients are combined. Over-mixing develops the gluten in the flour. This makes your cake tough and dense, not soft and tender. Stir by hand with a spatula for the final mixing. A few small lumps in the batter are just fine and better than a tough cake.
Mistake 3: Undermixing the Mascarpone
If your mascarpone cheese is straight from the fridge, it will be lumpy when you try to mix it. These lumps will stay in your frosting, making it look curdled. Always take the mascarpone out ahead of time to soften. Beat it with the powdered sugar and vanilla until it is perfectly smooth and creamy before you add the whipped cream.
Mistake 4: Skimping on the Soak
Don’t be shy with the coffee syrup! The cake layers should drink it up and become deeply flavorful and moist. A dry cake layer will make the final dessert taste bland and separate. Use all the syrup, divided evenly between the two layers. The cake can handle it and will thank you with amazing flavor.
Mistake 5: Skipping the Chill Time
I know it’s hard to wait. But slicing into this cake right after frosting is a mistake. It needs at least 2 hours in the fridge to set. This allows the syrup to fully distribute and the frosting to firm up. The slices will be clean and the flavors will have married beautifully. It’s worth the wait.
Your Tiramisu Cake Questions, Answered
Can I make this cake ahead of time?
Absolutely! This cake is actually better the next day. You can bake the cake layers up to two days in advance. Let them cool completely, then wrap them tightly in plastic wrap and store at room temperature. You can also make the syrup and store it in the fridge. Assemble the whole cake the day before you need it. Just keep it refrigerated until serving time.
My frosting is runny. What did I do wrong?
A runny frosting usually means something was too warm. Your heavy cream might not have been cold enough when you whipped it. Or your mascarpone was too soft. The kitchen itself might have been too hot. To fix it, put the whole bowl of frosting into the refrigerator for 30 minutes. Then, whip it again for a minute or two. It should firm up nicely.
What’s the best type of coffee to use?
Use a coffee you love to drink, because that flavor will shine through. A dark roast or espresso will give the strongest, most authentic tiramisu taste. If you use instant coffee or espresso powder, mix 1-2 tablespoons with 1 cup of hot water and let it cool. Avoid flavored coffees, as they can taste artificial in the final dessert.
Can I freeze the assembled cake?
Yes, you can! Freeze the fully assembled and frosted cake, uncovered, for one hour until the frosting is solid. Then wrap it very well in plastic wrap and then foil. Label it and freeze for up to one month. Thaw it slowly in the refrigerator overnight before serving. This works great for planning ahead for parties.
Is there a non-dairy alternative for the mascarpone?
For a non-dairy version, you can try using a thick, plain coconut cream. Whip the solid part from a can of full-fat coconut milk. Then fold it into a vegan cream cheese alternative. The flavor will be different, but it can create a similar creamy texture. Be sure to use a powdered sugar that is vegan-friendly.
Why did my cake layers sink in the middle?
Sinking usually means the cake wasn’t quite baked through, or the oven door was opened too early. Make sure your oven is fully preheated. Don’t open the door until at least the 20-minute mark. Test for doneness with a toothpick—it should come out with just a few moist crumbs, not wet batter.
Can I use a different size pan?
You can, but it will change the baking time. For three 6-inch pans, reduce the baking time to 18-22 minutes. For a 9×13 sheet pan, the cake will be thinner and may bake in 18-20 minutes. Always rely on the toothpick test rather than the clock to know when it’s done.
What can I use instead of a pastry brush for the syrup?
No pastry brush? No problem. You can use a clean, unused paintbrush from a hardware store. Or, you can very carefully spoon the syrup over the cake layers. Use the back of the spoon to gently spread it to the edges. Just go slowly so it soaks in evenly.
How do I get clean slices when serving?
For picture-perfect slices, dip a sharp knife in hot water and wipe it dry between each cut. The heat helps the knife glide smoothly through the cold frosting and cake. This gives you neat, beautiful slices every single time.
Can I add alcohol to this recipe?
You can, for a more traditional tiramisu flavor. Add 1-2 tablespoons of coffee liqueur (like Kahlúa), Marsala wine, or rum to your cooled coffee syrup. Just know that the alcohol will not cook off, so it’s for adults-only servings.
The Final Slice
There you have it—everything you need to create a Coffee Tiramisu Cake that will have everyone asking for the recipe. It’s a labor of love that’s totally doable. The combination of tender cake, rich coffee, and silky frosting is just magic. Whether it’s for a special day or just to make a regular day special, this cake delivers joy in every bite. Now, go preheat that oven. Your masterpiece awaits.
Crispy Lemon Pepper Wings
Ingredients
Equipment
Method
- Preheat your oven to 350°F (175°C) and grease and flour two 8-inch round pans.
- In a bowl, whisk together flour, baking powder, and salt.
- In a larger bowl, beat softened butter and sugar until pale and fluffy.
- Add eggs one at a time, mixing well after each addition, then add vanilla extract.
- Alternately mix in the dry ingredients and whole milk until smooth and thick.
- Divide the batter between the prepared pans, smoothing the tops, and bake for 20-25 minutes.
- Let the cakes cool in the pans for 10 minutes before turning them out onto a cooling rack.
- For the coffee syrup, combine cooled coffee and sugar in a saucepan, warm over medium heat until sugar dissolves, then cool to room temperature.
- For the frosting, whip chilled heavy cream until soft peaks form.
- In another bowl, mix mascarpone cheese, powdered sugar, and vanilla until smooth.
- Gently fold the whipped cream into the mascarpone mixture until fully combined.
- To assemble, place the first cake layer on a plate and brush generously with coffee syrup.
- Spread a layer of mascarpone frosting over the soaked cake, then top with the second cake layer.
- Repeat the soaking and frosting process, then cover the sides of the cake with remaining frosting.
- Dust the top with cocoa powder and add chocolate shavings if desired.
- Chill for at least 2 hours before serving.