Banana-Strawberry Cheesecake Fantasy: A Slice of Joy
You know that moment when dessert just *has* to be special? Maybe it’s a birthday, a sunny Sunday treat, or you just need a hug in cake form. That’s where this Banana-Strawberry Cheesecake Fantasy comes in. It all started for me when my niece declared she wanted a “pink and yellow birthday cake.” My classic cheesecake felt too plain. I started playing with the ripest bananas on my counter and a pint of ruby-red strawberries. The result was pure magic—creamy, fruity, and with that perfect crunchy crust. It’s not just a dessert; it’s a conversation starter that disappears faster than you can say “seconds, please!”
A Fun Twist on a Classic Favorite
Cheesecake has a grand history, from ancient Greece to New York diners. But my kitchen isn’t a history museum! It’s a place for fun experiments. The traditional version is gorgeous, but why not let the fruit bowl inspire you? By folding in mashed banana, you add a natural sweetness and incredible moisture. The strawberry pieces give little bursts of tart freshness. It feels like a modern, sunnier take on a beloved classic. It’s the kind of recipe that honors tradition but isn’t afraid to wear a colorful, fruity hat.
Why You’ll Adore This Dreamy Dessert
First, it’s stunning. The pink puree topping with whole strawberries is downright pretty. Second, it’s a fantastic flavor combo. The banana makes it unbelievably creamy, while the strawberry cuts through the richness. Third, it’s easier than it looks! You don’t need a water bath or any fancy tricks. Just mix, bake, and let the fridge do the final work. It’s a reliable showstopper that will have everyone asking for the recipe.
When to Whip Up This Cheesecake Fantasy
This cheesecake is your secret weapon for making moments memorable. It’s perfect for spring and summer celebrations like Mother’s Day or bridal showers. It’s a star at potlucks—just try to leave with an empty plate! I also love making it for a “just because” weekend. Slicing into that chilled beauty after a family dinner feels like a real event. It turns an ordinary Tuesday into a mini-party.
Gathering Your Ingredients
Using simple, fresh ingredients is key. Here’s what you’ll need:
For the Crust:
- 1 1/2 cups graham cracker crumbs
- 1/4 cup granulated sugar
- 1/3 cup unsalted butter, melted
For the Filling:
- 3 packages (8 oz each) full-fat cream cheese, softened
- 1 cup granulated sugar
- 1 teaspoon pure vanilla extract
- 3 large eggs, at room temperature
- 1 cup mashed ripe bananas (about 2 medium)
- 1 cup finely chopped fresh strawberries
For the Topping & Garnish:
- 1/2 cup strawberry puree (from blended fresh or frozen strawberries)
- Whole fresh strawberries for garnish
Handy Ingredient Swaps
No worries if you’re missing something! Here are easy swaps:
- Graham Cracker Crumbs: Use digestive biscuits, vanilla wafers, or even gluten-free graham crumbs.
- Strawberries: Frozen strawberries work great for the puree and filling. Just thaw and drain well before chopping.
- Cream Cheese: Full-fat is best for texture, but reduced-fat will work. Avoid fat-free.
- Butter: For a different flavor, try using melted coconut oil in the crust.
Crafting Your Banana-Strawberry Cheesecake Fantasy
Let’s get baking! Clear your counter, put on some music, and get ready to create something wonderful.
Step 1: Prepare the Crust
Start by mixing your graham cracker crumbs and sugar in a medium bowl. The scent is already so nostalgic! Pour in the melted, golden butter. Stir it until every crumb is coated and looks like wet sand. This buttery mix is the foundation of your dessert. Press it firmly and evenly into the bottom of your 9-inch springform pan. I use the bottom of a measuring cup to really tamp it down. Pop it in the fridge to chill and set. This helps prevent a soggy crust later. Pro tip: A firm, even crust is key for clean slices.
Step 2: Make the Luscious Filling
In a large bowl, beat the softened cream cheese until it’s completely smooth. No lumps allowed! Add the sugar and vanilla. Beat it again until it’s fluffy and pale. This takes a couple of minutes. Now, add your eggs one at a time. Beat just until the yellow yolk disappears into the white batter. Over-beating here adds too much air and can cause cracks. In a separate bowl, mash those ripe bananas with a fork until smooth. Fold the banana mash and the finely chopped strawberries gently into the cream cheese mixture. The batter will turn a lovely pale pink with red speckles.
Step 3: Bake to Perfection
Preheat your oven to 350°F (175°C). Take the crust out of the fridge. Pour your beautiful pink filling over the crust, smoothing the top. The oven should be ready now. Place the pan on the center rack and bake for 50-55 minutes. You want the edges to be set, but the very center should still have a slight, gentle jiggle—like Jell-O. It will firm up as it cools. A fully solid center means it’s overbaked and might be dry. Chef’s tip: For extra creaminess, place a pan of hot water on the rack below your cheesecake while it bakes.
Step 4: Cool, Top, and Chill
When done, take the cheesecake out and let it cool on a wire rack for 10 minutes. Then, run a thin knife around the edge of the pan. This prevents the cake from sticking and cracking as it shrinks during cooling. Let it cool for another hour. Now for the fun part! Spread your vibrant strawberry puree over the top like a shiny pink blanket. Don’t do this while it’s hot, or the puree will melt. Refrigerate the whole cake, uncovered, for at least 4 hours, but overnight is truly best. This long chill sets the texture perfectly.
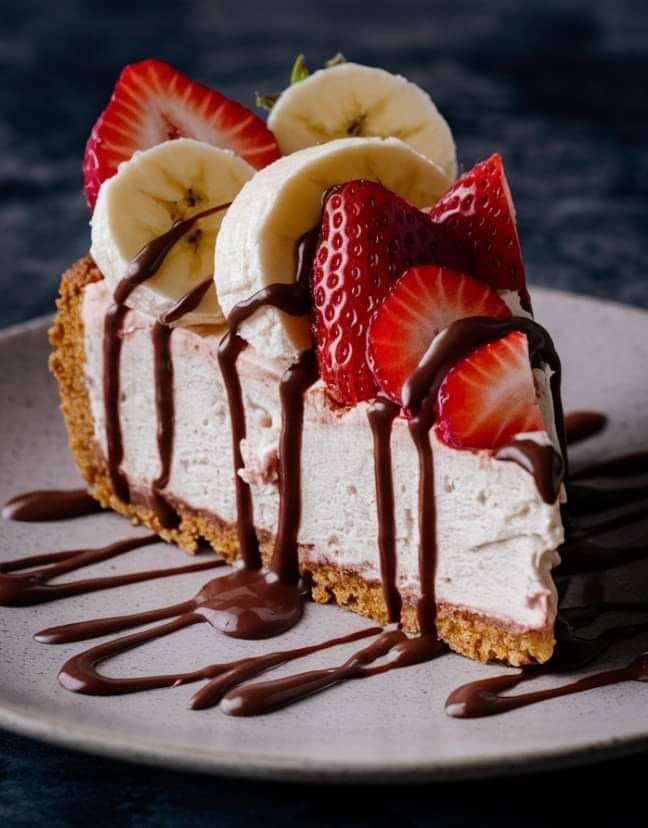
Step 5: The Grand Finale & Serve
The next day, carefully unlock and remove the springform ring. Garnish the top with a crown of whole, gorgeous strawberries. To slice, use a long, thin knife dipped in hot water and wiped clean between each cut. This gives you those pristine, restaurant-quality slices. Serve it chilled, straight from the fridge. The contrast of the cool, creamy filling, sweet-tart topping, and crunchy crust is pure bliss.
Your Recipe Timetable
A great dessert takes a little planning. Here’s your schedule:
- Prep Time: 20 minutes (active fun in the kitchen)
- Cook Time: 55 minutes (time for the oven to work its magic)
- Cooling & Chilling Time: Overnight (this is the secret for perfect texture!)
- Total Time: About 9 hours (mostly hands-off chilling)
- Servings: 12 happy people
- Calories: Approximately 350 kcal per serving
My Secret for the Creamiest Texture Ever
Here’s my little secret: use very ripe, spotty bananas. Those brown-speckled bananas are much sweeter and mash into a smoother, more liquid puree. This blends into the cheesecake batter seamlessly, adding moisture and flavor without leaving any chunky bits. It makes the filling impossibly smooth and adds a deeper banana flavor that isn’t overwhelming.
A Berry Interesting Fact
Did you know the average strawberry has about 200 tiny seeds on its outer skin? That’s right, those little specks are all individual seeds! It’s also not technically a berry in the botanical sense—a banana is. So our Banana-Strawberry Cheesecake Fantasy is a fun mix of a true berry and a “false” berry, making it a deliciously clever dessert.
Kitchen Tools You’ll Need
You likely have most of this already:
- 9-inch springform pan (non-negotiable for easy release!)
- Electric hand mixer or stand mixer
- Mixing bowls (large and medium)
- Measuring cups and spoons
- Spatula for folding and scraping
- Fork or potato masher for the bananas
- Knife and cutting board
- Blender or food processor for the strawberry puree
Storing Your Masterpiece
In the Refrigerator: This cheesecake must live in the fridge. Keep it covered with plastic wrap or in a cake carrier. It stays fresh and delicious for up to 5 days. The flavor actually gets better on the second day as everything melds together beautifully.
In the Freezer: Yes, you can freeze it! Wrap the whole cheesecake or individual slices tightly in plastic wrap, then again in foil. Freeze for up to 2 months. Thaw overnight in the refrigerator before serving. The texture remains wonderfully creamy.
A Note on the Topping: If you plan to freeze it, consider adding the fresh strawberry garnish after thawing. The whole strawberries can become mushy when frozen and thawed.
Tips for Cheesecake Success
- Room Temperature is Key: Let your cream cheese and eggs sit out for an hour before starting. This prevents a lumpy batter.
- Don’t Over-mix: Once you add the eggs, mix just until combined. Too much air causes the cake to puff and fall, leading to cracks.
- Dry Your Strawberries: After washing and chopping your strawberries, pat them dry with a paper towel. Extra water can make the filling runny.
- Patience with Chilling: That overnight chill is not a suggestion—it’s the rule! It ensures a firm, sliceable texture.
Make It Look Fancy
- Drizzle plates with extra strawberry puree and a dollop of whipped cream before placing the slice.
- Add mint leaves alongside the strawberry garnish for a pop of green.
- For a party, make mini cheesecakes in a muffin tin with cupcake liners. Just reduce the baking time.
- Dust the serving plate with a little powdered sugar or crushed graham cracker crumbs for a finished look.
Dreamy Recipe Variations to Try
Love this base recipe? Here are six fun twists:
- Tropical Dream: Swap strawberries for 1 cup of well-drained crushed pineapple and add 1/2 cup of shredded coconut to the crust.
- Chocolate-Banana: Add 1/2 cup of cocoa powder to the filling and use chocolate graham crackers for the crust. Keep the strawberry puree for a chocolate-covered strawberry effect.
- Lemon-Berry Bliss: Replace the banana with 1/4 cup of fresh lemon juice and 1 tablespoon of zest. Use a mix of strawberries and blueberries.
- Peanut Butter Banana: Swirl 1/2 cup of warm peanut butter into the filling before baking. Garnish with sliced bananas and a chocolate drizzle.
- Greek Yogurt Lightened-Up: Replace one package of cream cheese with an equal amount of full-fat plain Greek yogurt for a slightly tangier, lighter texture.
- No-Bake Version: Use gelatin to set a no-bake filling with the same flavors. Perfect for hot summer days when you don’t want to turn on the oven.
Common Mistakes to Avoid
Avoid these pitfalls for a perfect cheesecake every time.
Mistake 1: Using Cold Ingredients
Starting with cold cream cheese and eggs is a top cause of a lumpy, uneven batter. The cold cream cheese won’t blend smoothly with the sugar. You end up over-mixing to try to fix it, which adds too much air. Always plan ahead. Take your cream cheese and eggs out of the fridge at least an hour before you start baking. The cream cheese should feel very soft to the touch.
Mistake 2: Over-baking the Cheesecake
It’s easy to think a cheesecake should be completely firm like a cake when it comes out of the oven. But that leads to a dry, crumbly texture. A cheesecake sets as it cools. The center should still have a slight wobble when you gently shake the pan. It will firm up in the fridge. Remember, carryover cooking happens in the hot pan. Err on the side of underdone rather than overdone.
Mistake 3: Skipping the Knife Release Step
After the initial 10-minute cool, many people skip running a knife around the edge. The cheesecake contracts as it cools. If it’s stuck to the sides of the pan, it has nowhere to go but crack down the middle. This simple 30-second step is your best insurance against major cracks. Use a thin, non-serrated knife and gently glide it between the cake and the pan.
Mistake 4: Not Draining the Fruit Enough
Fresh fruit contains a lot of water. If you add wet, chopped strawberries directly to the batter, they can release juices during baking. This creates soggy spots and can make the filling separate or not set properly. Always chop your strawberries, then lay them on a few paper towels and gently pat them dry before folding them in.
Your Cheesecake Questions, Answered
Can I use frozen strawberries for the filling?
Yes, you absolutely can! Frozen strawberries are a great option, especially when they’re not in season. The key is to thaw them completely first. Place the frozen strawberries in a colander over a bowl and let them thaw in the refrigerator. Once thawed, chop them and then press them gently between layers of paper towels to remove as much excess liquid as possible. This step is crucial to prevent a watery cheesecake filling. The flavor will still be wonderful.
Why did my cheesecake crack on top?
Cracks happen, and don’t worry—it will still taste amazing! The most common reasons are over-mixing the batter (which adds too much air that then escapes), over-baking, or cooling the cheesecake too quickly. Using a water bath during baking helps create a more gentle, even heat and prevents cracks. Also, remember not to open the oven door during the first 30-40 minutes of baking. Sudden temperature changes can make it crack. The good news? Our strawberry puree topping hides any cracks beautifully!
How do I know when the cheesecake is done baking?
Don’t rely on time alone. Ovens vary. The best test is the “jiggle test.” About 5 minutes before the minimum bake time, gently shake the springform pan. The edges of the cheesecake should look set and firm. The center, about a 2-3 inch circle in the middle, should have a slight, gentle jiggle—like Jell-O. It should not be liquidy, but it should not be solid either. The residual heat will continue to cook that center as it cools on the counter.
Can I make this cheesecake ahead of time?
This is actually the *best* make-ahead dessert! Cheesecake needs that long, overnight chill to set perfectly and develop its full flavor. I always make mine the day before I plan to serve it. After baking and adding the puree topping, I cover it loosely with foil (without touching the topping) and leave it in the fridge. This frees up your whole day of the event. You just garnish and serve. The texture and taste are actually better on day two.
What’s the best way to slice a cheesecake cleanly?
For picture-perfect slices, use a long, thin, sharp knife. Before the first cut, dip the blade in very hot water. Wipe it completely dry with a clean towel. Make a smooth, confident cut. After each slice, repeat: dip in hot water, wipe dry, then cut again. The heat helps the knife glide through the cold, dense filling without dragging or tearing. It also cuts cleanly through the sticky strawberry topping. This method is a game-changer for presentation.
My bananas aren’t ripe. Can I still use them?
I really don’t recommend it. Green or just-yellow bananas are starchy, not sweet, and they don’t mash into a smooth puree. They can leave unpleasant chunks and won’t add much flavor. If you’re in a pinch, you can try a trick: place unpeeled bananas on a baking sheet and bake in a 300°F oven for 15-20 minutes, until the skins turn black. Let them cool, then scoop out the insides. They’ll be much sweeter and softer. But truly, waiting for spotty bananas is worth it.
Can I use a different pan if I don’t have a springform?
A springform pan is designed for easy removal of delicate cakes like cheesecake. If you absolutely must use a regular 9-inch cake pan, line the bottom with parchment paper, letting it overhang the sides. This creates “slings” you can use to lift the whole cheesecake out after chilling. Be very careful and use two large spatulas. It’s trickier and risks breaking the crust, so a springform is a worthwhile investment if you bake often.
Is there a way to make a lighter or lower-calorie version?
You can make some adjustments, but remember, texture will change. For a lighter version, use reduced-fat (not fat-free) cream cheese and Neufchâtel cheese. You could replace one egg with two egg whites. In the crust, you can reduce the butter to 3 tablespoons and the sugar to 2 tablespoons. The mashed banana adds natural sweetness, so you might reduce the sugar in the filling slightly. It won’t be as rich and creamy as the original, but it will still be a tasty, slightly lighter treat.
How long can leftover cheesecake sit out?
Because it’s a dairy-based dessert, you shouldn’t leave it out at room temperature for more than 2 hours. For food safety, it’s best to return leftovers to the refrigerator promptly after serving. If you’re having a party, you can keep the cheesecake on the table for the duration of the meal, but then put it back in the fridge. The cold temperature also keeps its texture firm and delicious.
Can I use a store-bought strawberry topping instead of puree?
You can, but the result will be different. Store-bought toppings are often much sweeter, thicker, and have a more gelatinous texture. They might also have artificial flavors. A homemade puree from fresh or frozen strawberries has a brighter, fresher, and slightly tart flavor that perfectly balances the sweet cheesecake. If you use store-bought, choose a high-quality one and consider thinning it with a little lemon juice. But making your own is simple and tastes so much better!
Ready for Your Baking Adventure?
So there you have it—everything you need to create your own stunning Banana-Strawberry Cheesecake Fantasy. This recipe is a labor of love that pays off in every creamy, fruity bite. It’s brought so much joy to my family table, and I know it will do the same for yours. Don’t be intimidated. Just follow the steps, embrace the chill time, and get ready for the compliments to roll in. Now, go preheat that oven and let’s make some magic happen. Happy baking!
Savory Mushroom Crepes
Ingredients
Equipment
Method
- Prepare the crust by mixing graham cracker crumbs and sugar in a medium bowl; stir in melted butter and press firmly into a 9-inch springform pan.
- Refrigerate the crust to chill while you prepare the filling.
- In a large bowl, beat softened cream cheese until smooth, then add sugar and vanilla, mixing until fluffy.
- Add eggs one at a time, mixing just until incorporated.
- Mash the ripe bananas in a separate bowl and fold them, along with the chopped strawberries, into the cream cheese mixture.
- Preheat the oven to 350°F (175°C) and pour the filling over the chilled crust.
- Bake for 50-55 minutes until the edges are set and the center has a slight jiggle.
- Cool the cheesecake on a wire rack for 10 minutes; then run a knife around the edge of the pan and let cool for another hour.
- Spread strawberry puree over the top and refrigerate uncovered for at least 4 hours, ideally overnight.
- Once chilled, remove the springform ring and garnish with whole strawberries before serving.