The Magical Fluffy Japanese Cheesecake: Your New Favorite Dessert
The first time I bit into a Japanese cheesecake, I genuinely gasped. It wasn’t just a cake. It was a cloud that tasted like cheesecake! It jiggled playfully on the plate, looking impossibly tall and light. I knew right then I had to master the recipe at home. After many delightful (and a few hilarious) kitchen experiments, I’ve perfected a version that’s surprisingly approachable. Forget dense and heavy—this is a dessert that floats off the fork and straight into your heart. Let’s make this majestic, fluffy masterpiece together.
From Japan to Your Kitchen: A Cake with a Story
This wonderful dessert, often called a “soufflé cheesecake” or “cotton cheesecake,” has its roots in Japan. It’s a beautiful fusion of Western cheesecake traditions and the Japanese appreciation for delicate, light textures—think of the airiness of a perfect chiffon cake. The secret is in the generous amount of whipped egg whites folded in, which gives it that legendary rise and jiggle. While a classic New York cheesecake is rich and firm, the Japanese version is ethereal and soft, almost melting in your mouth. It’s a testament to how a simple twist on ingredients can create a completely new, unforgettable experience.
Why You’ll Fall in Love With This Recipe
You’ll adore this recipe because it feels fancy but isn’t scary to make. The flavor is sublime—less tangy than its American cousin, with a subtle, sweet creaminess that’s incredibly satisfying. It’s also lighter, so you can enjoy a generous slice without feeling overly full. Watching it puff up golden and proud in the oven is pure kitchen magic. Plus, that final dusting of icing sugar transforms it into a snowy, elegant treat perfect for any occasion. It’s the kind of dessert that makes everyone ask, “You made this?”
Perfect Occasions for Your Fluffy Masterpiece
This cheesecake is wonderfully versatile. It’s elegant enough for a birthday or anniversary dinner, yet simple enough for a casual weekend treat. I love bringing it to potlucks—it always disappears first! It’s fantastic for a Mother’s Day brunch or a bridal shower. Because it’s not overly sweet, it pairs beautifully with afternoon tea or coffee. Honestly, any day that calls for a little extra joy is the right day for a Japanese cheesecake.
Gathering Your Ingredients
Here’s everything you’ll need for this cloud-like delight. Precision is key here, so a kitchen scale is your best friend.
- 30 grams all-purpose flour
- 20 grams cornstarch
- 180 grams full-fat cream cheese, softened
- 2 tablespoons unsalted butter
- 4 tablespoons whole milk
- 3 large egg yolks
- 3 large egg whites
- 1 teaspoon pure vanilla extract
- 70 grams granulated sugar
- 1 teaspoon lemon juice (fresh is best!)
- Icing sugar, for a pretty dusting
Handy Substitution Options
Don’t fret if you’re missing an item! Here are some easy swaps:
- Cornstarch: You can use an equal amount of more flour, but the cornstarch really helps with that tender crumb.
- Whole Milk: Any milk you have on hand will work—2%, even plain unsweetened almond milk in a pinch.
- Lemon Juice: A half teaspoon of cream of tartar works wonders to stabilize the egg whites.
- Springform Pan: If you don’t have one, a regular round cake pan lined with parchment paper is fine. Just be gentle when unmolding.
Let’s Create Some Magic: Step-by-Step Preparation
Step 1: Preheat and Prep
Start by preheating your oven to 300°F (150°C). This moderate heat is crucial for a gentle, even rise. Get out a tall cake pan (I use a 7-inch round springform) and line the bottom with parchment paper. You don’t need to grease the sides—the cake needs to cling to them to climb high! Place a deep roasting pan in the bottom of your oven. We’ll use it for the water bath later. Pro tip: Having everything ready before you start mixing makes the process smooth and relaxing.
Step 2: Melt the Creamy Base
Bring a small saucepan of water to a simmer. Place a heatproof bowl over it (make sure the bottom doesn’t touch the water). Add the cream cheese, butter, and milk. The gentle heat will soften everything beautifully. Stir until the mixture becomes a smooth, lump-free, pale yellow pool. It should look rich and silky. Take the bowl off the heat and let it cool for just a minute. You don’t want to cook the eggs in the next step!
Step 3: Enrich with Yolks and Vanilla
Whisk your three egg yolks with the vanilla extract in a small bowl. Now, slowly drizzle this golden stream into the warm cream cheese mixture, whisking constantly. The vanilla scent is heavenly! You’ll see the mixture thicken slightly and take on a gorgeous, sunny hue. It’s important to add the yolks while the base is warm, but not hot, to blend them seamlessly.
Step 4: Sift in the Dry Ingredients
Time to give our cloud some structure! Sift the flour and cornstarch directly over the cream cheese mixture. I use a fine-mesh strainer and tap it gently—it’s oddly satisfying. Using a flexible spatula, fold the dry ingredients in until just combined. A few tiny streaks of flour are okay; we don’t want to overmix. The batter will be thick, smooth, and cling to the spatula.
Step 5: Whip the Meringue to Stiff Peaks
In a spotlessly clean, dry bowl, combine the egg whites and lemon juice. The acid helps stabilize the foam. Beat with an electric mixer on medium speed until the whites are frothy. Now, gradually add the sugar, about a tablespoon at a time, while beating on high. Keep going until you get glossy, stiff peaks. This means when you lift the beaters, the meringue stands straight up. This airy white fluff is the engine of our cake’s incredible lift!
Step 6: Gently Fold It All Together
This is the most important step! Take a scoop of the meringue and stir it into the cream cheese batter to lighten it. Then, gently pour the rest of the meringue on top. With a large spatula, fold using big, sweeping motions from the bottom up. You want to keep as much air as possible. Stop when the mixture is just combined—it should be a uniform, pale, and beautifully fluffy batter. Chef’s tip: A few white streaks are better than a deflated batter. Patience here is everything.
Step 7: The Bain-Marie Bake
Pour the lofty batter into your prepared pan. Smooth the top gently. Place the pan inside the roasting pan in your oven. Now, carefully pour hot water into the roasting pan until it comes about halfway up the side of your cake pan. This water bath creates a steamy environment for a gentle, crack-free bake. Bake at 300°F (150°C) for 30 minutes. Then, lower the heat to 230°F (110°C) for 30 more minutes. Finally, boost it to 275°F (135°C) for a final 15 minutes to golden the top perfectly.
Step 8: The Patient Cool Down
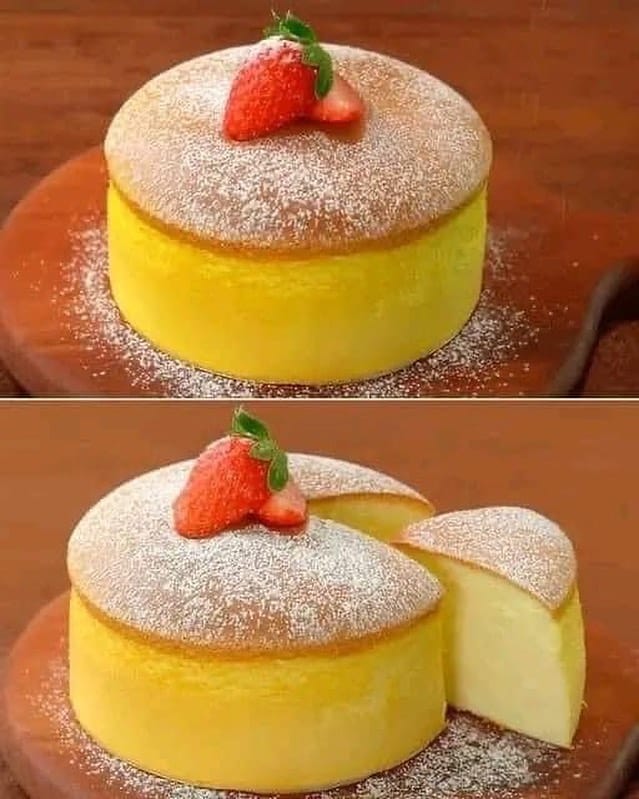
When the time is up, turn off the oven. Crack the door open with a wooden spoon and let the cake cool inside for about an hour. This slow cooling prevents a sudden temperature drop that could make it collapse. Then, remove it from the water bath and let it cool completely on a rack. Run a knife around the edge, unlatch the springform, and marvel at your creation! A final dusting of icing sugar makes it look like a winter wonderland. It’s ready!
Timing Your Kitchen Project
Let’s plan your time. Prep work takes about 25 minutes of active time. The baking process is a total of 1 hour and 15 minutes. The crucial cooling time in the oven and on the rack is about 1 hour and 30 minutes. So, from start to serving, plan for about 3 hours and 10 minutes. Most of that is hands-off time, so you can relax or tidy up!
My Chef’s Secret for Success
My absolute secret? Room temperature everything. Take the cream cheese, eggs, and milk out of the fridge at least an hour before. Room temperature ingredients blend smoothly and create a more stable batter, which is the foundation for that perfect, even rise and tender texture. Cold cream cheese will leave lumps, and cold egg whites won’t whip up as voluminously. This simple step makes a world of difference.
A Little Extra Fun Fact
Did you know the famous Japanese cheesecake chain “Uncle Tetsu” often has lines out the door? Their signature is a super jiggly, incredibly light version. People don’t just buy it for the taste—they buy it for the mesmerizing, wobbly show! Making it at home lets you create that same theatre right in your kitchen. It’s a dessert that delights all the senses.
Necessary Equipment Checklist
- 7-inch round springform pan
- Parchment paper
- Stand mixer or hand mixer
- Heatproof mixing bowl (for the double boiler)
- Flexible silicone spatula
- Fine-mesh strainer (for sifting)
- Large roasting pan (for the water bath)
- Kitchen scale (highly recommended)
Storing Your Fluffy Treasure
Once completely cool, you can store your Japanese cheesecake right in the springform pan or on a plate. Loosely cover the top with plastic wrap or slide it into a cake carrier. It will keep beautifully at room temperature for about one day, which is often when its texture is at its absolute peak—light and cloud-like.
For longer storage, pop it in the refrigerator. It will stay fresh for 3-4 days. Note that chilling will firm it up slightly, making it more like a traditional cheesecake but still wonderfully soft. Let it sit out for 15-20 minutes before serving to take off the chill.
You can also freeze it! Wrap the whole cake or individual slices tightly in plastic wrap, then in foil. Freeze for up to a month. Thaw overnight in the refrigerator for the best results. I don’t recommend microwaving to thaw, as it can make the texture gummy.
My Best Tips and Advice
- Weigh your ingredients. Especially the flour and sugar. Cup measures can vary too much for this delicate recipe.
- Ensure your egg white bowl is completely grease-free. Any trace of yolk or fat can prevent them from whipping up.
- Don’t skip the water bath. It’s non-negotiable for that even, moist bake without cracks.
- Resist the urge to open the oven door during the first 45 minutes of baking. The draft can cause a collapse.
- If the top is browning too fast, tent it loosely with a piece of aluminum foil.
Beautiful Presentation Ideas
A simple dusting of icing sugar is classic, but get creative!
- Serve with a pile of fresh, colorful berries on the side.
- Drizzle each slice with a homemade berry coulis or a dollop of lightly sweetened whipped cream.
- Grate a little lemon or orange zest over the top for a vibrant, fragrant touch.
- For a dinner party, garnish with edible flowers for a truly stunning plate.
6 Dreamy Recipe Variations to Try
Once you master the basic recipe, the fluffy world is your oyster!
- Matcha Green Tea: Sift 1-2 tablespoons of high-quality matcha powder in with the flour. You’ll get a beautiful green hue and elegant, earthy flavor.
- Chocolate Marble: Fold 2 tablespoons of melted, cooled dark chocolate into half the batter. Swirl it gently with the plain batter before baking for a marbled effect.
- Citrus Zest: Add the finely grated zest of one lemon, orange, or yuzu to the cream cheese mixture. It gives a bright, sunny aroma.
- Earl Grey Infused: Steep the milk with two Earl Grey tea bags before adding it to the cream cheese. Strain out the bags. The floral bergamot note is divine.
- Cheesecake “Soufflé” Cups: Bake the batter in individual ramekins for about 20-25 minutes. Serve immediately for a fun, personal soufflé-like experience.
- Honey Sweetened: Replace half the sugar with a mild, flavorful honey. Add it to the cream cheese mixture. The flavor is wonderfully warm and complex.
Common Mistakes to Avoid
Mistake 1: Not Whipping the Egg Whites Enough
This is the number one reason for a flat cake. If your meringue is soft and droopy, it doesn’t have the power to lift the heavy batter. You must beat until you get stiff, glossy peaks that hold their shape firmly. A quick test: turn the bowl upside down (carefully!). The meringue shouldn’t move. Pro tip: Ensure your bowl and beaters are completely clean and dry before starting.
Mistake 2: Overmixing the Final Batter
When you fold the meringue into the base, it’s tempting to mix until it’s perfectly smooth. But every stir pops precious air bubbles. You want to fold just until no big white streaks remain. A few tiny specks are fine. A deflated batter leads to a dense, heavy cake instead of a light, airy one. Use a gentle hand and a wide spatula.
Mistake 3: Skipping or Messing Up the Water Bath
Baking this cake without a water bath is like trying to grow a plant without water. The steam is essential for gentle, even heat that cooks the cake slowly and prevents the top from cracking and the edges from drying out. Make sure your springform pan is well-wrapped in foil to prevent leaks, and use hot water from the kettle to fill the roasting pan.
Mistake 4: Rush-Cooling the Cake
Pulling the hot cake right out of the oven is a shock to its delicate structure. The sudden change in temperature and humidity can cause it to sink dramatically in the middle. Letting it cool gradually in the turned-off oven with the door ajar allows it to set properly as it slowly comes down in temperature. Patience here rewards you with a beautifully tall cake.
Frequently Asked Questions
Why did my Japanese cheesecake collapse?
Collapse usually happens for one of three reasons. First, the egg whites weren’t whipped to stiff enough peaks. Second, the batter was overmixed and lost its air. Third, the cake cooled too quickly after baking. Always whip the meringue firmly, fold gently, and let it cool slowly in the oven. Even a slight sink in the center is normal and still tastes amazing!
Can I make this recipe without a springform pan?
Yes, you can! Use a regular round cake pan. Line the bottom and the sides with parchment paper, leaving an overhang you can use as “handles.” This will help you lift the delicate cake out once it’s completely cool. Be extra gentle when unmolding, as the cake is very soft and tender. A springform is easier, but not an absolute must.
My top cracked! What did I do wrong?
A crack often means the oven was too hot, or there wasn’t enough steam. The water bath should provide consistent, moist heat. Also, ensure you’re not baking at too high a temperature. Following the step-down baking method (starting at one temp, then lowering it) helps prevent cracks. If it does crack a little, don’t worry—a dusting of icing sugar will hide it, and it will still taste incredible.
How do I know when it’s fully cooked inside?
Unlike a regular cake, a toothpick test can be misleading because it’s meant to be very moist. The best signs are a golden-brown top and the cake pulling away slightly from the sides of the pan. It should also jiggle uniformly in the center when gently shaken—a firm, set jiggle, not a liquid one. The detailed baking times in the recipe are very reliable.
Can I use low-fat cream cheese?
I strongly recommend using full-fat, brick-style cream cheese. Low-fat versions have more water and stabilizers, which can throw off the texture and moisture balance of this sensitive recipe. For the signature rich yet light flavor and perfect structure, full-fat is the way to go. Think of it as a special treat worth the splurge!
Is it supposed to be wobbly like jelly?
Yes, absolutely! That iconic jiggle is a hallmark of a great Japanese cheesecake. When it’s fresh and warm from the oven, it will have a glorious, shaking-like-a-leaf wobble. As it cools and sets, it firms up but remains incredibly soft and tender. Embrace the jiggle—it means you’ve created the perfect airy texture.
How far in advance can I make it?
You can bake it the day before you plan to serve it. In fact, many people find the flavor is even better after resting overnight in the fridge. Just make sure it’s completely cooled before you cover and refrigerate it. Take it out about 30 minutes before serving to let it come closer to room temperature for the best texture and flavor.
Can I add fruit or chocolate chips to the batter?
Be very careful with add-ins. Heavy chunks like fruit or chocolate chips can sink straight to the bottom during baking, disrupting the cake’s structure. If you want to add flavor, use extracts, zests, or powders (like matcha or cocoa powder) that can be blended smoothly into the batter. For fruit, serve it on the side or as a sauce on top.
Why is the lemon juice important?
The lemon juice (or cream of tartar) is an acid that helps stabilize the egg white foam. It strengthens the protein network in the whites, allowing them to hold more air and creating a meringue that is less likely to deflate or weep. It’s a small ingredient that plays a huge role in giving your cake its lofty height and stable structure.
What’s the difference between this and a New York cheesecake?
They’re like distant, delicious cousins! A New York cheesecake is dense, rich, and very firm, relying on lots of cream cheese, eggs, and sometimes sour cream. It’s baked solid. A Japanese cheesecake uses fewer dairy ingredients and incorporates a large amount of whipped egg white, making it light, fluffy, and soufflé-like. It’s a different, magical experience altogether.
Your Journey to Fluffy Perfection
And there you have it—your complete guide to baking a stunning, cloud-like Japanese cheesecake. Remember, my first one wasn’t perfect either, but it was still delicious. Each time you make it, you’ll learn a little more. The joy is in the process: watching the meringue billow, folding the airy batter, and that moment of pride when you unveil your tall, golden masterpiece. So preheat that oven, put on some music, and get ready to create a dessert that’s as fun to make as it is to eat. Happy baking!
Tropical Coconut Delight
Ingredients
Equipment
Method
- Preheat your oven to 300°F (150°C) and prepare a tall cake pan lined with parchment paper.
- Melt the cream cheese, butter, and milk over simmering water until smooth.
- Whisk the egg yolks with vanilla extract and slowly add to the cream cheese mixture.
- Sift in the flour and cornstarch, then fold until just combined.
- In a clean bowl, whip the egg whites with lemon juice until frothy, then gradually add sugar until stiff peaks form.
- Gently fold the meringue into the cream cheese batter until just combined.
- Pour the batter into the prepared pan and place it in a roasting pan with water for a bain-marie bake.
- Bake at 300°F (150°C) for 30 minutes, then lower the heat to 230°F (110°C) for 30 minutes, and finally increase to 275°F (135°C) for 15 minutes.
- Let the cake cool in the oven for about an hour with the door ajar, then cool completely on a rack.