Sweet Little Dreams: The Magic of Queijadas Custard Cupcakes
There’s something magical about a dessert that makes you close your eyes and hum with happiness. For me, that dessert is Portuguese Queijadas. The first time I bit into one, I was at a friend’s house. The scent of lemon and warm butter filled the air. I expected a muffin. What I got was a creamy, sweet, melt-in-your-mouth custard cupcake that tasted like pure sunshine. Right then, I knew I had to learn to make them. After many happy (and slightly messy) kitchen experiments, I’m so excited to share this perfect recipe with you.
A Bite of Portuguese Sunshine
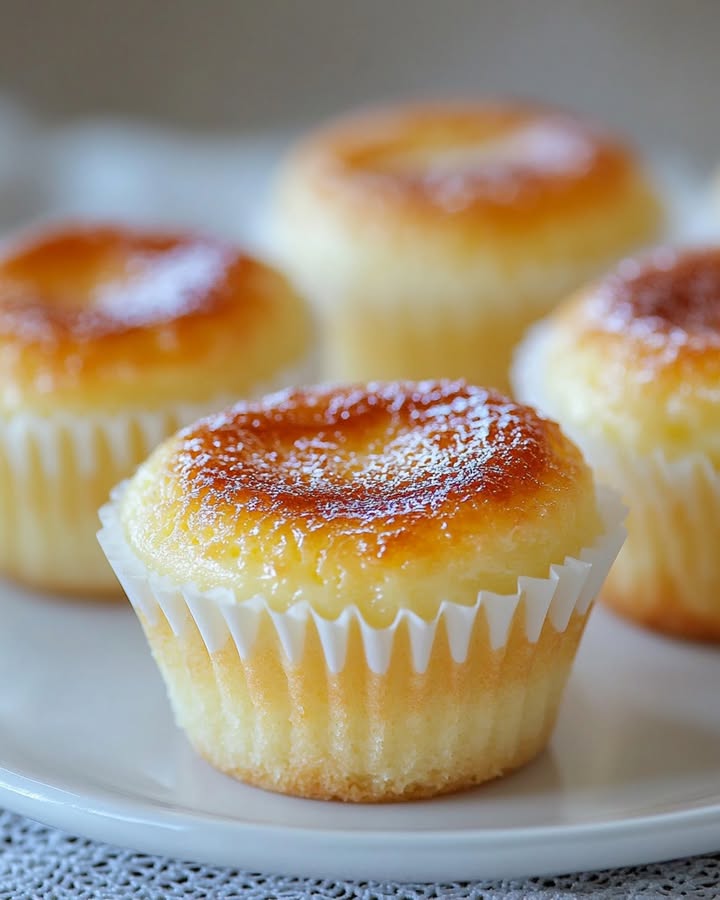
Queijadas (pronounced kay-ZHAH-dash) are a cherished sweet from Portugal, particularly famous on the island of São Miguel in the Azores. Traditionally, they are small, cheesecake-like pastries made with fresh cheese, eggs, sugar, and milk. My version is a beloved home-style adaptation that uses ingredients you can find anywhere. It skips the special cheese but keeps the soul of the dessert: a velvety, rich, and impossibly creamy custard set inside a delicate, golden shell. It’s like the lovechild of a flan and a cupcake, and it’s utterly irresistible.
Why This Queijadas Recipe Will Steal Your Heart
If you love desserts that are surprisingly simple but taste like you spent all day in the kitchen, this is for you. The ingredient list is basic, but the result is pure magic. The texture is the real star—creamy and soft in the center with a slightly caramelized, golden edge. The lemon zest adds a bright, fresh note that cuts through the sweetness perfectly. Plus, they are fantastic make-ahead treats. Bake a batch, pop them in the fridge, and you have a dazzling dessert ready for any surprise visit or sweet craving.
When to Bake Your Queijadas Cupcakes
These little gems are the ultimate versatile treat. They are perfect for a fancy afternoon tea, a unique addition to a holiday dessert table, or a sweet ending to a summer barbecue. I love bringing them to potlucks because they are easy to transport and always disappear first. They’re also a wonderful project to bake with kids on a weekend—just warn them about the splashing batter!
Gathering Your Ingredients
Here’s what you’ll need to make about 30 delightful custard cupcakes:
- 1 stick (8 tbsp.) unsalted butter, cut into chunks
- 3 1/2 cups whole milk
- 1 1/2 cups all-purpose flour
- 1/4 teaspoon baking powder
- 4 large eggs
- 3 1/4 cups granulated sugar
- 1 teaspoon vanilla extract
- Zest of 2 lemons
Easy Ingredient Swaps (No Stress!)
Don’t panic if you’re missing something! Here are some easy swaps:
- Milk: While whole milk gives the richest custard, 2% milk will work in a pinch.
- Lemon Zest: If you’re out of lemons, try orange zest for a different, but equally lovely, citrus twist.
- Sugar: This recipe is traditionally very sweet. You can safely reduce the sugar to 2 1/2 cups if you prefer.
- Vanilla: A vanilla bean paste can be used instead of extract for those pretty little specks.
Crafting Your Portuguese Custard Cupcakes: A Step-by-Step Journey
Let’s walk through this together. Don’t be scared by the watery batter—that’s the secret to their amazing texture!
Step 1: Getting Your Oven Ready
First things first, preheat your oven to 350°F (175°C). This ensures it’s perfectly hot when your batter is ready. Grab your standard-size muffin pans. Give them a good spray with non-stick cooking spray. You’ll need enough for about 30 cupcakes, so you might need to bake in batches. Lining them with paper liners works too, but I find a direct spray gives the edges that lovely golden crust.
Step 2: Warming the Butter and Milk
In a medium saucepan, melt the butter chunks over medium heat. Once it’s melted and bubbling gently, pour in all that cold whole milk. Stir this mixture occasionally until it’s just warm to the touch. You’ll see little flecks of butter swirling in the milk. Don’t let it boil! Once warm, take it off the heat and set it aside. This gentle warming helps everything blend smoothly later.
Step 3: Whisking the Dry Goods
While your milk mixture cools a bit, grab a small bowl. Measure out your flour and baking powder and whisk them together. This tiny bit of baking powder isn’t for rise, but to give the custard just a hint of lift and a perfect texture. Setting this aside now means no frantic searching later when your hands are full of batter.
Step 4: Creating the Sweet Egg Base
Now for the fun part! Crack your eggs into a deep mixing bowl. Beat them on medium speed for about one minute until they’re frothy. Here’s the key: with the mixer running, gradually add the sugar, about one cup at a time. Beat for a full minute after each cup. This incorporates air and makes the sugar dissolve. Finally, beat in the vanilla extract and that beautifully fragrant lemon zest. Your kitchen will already smell amazing.
Step 5: The Big Mix: Bringing It All Together
This is the crucial step. Keep your mixer on medium speed. Slowly pour in about 1 cup of the warm milk and butter mixture. Beat for 30 seconds. Now add half of your flour mixture. Beat for another 30. Add another cup of milk, beat. Add the rest of the flour, beat. Add half of the remaining milk, and this time, beat for a full minute. Pro Tip: The batter will be VERY thin and splashy! I always use a large paper plate as a shield over my bowl to contain the mess. It works like a charm.
Step 6: The Final Pour
Slowly pour in the last of the milky, buttery goodness. Beat everything for a final 30 seconds. You should have a smooth, liquid batter that looks more like a drink than a cake batter. This is exactly right! That thin batter is what bakes into a creamy custard center.
Step 7: Filling the Pans
Using a ladle or a large measuring cup with a spout, carefully fill each prepared muffin cup about 3/4 full. The batter is runny, so pour slowly. Don’t worry if they all look the same—they will puff and settle beautifully in the oven.
Step 8: Baking to Golden Perfection
Place your pans in the preheated oven. Bake for 35 to 38 minutes. You’ll know they’re done when the edges are a deep, golden brown and the centers are just set. They will jiggle slightly, but shouldn’t look liquid. Chef’s Tip: Do not open the oven door early! They might sink a little in the middle as they cool, and that’s perfectly normal. It just creates a little well for extra deliciousness.
Step 9: Cooling & The Big Reveal
Let the Queijadas cool in the pans for about 5-10 minutes. This lets them firm up just enough to handle. Then, gently run a butter knife around the edges and transfer them to a wire rack to cool completely. The wait is the hardest part, but it’s worth it.
Your Queijadas Timeline
- Prep Time: 20 minutes
- Cook Time: 35-38 minutes
- Cooling Time: 1 hour (trust me, let them cool!)
- Total Time: About 2 hours
My Secret for the Best Texture
Here’s my little secret: always serve these Queijadas chilled. Something magical happens in the fridge. The texture transforms from simply delicious to unbelievably rich, dense, and creamy—like the best cheesecake you’ve ever had. Let them cool to room temperature first, then cover and refrigerate for at least a few hours. The flavor deepens, and every bite becomes heaven.
A Sweet Story: More Than Just a Cupcake
In Portugal, Queijadas are often tied to festivals and family gatherings. Each region has its own version. Some use cinnamon, others use different cheeses. This recipe is a beautiful example of how immigrants adapted treasured recipes with new-world ingredients. Every time I make them, I think of that warm kitchen and my friend’s grandmother’s smile. Food really is a passport to memories.
What You’ll Need in Your Kitchen
- Standard 12-cup muffin pans (you’ll need 2-3, or bake in batches)
- Non-stick cooking spray or paper liners
- Medium saucepan
- Mixing bowls (one small, one large/deep)
- Electric hand mixer or stand mixer
- Whisk
- Ladle or large measuring cup with a spout
- Wire cooling rack
- Zester or fine grater (for the lemon)
Storing Your Delicious Queijadas
Once completely cooled, these cupcakes store beautifully. Place them in a single layer in an airtight container. You can separate layers with parchment paper if you must stack them. They will keep at room temperature for about a day, but the fridge is their best friend.
For longer storage, pop the airtight container in the refrigerator. They will stay fresh and delicious for up to 5 days. The cold makes the texture even more delightful. Let them sit out for 15 minutes before serving if you prefer them less cold.
You can also freeze Queijadas for up to 2 months. Wrap each one individually in plastic wrap, then place them all in a freezer bag. Thaw overnight in the refrigerator before serving.
My Best Tips for Queijadas Success
- The Splash Guard: Seriously, use that plate over the mixer bowl. Your counter (and your apron) will thank you.
- Room Temp Eggs: Using eggs straight from the fridge is fine, but room temperature eggs incorporate even better.
- Don’t Overbake: The centers should be set but still have a slight jiggle. Overbaking can make them rubbery.
- Chill Out: I can’t say it enough. Serve them cold for the ultimate experience.
Pretty Ways to Serve Your Cupcakes
- Dust the tops with a little powdered sugar or cinnamon for a simple, elegant look.
- Serve with a small dollop of whipped cream and a twist of lemon zest on top.
- Arrange them on a beautiful vintage cake stand for an afternoon tea.
- Drizzle with a homemade berry syrup or a sprinkle of fresh berries for a pop of color.
6 Fun Variations to Try Next Time
Once you master the classic, try these delicious twists:
- Cinnamon-Spiced: Add 1 teaspoon of ground cinnamon to the dry ingredients for a warm, cozy flavor.
- Orange Blossom: Swap the lemon zest for orange zest and add 1/2 teaspoon of orange blossom water.
- Almond Joy: Replace 1/4 cup of the flour with finely ground almond flour and add 1/2 tsp almond extract.
- Brown Sugar & Toffee: Substitute 1 cup of the white sugar with dark brown sugar for a deeper, caramel-like taste.
- Coconut Dream: Stir in 1/2 cup of toasted sweetened coconut flakes into the batter before baking.
- Mini Queijadas: Use a mini-muffin pan and reduce baking time to 20-25 minutes for perfect two-bite treats.
Common Mistakes to Avoid With Queijadas
Mistake 1: Expecting a Thick Batter
This is the biggest surprise for first-timers. If your batter looks like pancake mix, you might think you did something wrong. You didn’t! The batter for Queijadas is supposed to be very thin and watery. This high liquid content is what creates the signature creamy, custard-like center. Trying to thicken it with more flour will ruin the texture. Trust the process and pour that liquid batter right into the pans.
Mistake 2: Opening the Oven Door Too Early
We all want to peek! But opening the oven door before the Queijadas are set can cause them to collapse. The sudden drop in temperature shocks the delicate custard. Wait until at least the 30-minute mark before you even think about checking. Use the oven light to look. They are done when the edges are deeply golden and the center just jiggles a tiny bit.
Mistake 3: Skipping the Chilling Step
Eating a Queijada warm from the oven is nice. Eating one cold from the fridge is a transcendent experience. The chilling time allows the custard to fully set and the flavors to marry and intensify. Serving them immediately gives you a good cupcake. Serving them chilled gives you an unforgettable Portuguese dessert. Be patient and let the fridge work its magic.
Mistake 4: Not Beating the Sugar Long Enough
When the recipe says to beat the sugar into the eggs for a full minute after each addition, it’s not joking. This step is crucial for dissolving the granulated sugar into the eggs. If you rush it, you might end up with a slightly gritty texture in your final custard. Let your mixer do the work to ensure a silky-smooth result.
Your Queijadas Questions, Answered!
Why is my batter so runny? Did I mess up?
Nope, you did it perfectly! I promise. The batter for Queijadas is famously thin—more like a crepe or pancake batter than a typical cake batter. This high liquid-to-flour ratio is the secret to achieving that wonderful custardy, soft interior instead of a dry, bready cake. So, if your batter looks like sweetened milk, you are right on track. Just be careful when pouring it into the muffin cups.
Can I use a different type of milk, like almond or skim milk?
You can, but the result won’t be as rich or authentic. Whole milk provides the fat and creaminess that defines the luxurious texture of the custard. Using a lower-fat milk will make the cupcakes less tender and creamy. Non-dairy milks will work in a pinch, but they will significantly alter the classic flavor and may not set the same way. For the best results, I strongly recommend sticking with whole milk.
My cupcakes sunk in the middle. Are they ruined?
Absolutely not! In fact, a slight sink in the center is completely normal for Queijadas. As they cool, the delicate custard structure relaxes a bit, often creating a charming little dip. This is not a sign of under-baking. As long as the edges are golden and the center is set (not liquid), you have succeeded. That little well is a perfect spot for a berry or a dusting of powdered sugar.
How long do they last, and how should I store them?
Stored correctly, your Queijadas will stay delicious for days. Once completely cool, place them in an airtight container. They can sit at room temperature for about a day. For longer storage, keep them in the refrigerator. They will last for 4-5 days chilled, and many people think they taste even better cold. You can also freeze them for up to two months. Thaw in the fridge overnight.
Can I make them less sweet? 3 1/4 cups of sugar seems like a lot.
It is a lot, and you are right to ask! This is a very traditional, very sweet Portuguese dessert. However, you can absolutely reduce the sugar. I have successfully made them with 2 1/2 cups of sugar, and they were still beautifully sweet and delicious. Start by reducing it to 3 cups if you’re nervous. The texture might be slightly less creamy, but they will still be wonderful. Find the sweetness level that makes your family happy.
Can I use lemon juice instead of zest?
I wouldn’t recommend it. Lemon zest gives you the bright, aromatic oils from the peel without adding extra liquid or sharp acidity. Lemon juice would add liquid to an already very wet batter and could make the flavor tart instead of fragrant. If you don’t have a zester, use the fine side of a box grater, being careful to only get the yellow zest, not the bitter white pith underneath.
Do I need to use a mixer, or can I whisk by hand?
You can whisk by hand, but be prepared for an arm workout! A hand mixer or stand mixer is highly recommended. It helps dissolve all that sugar properly into the eggs and incorporates just the right amount of air. Whisking by hand, it’s very difficult to get the sugar fully dissolved, which could lead to a grainy texture in your finished cupcakes.
What’s the best way to get them out of the pan without sticking?
A good coating of non-stick cooking spray is your best friend. Let the cupcakes cool in the pan for 5-10 minutes first. This lets them firm up a little. Then, take a small offset spatula or a butter knife and gently run it around the edge of each cupcake. They should lift out easily. If you used paper liners, they should peel away cleanly once completely cool.
Can I make these in a different pan, like a square baking dish?
While you could pour the batter into a greased 9×13 inch dish, you won’t get the same result. The individual cupcake form allows the heat to circulate around each one, creating that perfect golden edge and creamy center. Baking it as one large sheet would change the baking time dramatically and you’d lose the charming individual portions. Stick with the muffin pans for the classic experience.
Are Queijadas meant to be served with anything?
They are perfect all on their own! Their rich, sweet, and citrusy flavor doesn’t need any accompaniment. That said, a cup of strong coffee or tea is a classic pairing. For a fancy touch, a light dusting of powdered sugar, a dollop of barely-sweetened whipped cream, or a few fresh berries on the side are all lovely additions that won’t overpower the delicate custard.
Your New Favorite Treat Awaits
There you have it—the secret to making incredible Portuguese Queijadas right in your own kitchen. They might seem a little different at first, with their thin batter and custardy center, but that’s what makes them so special. This recipe is a little piece of Portuguese tradition, adapted for your home. It’s a recipe that creates smiles, sparks conversations, and leaves everyone asking for just one more. So, preheat that oven, zest those lemons, and get ready for a sweet adventure. Happy baking!
Chocolate Orange Delight
Ingredients
Equipment
Method
- Preheat your oven to 350°F (175°C) and prepare your standard-size muffin pans with non-stick spray.
- In a medium saucepan, melt the butter over medium heat and then stir in the cold milk until just warm.
- Whisk together the flour and baking powder in a small bowl and set aside.
- In a mixing bowl, beat the eggs on medium speed for one minute, then gradually add sugar, one cup at a time, beating after each addition. Add vanilla and lemon zest.
- Slowly pour in about 1 cup of the warm milk mixture, then add half the flour mixture and mix. Alternate adding milk and flour, finishing with milk and mixing for a final 30 seconds.
- Ladle the thin batter into the prepared muffin cups, filling each about 3/4 full.
- Bake for 35 to 38 minutes or until the edges are golden brown and the centers are just set.
- Let the Queijadas cool in the pans for 5-10 minutes before transferring them to a wire rack to cool completely.